- How to Create a Disk Partitions in Linux
- Creating a Disk Partition in Linux
- Related Posts
- 6 thoughts on “How to Create a Disk Partitions in Linux”
- Create a Partition in Linux — A Step-by-Step Guide
- How to Create a Partition in Linux?
- Using the command mode
- Creating a partition
- Setting the partition type
- Finalising the changes
- Formatting a partition
- Wrapping up
How to Create a Disk Partitions in Linux
In order to effectively use storage devices such as hard drives and USB drives on your computer, you need to understand and know how to structure them before using in Linux. In most cases, big storage devices are split into separate portions called partitions.
Partitioning enables you to split your hard drive into multiple parts, where each part acts as its own hard drive and this is useful when you are installing multiple operating systems in the same machine.
In this article, we will explain how to partition a storage disk in Linux systems such as CentOS, RHEL, Fedora, Debian and Ubuntu distributions.
Creating a Disk Partition in Linux
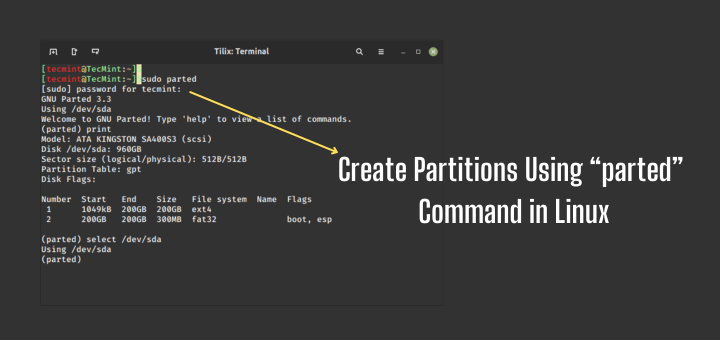
In this section, we will explain how to partition a storage disk in Linux using the parted command.
The first step is to view the partition table or layout on all block devices. This helps you identify the storage device you want to partition. You can do this using parted or fdisk command. We will use the former for purposes of demonstration, as follows, where the -l flag means list partition layout on all block devices.
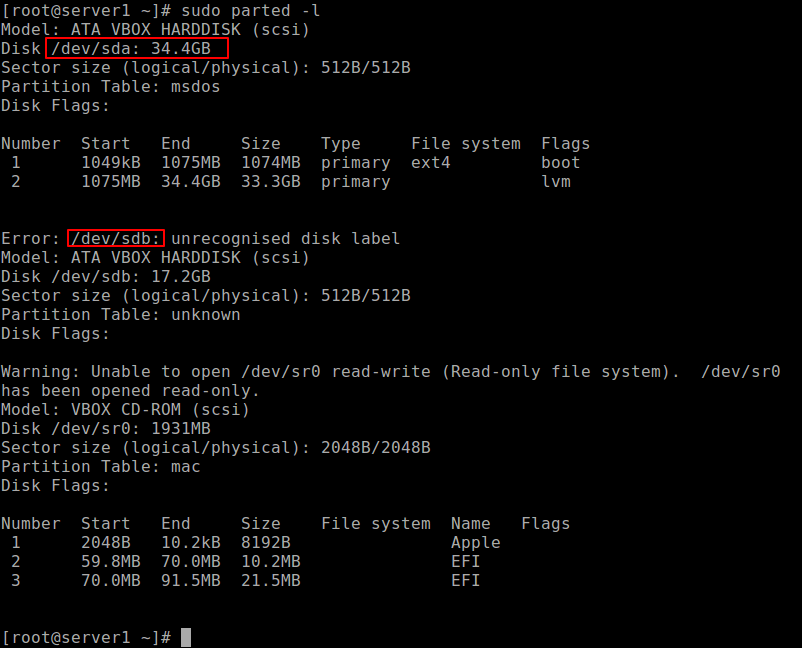
From the output of the above command, there are two hard disks attached to the test system, the first is /dev/sda and the second is /dev/sdb .
In this case, we want to partition hard disk /dev/sdb . To manipulate disk partitions, open the hard disk to start working on it, as shown.
At the parted prompt, make a partition table by running mklabel msdos or gpt, then enter Y/es to accept it.
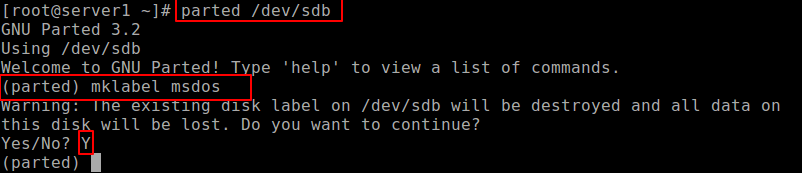
Important: Make sure to specify the correct device for partition in the command. If you run parted command without a partition device name, it will randomly pick a storage device to modify.
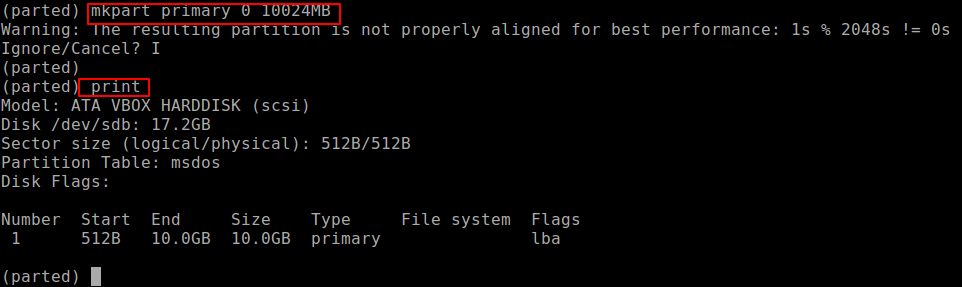
Next, create a new primary partition on the hard disk and print the partition table as shown.
(parted) mkpart primary ext4 0 10024MB (parted) print
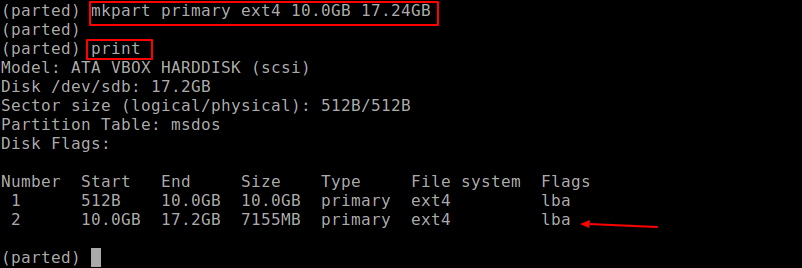
You can create another partition for the reaming space as shown.
(parted) mkpart primary ext4 10.0GB 17.24GB (parted) print
To quit, issue the quit command and all changes are automatically saved.
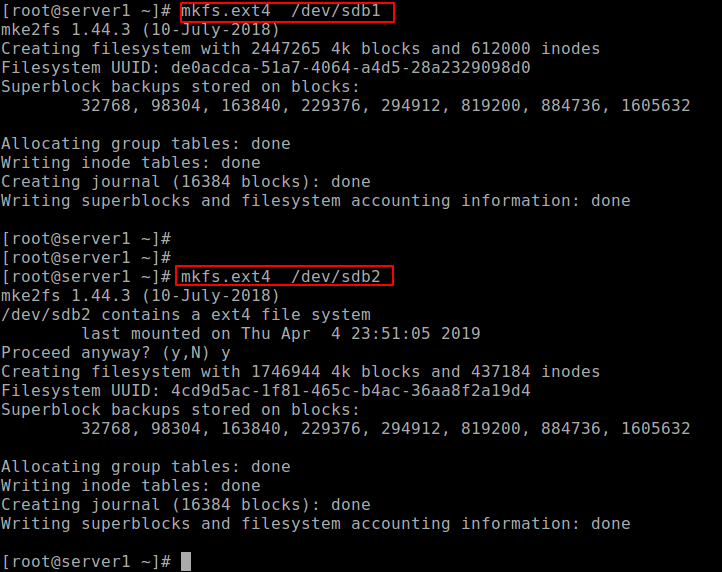
Next, create the file system type on each partition, you can use the mkfs utility (replace ext4 with the file system type you wish to use).
# mkfs.ext4 /dev/sdb1 # mkfs.ext4 /dev/sdb2
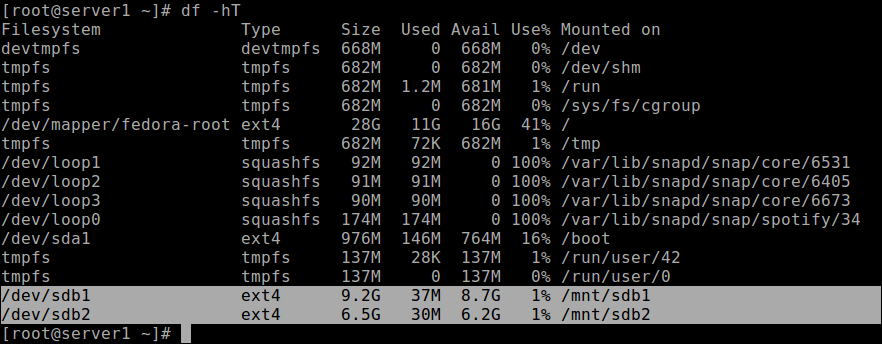
Last but not least, to access the storage space on the partitions, you need to mount them by creating the mount points and mount the partitions as follows.
# mkdir -p /mnt/sdb1 # mkdir -p /mnt/sdb2 # mount -t auto /dev/sdb1 /mnt/sdb1 # mount -t auto /dev/sdb2 /mnt/sdb2
To check if the partitions are actually mounted, run the df command to report file system disk space usage.
Important: You may need to update /etc/fstab file to mount newly created partitions automatically at boot time.
You might also like to read these following related articles:
That’s all! In this article, we have shown how to partition a storage disk, create a file system type on a partition and mount it in Linux systems. You can ask questions or share you thoughts with us via the comment form below.
Aaron Kili is a Linux and F.O.S.S enthusiast, an upcoming Linux SysAdmin, web developer, and currently a content creator for TecMint who loves working with computers and strongly believes in sharing knowledge.
Each tutorial at TecMint is created by a team of experienced Linux system administrators so that it meets our high-quality standards.
Related Posts
6 thoughts on “How to Create a Disk Partitions in Linux”
I successfully partitioned my drive for Linux and Windows. On boot up, I had set Linux as the default. This resulted in a screen giving me an option between OS choices. Then after a slight delay if nothing was selected the OS went to Linux. I was having a printer issue and changed the default to Windows. Now when I boot up the options screen does not show up and my system just goes straight into Windows. I would like to change the OS setting back to Linux as the default as I had before. Any help on getting a boot options screen in Windows would be greatly appreciated. Thanks Reply
@Jerry, Why not revert the changes you did and set Linux as the default option in your Boot settings? Reply
[[email protected] ahabab]# lsblk NAME MAJ:MIN RM SIZE RO TYPE MOUNTPOINTS sda 8:0 0 35G 0 disk ├─sda1 8:1 0 500M 0 part /boot/efi ├─sda2 8:2 0 2G 0 part [SWAP] ├─sda3 8:3 0 20G 0 part / ├─sda4 8:4 0 1G 0 part [SWAP] └─sda6 8:6 0 11.5G 0 part sr0 11:0 1 8G 0 rom /run/media/ahabab/RHEL-9-0-0-BaseOS-x86_64
[[email protected] ahabab]# df -HT | grep sda /dev/sda3 xfs 22G 5.3G 17G 25% / /dev/sda1 vfat 524M 7.4M 517M 2% /boot/efi
[[email protected] ahabab]# mount /dev/sda6 /testmount [[email protected] ahabab]# df -HT | grep sda /dev/sda3 xfs 22G 5.4G 17G 25% / /dev/sda1 vfat 524M 7.4M 517M 2% /boot/efi /dev/sda6 xfs 13G 120M 13G 1% /testmount
Before I started practicing according to your article, my machine’s partition system was as above. When I made the partition table by running “mklabel msdos“, then changed it to look like the below :
Command (m for help): p Disk /dev/sda: 35 GiB, 37580963840 bytes, 73400320 sectors Disk model: VMware Virtual S Units: sectors of 1 * 512 = 512 bytes Sector size (logical/physical): 512 bytes / 512 bytes I/O size (minimum/optimal): 512 bytes / 512 bytes Disklabel type: dos Disk identifier: 0xc00800d1 Device Boot Start End Sectors Size Id Type /dev/sda1 1 19578125 19578125 9.3G 83 Linux /dev/sda2 19578880 30064639 10485760 5G 83 Linux /dev/sda3 30064640 34258943 4194304 2G 83 Linux /dev/sda4 34258944 73400319 39141376 18.7G 5 Extended Command (m for help): w The partition table has been altered. Failed to add partition 2 to system: Device or resource busy Failed to add partition 3 to system: Device or resource busy Failed to add partition 4 to system: Device or resource busy
The kernel still uses the old partitions. The new table will be used at the next reboot.
Syncing disks. What will happen after rebooting my laptop? Will I get my user login option ? will OS run in my computer ? Reply
Warning: The resulting partition is not properly aligned for best performance. what is this warning? Reply
Create a Partition in Linux — A Step-by-Step Guide

While we believe that this content benefits our community, we have not yet thoroughly reviewed it. If you have any suggestions for improvements, please let us know by clicking the “report an issue“ button at the bottom of the tutorial.
In this tutorial, we’ll be covering the steps to create a partition in Linux. This can help you allocate different memory regions for specific uses. Creating partitions can also help you install multiple operating systems on your machine and minimize the damage in case of disk corruption.
How to Create a Partition in Linux?
In this tutorial, we will utilize the fdisk command to create a disk partition. The fdisk utility is a text-based command-line utility for viewing and managing disk partitions on a Linux system. Before we create a partition on our system, we need to list all the partitions on our system. This is essential as we need to choose a disk before we partition it. To view all the partitions currently on your system, we use the following command.

You might be prompted to enter your password again to verify your sudo privileges. Here we called the fdisk command with the -l to list the partitions. You should get an output similar to the following. Now, we choose one disk from this list to partition. For this tutorial, we will choose the disk. To create partitions, we use the ‘command mode’ of the fdisk command. To enter the command mode, we use this command in our terminal.

If you see an output similar to this, you have successfully entered the command mode.
Using the command mode

Once we enter the command mode, many beginners might get confused due to the unfamiliar interface. The command mode of fdisk uses single character commands to specify the desired action for the system. You can get a list of available commands by pressing ‘m’, as shown below.
Creating a partition

Our main objective here is to create a partition. To create a new partition, we use the command ‘n’. This will prompt you to specify the type of partition which you wish to create. If you wish to create a logical partition, choose ‘l’. Alternatively, you can choose ‘p’ for a primary partition. For this tutorial, we will create a primary partition. Now, we will be asked to specify the starting sector for our new partition. Press ENTER to choose the first available free sector on your system. Next, you’ll be prompted to select the last sector for the partition. Either press ENTER to use up all the available space after your first sector or specify the size for your partition. As shown in the screenshot above, we chose to create a 10 MB partition for this demonstration. Here ‘M’ specifies the unit as megabytes. You can use ‘G’ for gigabytes. If you don’t specify a unit, the unit will be assumed to be sectors. Hence +1024 will mean 1024 sectors from the starting sector.
Setting the partition type
Once we create a partition, Linux sets the default partition type as ‘Linux’. However, suppose we wish my partition type to be the ‘Linux LVM’ partition. To change the ID for our partition, we will use the command ‘t’. Now, we get prompted to enter the HEX code for our desired partition ID. We don’t remember the HEX code for the partition types on top of our heads. So we will take the help of the ‘L’ command to list all the HEX codes for the available partition types. This list should look as shown below.  We see that the HEX code 8e is the partition ID for the ‘Linux LVM’ partition type. Hence, we will enter the required HEX code. The following output gives us the confirmation that our partition ID has been changed successfully.
Finalising the changes

Now that we have created a new partition and given it our desired partition ID, we need to confirm our changes. All the changes made until this point are saved in the memory, waiting to be written on our disk. We use the command ‘p’ to see the detailed list of partitions for our current disk as seen in the screenshot below. This allows us to confirm all the changes we have done to the disk before making them permanent. Once you have verified the changes, press ‘w’ to write the new partition on your disk. If you don’t wish to permanently write your new partition to the disk, you can enter the command ‘q’. This will exit the fdisk command mode without saving any changes.
Formatting a partition
Once you create a new partition, it is advisable to format your new partition using the appropriate mkfs command. This is because using a new partition without formatting it may cause issues in the future. To see the list of all available mkfs commands, we enter the following in our command line.
This gives us a list of available mkfs commands. If we wish to format a partition on our current disk with the ext4 file system, we use this command.
sudo mkfs.ext4 [partition path] Wrapping up
That’s it! You now know how to create a partition in Linux using the fdisk command… You can reserve space for specific tasks. And in case one partition gets corrupted, you don’t need to worry about data on other partitions. As each partition is treated as a separate disk, data on other partitions remains safe. The fdisk utility is a powerful tool for the task of managing disk partitions, but it can often be confusing for new users. We hope this tutorial was able to help you understand how to create a new disk partition in Linux using the fdisk utility. If you have any feedback, queries or suggestions, feel free to reach out to us in the comments below.
Thanks for learning with the DigitalOcean Community. Check out our offerings for compute, storage, networking, and managed databases. Learn more about us