- How To: Build a Simple Router with Ubuntu Server 18.04.1 LTS (Bionic Beaver)
- Prerequisites
- 1. Network Interfaces configuration
- 2. SETTING UP A DHCP SERVER
- 3. CONFIGURING FIREWALL
- Related Posts
- How To: Connect to WiFi Automatically After Restart When LAN is Being Plugged In on Windows 10
- Ubiquiti Unifi Mesh Review – Mesh and Mesh Pro Models
- Ubiquiti Nanostation Loco M5 – Can You Make a WiFI Bridge With XM and XW Firmware Versions?
- Experiencing Slow Loading of Websites Such as Facebook, Instagram, Youtube on Windows 11? Here’s How to Solve It.
- Ubiquiti UniFi UAP‑AC‑PRO Vs UAP‑AC‑LR – What is the Difference?
- 20 Comments
- How to build Linux Router with Ubuntu Server 20.04 LTS
- How to build Linux Router with Ubuntu Server 20.04 LTS
How To: Build a Simple Router with Ubuntu Server 18.04.1 LTS (Bionic Beaver)

Blaz Valentinuzzi April 18, 2019
I work in a public library as a system administrator. Recently my task was to put public computers behind a separate router in order to control internet access. As I have plenty of computer parts lying around I decided to build a router with some older computer with a Linux operating system. In my case Ubuntu Server 18.04.1 LTS (Bionic Beaver).
I wrote this guide to help others with a similar task.
Prerequisites
- A computer running Ubuntu Server 18.04.1 LTS. I’m not going into the details on how to install Ubuntu operating system. It is pretty straightforward. If you need help for the basic installation you can use this guide on HowtoForge.
- At least two network interfaces. One is for the WAN and the other for LAN part of a router. You would also want to use some switch in a case you are going to connect multiple devices in the local network. But this is pretty much everything you need for a working router.
If you are not that much into building a machine from your old computer parts, there are plenty of small form network appliances on the Amazon. They are like small fanless solid state computers with two or more network interfaces. I recommend this one:
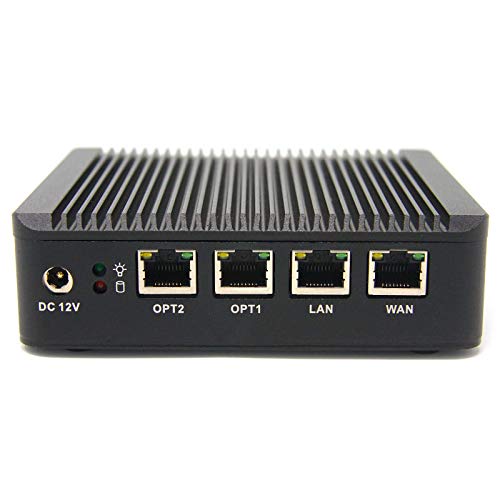
Note that this one is a BAREBONE without RAM and SSD mSata. You need to buy them separately and put in by yourself. Like:

…and mSATA SSD drive:

Note: As we are going to be messing up with the firewall, I would not recommend you to configure it via SSH. You may lock yourself out during the process.
1. Network Interfaces configuration
First, we need to configure the network interfaces we will be using. In my case, eth0 will be the WAN and eth1 LAN.
WAN (eth0) – this interface will get an IP from the ISP, so we leave it using DHCP.
LAN (eth1) – we configure the interface with a static IP within the subnet we are going to use for local area network
Just a little note, Ubuntu 18.04 does not use the traditional network configuration file /etc/network/interfaces. It uses NETPLAN. In my case, there is a config file, called 50-cloud-init.yaml inside the /etc/netplan/ folder. In your case, the file may have a different name, just look for the file with .yaml extension inside netplan folder.
sudo nano /etc/netplan/50-cloud-init.yaml
Edit it accordingly to your network needs, in my example I configured like this:
# This file is generated from information provided by # the datasource. Changes to it will not persist across an instance. # To disable cloud-init's network configuration capabilities, write a file # /etc/cloud/cloud.cfg.d/99-disable-network-config.cfg with the following: # network: network: ethernets: eth0: dhcp4: true eth1: addresses: - 192.168.1.1/24 dhcp4: false nameservers: addresses: - 8.8.8.8 - 8.8.4.4 search: [] version: 2
To sum up: eth0 which is the WAN, gets IP from internet provider’s modem. Eth1 is LAN part of the router. We need it to have a static IP and DNS servers (in my example I used Google’s). Also we didn’t configure any gateway on eth1.
Save the configuration with following commands:
sudo netplan generate sudo netplan apply
2. SETTING UP A DHCP SERVER
Next, we want to set up a DHCP server. We really don’t want to configure each client with static IP within the LAN network. For this task, we need to install the following package.
sudo apt-get install isc-dhcp-server
Next we need to edit /etc/default/isc-dhcp-server file. This tells the DHCP server which network interface it should be listening to. In my case it of course eth1, the LAN interface.
sudo nano /etc/default/isc-dhcp-server
And under “INTERFACESv4” insert your LAN network interface. In my case it’s eth1:
Next step would be configuring the DHCP server. This is done by editing the file /etc/dhcp/dhcpd.conf
sudo nano /etc/dhcp/dhcpd.conf
Here is a bunch of different parameters, most of them are commented with # before every line. To keep it shorter, I will write it down only the parameters I used and/or edit them accordingly my needs. If you want, you can delete all the content of this file and just copy/paste the code below. Of course, you change the IPs, GATEWAYS, etc.. according to your own network configuration.
option domain-name «whatever.you.want»; option domain-name-servers 8.8.8.8, 8.8.4.4; default-lease-time 600; max-lease-time 7200; ddns-update-style none; authoritative; log-facility local7; subnet 192.168.1.0 netmask 255.255.255.0
Now let’s apply the settings and enable the DHCP server on boot with following commands:
sudo systemctl restart isc-dhcp-server sudo systemctl enable isc-dhcp-server
With the following command, we check the status.
sudo systemctl status isc-dhcp-server
If everything is correctly set up, there must be a line, saying “ACTIVE“. Otherwise, you messed something up within /etc/dhcp/dhcpd.conf file. It may be missing some semicolon or bracket.
3. CONFIGURING FIREWALL
In order to have a functional router, we need to configure the firewall properly. This is done by writing down some iptables rules. In order to preserve the rules if the server is restarted, I created a script to be executed at boot time.
First lets enable UFW with…
Next we need to enable forwarding packages from WAN to LAN. We the following parameter inside /etc/ufw/sysctl.conf file:
sudo nano /etc/ufw/sysctl.conf
…and we just remove the # in front of the following line:
In Ubuntu 18.04 the file /etc/rc.local doesn’t exist anymore. But we can still create it with:
Next, copy/paste the following script. There are comments explaining each iptables rule. You can delete them if you wish, but you must NOT delete #!/bin/bash. Also, change eth0 and eth1 if your network interfaces have some different names.
#!/bin/bash # /etc/rc.local # Default policy to drop all incoming packets. iptables -P INPUT DROP iptables -P FORWARD DROP # Accept incoming packets from localhost and the LAN interface. iptables -A INPUT -i lo -j ACCEPT iptables -A INPUT -i eth1 -j ACCEPT # Accept incoming packets from the WAN if the router initiated the connection. iptables -A INPUT -i eth0 -m conntrack \ --ctstate ESTABLISHED,RELATED -j ACCEPT # Forward LAN packets to the WAN. iptables -A FORWARD -i eth1 -o eth0 -j ACCEPT # Forward WAN packets to the LAN if the LAN initiated the connection. iptables -A FORWARD -i eth0 -o eth1 -m conntrack \ --ctstate ESTABLISHED,RELATED -j ACCEPT # NAT traffic going out the WAN interface. iptables -t nat -A POSTROUTING -o eth0 -j MASQUERADE # rc.local needs to exit with 0 exit 0
This script must be executed at boot time, so we need to make the file executable with the following command:
sudo chmod 755 /etc/rc.local
And that’s it. We reboot the router with sudo reboot command and we are good to go. 🙂
Related Posts
How To: Connect to WiFi Automatically After Restart When LAN is Being Plugged In on Windows 10

Ubiquiti Unifi Mesh Review – Mesh and Mesh Pro Models

Ubiquiti Nanostation Loco M5 – Can You Make a WiFI Bridge With XM and XW Firmware Versions?

Experiencing Slow Loading of Websites Such as Facebook, Instagram, Youtube on Windows 11? Here’s How to Solve It.

Ubiquiti UniFi UAP‑AC‑PRO Vs UAP‑AC‑LR – What is the Difference?
20 Comments
Thank you so much for this guide! I am relatively new at linux but know enough to learn quickly. My setup is pretty much as you describe above except that rather than server out IP’s via DHCP my setup will:
1. Accept unfiltered content from my ISP via the modem
2. filer the content running:
– ufw
– fail2ban
– Pi-Hole
3. Send the resulting filtered content to a Google Wi-Fi that will take care of handing out IP addresses Do you know if this setup is possible?
Blaz Valentinuzzi November 26, 2018
Definitely possible.
You have two options. 1. Connect WAN side of Google Wi-FI to LAN of the Ubuntu machine. You can assign a static IP or you leave it to DHCP server to assign a WAN IP of Google Wi-Fi router. In this case, you have double NAT, which is just fine in most cases. Just make sure the subnets of Ubuntu LAN (Google WiFi WAN) and Google Wi-Fi LAN are different. 2. You put a Google Wi-Fi to Bridge Mode. This way you leave routing (and of course assigning IPs to Wifi clients) only to Ubuntu router.
Hi! I’ve got Ubuntu Server on VirtualBox, with 2 network: nat, int net.
So my problem is: on the second network internet doesn’t works.
Blaz Valentinuzzi December 21, 2018
top effort this worked like a treat……. this setup rules for loads of workarounds. e.g. creating a nice isolate wired LAN you have complete control over. whilst leaving the rubbish BT homehub to deal with all the wifi junk in the house. Got this running on an old lenovo desktop box from the attic, with a used 4 port 1Gb server network card for £10 quid in about 20 mins.
Blaz Valentinuzzi February 5, 2019
Nice tuto Blaz.
It worked like a charm for me. The unique difference is that my provider uses PPPOE and i will have to config the conection.
Many thanks for your time!.
Abraham
Blaz Valentinuzzi March 21, 2019
You need to change the settings under the “eth0” (which is the WAN port of the router). As you can see, now is: “dhcp4: true”
Change it accordingly to the given static IP, GW, MASK and DNS provided by your ISP. So the segment of eth0 would be something like:
dhcp4: false
addresses:
— xxx.xxx.xxx.xxx/xx
gateway4: xxx.xxx.xxx.xxx
nameservers:
addresses:
— xxx.xxx.xxx.xxx
— xxx.xxx.xxx.xxx
Note that the subnet mask is presented by the prefix /xx after the IP address. Here’s a cheat sheet: 🙂
Prefix size | Subnet mask
/24 | 255.255.255.0
/25 | 255.255.255.128
/26 | 255.255.255.192
/27 | 255.255.255.224
/28 | 255.255.255.240
/29 | 255.255.255.248
/30 | 255.255.255.252 I hope it helps. Good luck.
How to build Linux Router with Ubuntu Server 20.04 LTS
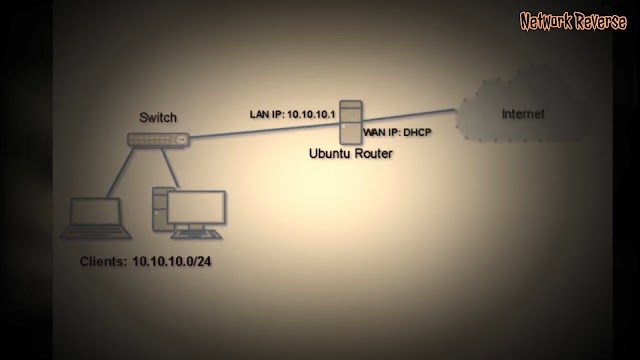
Linux router configuration is simple, you just need to make sure the router have two interfaces that connected to the network that will be routed, enable packet forwarding and iptables for NAT if needed. There are more advanced configuration, but in this post we will build Linux router on Ubuntu Server 20.04 to allow LAN traffic through to internet on WAN interface with NAT.
How to build Linux Router with Ubuntu Server 20.04 LTS
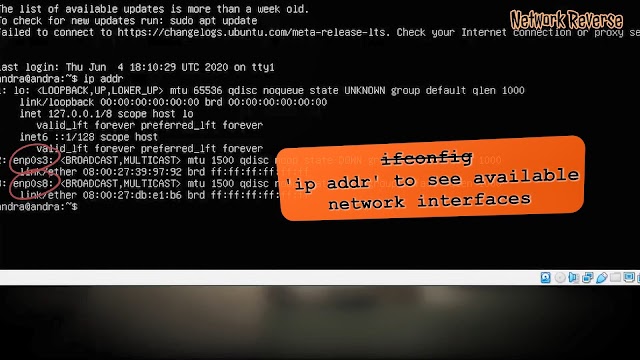
Ubuntu Server 20.04 comes with netplan as default network interface configuration tool.If you are not familiar with netplan please read the previous post about Ubuntu Server 20.04 LTS — Basic Network Configuration with netplan.
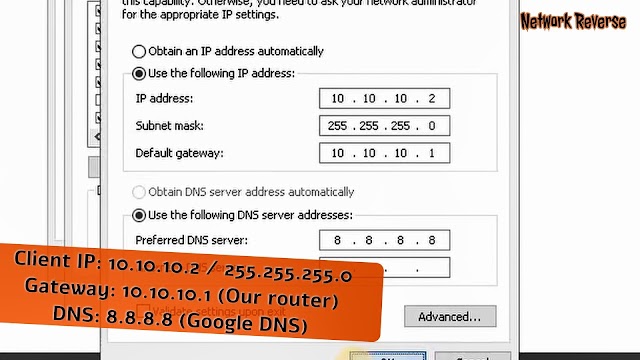
- enp0s3 is the WAN interface, it will be configured to obtain IP address from DHCP server.
- enp0s8 is the LAN interface, it will be configured to use 10.10.10.1/24 IP address.
nano /etc/netplan/anything.yaml
This configuration below addedd interface enp0s3 to obtain dhcp and enp0s8 to use 10.10.10.1/24 IP address. Just add lines that red colored to your configuration file, if it is a newly installed Ubuntu Server.
network: version: 2 renderer: networkd ethernets: enpos3: dhcp4: yes enp0s8 addresses: - 10.10.10.1/24 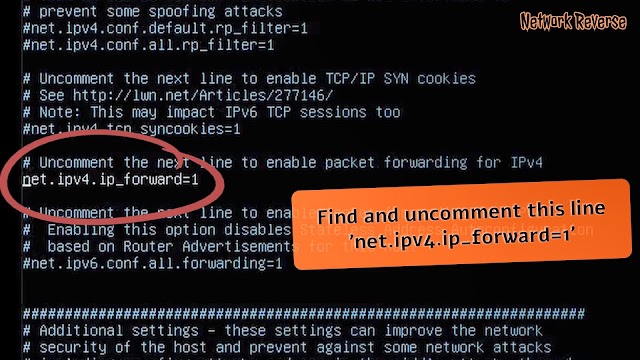
iptables -t nat -A POSTROUTING -j MASQUERADE
iptables command line will not be saved after the system reboot, there are many ways to make it persistent after reboot. This time we will use the easiest way to install iptables-persistent package to the Ubuntu server.
apt update -y && apt install iptables-persistent
It will asks you to save the current ipv4 and ipv6 iptables rules, answer yes to save it or no to save it later.
iptables-save > /etc/iptables/rules.v4 This command will save the iptables rules to /etc/iptables/rules.v4 , where later it will be restored by iptables-persistent on every reboot.
If all going well, we have finished building Linux Router with Ubuntu Server 20.04 LTS. According to the topology, the clients use 10.10.10.0/24 network address. So configure the clients accordingly.
You can watch all the activity above on building Linux Router with Ubuntu Server 20.04 LTS from this youtube video below. If you still have any problems, please put your comments.
