- Introduction
- My virtual lab
- Let’s start
- First things first
- Adding the Remote Access role
- Configuring the Remote Access Role
- Adding the second NAT interface
- Checking the configuration
- Testing the LAN Routing and NAT
- Creating a Gateway Router on Windows Server 2016 Core
- Setting up the server
- Installing and configuring the Gateway
- Validation
- Как настроить NAT в Windows Server 2016
Introduction
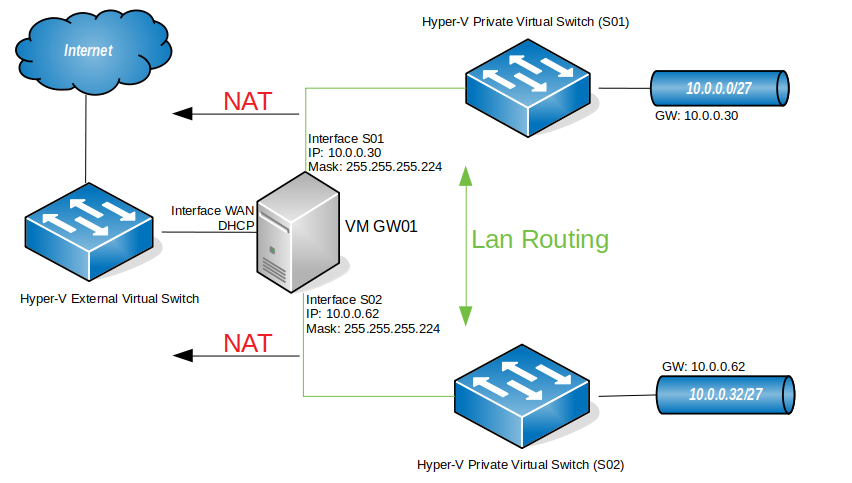
In this article I’m setting up a 3 way router with Windows Server 2016, which will be performing LAN routing between two subnets and NAT for both subnets. This setup will replace the gateway I had in my Hyper-V virtual lab. So, basically, I needed to add a new subnet to my virtual lab (10.0.0.32/27) and I needed both subnets to communicate and both to have internet access. I could have done this by adding a router between both subnets, but for that I would need to add a new virtual machine, which would be consuming additional resources from my Hyper-V server. This way, I’ll have a solution that will grow with the virtual lab. In case I need to add a new subnet to the lab, I just have to add a new interface to the router and all subnets will be automatically routed between each other. Perfect!
My virtual lab
| Please note that this is my virtual lab configuration. You will have to configure the router to match your own network config, but, if you are reading this, I assume you already know that. Also, DNS servers are not in place here. After configuring the router, your client PCs will need to have a DNS server configured – usually your internet router – so that they will be able to browse the internet. Again, if you are reading this article I assume you have a basic understanding how these things work. |
Let’s start
First things first
You will need a machine with Windows Server 2016 installed, for which you can find a guide here, with three network cards attached to it, as per the diagram above.
Adding the Remote Access role
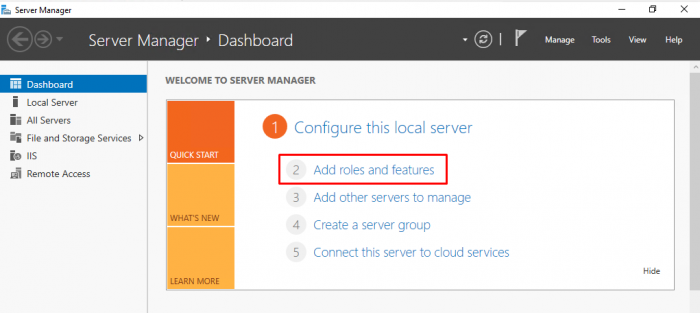
- Open “Server Manager”. Click on the start button and find “Server Manager”.
- Click on “Add roles and features”.
- Click “Next” until you reach the “Select server roles” window. Check the “Remote Access” box and click “Next”.
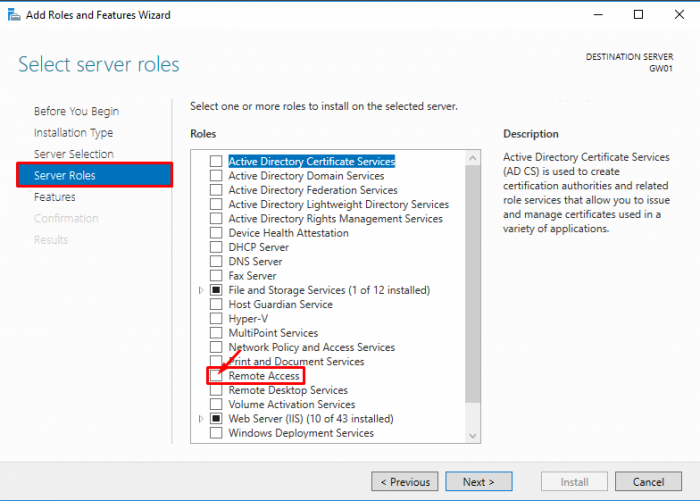
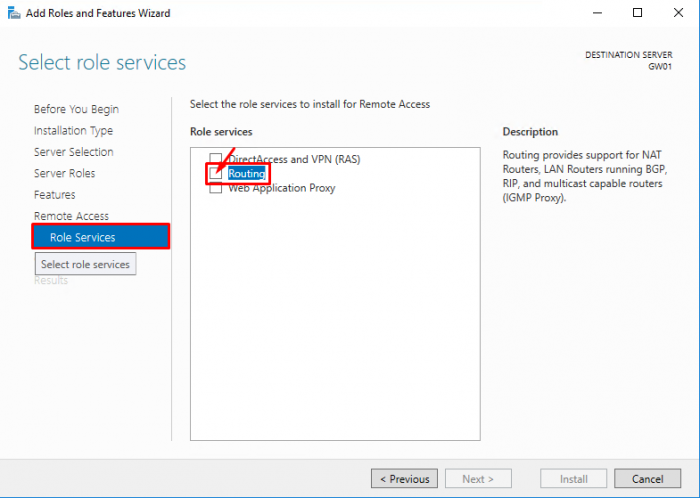
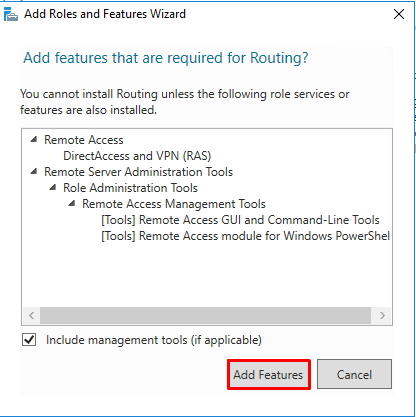
- Note that “DirectAccess and VPN (RAS)” are selected by default. No need to make any changes. Press “Next”.
Configuring the Remote Access Role
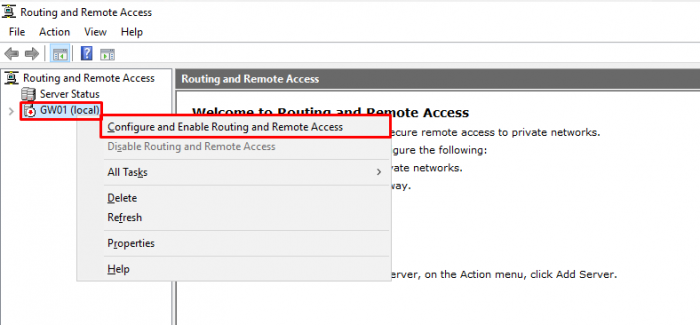
- Press “Next” at the welcome window of the “Routing and Remote Access Server Setup Wizard”.
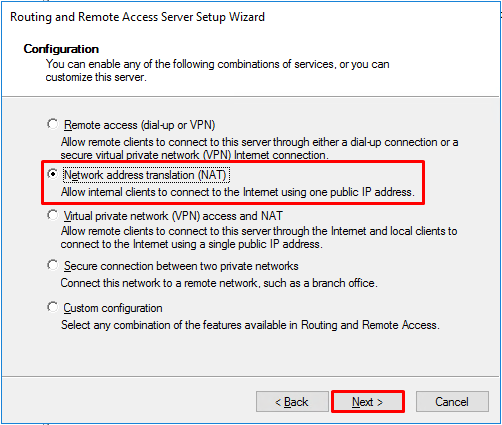
- On the “Configuration” window, select “Network address translation (NAT)” and press “Next”.
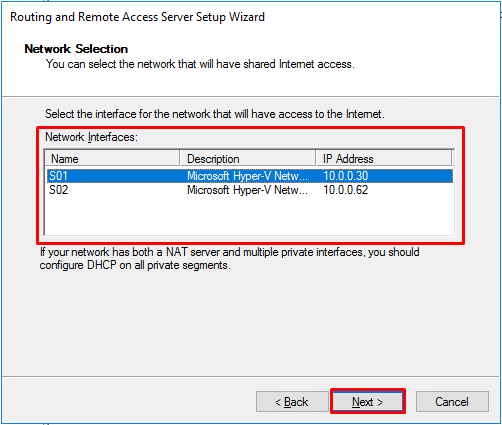
- Select the public interface that you are using to connect to the internet. Press “Next”.
- Select the interface that will have access to internet. Select the first interface and press “Next”. We’ll deal with the second interface later.
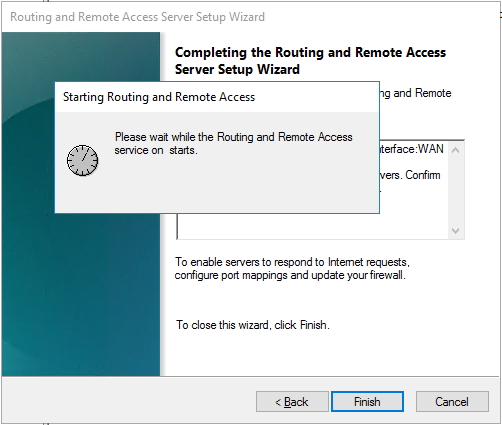
- Click on “Finish” to close the setup wizard. If a pop-up window comes up warning about firewall ports for VPN connections, you can safely ignore this warning as we are not setting up any VPN access. Just press “OK” and wait for the “Routing and Remote” access service to start.
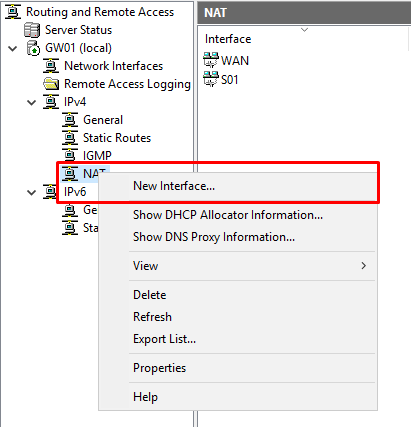
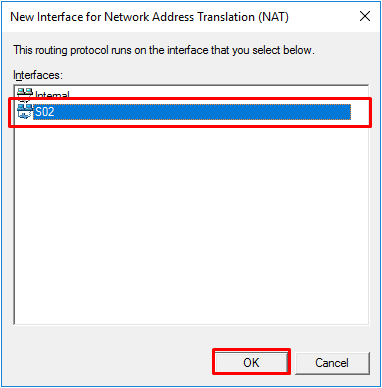
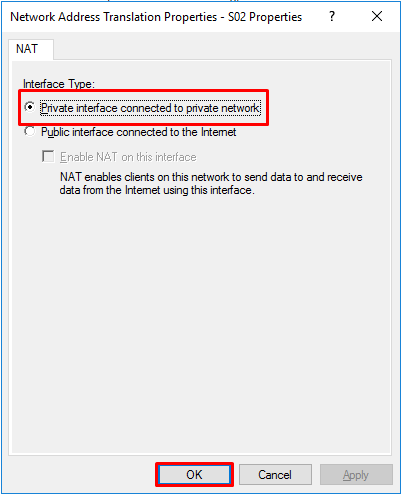
Adding the second NAT interface
So, during the Routing and Remote Access setup wizard, we’ve configured NAT for one of the subnets, but if we want (and we do!) to provide internet access to another subnet, we must configure NAT for the second (n) interface.
And this ends setting up the server. Now it’s time to test if all is working as it should!
Checking the configuration
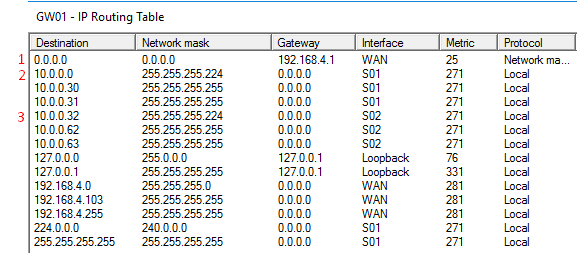
In the “Routing and Remote Access” console, under IPv4, right-click “Static Routes” and choose “Show IP Routing Table…”. A new window, with the known routes to this computer, will pop-up. Analyzing that window (please always remember that this IP Routing table is regarding my setup, which is the one described in the diagram on the top of the page), you will see that we have:
1 – A gateway! All traffic that the router doesn’t know where to direct it, will direct it to the gateway.
2- Traffic for the network (subnet) 10.0.0.0 with a netmask of 255.255.255.224 (/27) will be directed to the interface S01, which is the interface connected to that subnet.
3- Traffic for the network 10.0.0.32 with a netmask of 255.255.255.224 will be directed to the interface S02, which is the interface connected to that subnet.
Testing the LAN Routing and NAT
NOTE: for all to work properly, ideally you should have a DHCP assigning IP addresses on each subnet and also a DNS server for your client computers to be able to resolve names and browse the internet.
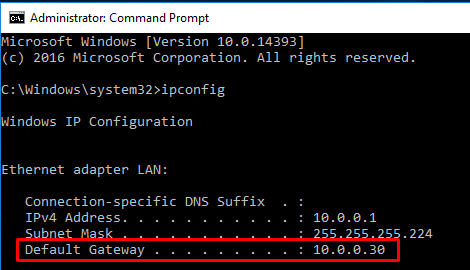
Having said that, from one of the computer clients connected to S01, you should be able to ping S02. This is the IP config I have at one of my servers in S01. You’ll see that the gateway for this subnet is the IP of the router (10.0.0.30).
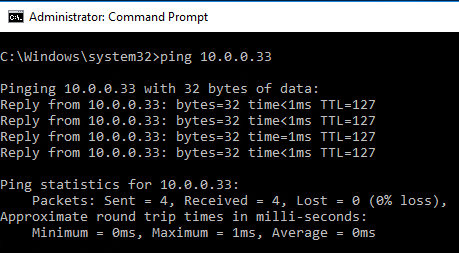
If you ping an IP address in the S02 subnet, this should be the result:
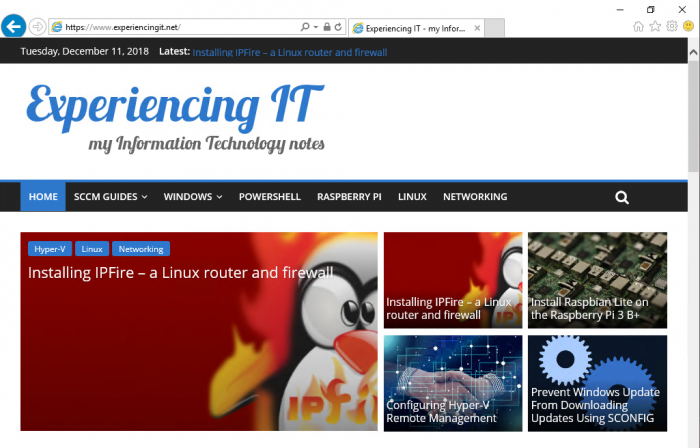
And if you try and browse the internet, voilá!
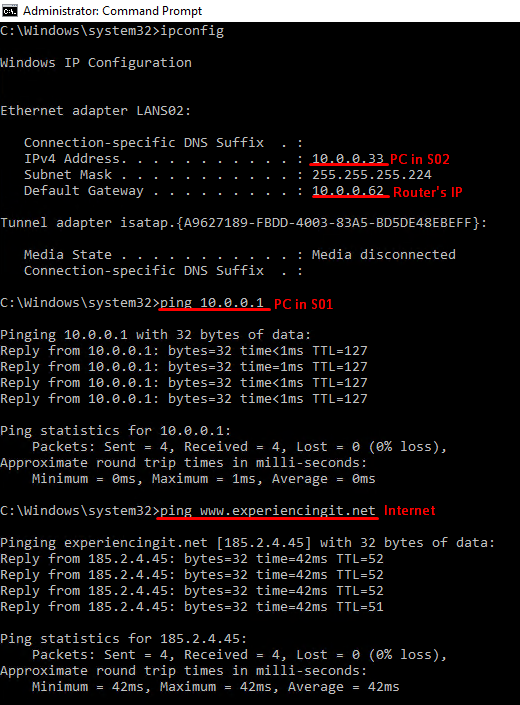
And the sames goes from a computer on subnet S02:
If you run into any issues, ie, not pinging from one subnet to the other, disable the router firewall and try again. That should do it. Or, instead of disabling the firewall completely, add – or enable – rules to allow traffic between both subnets. In my case, I disabled the firewall completely because this is a lab environment, with no direct connection to the internet.
As always, if you found this article useful, share it with your friends.
If you have any questions or suggestions, please leave your comment.
And… Thank you for reading!
Creating a Gateway Router on Windows Server 2016 Core
I seem to spin up a lot of Virtual Labs. To make sure my lab doesn’t interfere with the rest of my network, and to simulate a larger enterprise environment you should use a virtual router.
I normally use pfSense as my virtual router of choice, but decided recently to create a router on Windows Server 2016 Core.
This isn’t the first time I’ve installed or used Windows Server Core — in a previous lab I have used it for a DC but I haven’t had much experience with it. This is the first time I’ve used Windows Server for a router let alone on Core.
- You’ve configured your Virtual Switches with one connected to your host’s network and at least one privateinternal network
- You’ve created the virtual machine with the associated NICs attached
- You’ve installed Windows Server 2016 Core selecting the none GUI option
Setting up the server

- On first boot you’ll be presented with a prompt asking to configure the Administrator password.
- We’ll be doing most of the work in Powershell so we need to launch it.

First lets name the computer (ignore the prompt about rebooting, we’ll do this after configuring the machine).
> Rename-Computer -NewName GW 
We then want to rename the adaptors using Rename-NetAdaptor. Using the -Name switch to pass the current names that we found in the previous step. Then use Get-NetIPConfiguration again to confirm.
> Rename-NetAdapter -Name Ethernet -NewName External > Rename-NetAdapter -Name "Ethernet 2" -NewName Internal > Get-NetIPConfiguration 
Next we’ll configure and validate the internal network adaptors IP details, DNS Addresses, and disable IPv6 for both adaptors. I’m setting my DNS addresses to 172.0.0.10 as this will be my DC, and 192.168.1.254 as this is my external router.
> New-NetIPAddress -InterfaceAlias Internal -IPAddress 172.0.0.1 -PrefixLength 24 > Set-DnsClientServerAddress -InterfaceAlias Internal -ServerAddresses 172.0.0.10, 192.168.1.1 > Disable-NetAdaptorBinding -Name Internal, External -ComponentID ms_tcpip6 > Get-NetAdaptorBinding -Name Internal, External -ComponentID ms_tcpip6 > Get-NetIPConfiguration > Test-NetConnection 
The last step is to reboot the computer.
Installing and configuring the Gateway
- After boot, login, and launch Powershell.
- First, we need to enable a firewall rule used by routing.
> Enable-NetFirewallRule -DisplayName "File and Printer Sharing (Echo Request - ICMPv4-In)" > Install-WindowsFeature Routing -IncludeAllSubFeature -IncludeManagementTools > Restart-Computer 
Once rebooted, re-login and launch Powershell to install the router.
> Install-RemoteAccess -VpnType Vpn 
We now need to enter a NETSH session.
> routing ip nat add interface External > routing ip nat set interface External mode=full > routing ip nat add interface Internal 
Validation
We can validate the config by creating a second VM with or without a GUI. Configuring the IP address inside the 172.0.0.0/24 range with a default gateway of the GW we’ve just configured (172.0.0.1), and the DNS address of your external router. We then use the the Test-NetConnection Powershell command to confirm external access.

Thats it, you should have now configured a Virtual Router on Windows Server 2016 Core. Let me know how it goes!
Как настроить NAT в Windows Server 2016
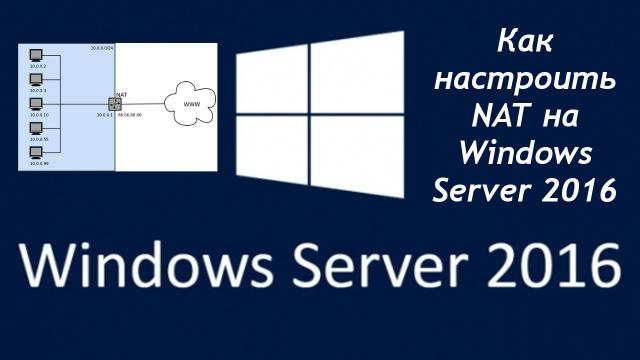
Привет, недавно столкнулся с ситуацией — есть выделенный сервер, на сервер установлен Hyper-V, провайдер выдает один белый IP на сервер. Обратились ко мне с вопросом — как можно сделать так, что бы не покупая дополнительные адреса, на создаваемых на сервере виртуальных машинах работал интернет.
В случае, например с VirtualBox вопрос решается подключением виртуальной машины к сети с типом NAT, но как же быть с Hyper-V, в нем нельзя подключить виртуальный свитч к сети NAT.
Ответ очевиден — нужно подключить свитч к внутренней сети, и с него трафик натить через физический порт. Сделать это совсем не сложно.
Ниже я расскажу как можно настроить NAT на Windows Server 2016 через PowerShell, а так же как можно настроить NAT на более старых версиях ОС Windows, через RRAS (к слову и на Windows Server 2016, через RRAS то же можно делать).

Начнем с более предпочтительного и простого способа — через PowerShell, но он для Windows 2016 и Windows 10 (к слову эти же команды должны работать и на более старых версях Windows, при условии, что будет установлен PowerShell 5, но я не проверял, кто проверит, отпишитесь в комментариях).
#Добавляем виртуальный свитч New-VMSwitch -name NAT -SwitchType Internal #Добавляем NAT New-NetNat -Name LocalNat -InternalIPInterfaceAddressPrefix "10.0.0.0/24" #Назначем адрес виртуальному свитчу Get-NetAdapter "vEthernet (NAT)" | New-NetIPAddress ` -IPAddress 10.0.0.1 -AddressFamily IPv4 -PrefixLength 24 #Делаем проброс портов Add-NetNatStaticMapping -NatName NATnetwork -Protocol TCP ` -ExternalIPAddress 0.0.0.0 -InternalIPAddress 10.0.0.2 ` -InternalPort 22 -ExternalPort 50022 #Посмотреть текущие пробросы портов можной командой: Get-NetNatStaticMapping #Как и список сетей NAT Get-NetNat #Такими командами это хозяйство можно удалить Remove-NetNatStaticMapping -StaticMappingID 0 Remove-NetNat -Name LocalNat
Теперь опишу способ, как можно сделать NAT, который работает практически на всех версиях винды (на 2003, 2008, 2012 и 2016 соответсвенно), будем делать NAT через RRAS.
Сперва нужно поставить роль RAS, для этого заходим в диспетчер сервера, жмем управление и выбираем — добавить роли и компоненты.

В мастере добавления ролей, в ролях сервера, выбираем Удаленный доступ.

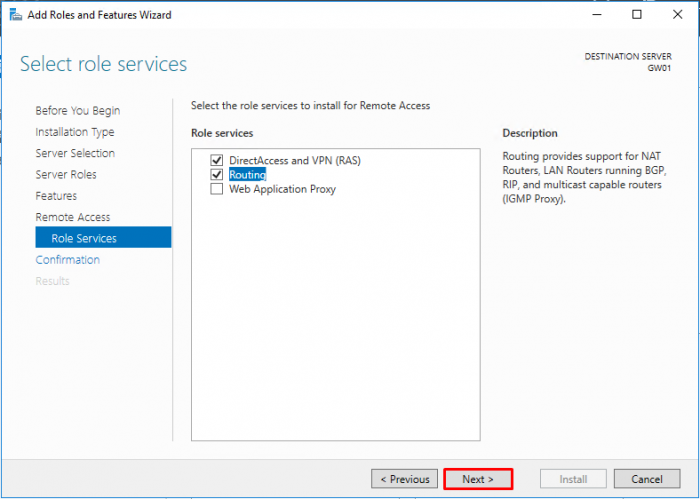
В службах ролей удаленного доступа, выбираем маршрутизация,

и добавляем необходимые компоненты.

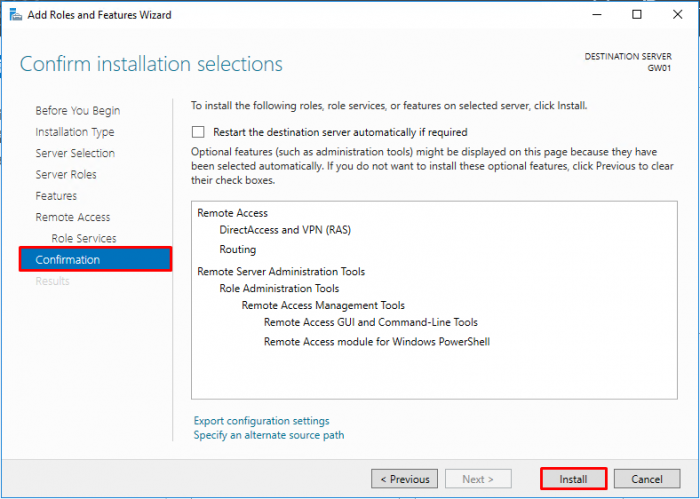
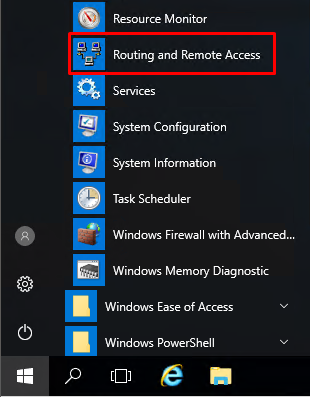
После завершения установки, перезагружаем сервер, возвращаемся в диспетчер сервера и выбираем: средства — маршрутизация и удаленный доступ.

Щелкаем правой кнопкой по нашему серверу и выбираем — настроить маршрутизацию и удаленный доступ.

На втором шаге мастера настройки сервера маршрутизации и удаленного доступа, выбираем — преобразование сетевых адресов (NAT).

Дальше выбираем сетевой интерфейс, который подключен к интернету.

На этом настройка NAT на Windows Server 2016 закончена, вернемся в консоль управления RRAS, развернем наш сервер, перейдем в IPv4, и зайдем в преобразование сетевых адресов.

Здесь можно посмотреть свойства сетевых интерфейсов. Например для внутреннего свойства выглядят так:


Здесь же можно сделать проброс портов, например, сделаю проброс ssh до виртуальной машины. Заходим в службы и порты и жмем добавить,

Здесь указываем понятное имя службы, входящий порт (порт по которому нужно ломиться на сервер), адрес сервера к которому пробрасываем порт, и порт сервера.

Всё порт проброшен. Можно пробовать подключиться.