- Saved searches
- Use saved searches to filter your results more quickly
- License
- muratdemirtas/MT7601u
- Name already in use
- Sign In Required
- Launching GitHub Desktop
- Launching GitHub Desktop
- Launching Xcode
- Launching Visual Studio Code
- Latest commit
- Git stats
- Files
- README.MD
- About
- MediaTek MT7601 Wireless Adapter Driver/Utility 5.1.25.0/1.5.39.173
- To install this package please do the following:& &
- About USB Network Adapter:& &
Saved searches
Use saved searches to filter your results more quickly
You signed in with another tab or window. Reload to refresh your session. You signed out in another tab or window. Reload to refresh your session. You switched accounts on another tab or window. Reload to refresh your session.
Ubuntu and Embedded Linux(Raspberry Pi, Banana Pi etc.) drivers for MediaTek MT7601u Wireless Chipset. Support Access Point(AP) and Station Mode(STA). Tested on 32-64 Bit Ubuntu and Raspberry Pi 2 with all kernels since v4.0.0+. You can use this driver for internet sharing(hotspot), robotic, file transfer or ssh.
License
muratdemirtas/MT7601u
This commit does not belong to any branch on this repository, and may belong to a fork outside of the repository.
Name already in use
A tag already exists with the provided branch name. Many Git commands accept both tag and branch names, so creating this branch may cause unexpected behavior. Are you sure you want to create this branch?
Sign In Required
Please sign in to use Codespaces.
Launching GitHub Desktop
If nothing happens, download GitHub Desktop and try again.
Launching GitHub Desktop
If nothing happens, download GitHub Desktop and try again.
Launching Xcode
If nothing happens, download Xcode and try again.
Launching Visual Studio Code
Your codespace will open once ready.
There was a problem preparing your codespace, please try again.
Latest commit
Git stats
Files
Failed to load latest commit information.
README.MD
Raspberry Pi MT7601u ACCESS POINT AND STATION MODE SUPPORT
This example will teach you for using unsupported Mediatek MT7601u based wireless chipsets as Access Point mode in Linux systems. So you can use this wireless antenna in your embedded or desktop based Linux robotic projects or sharing your internet connection(as like hotspot). No hardware and programming skills required. We will not use hostapd driver. Just follow what I write.
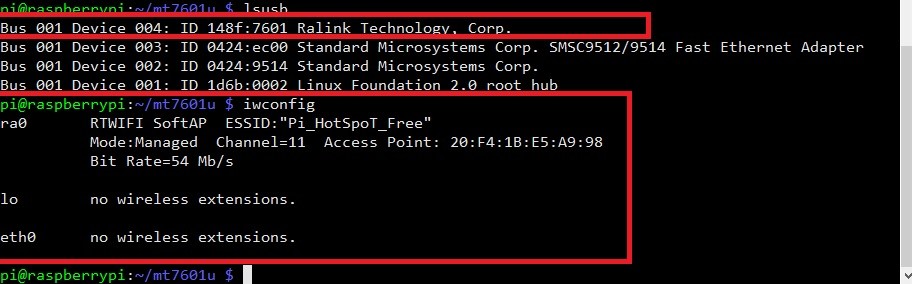
Plug your Wi-Fi antenna to your PC or Raspberry Pi and write this command to check if you have Clone MT7601.

Look this image if Ralink ID is equal with your Wi-Fi dongle then everything is fine. Your module will work. Follow instractions for your linux based operating systems.
ON UBUNTU 32-64 BIT SYSTEMS…
On Ubuntu 16.04 32-64 bit LTS systems, you can compile this driver easily. But you must be first update your system with these commands.
sudo apt-get update && sudo apt-get upgrade -y GETTING DRIVER ON UBUNTU 32-64 BIT SYSTEMS…
If you dont have git package then you install with this command.
GETTING SOURCE CODE FROM THIS REPOSITORY
Get this driver with git clone method from this repo. Type to terminal
sudo git clone https://github.com/muratdemirtas/MT7601u.git COMPILING DRIVER ON UBUNTU 32-64 BIT SYSTEMS…
Driver will download after this command to your home directory. Open downloaded driver folder with
ACCESS POINT CONFIGURATION…
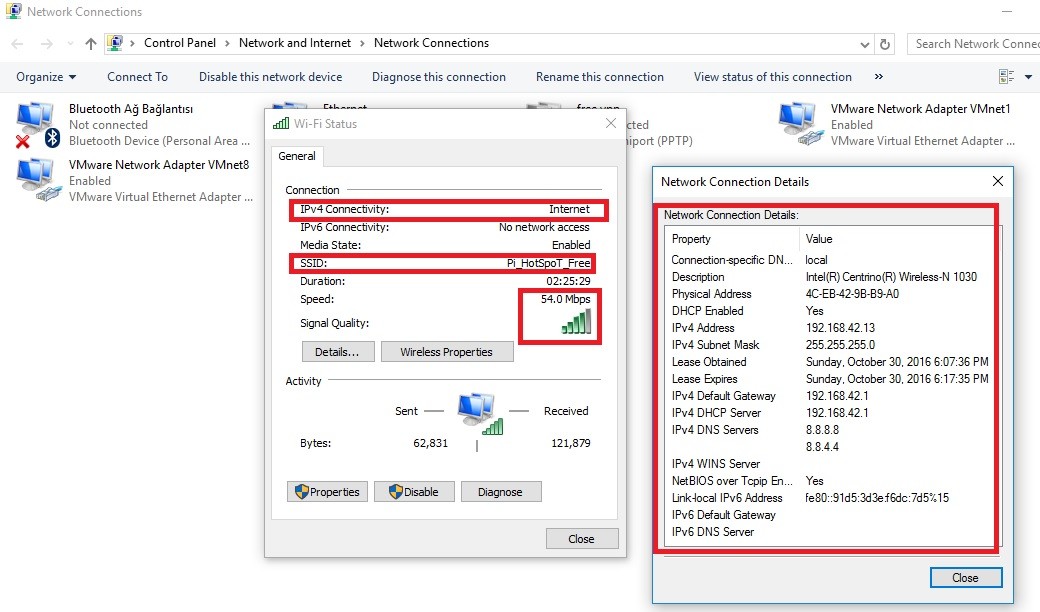
if you want to change your Access Point configuration, use this command for opening. If you have nano package then you can use vim,gedit or install nano package with following command (default ssid : Rpi_Hotspot_Free, password:1234567890)
sudo apt-get install nano -y sudo nano /home/pi/mt7601u/etc/Wireless/RT2870AP/RT2870AP.dat Write your settings and save for configuration, press “ctrl-w” + press “y” and press enter. Compile your driver with this commands.
cd mt7601u/ sudo cp -v /lib/modules/$(uname -r)/build/Module.symvers src/os/linux sudo make clean && make all && make install sudo rm -rvf src/os/linux/Module.symvers AFTER COMPILING SOURCE CODE…
So you if not receive any error messages and success , driver is compiled and ready for Access Point mode. Make install command will deploy your Access Point drivers (rtnet7601Uap, mt7601Uap) to kernel automatically. But old MT7601 Chipset kernel module must be remove from Linux kernel system. Only and easy way fort his, add old mt7601 kernel module to Linux blacklist. So you can this easy with these commands.
Just open your /etc/modprobe.d/blacklist file
sudo nano /etc/modprobe.d/blacklist and add drivername using following syntax:
press “ctrl-w” + press “y” and press enter for save.
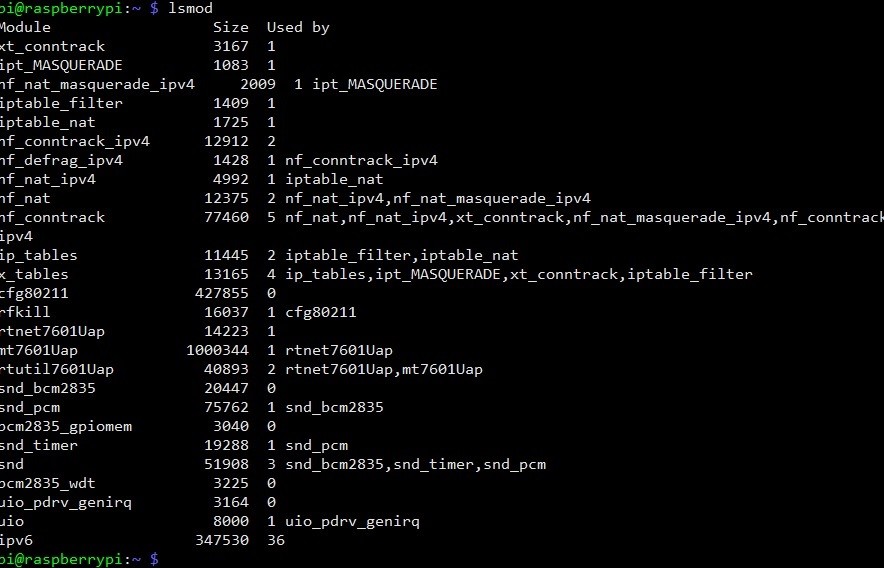
EDIT: In later versions since 12.10 (12.04?) the file is /etc/modprobe.d/blacklist.conf Reboot your system and use lsmod command to show the status of modules in the Linux Kernel. If you dont see any modüle as “mt7601u” then success.
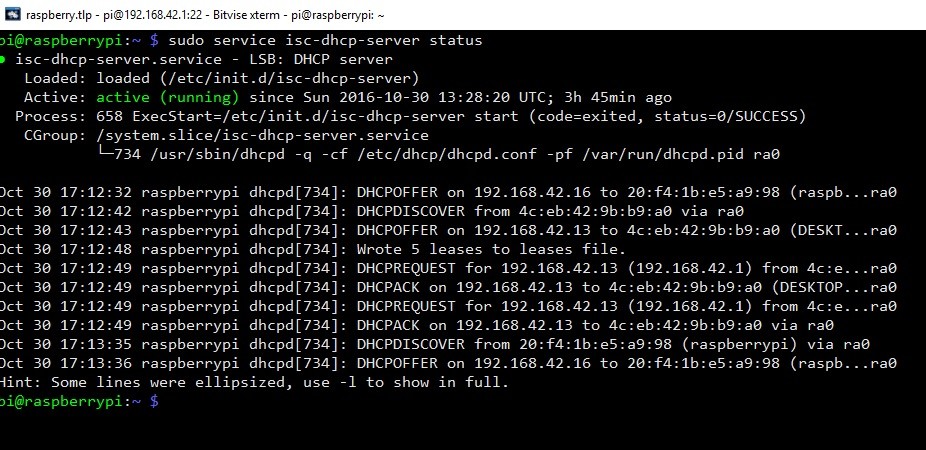
After reboot your system, Access Point is established and wait for dhcp install.
At this moment, you can connect your Access Point but you can’t obtain IP adress because DHCP server isn’t installed. Install with these commands..(You may need to sudo apt-get update if the Pi can’t seem to get to the apt-get repositories)
sudo apt-get install hostapd isc-dhcp-server Next, we will edit /etc/dhcp/dhcpd.conf, a file that sets up our DHCP server — this allows wifi connections to automatically get IP addresses, DNS, etc. Run this command to edit the file
sudo nano /etc/dhcp/dhcpd.conf option domain-name "example.org"; option domain-name-servers ns1.example.org, ns2.example.org; and change them to add a # in the beginning so they say
#option domain-name "example.org"; #option domain-name-servers ns1.example.org, ns2.example.org; Find the lines that say # If this DHCP server is the official DHCP server for the local # network, the authoritative directive should be uncommented
Then scroll down to the bottom and add the following lines
subnet 192.168.42.0 netmask 255.255.255.0
Save the file by typing in Control-X then Y then return
sudo nano /etc/default/isc-dhcp-server and scroll down to INTERFACES=»» and update it to say INTERFACES=»ra0″
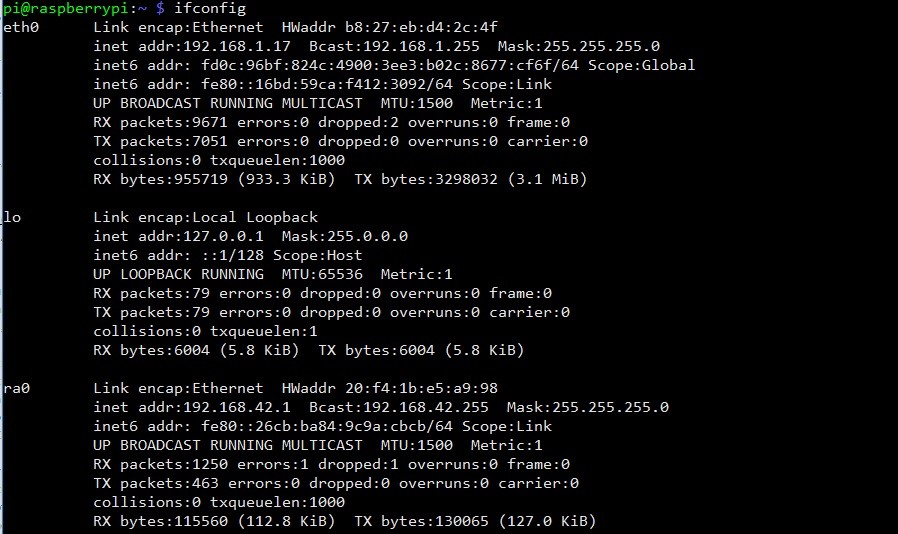
set static IP for your wifi card type and route packages for internet share type these commands to terminal
sudo ifconfig ra0 192.168.42.1 sudo iptables -F sudo sh -c "echo 1 > /proc/sys/net/ipv4/ip_forward " sudo iptables -t nat -A POSTROUTING -o eth0 -j MASQUERADE sudo iptables -A FORWARD -i eth0 -o ra0 -m state --state RELATED,ESTABLISHED -j ACCEPT sudo iptables -A FORWARD -i ra0 -o eth0 -j ACCEPT sudo iptables -t nat -S So your Access Point is ready and internet sharing will work
ON RASPBERRY PI EMBEDDED LINUX 32-64 BIT SYSTEMS…
For compiling this module, use these commands for compiling and take a coffee.
git clone https://github.com/muratdemirtas/MT7601u.git cd mt7601u/ sudo cp -v /lib/modules/$(uname -r)/build/Module.symvers src/os/linux sudo make clean && make all && make install sudo rm -rvf src/os/linux/Module.symvers sudo ifconfig wlan0 down sudo rmmod mt7601u sudo ifconfig ra0 up sudo ifconfig ra0 192.168.42.1 sudo iptables -F sudo sh -c "echo 1 > /proc/sys/net/ipv4/ip_forward " sudo iptables -t nat -A POSTROUTING -o eth0 -j MASQUERADE sudo iptables -A FORWARD -i eth0 -o ra0 -m state --state RELATED,ESTABLISHED -j ACCEPT sudo iptables -A FORWARD -i ra0 -o eth0 -j ACCEPT sudo iptables -t nat -S sudo service isc-dhcp-server restart if you receive «Makefile:387: recipe for target ‘LINUX’ failed». You need to get Raspberry Pi linux headers using rpi-source.
sudo wget https://raw.githubusercontent.com/notro/rpi-source/master/rpi-source -O /usr/bin/rpi-source sudo chmod +x /usr/bin/rpi-source /usr/bin/rpi-source -q --tag-update sudo rpi-source About
Ubuntu and Embedded Linux(Raspberry Pi, Banana Pi etc.) drivers for MediaTek MT7601u Wireless Chipset. Support Access Point(AP) and Station Mode(STA). Tested on 32-64 Bit Ubuntu and Raspberry Pi 2 with all kernels since v4.0.0+. You can use this driver for internet sharing(hotspot), robotic, file transfer or ssh.
MediaTek MT7601 Wireless Adapter Driver/Utility 5.1.25.0/1.5.39.173
This package contains the files needed for installing the MediaTek MT7601 Wireless Adapter Driver and Utility. If it has been installed, updating (overwrite-installing) may fix problems, add new functions, or expand existing ones. Even though other OSes might be compatible as well, we do not recommend applying this release on platforms other than the ones specified.&
To install this package please do the following:& &
— Make sure that all system requirements are met.&
— Save the downloadable package on an accessible location (such as your desktop).&
— Locate and double-click on the newly-downloaded file.&
— Allow Windows to run the file (if necessary).&
— Read EULA (End User License Agreement) and agree to proceed with the installation process.&
— Follow the on-screen instructions.&
— Close the wizard and perform a system reboot to allow changes to take effect.&
&
About USB Network Adapter:& &
When connected, the operating system usually installs a generic driver that helps the computer to recognize the newly attached device.&
&
However, proper software must be applied if you want to make use of all features that the network adapter has available. This task also allows computers to properly recognize all device characteristics such as manufacturer, chipset, technology, and others.&
&
Updating the adapter’s drivers and utilities version might improve overall performance and stability, increase transfer speeds, fix different compatibility problems and several network-related errors, as well as bring various other changes.&
&
To install this release, simply get the package, extract it if necessary, run the setup, and follow the instructions displayed on-screen. When done, don’t forget to perform a system restart and reconnect the network adapter to make sure that all changes take effect properly.&
&
Without further ado, if you intend to apply this version, click the download button and install the package. Moreover, check with our website as often as possible so that you don’t miss a single new release.&