- Mikrotik and LTE via Android
- Background
- Goal
- Prerequisites
- 0. Ensure your Android device can connect to the Internet
- 1. Plug your phone into the router’s USB port
- 2. Enable USB tethering on your Android device
- 3. Check the LTE interface / USB device
- 4. Enable a DHCP client
- 5. Check your route table
- 6. Tweak firewall rules
- 8. Test on the router
- 9. Connect devices and use the Internet!
- Conclusion
- Mikrotik в качестве Wi-Fi клиента
- Микротик раздать интернет с телефона
- Раздать интернет с телефона на MikroTik
Mikrotik and LTE via Android
Use an old Android device for 4G / LTE Internet on a Mikrotik router.
Background
Each year, we go on a family holiday. The place we stay has no Internet (shocking, I know).
Over the last few years, this hasn’t been a big problem — just use our mobile devices, or just stay off the Internet for a week!
This year, the number of games which require some level of Internet connectivity has exceeded a critical point (basically all my son’s Lego games need to connect to a server to work — silly DRM). And, my son’s computer is a desktop with no WiFi device, so tethering is painful.
I decided I’d connect my old Galaxy Nexus Android phone to an old RB751U Mikrotik router, which was spare at work. This should give wired ethernet connectivity and Internet via 4G / LTE.
Goal
Configure a Mikrotik router to use 4G / LTE to access the Internet.
I’m not going to show any other configuration you may need for a Mikrotik device as a home router, but you’d need to do that as well.
I’m also assuming that the LTE will be the primary and sole Internet connection (no fail over, no duel connections).
Prerequisites
- An Android device, minimum version 4.4.4
- A Mikrotik router with USB port, minimum RouterOS version 6.7 (see supported hardware)
- Mobile broadband on your Android device
0. Ensure your Android device can connect to the Internet
It’s no good if your Android can’t connect to the Internet.
I’m using a pre-paid mobile broadband service from Vodafone Australia. Mostly because it was half price when I bought it.
I needed to go through the process of activating the service, and reboot my phone with the new SIM card.
If you’re using your main phone or tablet, this should already be working.
(Oh, and it’s worth disabling WiFi on your phone as well, as USB tethering will prefer WiFi over mobile broadband. Which causes confusion when testing).
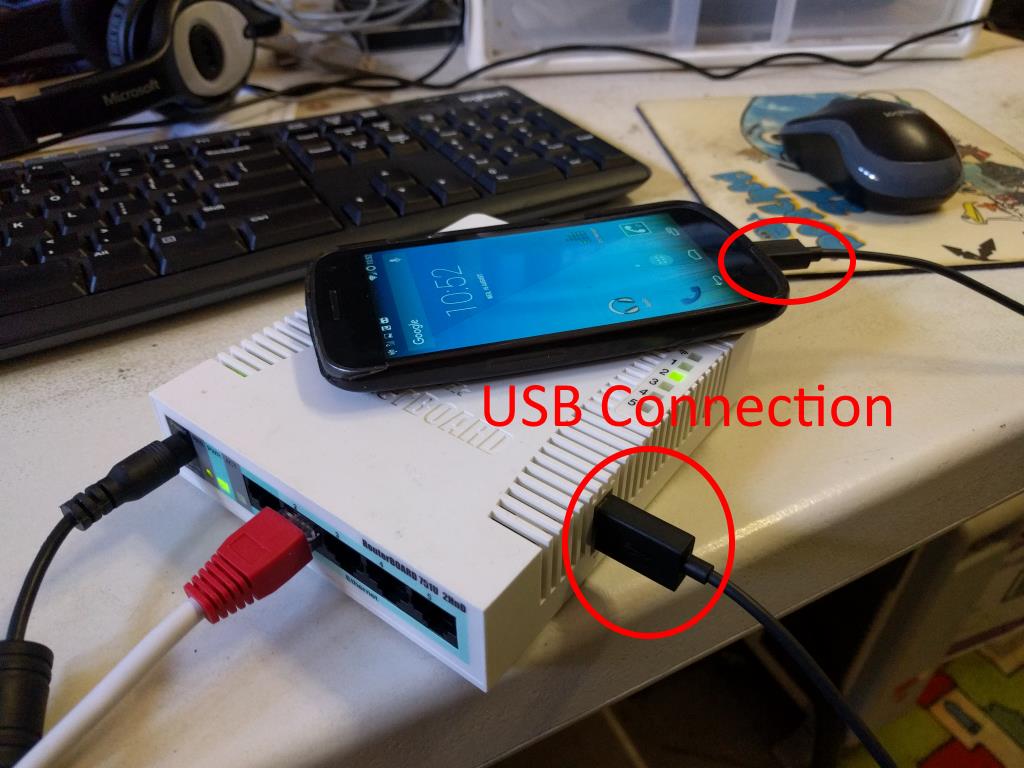
1. Plug your phone into the router’s USB port
The RB751U has a full sized USB port, so pretty much any phone USB cable will work. My main RB2011 device has a micro USB port, so I need an adapter cable.
2. Enable USB tethering on your Android device
Before the Mikrotik router will recognise your phone / tablet, you need to enable USB tethering.
My old Galaxy Nexus is using a Cyanogen Mod 4.4.4 Android, which has USB tethering under Settings -> More -> Tethering & portable hotspot -> USB tethering. Yours may be in a different location.
Important note: I haven’t been able to figure out how to automatically enable USB tethering on my Android device. This means when you reboot the router the Internet will not automatically come back up. You must manually enable USB tethering again.
This is fine for my scenario (a week long holiday), but would pose problems for a longer term connection.
3. Check the LTE interface / USB device
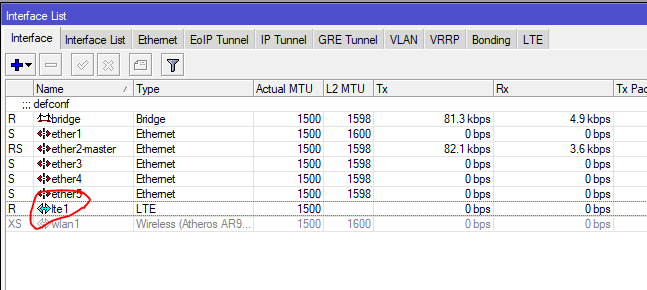
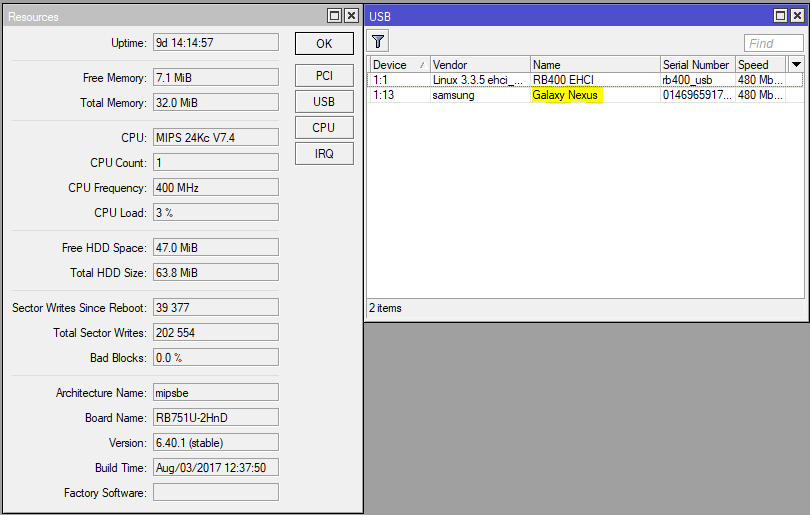
On your Mikrotik, you should see a new interface lte1 and a new USB device.
A list of connected USB devices can be found in System -> Resources -> USB.
4. Enable a DHCP client
Android USB tethering works by looking like a USB network device, which your router / computer connects to and gets access to the Internet via DHCP.
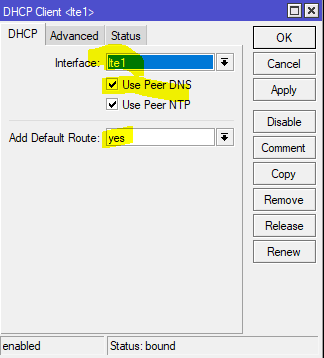
As with most things in Mikrotik, you need to explicitly add a DHCP client for your new 3G / LTE interface.
You should enable a default route and Use Peer DNS. Other settings aren’t particularly important.
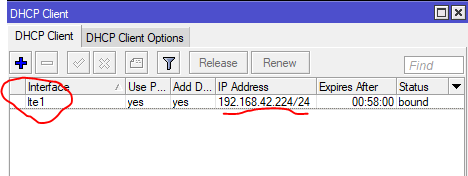
Its worth noting that there’s a double NAT going on here. The Android device is presenting a 192.168.42.xxx range to the router, and my Mikrotik is presenting the 10.46.10.xxx range to devices which connect to it. Each time, the devices will do a network address translation to make the Internet work.
This isn’t a problem for my scenario (downloading stuff, consuming content), but will pose problems if you’re trying to host a web server.
5. Check your route table
If all has gone well, you should see a new interface added which corresponds to the IP address in your DHCP client / LTE interface.
(Note: I’ve manually disabled a default route to my normal ADSL connection in this picture).

6. Tweak firewall rules
The default firewall rules assume the Internet is connected to the first ethernet port ( ether1 ). You’ll need to change those rules to use lte1 instead.
I also add a few passthrough firewall rules to track bandwidth usage (in Australia, mobile Internet is an order of magnitude more expensive than fixed line connections, per GB).
[admin@MikroTik] /ip firewall filter> print
Flags: X — disabled, I — invalid, D — dynamic
0 D ;;; special dummy rule to show fasttrack counters
chain=forward action=passthrough
1 ;;; Client Usage of LTE
chain=forward action=passthrough out-interface=lte1 log=no log-prefix=»»
2 chain=forward action=passthrough in-interface=lte1 log=no log-prefix=»»
3 ;;; Router usage of LTE
chain=output action=passthrough out-interface=lte1 log=no log-prefix=»»
4 chain=input action=passthrough in-interface=lte1 log=no log-prefix=»»
5 ;;; defconf: accept ICMP
chain=input action=accept protocol=icmp
6 ;;; defconf: accept established,related
chain=input action=accept connection-state=established,related
7 ;;; defconf: drop all from WAN
chain=input action=drop in-interface=lte1 log=no log-prefix=»»
8 ;;; defconf: fasttrack
chain=forward action=fasttrack-connection connection-state=established,related
9 ;;; defconf: accept established,related
chain=forward action=accept connection-state=established,related
10 ;;; defconf: drop invalid
chain=forward action=drop connection-state=invalid
11 ;;; defconf: drop all from WAN not DSTNATed
chain=forward action=drop connection-state=new connection-nat-state=!dstnat
in-interface=lte1 log=no log-prefix=»»
[admin@MikroTik] /ip firewall filter>
8. Test on the router
You can ping 8.8.8.8 from Tools -> Ping, and you should see the passthrough firewall rules tick up.
9. Connect devices and use the Internet!
At this point, all looks good, so connect a device and use the Internet!
First thing I do is a speed test. Mostly because its depressing how slow my ADSL is compared to LTE.
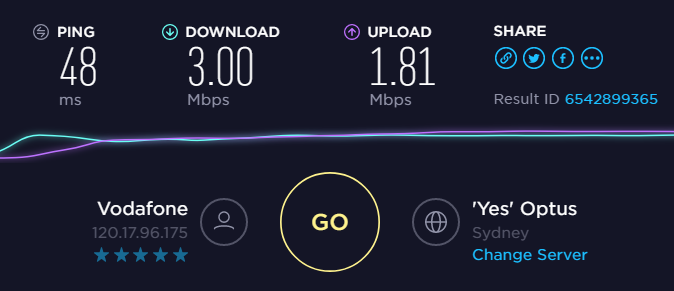
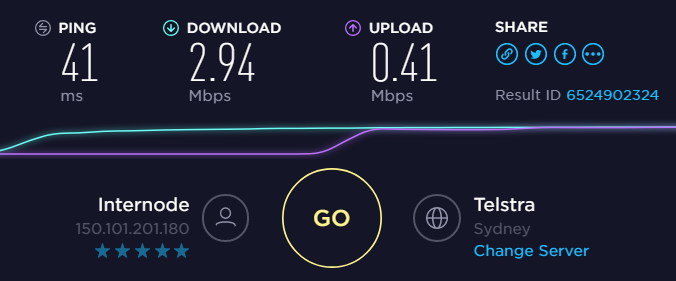
Although in this case, they’re both pretty ordinary. I guess I get what I pay for (cheapest mobile broadband and ~5 year old mobile device)!
Conclusion
Setting up a Mikrotik router to use an Android device is pretty straight forward. Nothing particularly special is needed for supporting Android phones.
The double NAT and manual enabling of USB tethering are handicaps, not severe enough for my use. If you want a more permanent LTE connection, check the Mikrotik list of supported hardware.
Mikrotik в качестве Wi-Fi клиента
Пожалуй, каждый рано или поздно сталкивается с ситуациями, когда либо интернет-провайдер осуществляет технические работы, либо на его линии возникают неполадки — и как итог домашний интернет перестает работать. На помощь в таком случае приходит мобильный интернет от сотового оператора. Все современные смартфоны поддерживают функционал «Точки доступа» — когда мобильное устройство может выступить в качестве точки доступа, а другие устройства — подключиться к нему обычным способом по wi-fi.
Но что делать, если на вашем компьютере нет wi-fi адаптера, и единственный вариант — подключение кабеля от вышестоящего роутера? С помощью этой инструкции вы сможете настроить mikrotik в режиме Wi-Fi клиента — чтобы это оборудование получало интернет со смартфона и раздавало его на все остальные устройства.
Если ваш микротик уже был настроен заранее — скорее всего на нем уже создан какой-либо бридж с собственной адресацией. По умолчанию это bridge (с адресацией 192.168.88.1/24). Адреса из прописанного пула будут получать все подключенные к интерфейсам данного бриджа устройства.
Далее нужно поднять интернет на самом микротике.
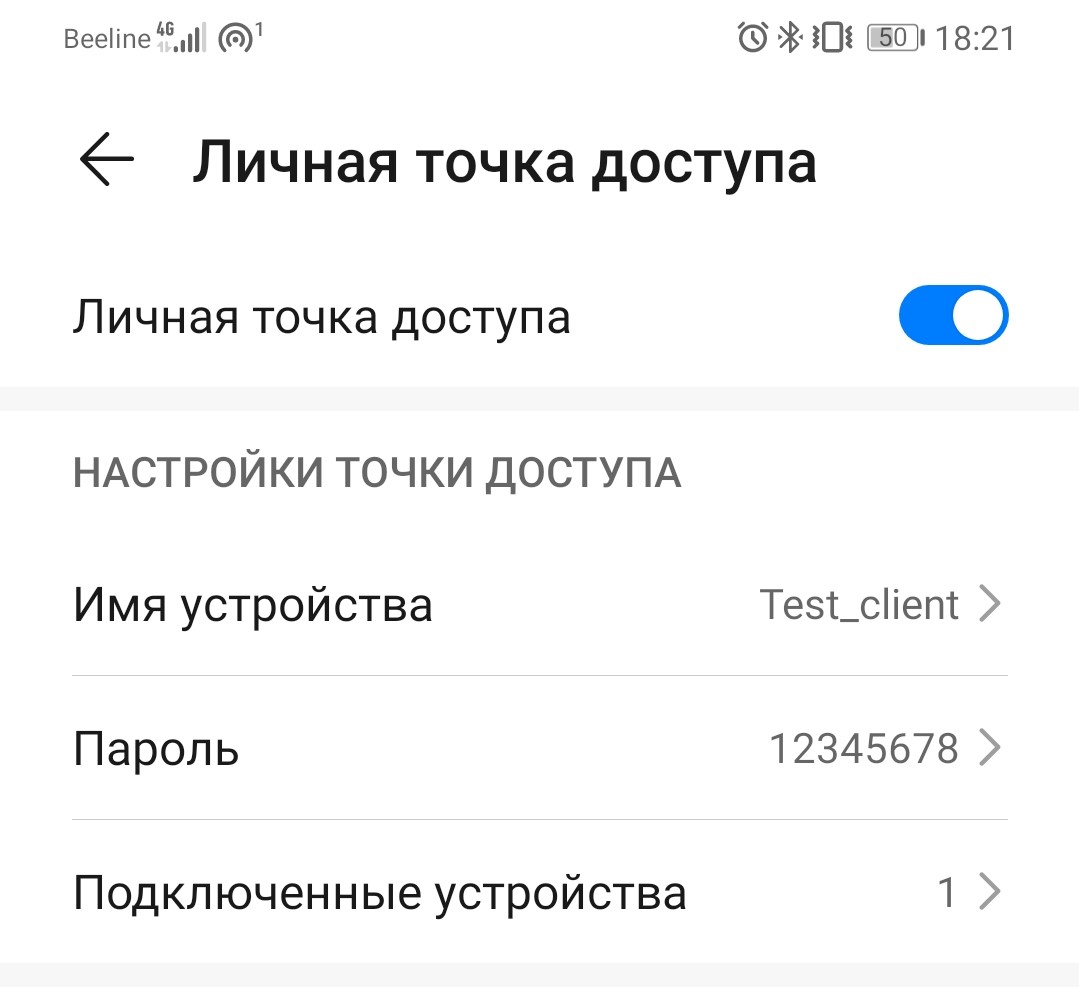
Зайдите на вашем смартфоне в настройки режима «Точка доступа / Мобильная точка доступа / Личная точка доступа» (на разных моделях устройств опция может отличаться). Пропишите желаемое название wi-fi сети и пароль (у нас — Test_client и 12345678 соответственно). Включите точку доступа.
Зайдите в настройки микротика, вкладка Wireless.
В меню Security Profiles создаем профиль, прописываем в нем пароль, который прописан на точке доступа смартфона.
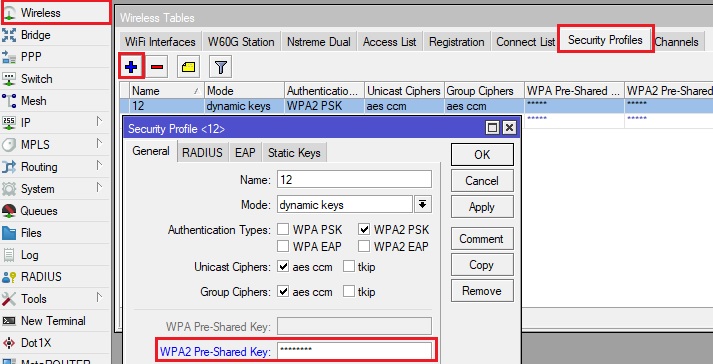
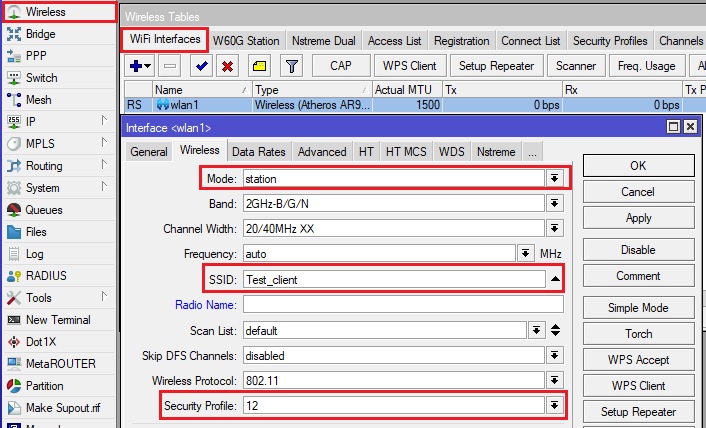
В меню WiFi Interfaces открываем wlan1, вкладка Wireless:
значение Mode — выставляем station.
значение SSID — идентичное точке доступа смартфона имя.
значение security profile — созданный ранее профиль с паролем.
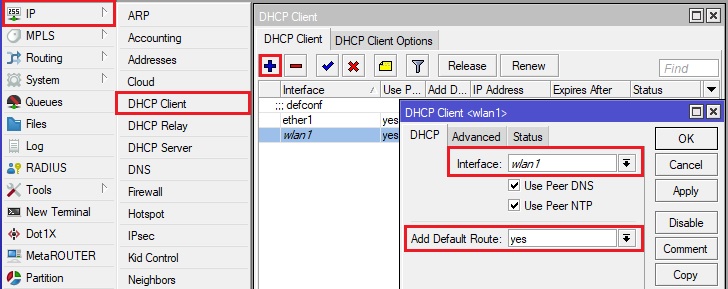
Далее остается лишь настроить раздачу интернета на микротик с вашей точки доступа.
В разделе IP -DHCP Client добавьте новый параметр: в качестве интерфейса выберите wlan1 (данный интерфейс не должен находиться в каком-либо бридже), в Add Default Route — yes.
Или же примените в New Terminal микротика скрипт:
/ip dhcp-client add interface=wlan1 disabled=no
Теперь при отключении проводного интернета, если на смартфоне включена настроенная точка доступа, микротик и все устройства, находящиеся за ним, будут выходить в интернет через нее.
Микротик раздать интернет с телефона
Обнаружена блокировка рекламы: Наш сайт существует благодаря показу онлайн-рекламы нашим посетителям. Пожалуйста, подумайте о поддержке нас, отключив блокировщик рекламы на нашем веб-сайте.
Раздать интернет с телефона на MikroTik
Правила форума
Как правильно оформить вопрос.
Прежде чем начать настройку роутера, представьте, как это работает. Попробуйте почитать статьи об устройстве интернет-сетей. Убедитесь, что всё, что Вы задумали выполнимо вообще и на данном оборудовании в частности.
Не нужно изначально строить Наполеоновских планов. Попробуйте настроить простейшую конфигурацию, а усложнения добавлять в случае успеха постепенно.
Пожалуйста, не игнорируйте правила русского языка. Отсутствие знаков препинания и неграмотность автора топика для многих гуру достаточный повод проигнорировать топик вообще.
1. Назовите технологию подключения (динамический DHCP, L2TP, PPTP или что-то иное)
2. Изучите темку «Действия до настройки роутера».
viewtopic.php?f=15&t=2083
3. Настройте согласно выбранного Вами мануала
4. Дочитайте мануал до конца и без пропусков, в 70% случаев люди просто не до конца читают статью и пропускают важные моменты.
5. Если не получается, в Winbox открываем терминал и вбиваем там /export hide-sensitive. Результат в топик под кат, интимные подробности типа личных IP изменить на другие, пароль забить звездочками.
6. Нарисуйте Вашу сеть, рисунок (схему) сюда. На словах может быть одно, в действительности другое.
Всем привет.
Не до конца понимаю как это можно реализовать, но хочу попробовать. Это очень важно в моей работе.
В общем, есть Микротик RBcAP2nd
Есть несколько устройств, которые должны одновременно быть в сети (Цифровой микшер — по проводу, который управляется по WiFi, планшет, который управляет им, ноутбук , artNet — протокол управления световым оборудованием, и периодически другие устройства) и вместе с этим периодически с телефона необходимо раздавать интернет.
Пока в голове есть только один вариант.
Создать виртуальный wLan, с которого присоединиться к точке доступа телефона, эту сеть транслировать в wLan и ether1.
Пробовал как написал, но что-то не получается.
Подскажите, пожалуйста как можно решить вопрос
Буду благодарен
