- Создаем свой сервер на системе Ubuntu [Guide]
- How to Set Up a Dedicated Minecraft Server on Linux
- The Benefits of Having a Dedicated Server for Minecraft
- Setting up a Dedicated Minecraft Server
- Step 1: Connect to Your Hosting Via SSH
- Step 2: Install Java
- Install Java on Ubuntu
- Install Java on CentOS
- Step 3: Install Screen
- Step 4: Create a Directory for Minecraft Files
- Step 5: Download the Required Configuration Files
- Step 6: Accept Minecraft’s EULA
- Step 7: Run Screen
- Step 8: Run Your Minecraft Server
- Step 9: Configure Firewall
- Step 10: Point a Domain at Your Minecraft Server
Создаем свой сервер на системе Ubuntu [Guide]
![Создаем свой сервер на системе Ubuntu [Guide]](https://ru-minecraft.ru/uploads/posts/2017-11/medium/1511725181_sozdaem-svoy-server-na-sisteme-ubuntu.jpg)
M inecraft — одна из самых популярных сетевых игры нашего времени. Вот уже пятый год она объединяет миллионы игроков по всему миру. В этом руководстве мы рассмотрим установку сервера Minecraft и его базовую настройку в ОС Ubuntu 16.04.
- Сервер с установленной системой Ubuntu 16.04;
- Рекомендуемая емкость оперативной памяти сервера— 1Gb;
- Пользователь с sudo-привилегиями.
Для запуска сервера нам потребуется пакет Java. Если он у вас уже установлен, можете пропустить данный раздел.
Для начала обновим список пакетов:
Далее обновим пакеты по последних версий:
Если в ходе обновления появится подобное сообщение, просто нажмите Y -> enter.
After this operation, 3,435 kB of additional disk space will be used.
Do you want to continue? [Y/n] Y
Далее установим сам пакет Java:
Установка Screen и создание системного пользователя
Screen — это приложение для работы с несколькими терминалами в одном окне. Оно даст возможность запускать Minecraft в режиме демона.
Создадим репозиторий, где будет храниться Minecraft и его всевозможные настройки:
Добавим нового пользователя:
—home /srv/minecraft — параметр обозначающий домашнюю папку пользователя
—ingroup minecraft — параметр на добавление пользователя в группу minecraft
Установка Minecraft сервера
Перейдем в созданный репозиторий:
Ссылку на последнюю версию вы всегда можете получить на официальном сайте.
ВАЖНО: 1.10.2 Меняете на свою версию.
У нас имеется только 1Gb памяти. Поэтому мы укажем максимальное значение 700Mb (-Xmx700M). Первый параметр указывает начальное значение используемой памяти 256Mb (-Xms256M).
При запуске вы увидите следующее сообщение:
[16:44:56] [Server thread/INFO]: Starting minecraft server version 1.10.2
[16:44:56] [Server thread/INFO]: Loading properties
[16:44:56] [Server thread/WARN]: server.properties does not exist
[16:44:56] [Server thread/INFO]: Generating new properties file
[16:44:56] [Server thread/WARN]: Failed to load eula.txt
[16:44:56] [Server thread/INFO]: You need to agree to the EULA in order to run the server. Go to eula.txt for more info.
[16:44:56] [Server thread/INFO]: Stopping server
[16:44:56] [Server Shutdown Thread/INFO]: Stopping server
Сервер не запустится, но он создаст два файла: eula.txt и server.properties.
Первое хранит согласие на лицензионное соглашение, второй— настройки самого сервера Minecraft.
Откроем файл eula.txt (nano eula.txt) и изменим значение единственной переменной с false на true.
С полным текстом лицензионного соглашения можно ознакомиться здесь.
После этого еще раз запустим сервер:
Процесс генерации ландшафта займет около 30 секунд, после чего будет выведено следующее сообщение:
[16:56:51] [Server thread/INFO]: Preparing spawn area: 62%
[16:56:52] [Server thread/INFO]: Preparing spawn area: 66%
[16:56:53] [Server thread/INFO]: Preparing spawn area: 71%
[16:56:54] [Server thread/INFO]: Preparing spawn area: 76%
[16:56:55] [Server thread/INFO]: Preparing spawn area: 82%
[16:56:56] [Server thread/INFO]: Preparing spawn area: 87%
[16:56:57] [Server thread/INFO]: Preparing spawn area: 92%
[16:56:58] [Server thread/INFO]: Preparing spawn area: 97%
[16:56:58] [Server thread/INFO]: Done (27.145s)! For help, type «help» or «?»
Остановим его с помощью команду stop.
Данный инструмент можно сравнить с вкладками в браузере. Он позволяет создать их в любом количестве и запускать необходимые нам команды параллельно.
Запустим новый терминал в screen с нашим сервером:
После этого вы увидите стандартное сообщение о генерации ландшафта. Далее вы можете выйти из данного терминала, нажав (Ctrl + d -> a). Minecraft продолжит работать в режиме демона, а вы можете выйти из сервера.
Вернуться назад к управлению Minecraft можно с помощью команды:
How to Set Up a Dedicated Minecraft Server on Linux
The ability to build and improve your gaming experience depends on the backend infrastructure of your server. Dedicated servers have advanced performance potential making them an efficient platform for gaming workloads.
Minecraft dedicated servers are the ideal option for online Minecraft gaming.
In this tutorial, you will learn why and how to set up a dedicated Minecraft server.
- Access to a command line/terminal
- A dedicated game server
- At least 5GB of RAM
- Intel core-based CPUs or AMD K8-based CPUs IBM 970 2.0 GHz
and better
The Benefits of Having a Dedicated Server for Minecraft
With a dedicated Minecraft server, you are the sole user of the server resources. Therefore, you can expect more processing, memory, and storage capabilities to handle demanding workloads better.
The main advantages of setting up a Minecraft server with dedicated resources include:
- Improved performance.
- Full use of resources and bandwidth.
- Control over mods and plugins.
- Better security and privacy.
For more information about having such a setup, check out our dedicated game servers.
Note: To learn more about how dedicated gaming servers work and how to choose a provider, refer to our article What Is a Dedicated Server for Gaming?
Setting up a Dedicated Minecraft Server
Step 1: Connect to Your Hosting Via SSH
The first step is to connect to your dedicated server.
1. Open the SSH terminal on your local machine and run the following command:
ssh your_username@host_ip_address2. Type in your password and hit Enter.
If you are connecting to the server for the first time, you need to confirm you want to continue connecting. Type yes and hit Enter.
You should now be connected to your dedicated server.
Step 2: Install Java
Once you are connected to the dedicated server, move on to installing Java.
We are going to set up the Java Development Kit (Open JDK), an open-source implementation of the Java platform.
The installation steps differ slightly depending on the Linux distribution running on your server.
Install Java on Ubuntu
1. Update the repository to ensure you download the latest version of OpenJDK:
2. Then, run the command to install the latest Java Development Kit:
sudo apt install default-jdk3. Confirm the installation by typing y (yes) and press Enter.
4. Verify Java is installed on your Ubuntu server by running:
The output should respond with the version of OpenJDK installed on the system.

For a detailed installation guide for Ubuntu, refer to How to Install Java on Ubuntu.
Install Java on CentOS
1. Start by updating the package repository:
2. Then, install the Java Development Kit with:
sudo yum install java-11-openjdk-devel3. The output should display it has successfully installed Java on the system. To confirm, you can check the Java version:

For a detailed installation guide for CentOS, refer to How To Install Java 11 & 12 On CentOS.
Step 3: Install Screen
Screen is a console application that keeps your server running when you’re not connected.
Step 4: Create a Directory for Minecraft Files
1. Create a minecraft directory where you will store the Minecraft files:
2. Then, move into the new directory with:
Step 5: Download the Required Configuration Files
1. Navigate to the Minecraft download page, right-click on the minecraft-server release and copy the link location.
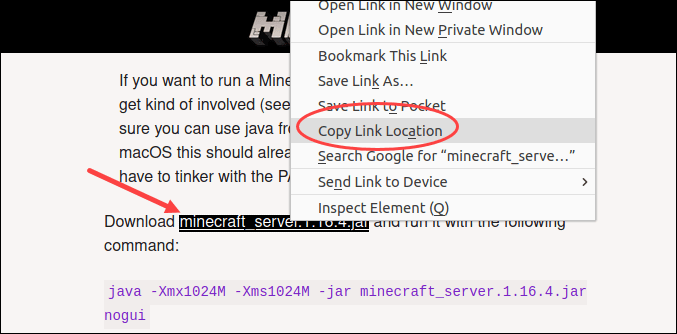
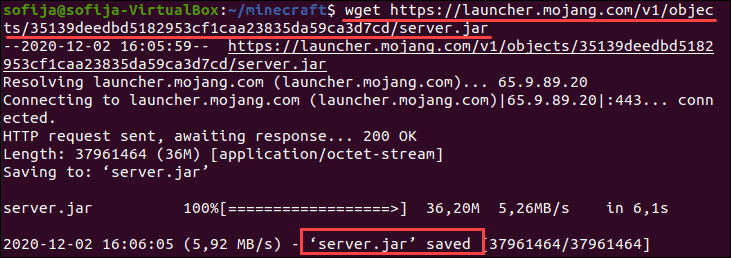
2. Next, download the Minecraft server files using the wget command. Paste the link location copied in the previous step:
wget https://launcher.mojang.com/v1/objects/35139deedbd5182953cf1caa23835da59ca3d7cd/server.jarThe output informs you it has downloaded the Minecraft server files and saved them under the name server.jar.
3. Rename the server.jar file so it matches the name of the Minecraft edition downloaded. At the time of writing, the latest Minecraft server release is 1.16.4. Therefore, we used the following command to rename the server.jar file into minecraft_server.1.16.4.jar:
mv server.jar minecraft_server.1.16.4.jar4. Next, execute the following command:
java -Xmx1024M -Xms1024M -jar minecraft_server.1.16.4.jar noguiThe output responds with an error informing you that you need to agree with the EULA (End User License Agreement) to run the service. Move on to the next step to do so.

Step 6: Accept Minecraft’s EULA
1. List the contents of the /minecraft directory to verify you have the eula.txt file:

3. The file contains a URL that takes you to the Minecraft end user license agreement. Navigate to the web page and read through the license agreement.
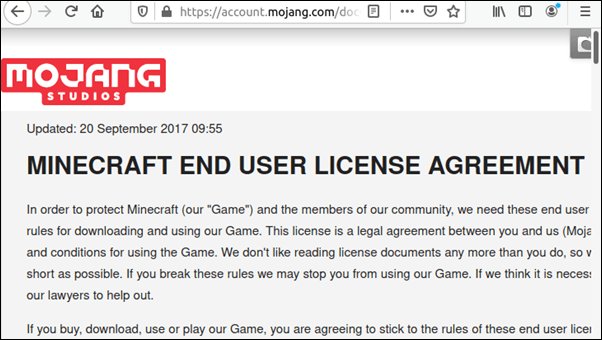
4. If you agree with the terms, return to the terminal window and modify the eula.txt file. Change the line eula=false into eula=true .

5. Save the changes (CTRL+O) and exit the text editor (CTRL+X).
Step 7: Run Screen
Start a Screen session using the screen command and add the -S option to name the session:
screen -S "Minecraft server"Step 8: Run Your Minecraft Server
1. Try starting the Minecraft server again by rerunning the java command to executing the jar file:
java -Xmx1024M -Xms1024M -jar minecraft_server.1.16.4.jar noguiWait for the system to finish executing. You should get a message that the process is Done! , meaning that the Minecraft server is up and running.
2. You can now detach from the Minecraft screen by pressing Ctrl+a+d.
3. To reattach to the screen, press Ctrl+r.
Note: To make changes to the default configuration, refer to the server.properties file stored in the /minecraft directory.
Step 9: Configure Firewall
To allow incoming connections from Minecraft, you need to edit the firewall configuration. By default, Minecraft uses port 25565.
The following command enables port forwarding for ufw:
CentOS 6.X and older comes with iptables by default. The commands to enable port forwarding for iptables are:
iptables -I INPUT -p tcp --dport 25565 -j ACCEPTiptables-save >/etc/sysconfig/iptablesCentOS 7.X and newer comes with firewalld by default. The following commands enables port forwarding for firewalld:
firewall-cmd --permanent --add-port=25565/tcpStep 10: Point a Domain at Your Minecraft Server
You can point a domain at your Minecraft server by updating the domain’s DNS records. Add an “A” record for your domain with the following values:
Bear in mind, it can take up to 24 hours to carry out the DNS changes.
After reading this article, you should have successfully set up a dedicated Linux Minecraft server. Now you can enjoy all the benefits of having complete control over hardware resources while gaming.
Before opting for a dedicated game server, learn more about the benefits dedicated servers deliver to end users.
Sofija Simic is an experienced Technical Writer. Alongside her educational background in teaching and writing, she has had a lifelong passion for information technology. She is committed to unscrambling confusing IT concepts and streamlining intricate software installations.
Fix SSH connection refused by troubleshooting some of the common causes for this problem. Take a look of all.
This article talks about the available billing models for Bare Metal Cloud servers. Here, you will also learn..
This article provides answers to everything you wanted to know about Bare Metal Cloud and how it compares to.
Speed up connecting to remote servers by enabling passwordless SSH login via public key authentication. In.