Modify The Linux Kernel
For the 3 rd task (this task) in The Eudyptula Challenge, we continue our work from the last challenge, compiling the absolute latest Linux Kernel from the source code. This time we focus on modifying the Makefiles and .config files that help us compile the kernel.
Before we begin, if you wish to work on The Eudyptula Challenge yourself before you read my notes (recommended), you can use my git repository, which has all 20 tasks and the code I used to complete each one.
Task No.3
- take the kernel git tree from Task 02 and modify the Makefile to and modify the EXTRAVERSION field. Do this in a way that the running kernel (after modifying the Makefile, rebuilding, and rebooting) has the characters «-eudyptula» in the version string.
- show proof of booting this kernel. Extra cookies for you by providing creative examples, especially if done in interpretive dance at your local pub.
- Send a patch that shows the Makefile modified. Do this in a manner that would be acceptable for merging in the kernel source tree. (Hint, read the file Documentation/SubmittingPatches and follow the steps there.)
Depending on how literally we interpret «modifying the Makefile», there are multiple ways we can accomplish this challenge. One of which we briefly talked about in the last challenge was to override variables in our make command when compiling the kernel.
Override Directives
Just like with a lot of userspace projects, the Linux kernel uses GNU make to compile the various files into its final form. This means we can use make’s ability to pass variable assignments as command line arguments.
From Chapter 6 of make’s documentation, if we use a command line argument to set the EXTRAVERSION variable, then all other assignments to EXTRAVERSION within the Makefile will be ignored. For example, we can override EXTRAVERSION by using a make command like this:
$ make -j `getconf _NPROCESSORS_ONLN` EXTRAVERSION=-eudyptula
This will force make to set EXTRAVERSION to -eudyptula and ignore the value set in the kernel’s Makefile, accomplishing our task for The Little Penguin.
Modify the Makefile
Our second option, if you want to take «modifying the Makefile» literally, is to do exactly that.
Simply open the kernel’s Makefile, located in the root directory in the source code we copied from Linus in the last challenge, with your favorite text editor. The first five lines will have EXTRAVERSION somewhere in it. Change the value to -eudyptula and save.
-EXTRAVERSION = -rc1 +EXTRAVERSION = -eudyptula
Now that the kernel’s Makefile will append -eudyptula to the kernel’s version string by default, we can simplify our make command to build the kernel into:
$ make -j `getconf _NPROCESSORS_ONLN`
Modify menuconfig
Our third option and arguably the least accurate of the three ways to interpret «modifying the Makefile» is to use the ncurses configuration tool that we briefly talked about in the last challenge. I say this is the least accurate because this method modifies the CONFIG_LOCALVERSION variable and not the EXTRAVERSION variable, which will add -eudyptula to our kernel’s version string, however not technically in the correct place.
We can start the ncurses menu with the following terminal command:
where you should see a screen that looks something like this:

From here, navigate to the General setup option and press ENTER to move into the next menu. Next, use the arrow keys to highlight the Local version option and press ENTER. A new menu will appear letting you enter a value.
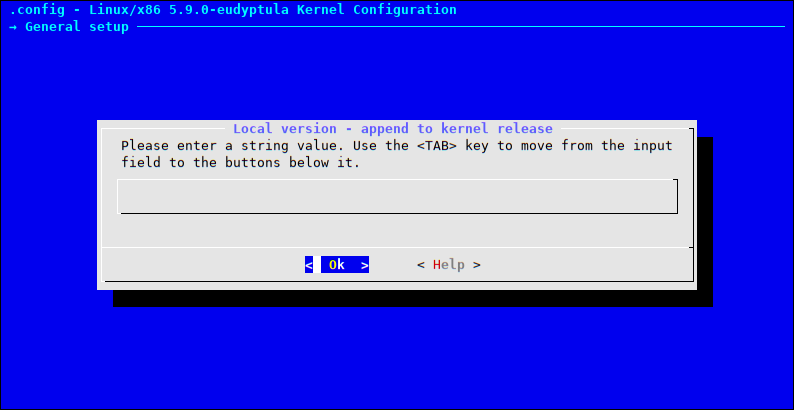
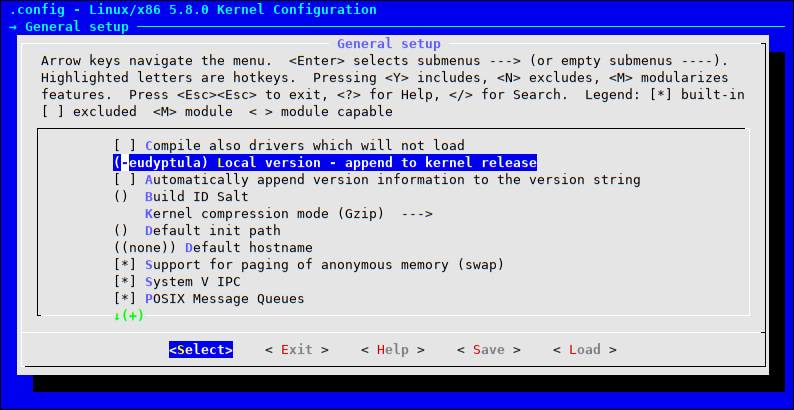
Type in -eudyptula and press TAB to move our cursor to the option and press ENTER to return back to the General setup menu. If everything went according to plan you should see «-eudyptula» set in the Local version menu:
From here, press TAB a few more times to move our cursor to highlight the option at the bottom. Then press ENTER to save the changes we made to our .config file.
After we’ve saved our changes press TAB a couple more times to highlight the option and ENTER to exit the ncurses menu.
Finally, with the changes to our .config file saved, we can re-compile our kernel with the same simpified command from above:
$ make -j `getconf _NPROCESSORS_ONLN`
If you wish to contact me, spam@bryanbrattlof.com is not the address to use.
Customizing the Linux kernel
This tutorial shows how to download, patch, modify and update the Linux kernel in the existing system on VisionSOM module. It was tested on the PC with Ubuntu 18.04 host system.
Downloading toolchain
For the kernel compilation we need an appropriate compiler that will generate kernel image for the ARM architecture. We will use the ready toolchain from Linaro. It can be download from the Linaro website using wget command:
wget https://releases.linaro.org/components/toolchain/binaries/7.4-2019.02/arm-linux-gnueabihf/gcc-linaro-7.4.1-2019.02-x86_64_arm-linux-gnueabihf.tar.xz
and extracted using tar:
tar -xf gcc-linaro-7.4.1-2019.02-x86_64_arm-linux-gnueabihf.tar.xz
Now the toolchain is ready to use.
Downloading the Linux kernel
The iMX6ULL processor is fully supported by the Linux kernel version maintained by the NXP company. We will use the kernel released under version 5.4.24. The sources of the NXP kernel patched by SoMLabs can be downloaded from the Github repositories using git command:
git clone https://github.com/SoMLabs/somlabs-linux-imx.git linux-imx
The original NXP kernel is available in the repository (branch imx_5.4.24_2.1.0):
https://source.codeaurora.org/external/imx/linux-imx
Customizing the Linux kernel
The kernel configuration tools require two environmental variables describing the chosen architecture and toolchain. We can set them in the current terminal with the following commands:
export ARCH=arm export CROSS_COMPILE=/gcc-linaro-7.4.1-2019.02-x86_64_arm-linux-gnueabihf/bin/arm-linux-gnueabihf-
Now we can create the default configuration from the SoMLabs kernel patch:
make visionsom_6ull_defconfig
This configuration may be used as a base for further customization. Alternatively one of the configuration files provided by NXP may also be used — they can be found in the arch/arm/configs/ directory.
To modify the kernel we can use some graphical tools. The examples are:
- make menuconfig — based on ncurses library
- make nconfig — based on ncurses library
- make xconfig — based on qt library
Each of these tools displays all of the possible configuration options of the kernel.
For example, in order to add the support for a luminosity sensor using the menuconfig tool we need to go to Device Drivers > Industrial I/O support > Light sensors section and select one of the supported devices (pressing Y adds the driver to kernel, M configures it as a kernel module, N removes the driver):
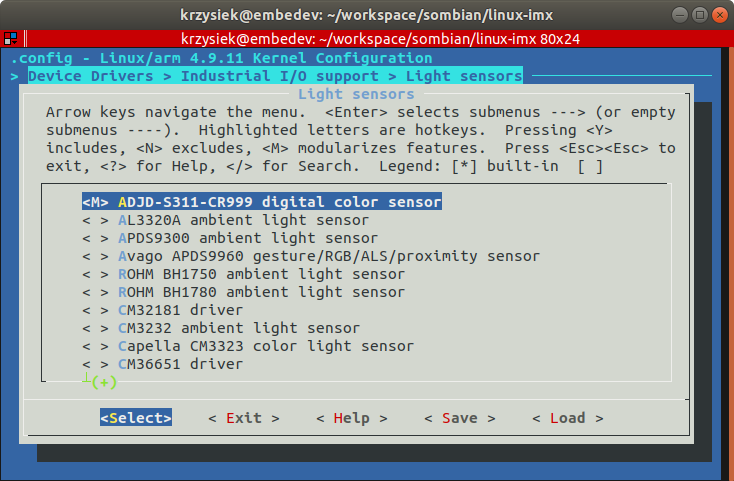
After all changes the we need to save them and the selected tool will generate a new configuration file (.config in the kernel source directory).
Building the Linux kernel
When the configuration is ready, the kernel can be built using the command:
called from the base kernel directory. It is important to remember also about the ARCH and CROSS_COMPILE variables:
export ARCH=arm export CROSS_COMPILE=/gcc-linaro-7.4.1-2019.02-x86_64_arm-linux-gnueabihf/bin/arm-linux-gnueabihf-
In order to compile the kernel in multi-core environment, the -j option can be added to define the number of cores for the compilation, for example:
This command will build the entire kernel, modules and the device tree. it is also possible to build selected parts by choosing one or more targets:
- zImage — kernel image
- modules — kernel modules
- dtbs — device tree
The new kernel image is located in the arch/arm/boot/zImage file and the device tree blobs can be found in the arch/arm/boot/dts/ directory. For the VisionCB-STD-6ULL there are four hardware configurations available:
- visioncb-6ull-std-sd.dtb — for SD card module version without wireless modem
- visioncb-6ull-std-sd-btwifi.dtb — for SD card module version with wireless modem
- visioncb-6ull-std-emmc.dtb — for eMMC card module version without wireless modem
- visioncb-6ull-std-sd-btwifi.dtb — for eMMC card module version with wireless modem
Finally the modules can be installed using the following command:
make modules_install INSTALL_MOD_PATH=
We need to specify the installation path of the modules in place of MODULES_INSTALL_PATH. It can be any local directory — all modules will be collected from the kernel source directory and copied there.
If we need the kernel headers we can collect them in a similar way:
make headers_install INSTALL_HDR_PATH=
Installing new Linux kernel
Now, when we have all kernel components we can install the to our VisionSOM system. The original kernel (zImage) and the device tree files (*.dtb) are located in the /boot directory on SD card or eMMC memory, so we can just backup the old versions and replace them. If the /boot directory is empty we need to mount the boot partition using the command:
The built device tree files should be renamed according to the original ones recognized by u-boot:
The kernel modules needs to be copied to the /lib/modules directory and the headers to /usr/include.
Mozilla Cavendish Theme based on Cavendish style by Gabriel Wicke modified by DaSch for the Web Community Wiki
github Projectpage – Report Bug – Skin-Version: 2.3.5