- Как перевести адаптер в режим монитора WiFi на Kali Linux
- Режимы монитора WiFi-адаптера на Kali Linux
- Режим монитора WiFi-адаптера вручную на Kali Linux
- Capture wireless packets in monitor mode in Linux
- Check if your Linux OS supports monitor mode
- Setup new wireless interface in monitor mode
- Create new wireless interface in monitor mode
- Set the channel frequency for the mon0
- Use wireshark to capture wifi traffic
- Restore your original wireless interface
- Three ways to set wireless interface to Monitor mode and Managed mode
- 1. How to enable monitor mode using iw
- 2. How to enable monitor mode using Airmon-ng
- 3. How to enable monitor mode using iwconfig
- NetworkManager prevents monitor mode
- Related articles:
Как перевести адаптер в режим монитора WiFi на Kali Linux
Я уже рассказывал, как работать с TP-Link WN722N в режиме монитора. Сегодня продолжу эту тему и покажу, как перевести любой адаптер в режим монитора Wi-Fi. Мы рассмотрим два способа: ручной и с помощью Aircrack-ng.
Режимы монитора WiFi-адаптера на Kali Linux
Давайте рассмотрим режимы WiFi-адаптеров в Kali Linux:
- Управляемый (Managed): этот режим работает по умолчанию для всех беспроводных сетевых адаптеров. Режим позволяет системе, такой как Kali Linux, подключаться к точке доступа или роутеру, но не может выполнять тестирование на проникновение.
- Монитор (Monitor) позволяет этичным хакерам выполнять тестированию на проникновение путем сканирования Wi-Fi и внедрения (инжект) пакетов.
- Мастер (Master) позволяет системам на базе Linux работать в качестве точек доступа или беспроводных маршрутизаторов.
- Ad hoc позволяет системе напрямую подключаться к другой системе без необходимости использования точки доступа или беспроводного маршрутизатора.
- Ретранслятор (Repeater) позволяет главному устройству просто принимать входящий сигнал и воспроизводить его для других клиентов в сети. Ретранслятор обычно используются для расширения зоны покрытия WiFi.
- Вторичный (Secondary) позволяет хосту работать в качестве резервного устройства для главной системы или ретранслятора.
Теперь, когда мы разобрались с режимами работы адаптера, давайте взглянем на настройку, включение и отключение режима монитора на Kali Linux.
Режим монитора WiFi-адаптера вручную на Kali Linux
Итак, далее покажу, как проверить состояние интефейса, включит или отключить режим монитора Kali Linux. Я буду работать с популярным WiFi-адаптером Alfa AWUS036NHA и Kali Linux на VirtualBox.
Подключите адаптер Alfa к VirtualBox и запустите систему Kali Linux.
Убедитесь, что адаптер Wi-Fi обнаружен в Kali Linux:

Адаптер был обнаружен как wlan0 и в настоящее время находится в режиме Управляемый (Managed).
Отключите беспроводной интерфейс:
Переведите режим интерфейса в режим монитора:
Capture wireless packets in monitor mode in Linux
In this tutorial, I will be showing how to setup a wireless interface in monitor mode and how to capture wireless network traffic using wireshark.
I have been using Kubuntu Linux system to demonstrate this tutorial. This tutorial can be adapted to other Linux based distributions easily.
Check if your Linux OS supports monitor mode
Most, if not all, of the the modern wifi adapters shipping with laptops/desktops support capturing wireless traffic in monitor mode. If you need cheap and best option, you could choose Raspberry Pi 3B+ or Raspberry Pi 4B. Both SBCs support capturing in monitor mode through their Broadcom chipsets.
To check if your Linux kernel driver supports monitor mode, use the following command.
iw list | grep -i "supported interface modes" -A 20 | grep "* monitor" If you don’t get any output, either your wifi chipset or the wifi driver doesn’t support monitoring wifi. Mostly it would be latter case. Note that for Raspberry Pi devices, you might need to install Kali Linux. It’s an Ubuntu based system customized for most networking related tasks.
Setup new wireless interface in monitor mode
Even though, it’s possible to use the existing wireless interface (in my case it is wlp2s0), the Ubuntu system reverting the interface back from monitor mode to managed mode. So I thought of deleting it and creating a new interface for monitoring purpose. You could restore your original wireless interface back using the commands mention here. Please note down your wifi interface name using ip link command. It looks like wlp2s0 or wlan0.
Create new wireless interface in monitor mode
Lets create a new interface called mon0, delete the existing interface and finally bring up the new interface up. Don’t forget to replace the interface name wlp2s0 with yours.
# Create new interface called mon0 sudo iw phy phy0 interface add mon0 type monitor sudo iw dev wlp2s0 del # Replace wlp2s0 with your interface name sudo ip link set mon0 up # Bring up the interface mon0 up You can check if your wireless interface mon0 is created successfully in monitor mode or not, using the following command.
The output would be similar to following
phy#0 Interface mon0 ifindex 6 wdev 0xa addr ad:ec:1c:aa:d3:c7 type monitor You could see one of the line as type monitor.
Set the channel frequency for the mon0
Obviously you are going to capture wireless traffic for certain channel. For ex: channel 44, 60, 112 etc. We need to set the respective channel frequency to be captured by mon0. You can find the frequency of certain channel from following table.
Now, set the channel frequency using the following command
sudo iw dev mon0 set freq For example if I want to capture wirless traffic on channel 44, from the above table, the channel frequency is 5220. So the command would be
sudo iw dev mon0 set freq 5220 Use wireshark to capture wifi traffic
Wireshark is a packet analyzer. We can select the specific interface, in this case mon0, and then start capturing. Run the following command in terminal to install wireshark.
sudo apt install wireshark When it prompts to select the installation for non-root users, select yes. You might need to run the following commands to make wireshark run properly.
sudo usermod -a -G wireshark $USER sudo adduser $USER wireshark Launch the wireshark form Application Launcher. It should show all the interfaces available in the system as shown in the below figure. If the interfaces are not showing up, then logout and logging into the system might be needed to take effect the above wireshark configuration. In that case, you might need to follow the tutorial from the start.

Select the interface to be captured (mon0) and start capturing the wireless traffic by clicking the blue button. Once you done with the capture, click on red button to stop the capture. Go to File -> Save as menu to save the capture.
Restore your original wireless interface
To restore your original interface and to delete the mon0 interface, run the following commands. Replace wlp2s0 with your original wifi interface noted at the starting of the tutorial.
sudo iw dev mon0 del sudo iw phy phy0 interface add wlp2s0 type managed Three ways to set wireless interface to Monitor mode and Managed mode
You can use the following command to set wireless interface to Monitor mode and Managed mode on any Linux distro. The only requirement is availability wireless adapter that supports monitor mode. This one is recommended.
1. How to enable monitor mode using iw
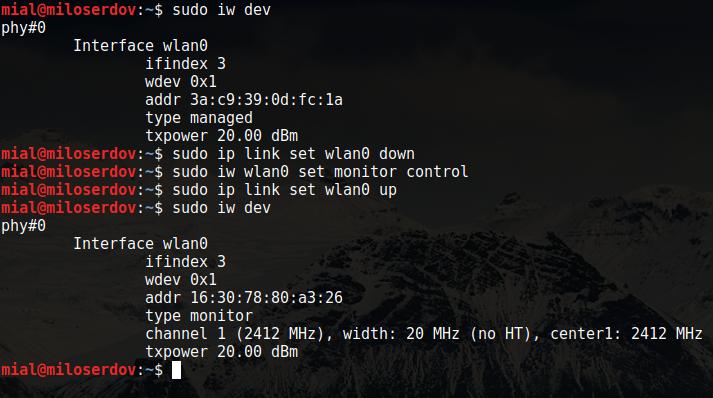
You should check whether the operating system is able to recognize your Wi-Fi card. In addition, you need to know the name of the wireless interface.
Get to know the wireless interface name:
phy#0 Interface wlan0 ifindex 3 wdev 0x1 addr 3a:c9:39:0d:fc:1a type managed txpower 20.00 dBm

As you can see, the name of my wireless interface is wlan0. In addition, you can see that it is in managed mode.
To set wireless interface to Monitor mode with iw you can use the following command sequence:
sudo ip link set IFACE down sudo iw IFACE set monitor control sudo ip link set IFACE up
Where IFACE replace with actual name of your wireless interface. In may example:
sudo ip link set wlan0 down sudo iw wlan0 set monitor control sudo ip link set wlan0 up
Then check the status of you wireless interface one more time:
sudo iw dev phy#0 Interface wlan0 ifindex 3 wdev 0x1 addr 16:30:78:80:a3:26 type monitor channel 1 (2412 MHz), width: 20 MHz (no HT), center1: 2412 MHz txpower 20.00 dBm
As you can see, now type monitor. Note: the name of interface is not changed by this method.
To return wireless interface in Managed mode with iw you can use the following command sequence:
sudo ip link set IFACE down sudo iw IFACE set type managed sudo ip link set IFACE up
Where IFACE replace with actual name of your wireless interface. In may example:
sudo ip link set wlan0 down sudo iw wlan0 set type managed sudo ip link set wlan0 up
2. How to enable monitor mode using Airmon-ng
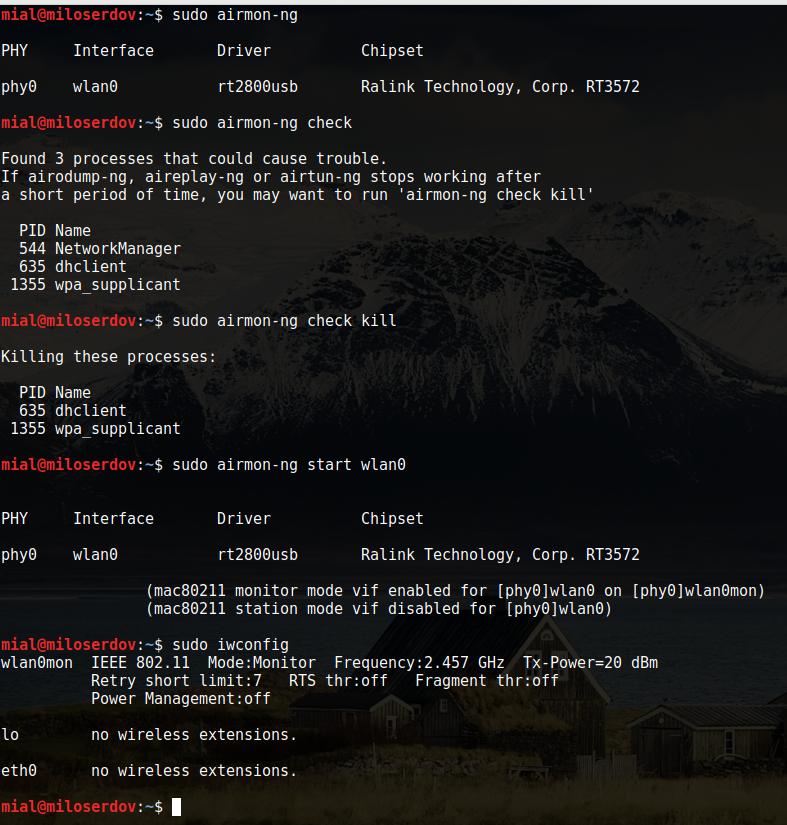
Again, we should get information about our wireless interface:
PHY Interface Driver Chipset phy0 wlan0 rt2800usb Ralink Technology, Corp. RT3572
The name of interface is wlan0.
Checking for interfering processes
Before putting a card into monitor mode, it will automatically check for interfering processes. It can also be done manually by running the following command:
This command stops network managers then kill interfering processes left:
At last, we start monitor mode:
sudo airmon-ng start wlan0 PHY Interface Driver Chipset phy0 wlan0 rt2800usb Ralink Technology, Corp. RT3572 (mac80211 monitor mode vif enabled for [phy0]wlan0 on [phy0]wlan0mon) (mac80211 station mode vif disabled for [phy0]wlan0)
As you can see, it created a monitor mode interface called wlan0mon.
sudo iwconfig wlan0mon IEEE 802.11 Mode:Monitor Frequency:2.457 GHz Tx-Power=20 dBm Retry short limit:7 RTS thr:off Fragment thr:off Power Management:off lo no wireless extensions. eth0 no wireless extensions.
Disable monitor mode
sudo airmon-ng stop wlan0mon PHY Interface Driver Chipset phy0 wlan0mon rt2800usb Ralink Technology, Corp. RT3572 (mac80211 station mode vif enabled on [phy0]wlan0) (mac80211 monitor mode vif disabled for [phy0]wlan0mon)
Don’t forget to restart the Network Manager. It is usually done with the following command:
sudo systemctl start NetworkManager
3. How to enable monitor mode using iwconfig
As usual, start from checking interface name:
sudo iwconfig lo no wireless extensions. eth0 no wireless extensions. wlan0 IEEE 802.11 ESSID:off/any Mode:Managed Access Point: Not-Associated Tx-Power=20 dBm Retry short limit:7 RTS thr:off Fragment thr:off Encryption key:off Power Management:off
The network interface with wireless extension is called wlan0.
sudo ifconfig IFACE down sudo iwconfig IFACE mode monitor sudo ifconfig IFACE up
sudo ifconfig wlan0 down sudo iwconfig wlan0 mode monitor sudo ifconfig wlan0 up
Disable monitor mode:
sudo ifconfig wlan0 down sudo iwconfig wlan0 mode managed sudo ifconfig wlan0 up
NetworkManager prevents monitor mode
If NetworkManager restarts automatically after each kill, and it pretends monitor mode, you can stop it manually:
In Kali Linux, BlackArch, Ubuntu, Linux Mint:
sudo systemctl stop NetworkManager
Note: when you stop NetworkManager, your Internet access disappears!