- Introduction
- Mounting ISO Files
- Manipulating Other Formats
- CloneCD/IMG Images
- CUE/BIN Images
- MDF Images
- NRG Images
- DMG Images
- Installation
- To Convert to IMG
- To Mount
- Creating the ISO
- Disc Image Integration for Nautilus
- Archive Mounter
- See Also
- Монтирование образов дисков
- Подключение стандартного ISO-образа
- Используя графический интерфейс
- Монтирование образа mdf linux
Introduction
For an introductory explanation of ISO images, instructions for creating and also burning them see IsoImage.
Mounting ISO Files
For instructions on how to mount an ISO, see MountIso.
Manipulating Other Formats
There are many other formats of archives that have been created over the years for numerous reasons. To mount them, it is usually necessary to convert them to ISO and then use your preferred means. Unless otherwise specified, these programs are available in the Universe repository and can be installed by numerous means. For convenience apturl links have been made, click the package names and they will install as long as the protocol is supported. None of these programs are installed by default.
The following exclusively deals with the command line.
CloneCD/IMG Images
ccd2iso /path/to/example.img /path/to/example.iso
sudo mount -o loop /path/to/example.iso /media/example
CUE/BIN Images
bchunk /path/to/example.bin /path/to/example.cue /path/to/example.iso
MDF Images
mdf2iso /path/to/example.mdf /path/to/example.iso
sudo mount -o loop=/dev/loop0 /path/to/example.iso /media/example
NRG Images
nrg2iso /path/to/example.nrg /path/to/example.iso
sudo mount -o loop,offset=307200 /path/to/example.nrg /media/example
DMG Images
DMG (.dmg) images are primarily used by Apple, conversion of these files will allow data to be accessed. It will not allow the running of OSX programs on Linux without considerable effort not outlined in this guide. The following process will first convert to IMG and then to ISO, you may however stop at the first step if you wish and mount or burn.
Installation
For instructions on installation, see DMG2IMG.
To Convert to IMG
The following command will convert the example file from DMG to IMG.
dmg2img /path/to/example.dmg /path/to/example.img
Do NOT follow the instructions for mounting the file at the end of the conversion. It is not advisable to mount to the /mnt directory.
To Mount
As always a directory will be created in /media, the next step will ensure hfsplus support is available, lastly the IMG file mounted to the directory.
sudo mount -t hfsplus -o loop example.img /media/example
At this point, the image is available for browsing under the /media/example directory. These files can now be transferred to hard drive or elsewhere for storage. If you want an ISO file, continue to the next section.
Creating the ISO
The IMG file we now have is still an hfsplus archive, which cannot simply be converted into an ISO. As such, we will have to use an intermediary step to convert the data from its stored format to an ISO. Since we’ve already mounted it to a directory, the easiest way is simply to create a new ISO with any disc authoring program you are familiar with. Brasero, GnomeBaker and K3b are just a few options for this.
Simply open your software of choice and start a new data disc. Then add the files from the mounted archive to this new data disc project. Once satisfied, select Burn and instead of recording a CD or DVD, choose to make an ISO file.
For most users, Brasero will be available, for those inexperienced in it’s use the following is a guide.
If you’re using GNOME then you can run Brasero from Applications -> Sound & Video -> Brasero. Start a new data disc by selecting Data Project from the main Brasero window, or through the menu Project -> New Project. Ensure the side panel is enabled from View -> Enable Side Panel. From the side panel, navigate to the directory where the IMG was mounted, usually the name of the IMG will be listed in the Places pane. In our example, the location in Places would be called example located in the /media/example directory. Simply drag all the files and folders you want to the project.
Once ready, push Burn. and ensure you select to create Image File: at the new window so it creates an ISO. If you wish to change the default name or the location it is created, select Properties. Once satisfied, push Burn and the ISO will be created. Leave Increase compatibility with Windows systems checked unless you know better.
Disc Image Integration for Nautilus
Archive Mounter
By default in GNOME, Nautilus has support for mounting ISOs by simply right clicking on the file and selecting Open with Archive Mounter. This option still appears limited, mainly designed for archives and ISOs. This feature is still under development, thus the following guide will be preserved.
See Also
- AcetoneISO is a feature rich program which let you mount and burn ISO, BIN, NRG, MDF, and IMG files through a graphical user interface. It’s available through Ubuntu’s universe repository.
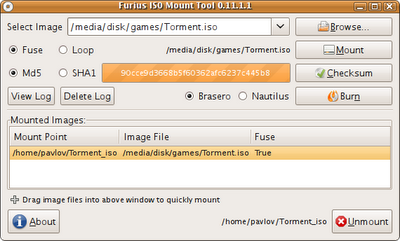
- Furius Iso Mount, available from the Ubuntu Software Center, enables you to mount ISO, BIN, NRG, MDF, and IMG files through a graphical user interface
- cdemu is a kernel module for mounting Cue/Bin files directly. To install it you would have to setup linux headers, compile the module and modprobe it in. This is out of the scope of this page. There is a script under development in the Ubuntu forums for automating the building of cdemuLocated Here (Use this at your own risk.)
- «Mount and Unmount ISO images without burning them» has a nice step-by-step explanation (with screen shots) showing how to mount and unmount ISO images.
- clonezilla is an open source disk backup & restore distro
ManageDiscImages (последним исправлял пользователь 78 2015-11-30 18:17:47)
The material on this wiki is available under a free license, see Copyright / License for details
You can contribute to this wiki, see Wiki Guide for details
Монтирование образов дисков
ISO -образ — это неформальный термин для обозначения образа диска, содержащего файловую систему стандарта ISO 9660. В более общем смысле, термин относится к образу любого оптического диска. Этот образ представляет собой обыкновенный файл. Его можно использовать (в совокупности со специальными программными средствами) вместо компакт-диска.
Монтирование образов — очень полезная операция. Она позволяет пользователю получить доступ к данным на ISO , не прожигая диск и не портя болванку. Это гораздо быстрее, когда приходится работать сразу с несколькими образами. Эти операции можно провести с использованием графического пользовательского интерфейся ( GUI ) или при помощи Терминала.
Следует иметь в виду, что ISO -образ содержит меньше информации, чем исходный компакт-диск. На компакт-диске содержится служебная информация, которая может, в частности, использоваться для защиты от копирования. Возможностью сохранять подобную информацию обладают некоторые из программ для работы с компакт-дисками.
Подключение стандартного ISO-образа
Используя графический интерфейс
Для монтирования образов дисков в Gnome имеется множество графических утилит:
ISOmorphin — программа написанная на языке Python. Для работы необходимо закачать и распаковать архив в любое удобное место, а затем запустить файл isomorphin.py в папке.
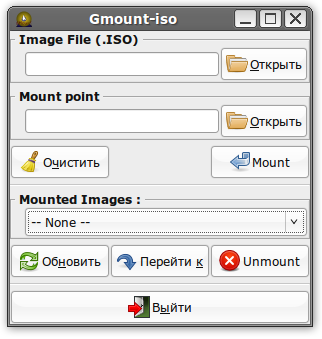
Gmount-iso — Маленькая и довольно удобная программка, позволяющая монтировать ISO образы в произвольную папку, а также отмонтировать уже подключённые образы. Добавлена возможность расчета md5 суммы и объема образа. Интерфейс программы прост до безобразия и в пояснениях не нуждается. Для установки используйте команду:
sudo apt-get install gmountiso
Данная программа будет доступна в меню: Приложения→Системные→gISOMountUsage.
Furius ISO Mount — автоматически создает точку монтирования в домашней папке пользователя и удаляет ее при размонтировании, позволяет записывать образы в форматах ISO и IMG. А так же рассчитывать контрольные суммы Md5 и SHA1.
AcetoneISO — графическое приложение, написанное на Qt, для работы с образами CD/DVD дисков (клон Daemon Tools для Linux с новыми возможностями). На сайте заявлены следующие возможности:
Монтирование образа mdf linux
Всем здравствовать! Установил себе линукс минт xfce. Пока осваиваюсь. Это мой первый вопрос на форуме(и не последний). Прошу, простить и понять.
Как поставить программу виртуального дисковода, для чтения образов диска от Alcohol 120? Объяснять, как самому тупому пользователю! На пальцах!
System:
Kernel: 5.4.0-65-generic x86_64 bits: 64 compiler: gcc v: 9.3.0
Desktop: Xfce 4.14.2 Distro: Linux Mint 20.1 Ulyssa
base: Ubuntu 20.04 focal
Machine:
Type: Laptop System: LENOVO product: 20206 v: Lenovo B590 serial:
Mobo: LENOVO model: 20206 serial: UEFI [Legacy]: LENOVO
v: H9ET73WW(1.10) date: 04/09/2013
Battery:
ID-1: BAT0 charge: 15.0 Wh condition: 36.6/40.4 Wh (91%)
model: LGC 45N1049 status: Charging
Device-1: hidpp_battery_0 model: Logitech Wireless Mouse
charge: 55% (should be ignored) status: Discharging
CPU:
Topology: Dual Core model: Intel Pentium 2020M bits: 64 type: MCP
arch: Ivy Bridge rev: 9 L2 cache: 2048 KiB
flags: lm nx pae sse sse2 sse3 sse4_1 sse4_2 ssse3 vmx bogomips: 9578
Speed: 1197 MHz min/max: 1200/2400 MHz Core speeds (MHz): 1: 1197 2: 1197
Graphics:
Device-1: Intel 3rd Gen Core processor Graphics vendor: Lenovo
driver: i915 v: kernel bus ID: 00:02.0
Display: x11 server: X.Org 1.20.9 driver: modesetting unloaded: fbdev,vesa
resolution: 1366×768~60Hz
OpenGL: renderer: Mesa DRI Intel HD Graphics 2500 (IVB GT1)
v: 4.2 Mesa 20.2.6 direct render: Yes
Audio:
Device-1: Intel 7 Series/C216 Family High Definition Audio vendor: Lenovo
driver: snd_hda_intel v: kernel bus ID: 00:1b.0
Sound Server: ALSA v: k5.4.0-65-generic
Network:
Device-1: Broadcom and subsidiaries BCM43142 802.11b/g/n vendor: Lenovo
driver: wl v: kernel port: efa0 bus ID: 02:00.0
IF: wlp2s0 state: up mac:
Device-2: Realtek RTL8111/8168/8411 PCI Express Gigabit Ethernet
vendor: Lenovo driver: r8169 v: kernel port: 2000 bus ID: 03:00.0
IF: enp3s0 state: down mac:
Drives:
Local Storage: total: 465.76 GiB used: 32.27 GiB (6.9%)
ID-1: /dev/sda vendor: Seagate model: ST500LT012-9WS142 size: 465.76 GiB
Partition:
ID-1: / size: 93.37 GiB used: 8.84 GiB (9.5%) fs: ext4 dev: /dev/sda2
ID-2: /home size: 359.83 GiB used: 22.80 GiB (6.3%) fs: ext4
dev: /dev/sda3
ID-3: swap-1 size: 3.81 GiB used: 647.2 MiB (16.6%) fs: swap
dev: /dev/sda1
Sensors:
System Temperatures: cpu: 43.0 C mobo: 34.0 C
Fan Speeds (RPM): cpu: 0
Info:
Processes: 186 Uptime: 1h 41m Memory: 1.47 GiB used: 875.2 MiB (58.1%)
Init: systemd runlevel: 5 Compilers: gcc: 9.3.0 Shell: bash v: 5.0.17
iat (Iso9660 Analyzer Tool) — консольная утилита для анализа структуры образов CD/DVD-ROM различных форматов и преобразования их в формат ISO 9660.
поддерживает конвертацию в формат ISO 9660 образов форматов BIN / CUE (образ CDRWIN), MDF (MDX), PDI (образ Pinnacle Instant CD/DVD), CDI (образ DiscJuggler), NRG (образ Nero Burning ROM) и образ B51
sudo apt install iat iat .mdf .isosudo apt install ccd2iso ccd2iso .img .iso
