- How to Mount and Unmount an ISO Image in Linux
- What is an ISO file?
- How to Temporarily Mount an ISO Image in Linux?
- How to Unmount an ISO Image in Linux?
- How to Permanently Mount an ISO Image in Linux using fstab?
- Bonus Tip! How to List ISO Image File Content
- Wrap Up
- Как смонтировать iso образ в Linux
- Как смонтировать ISO-файл в Linux
- Как смонтировать файлы ISO с помощью командной строки
- Монтирование файлов ISO с помощью Gnome
- Выводы
- How to Mount and Unmount an ISO Image in Linux
- How to Mount an ISO Image in Linux
- How to Unmount an ISO Image in Linux
How to Mount and Unmount an ISO Image in Linux
In computing, you might stumble upon an ISO image file. Have you ever wondered what the story is behind these files? How can you mount and unmount an ISO image in Linux?
What is an ISO file?
An ISO image, or “.iso” (International Organization for Standardization), is popularly known as an archive file that uses the ISO 9660 file system to distribute operating system or game files on CD/DVD media.
It compresses the file that can be easily written to an optical disc, disc-sector by disc-sector. Most of the popular Linux operating systems like Debian, Ubuntu, Fedora, Kali Linux, etc. are distributed in the ISO file format.
There might be a situation where you need to view the content inside this ISO file. That can be done on any operating system using the application except Linux, which can easily mount and unmount ISO image files without any applications.
In this beginner’s guide, you will learn how to mount and unmount ISO image files on the Linux system temporarily and permanently without any applications.
How to Temporarily Mount an ISO Image in Linux?
Open your terminal app using the Ctrl+Alt+t keyboard shortcut, and then navigate to the ISO image file directory.
$ cd Downloads/ $ lsBelow is the output of the above command.

It’s time to create a mount point directory where all the files will be mounted. In general, you should create a mounting point directory on the /mnt/ path that stores the mounted files.
We will follow the same principle by creating the isofile directory within the /mnt/ path using the following command.
$ sudo mkdir -p /mnt/isofile $ ls /mnt/Below is the output of the above command.

Once you have created the mount point directory, use the mount command with the ISO image file path along with the -o loop option (necessary to access archived files as a block device), as shown below.
$ sudo mount -o loop ubuntu-22.04-desktop-amd64.iso /mnt/isofile/Below is the output of the above command.

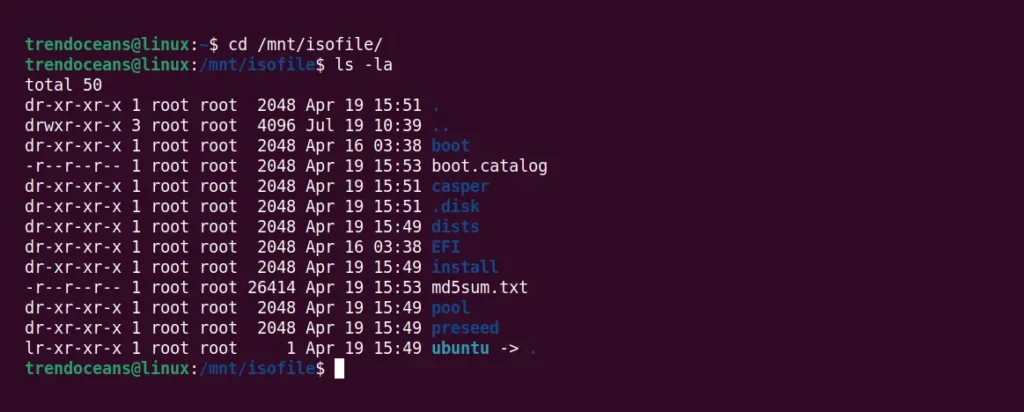
Above, mounted files are read-only. You cannot modify or change anything in the mounting location. However, to list the content of the ISO image file, navigate to a mount path and use the ls command, as shown below.
$ cd /mnt/isofile/ $ ls -laBelow is the output of the above command.
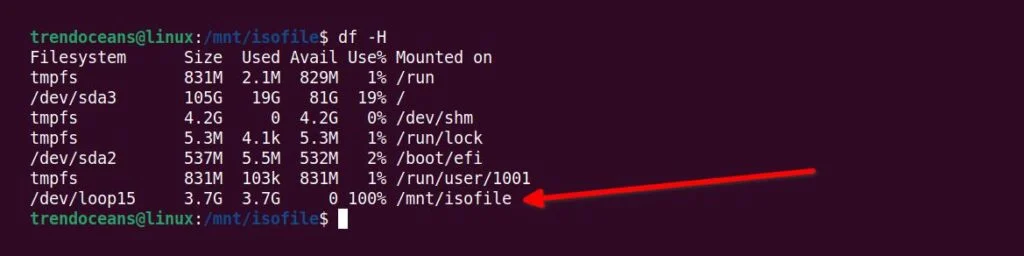
If the file is not visible or something went wrong, then you can verify the ISO image file is mounted to the target destination by using the following command.
Below is the output of the above command.
If you did not find the mount point, then check your ISO image file and repeat the above-mentioned steps.
How to Unmount an ISO Image in Linux?
Simply use the umount command by specifying the location of the mounting point to unmount.
$ sudo umount /mnt/isofileBelow is the output of the above command.

How to Permanently Mount an ISO Image in Linux using fstab?
The above steps can only mount the ISO image file temporarily in your Linux system. Sometimes, you want to permanently mount an ISO image file in Linux without repeating the same command on each boot.
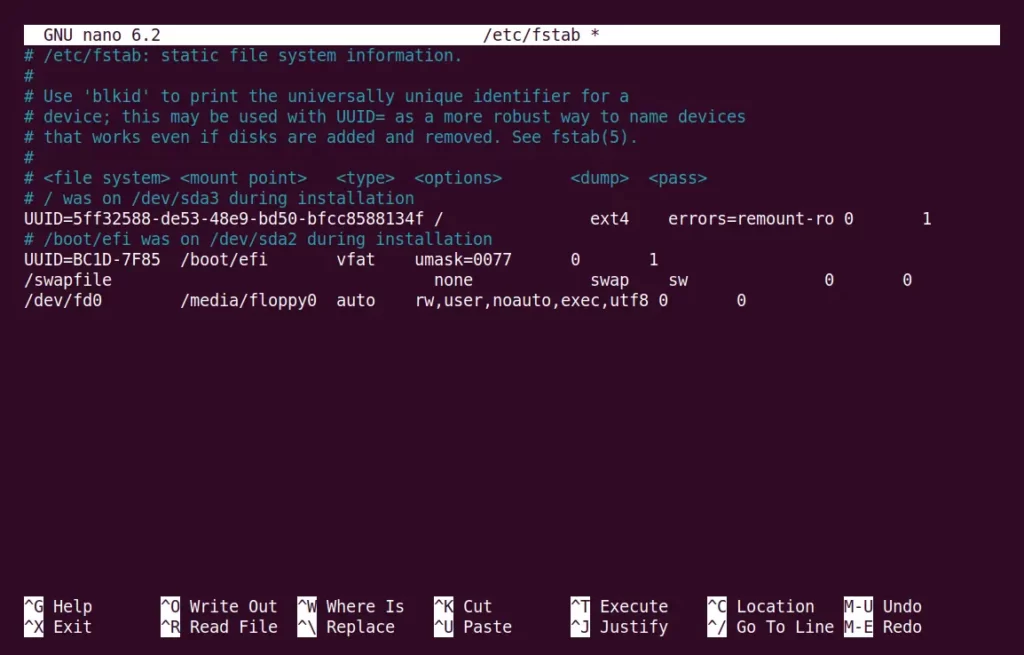
To permanently mount an ISO image in Linux, open the /etc/fstab file using your choice of text editor.
$ sudo nano /etc/fstabThe above command will open the /etc/fstab file, as shown below.
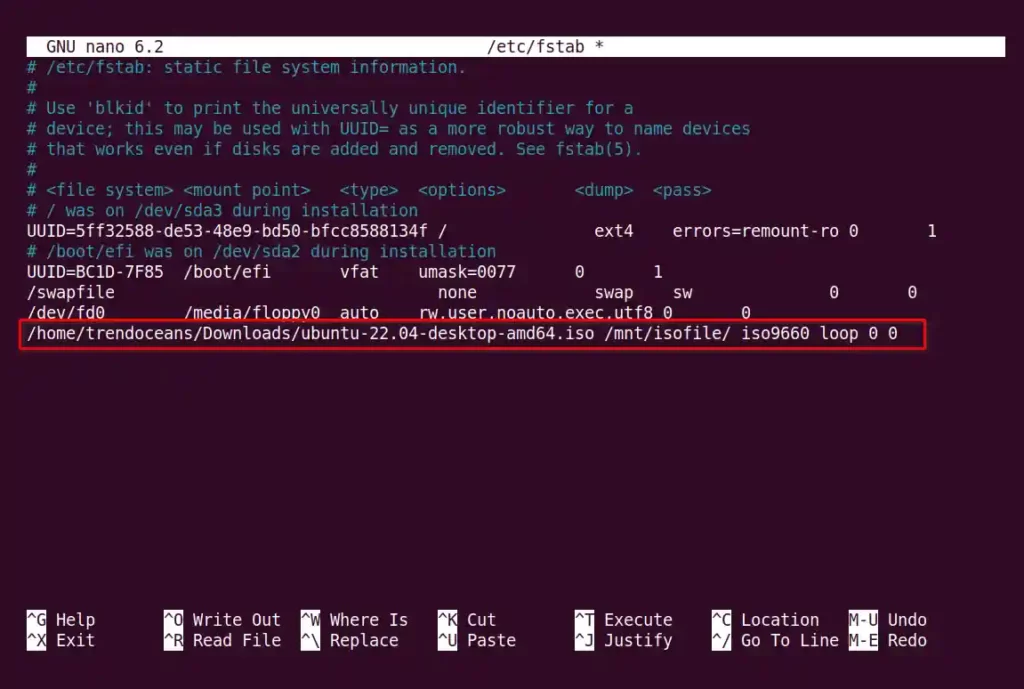
Then add the full path of your “.iso” file with the mount path at the end of the file, as shown below.
/home/trendoceans/Downloads/ubuntu-22.04-desktop-amd64.iso /mnt/isofile/ iso9660 loop 0 0
Below is the output of the above command.
Save and close the file, then execute the below command to verify the fstab file is configured without an error.
$ sudo mount -aBelow is the output of the above command.

If the output is error-free, then it means all the configuration is properly done and next time you reboot your system, it will automount the ISO file in the target mounting directory.
If you want to remove the auto-mounting of the ISO image file on boot, then repeat the above steps and remove the last line added in the fstab configuration file.
Bonus Tip! How to List ISO Image File Content
You can use the isoinfo command with the -l (Generate output similar to ‘ ls -lR ‘) and -i (Filename to read ISO-9660 image) options to list the ISO image file content without mounting the ISO image file by using the following command.
$ isoinfo -l -i ubuntu-22.04-desktop-amd64.iso | lessBelow is the output of the above command.
To get a clean output by just printing the image file content name without displaying the additional information, use the isoinfo -p -i imagefile.iso | less command.
Wrap Up
The above steps are the easiest way to mount ISO image files temporarily or permanently on a Linux system. However, distribution file managers like Nautilus for GNOME provide an integrated option for mounting an ISO image file.
But they don’t have an option to automount an ISO image file on boot. That’s all for now. If you have any queries or questions, then feel free to comment.
Innovative tech mind with 12 years of experience working as a computer programmer, web developer, and security researcher. Capable of working with a variety of technology and software solutions, and managing databases.
Как смонтировать iso образ в Linux
Добрый день всем, кто оказался на данном сайте. Эта статья будет полезна тем, кто только начинает знакомится с Linux. В системах Wondows нам приходилось для монтирования iso образов скачивать программы типа DAEMON Tools и Alcohol 120. В системах Linux можно спокойно обойтись без всех этих программ. Так как в Linux есть встроенные средства, которые под час не видны глазу. И как раз об одном из них и идет сегодня речь. А именно, способность монтировать образы дисков избегая сторонних программ. Давайте сначала создадим папку, в которую в последствии и будем монтировать iso образы наших дисков. Для этого переходим в терминал и вводим команды:

После чего можно приступать к монтированию нашего iso образа. И в этом нам поможет команда “mount”. А монтировать мы будем образ с Kali Linux, который лежит в папке “Загрузки”. И так, переходим в терминал и вводим команду для монтирования нашего образа.
sudo mount -o loop /home/cyber-x/Загрузки/kali-linux-2019.4-kde-amd64.iso /media/iso-img


Теперь мы можем открыть либо файловый менеджер и увидеть примонтированный образ, либо перейти в папку “/media/iso-img” и увидеть его там.

Что бы отмонтировать наш образ достаточно выполнить следующую команду:
Стоит отметить, что при выполнении этой команды возможно выскочит сообщение, примерно следующего содержания:
sudo umount: /media/iso: device is busy.
Это означает, что наш образ открыт в файловом менеджере, а может быть выполняются какие то иные действия. То есть, возможно, что при редактировании этого образа, операция еще выполняется. Так что, дождитесь окончания всех операций, закройте файловый менеджер и отмонтируйте отбраз.


А на этом сегодня все. Как вы можете заметить, смонтировать образ iso без установки постороннего п.о. не сложно.
Как смонтировать ISO-файл в Linux
Файл ISO — это архивный файл, который обычно содержит полный образ компакт-диска или DVD. Например, большинство операционных систем, таких как Windows, Linux и macOS, распространяются в виде образов ISO.
Файлы ISO можно извлечь с помощью популярных архивных программ, смонтировать на устройстве с петлей и записать на USB-накопитель или пустой компакт-диск.
В этом руководстве мы объясним, как монтировать файлы ISO в Linux.
Как смонтировать файлы ISO с помощью командной строки
Команда mount позволяет прикреплять (монтировать) файлы ISO в определенной точке монтирования в дереве каталогов.
Инструкции в этом разделе должны работать с любым дистрибутивом Linux, включая Ubuntu, Debian и CentOS.
- Начните с создания точки монтирования, это может быть любое место, которое вы хотите:
sudo mount /path/to/image.iso /media/iso -o loopМонтирование файлов ISO с помощью Gnome
Если вы используете дистрибутив Linux, который использует Gnome в качестве среды рабочего стола, вы можете смонтировать файл ISO с помощью приложения для монтирования образа диска Gnome.
Найдите ISO-файл, который вы хотите смонтировать, и щелкните его правой кнопкой мыши. В контекстном меню выберите «Открыть с помощью Disk Image Mounter».
После подключения образа на рабочем столе должен появиться значок устройства. Дважды щелкните по нему, и откроется файловый менеджер Gnome.
Чтобы отключить файл ISO, щелкните правой кнопкой мыши значок устройства и выберите «Размонтировать».
Выводы
В Linux вы можете монтировать файлы ISO с помощью команды mount . Пользователи настольных компьютеров могут использовать графические инструменты, такие как Gnome Disk Image Mounter.
Если у вас есть какие-либо вопросы или отзывы, не стесняйтесь оставлять комментарии.
How to Mount and Unmount an ISO Image in Linux
An ISO image or .iso (International Organization for Standardization) file is an archive file that contains a disk image called ISO 9660 file system format.
Every ISO file has .iso an extension has a defined format name taken from the ISO 9660 file system and is specially used with CD/DVD ROMs. In simple words, an iso file is a disk image.

I have seen most of the Linux operating system images that we download from the internet are .ISO format. Typically an ISO image contains the installation of software such as operating system installation files, games installation files, or any other applications.
Sometimes it happens that we need to access files and view content from these ISO images, but without wasting disk space and time by burning them onto CD/DVD or USB drives using our tools.
This article describes how to mount and unmount an ISO image on a Linux Operating system to access and list the content of files.
How to Mount an ISO Image in Linux
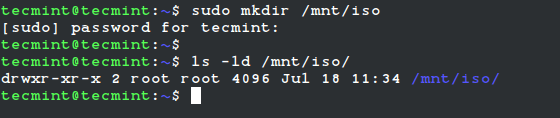
To mount an ISO image on RedHat-based or Debian-based Linux distributions, you must be logged in as a “root” user or switch to “sudo” and run the following commands from a terminal to create a mount point.
# mkdir /mnt/iso OR $ sudo mkdir /mnt/iso
Once you created a mount point, use the “mount” command to mount an iso file called “Fedora-Server-dvd-x86_64-36-1.5.iso“.
# mount -t iso9660 -o loop /home/tecmint/Fedora-Server-dvd-x86_64-36-1.5.iso /mnt/iso/ OR $ sudo mount -t iso9660 -o loop /home/tecmint/Fedora-Server-dvd-x86_64-36-1.5.iso /mnt/iso/

Where Options
- -t – This argument is used to indicate the given filesystem type.
- ISO 9660 – It describes the standard and default filesystem structure to be used on CD/DVD ROMs.
- -o – Options are necessary with a -o argument followed by a separated comma string of options.
- loop -The loop device is a pseudo-device that is often used for mounting CD/DVD ISO images and makes those files accessible as a block device.
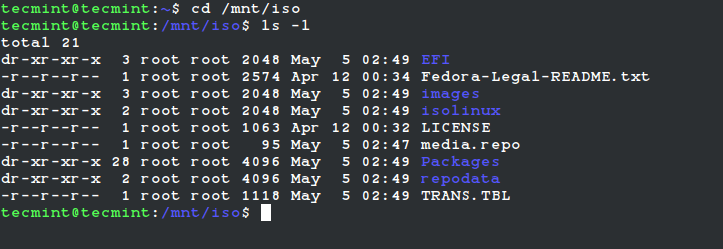
After the ISO image is mounted successfully, go to the mounted directory at /mnt/iso and list the content of an ISO image. It will only mount in read-only mode, so none of the files can be modified.
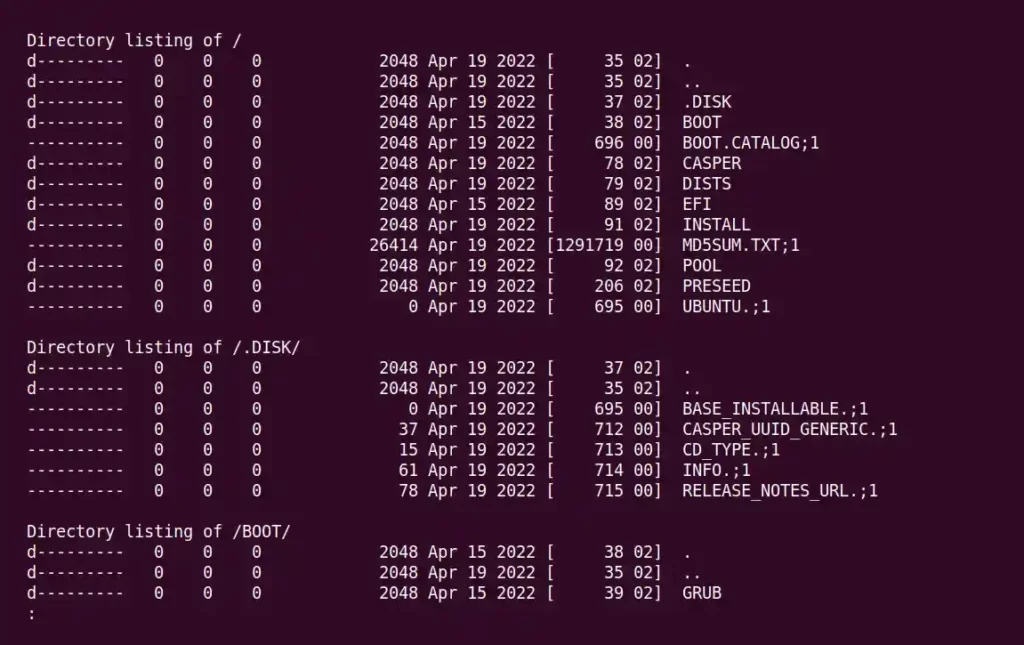
You will see the list of files of an ISO image, that we have mounted in the above command. For example, the directory listing of a Fedora-Server-dvd-x86_64-36-1.5.iso image would look like this.
total 21 dr-xr-xr-x 3 root root 2048 May 5 02:49 EFI -r--r--r-- 1 root root 2574 Apr 12 00:34 Fedora-Legal-README.txt dr-xr-xr-x 3 root root 2048 May 5 02:49 images dr-xr-xr-x 2 root root 2048 May 5 02:49 isolinux -r--r--r-- 1 root root 1063 Apr 12 00:32 LICENSE -r--r--r-- 1 root root 95 May 5 02:47 media.repo dr-xr-xr-x 28 root root 4096 May 5 02:49 Packages dr-xr-xr-x 2 root root 4096 May 5 02:49 repodata -r--r--r-- 1 root root 1118 May 5 02:49 TRANS.TBL
How to Unmount an ISO Image in Linux
Simply run the following command from the terminal either “root” or “sudo” to unmount a mounted ISO image.
# umount /mnt/iso OR $ sudo umount /mnt/iso