- Mounting an ISO Image in Linux
- Create a Mount Point for ISO Image
- Mount an ISO File in Linux
- Verify that ISO File is Mounted
- Unmount an ISO File in Linux
- How to Mount and Unmount an ISO Image in Linux
- How to Mount an ISO Image in Linux
- How to Unmount an ISO Image in Linux
- Как смонтировать / размонтировать ISO-образ в CentOS 8 / Rhel 8 Linux
- Требования к программному обеспечению и используемые условные обозначения
- Как смонтировать / размонтировать ISO-образ на CentOS 8 / Rhel 8 пошаговые инструкции
- Поиск проблемы
- WordPress система управления контентом для ведения блогов Развертывание и использование образов Docker
- Как установить последнюю версию Mesa на Debian 9 Stretch Linux
- Сопоставьте начало и конец имени файла, используя метасимволы и регулярное выражение
- How To Mount ISO File In Linux?
- Mount ISO File with mount Command
- List ISO File Contents
- Unmount ISO File with umount Command
- Mount ISO File In GNOME Desktop
Mounting an ISO Image in Linux
You can easily access an ISO image of a CD or DVD (e.g. RHEL DVD) from the command line in Linux.
To access an ISO disc image, you have to create a mount point (empty folder that will be used as a root filesystem) and mount an ISO file to it.
In this article, i’ll show how to Mount and Unmount an ISO file from the Linux Command Line (CentOS, RHEL, Fedora, Ubuntu, Debian, Mint etc.).
To mount an ISO image in Linux, you must be a root or use sudo.
Create a Mount Point for ISO Image
A mount point – is a directory (typically an empty folder) from which the content of an ISO disc image will be accessible.
$ sudo mkdir -p /mnt/mount_point
Mount an ISO File in Linux
Mount an ISO file /home/user/disk.iso to the mount point /mnt/mount_point :
$ sudo mount -o loop /home/user/disk.iso /mnt/mount_point
After ISO disk is mounted, you will receive the following message: ‘mount: warning: /mnt/mount_point seems to be mounted read-only‘.
You can ignore it, because according to the ISO 9660 standard, ISO images are always mounted in read-only mode.
Verify that ISO File is Mounted
List mounted devices to verify that ISO image has successfully been mounted:
Below you should see a line like the following:
/home/user/disk.iso on /mnt/mount_point type iso9660 (ro)
Now you can access the mount point and list the files stored on the ISO disk image:
Unmount an ISO File in Linux
Use the following command to unmount an ISO disc image:
$ sudo umount /mnt/mount_point
How to Mount and Unmount an ISO Image in Linux
An ISO image or .iso (International Organization for Standardization) file is an archive file that contains a disk image called ISO 9660 file system format.
Every ISO file has .iso an extension has a defined format name taken from the ISO 9660 file system and is specially used with CD/DVD ROMs. In simple words, an iso file is a disk image.

I have seen most of the Linux operating system images that we download from the internet are .ISO format. Typically an ISO image contains the installation of software such as operating system installation files, games installation files, or any other applications.
Sometimes it happens that we need to access files and view content from these ISO images, but without wasting disk space and time by burning them onto CD/DVD or USB drives using our tools.
This article describes how to mount and unmount an ISO image on a Linux Operating system to access and list the content of files.
How to Mount an ISO Image in Linux
To mount an ISO image on RedHat-based or Debian-based Linux distributions, you must be logged in as a “root” user or switch to “sudo” and run the following commands from a terminal to create a mount point.
# mkdir /mnt/iso OR $ sudo mkdir /mnt/iso
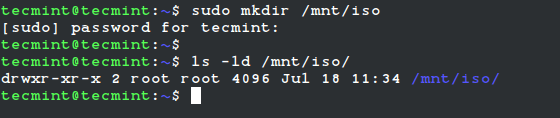
Once you created a mount point, use the “mount” command to mount an iso file called “Fedora-Server-dvd-x86_64-36-1.5.iso“.
# mount -t iso9660 -o loop /home/tecmint/Fedora-Server-dvd-x86_64-36-1.5.iso /mnt/iso/ OR $ sudo mount -t iso9660 -o loop /home/tecmint/Fedora-Server-dvd-x86_64-36-1.5.iso /mnt/iso/

Where Options
- -t – This argument is used to indicate the given filesystem type.
- ISO 9660 – It describes the standard and default filesystem structure to be used on CD/DVD ROMs.
- -o – Options are necessary with a -o argument followed by a separated comma string of options.
- loop -The loop device is a pseudo-device that is often used for mounting CD/DVD ISO images and makes those files accessible as a block device.
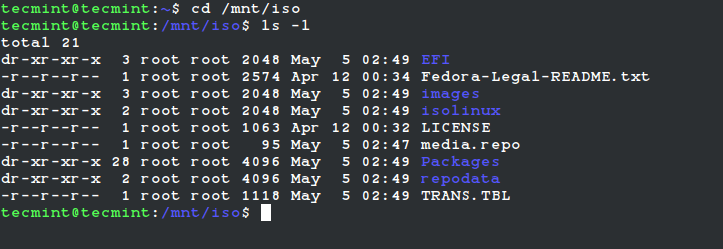
After the ISO image is mounted successfully, go to the mounted directory at /mnt/iso and list the content of an ISO image. It will only mount in read-only mode, so none of the files can be modified.
You will see the list of files of an ISO image, that we have mounted in the above command. For example, the directory listing of a Fedora-Server-dvd-x86_64-36-1.5.iso image would look like this.
total 21 dr-xr-xr-x 3 root root 2048 May 5 02:49 EFI -r--r--r-- 1 root root 2574 Apr 12 00:34 Fedora-Legal-README.txt dr-xr-xr-x 3 root root 2048 May 5 02:49 images dr-xr-xr-x 2 root root 2048 May 5 02:49 isolinux -r--r--r-- 1 root root 1063 Apr 12 00:32 LICENSE -r--r--r-- 1 root root 95 May 5 02:47 media.repo dr-xr-xr-x 28 root root 4096 May 5 02:49 Packages dr-xr-xr-x 2 root root 4096 May 5 02:49 repodata -r--r--r-- 1 root root 1118 May 5 02:49 TRANS.TBL
How to Unmount an ISO Image in Linux
Simply run the following command from the terminal either “root” or “sudo” to unmount a mounted ISO image.
# umount /mnt/iso OR $ sudo umount /mnt/iso
Как смонтировать / размонтировать ISO-образ в CentOS 8 / Rhel 8 Linux
В этом руководстве вы узнаете, как получить доступ и скопировать файлы из образа ISO, смонтировав образ ISO непосредственно в вашей системе CentOS 8 / RHEL 8 Linux.
В этом уроке вы узнаете:
- Как смонтировать ISO-образ
- Как размонтировать ISO-образ
- Как проверить смонтированный ISO-образ
- Как получить доступ к содержимому ISO-образа

Смонтировать и размонтировать ISO-образ в RHEL 8 и CentOS 8
Требования к программному обеспечению и используемые условные обозначения
Требования к программному обеспечению и условные обозначения командной строки Linux| Категория | Требования, условные обозначения или используемая версия программного обеспечения |
|---|---|
| Система | Red Hat Enterprise Linux 8 |
| Программного обеспечения | N / A |
| Другой | Привилегированный доступ к вашей системе Linux с правами root или через судо команда. |
| Условные обозначения | # — требует данных команды linux для выполнения с привилегиями root либо непосредственно как пользователь root, либо с использованием судо команда $ — требует данных команды linux для выполнения от имени обычного непривилегированного пользователя. |
Как смонтировать / размонтировать ISO-образ на CentOS 8 / Rhel 8 пошаговые инструкции
- Получите административные привилегии. Для выполнения всех приведенных ниже команд потребуются права администратора, поэтому смените его на root:
Когда будете готовы, подключите ISO-образ к ранее созданной точке монтирования с помощью устанавливать команда:
# mount -t iso9660 -o loop rhel-8.0-x86_64-dvd.iso / media / iso.
Все сделано. Теперь ISO-образ смонтирован. Проверить, смонтирован ли ISO-образ, можно с помощью команды mount:
Чтобы успешно размонтировать образ ISO, вам нужно оставить /media/iso каталог точки монтирования, в противном случае любая попытка размонтировать образ ISO приведет к сообщению об ошибке:
umount: / media / iso: target занят.
Поиск проблемы
Если вы не можете отключить ISO и получаете цель занята ошибка, вы можете использовать термоэлемент команда, чтобы убить процесс, удерживающий блокировку на вашей точке монтирования:
ПРЕДУПРЕЖДЕНИЕ
Следующая команда может повредить вашу систему или привести к нежелательным последствиям. Используйте только в крайнем случае .
Подпишитесь на новостную рассылку Linux Career Newsletter, чтобы получать последние новости, вакансии, советы по карьере и рекомендуемые руководства по настройке.
LinuxConfig ищет технических писателей, специализирующихся на технологиях GNU / Linux и FLOSS. В ваших статьях будут представлены различные руководства по настройке GNU / Linux и технологии FLOSS, используемые в сочетании с операционной системой GNU / Linux.
Ожидается, что при написании статей вы сможете идти в ногу с технологическим прогрессом в вышеупомянутой технической области. Вы будете работать независимо и сможете выпускать не менее 2 технических статей в месяц.
WordPress система управления контентом для ведения блогов Развертывание и использование образов Docker
ОИнструмент для ведения блога WordPress с автоматизированной сборкой docker и образ системы управления контентом (CMS) «linuxconfig / wordpress» можно использовать для мгновенного развертывания WordPress CMS на хостах докеров.КонфигурацияПриложени.
Как установить последнюю версию Mesa на Debian 9 Stretch Linux
ЗадачаУстановите последнюю стабильную версию Mesa на Debian Stretch.РаспределенияDebian 9 StretchТребованияРабочая установка Debian Stretch с правами root.СложностьСерединаУсловные обозначения# — требует данных команды linux для выполнения с приви.

Сопоставьте начало и конец имени файла, используя метасимволы и регулярное выражение
Вопрос:Как называется команда, которая ищет все файлы, начинающиеся с «A» и заканчивающиеся на «K»?Отвечать:ls | grep ^ A. * K $ Длинный ответ:Вместо того, чтобы искать одну команду, нам нужна комбинация команд для выполнения этого трюка. Прежде ч.
How To Mount ISO File In Linux?

ISO is a popular file format that is generally used to store optical media data like CDs, DVDs, etc. ISO files contain the image of a specific CD or DVD. Generally, operating systems, software, software bundles are stored inside ISO files. ISO is a file format and file system which is also defined as ISO 9660. ISO 9660 standard created in order to make every CD and DVD content compatible. The UDF is the next version of the ISO 9660 standard. UDF is backward compatible with the ISO 9660.
Mount ISO File with mount Command
The mount command is used to mount different disks and partitions with different file systems. As an ISO file is a file system defined as ISP 9660 or UDF we can use the mount command in order to mount ISO files. To mount the ISO file a mount point is required where the contents of the ISO represented. In the following example, the ISO file named ubuntu.iso mounted into cdrom directory located in the current user home directory. We provide the -o loop option and do not provide the sudo command. Following ISO mount operation does not require root privileges because the current user has access rights for his/her home directory.
mount -o loop /home/ismail/ubuntu.iso /home/ismail/cdromGenerally physical CD-ROM and ISO files are mounted under the /mnt directory. The /mnt directory requires root privielges to mount or create directory. First we will create a directory named /mnt/iso to mount ISO file.
Now we can mount the ISO file but again we require the root privileges. We provide the sudo command.
sudo -o loop /home/ismail/ubuntu.iso /mnt/isoBy default the ISO file file system type is automatically detected by the mount command. But in some cases it may not work. The file system type of the ISO file can be specified explicitly. The -t iso9660 can be specified as the file system like below.
sudo -o loop -t iso9660 /home/ismail/ubuntu.iso /mnt/isoList ISO File Contents
After mounting ISO file we can list the contents of the ISO file. We use the ls command to list mount directory contents. In the following example the ISO file is mounted under /mnt/iso .
Unmount ISO File with umount Command
The mounted ISO file can be unmounted by using the umount command. Just provide the mount directory of the ISO file to the umount command. In the following example, we unmount the /mnt/iso .
If the directory is its contents allready in use it can not be unmounted and return error about this.
Mount ISO File In GNOME Desktop
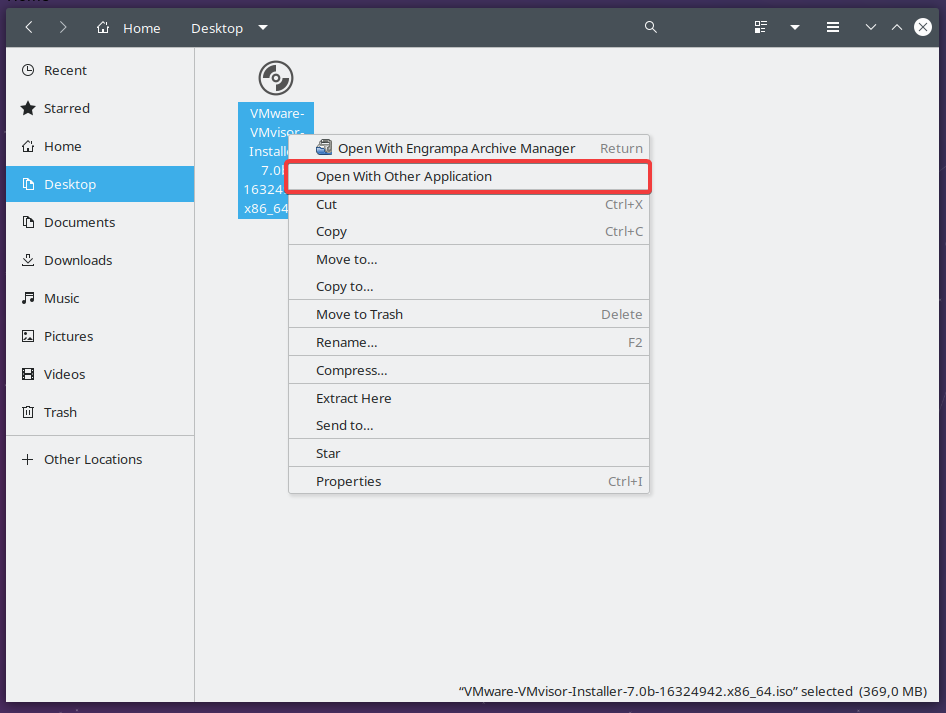
GNOME is a popular desktop environment used in Linux. It provides the tool named Disk Image Mounter which can be used to mount ISO files. First right-click to the ISO file like below. Select the “Open With Other Application” if the “Open With Disk Image Mounter” not listed.
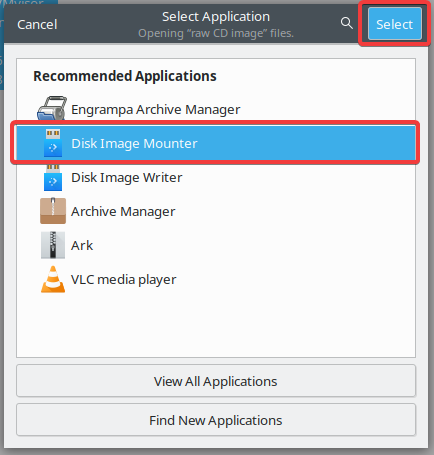
In the following Select Application screen select the Disk Image Mounter. As the last step click to the Select button. This mounts the ISO file automatically.
After the ISO file mounted it listed in the File Manager menu side bar like below.