How to mount Virtual Hard disk (VHD) file in Ubuntu Linux?
Virtual Hard Disk- VHD is a common virtual drive format used on Windows systems. Generally, we use them to install Virtual Machine operating systems such as in VirtualBox or Hyper-V. However, we can also create and use VHDs just like a native drive partition on Windows 10 or 7 systems.
Furthermore, backup images also save in the.VHD format, thus to access them is really a need of the hours, in case you want some file resides in them. So, what would happen, if you need to extract some files from VHD on Linux; resides on the local or remote machine. And you don’t have a Windows system. Don’t worry we can mount them on Linux as well.
For carrying out the tutorial, we are using Ubuntu 20.04 LTS focal fossa, however, the steps given here are also applicable for Ubuntu 18.04/19.04/16.04; Linux Mint, Elementary OS, ZorinOS, Kali Linux, and other similar ones.
Here we are going to mount a VHD image on Ubuntu or Debian-based systems that have some information we need to extract; using a tool called guestmounts. Let’s see how to use it.
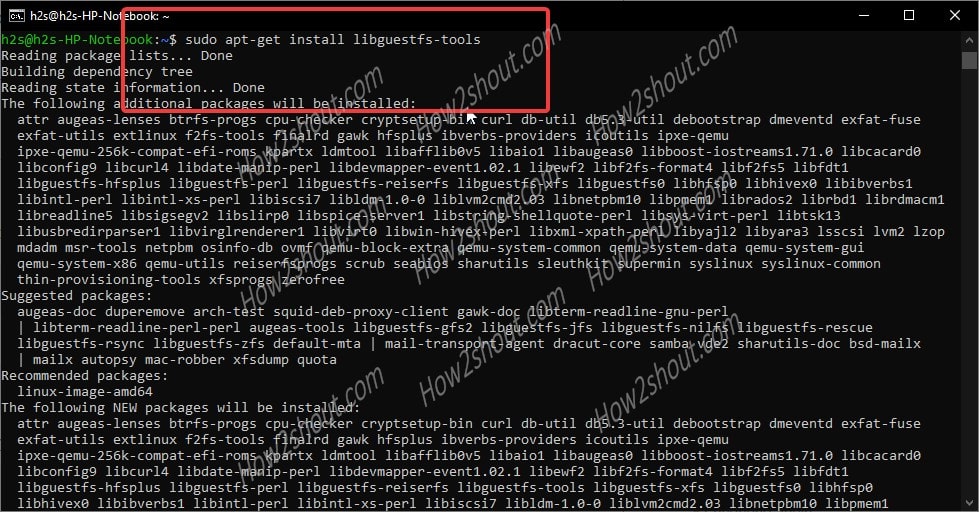
Step 1: The guestmounts tool comes in libguestfs package along with other tools, thus first we need to install the same. Here is the command to do that.
sudo apt-get install libguestfs-tools

If you get any dependencies error then simply run:
After that again run the above installation command to get “guestmount” tool on your Ubuntu or Debian system.
Step 2: If the Virtual Hard disk.VHD is on your local system then we can mount it directly. However, on remote storage with SAMA/CISF shared protocol, we need to add its support to Ubuntu Linux first.
sudo apt-get install cifs-utils
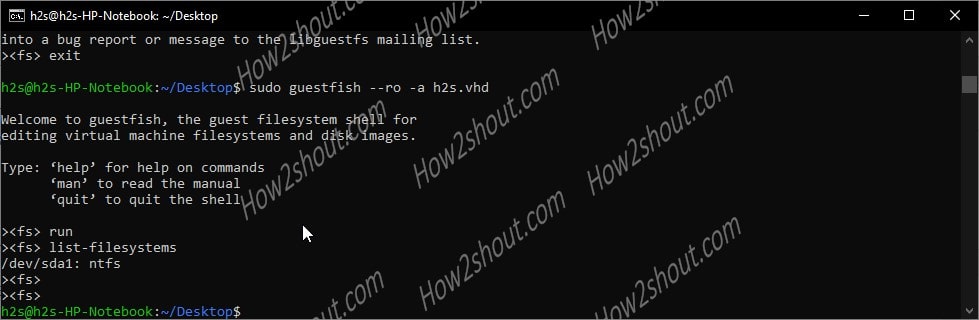
Step 3: Check the filesystem and available partitions on the Virtual Hard Disk image on Linux using “guestfish” command:
The guestfish is also a tool that comes along with the libguestfs-tools package.
sudo guestfish --ro -a VHD-file-path
Note: replace the VHD-file-path with the actual path where your VHD image located. For example: Here we have h2s.vhd located on the Desktop of Ubuntu, thus the command is:
sudo guestfish – -ro -a h2s.vhd
Once you dropped in the GuestFish Shell, type:
This will give you the partition details of the VHD image and the file system in which it has been formatted. Note down that.
As you can see that in the following image, our Virtual Disk image is in NTFS format.
Step 4: Switch to the root user. It is because we tried but couldn’t use the “guestmount” without sudo access. Thus, once you mount the VHD using under sudo rights, the mounted file image will only be accessible by the user root or the one that has the same access.
Read more: If you haven’t set the root password yet then please do that, here is the enable ubuntu root password tutorial.
Step 5: Run the guestmount command to mount the remotely or locally available.VHD image files.
sudo guestmount -a /path-to-demo.vhd -m /dev/sda1 --ro /path-of-the-directory-to-mount-VHD-image
*Replace: /path-to-demo.vhd with your VHD file image name and location path.
/dev/sda1: It is a device or partition of the Virtual Hard disk file system which we found with the help of guestfish command above. Replace it with yours.
–ro – It means read-only.
/path-of-the-directory-to-mount-VHD-image: Path where you want to mount your VHD image file on the system
You can see the below image for an idea:
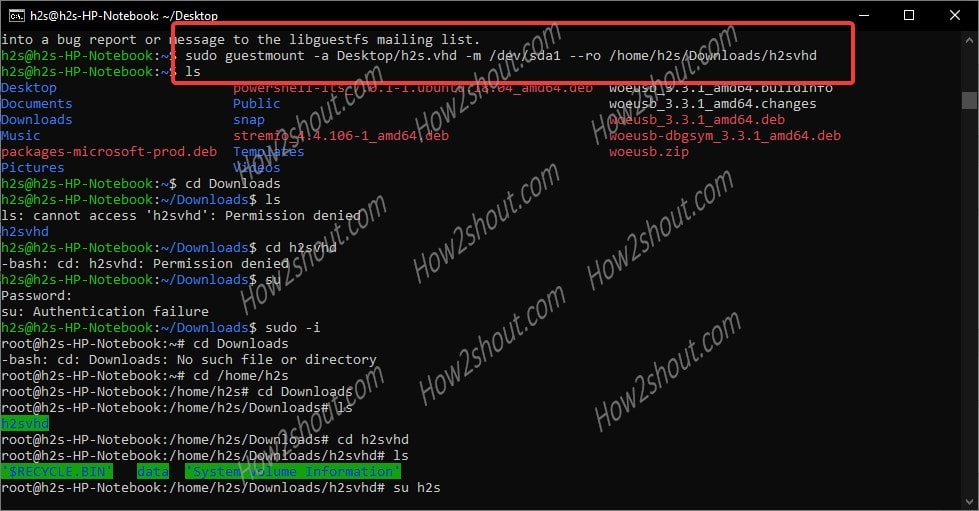
Step 6: Now, as we have mounted the VHD under sudo rights, thus only the root user can access the same. So, without exit the root shell environment, navigate to the directory where you have mounted the Virtual Hard disk file image. Afterward, you can easily access all this file inside that particular image.
Step 7: Those who want to access the VHD images using the Graphical File manager of Ubuntu. They need to first access it under administrative rights. So, run nautilus as root:
This will ask for the root password.
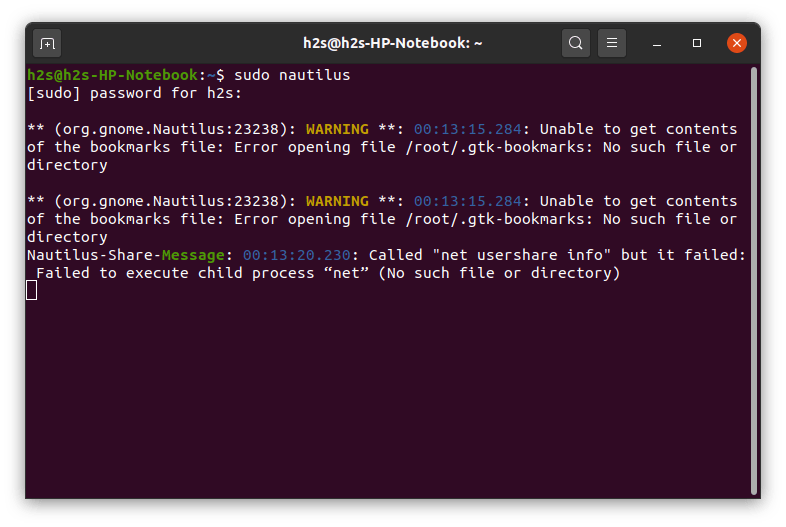
Now, the Ubuntu file manager will open under user root rights, navigate to the directory where VHD has been mounted by you. Click to open it.
Optional step:
In cases later, you want to unmount the VHD image from Ubuntu, then use the below command:
sudo guestunmount /mounted-directory-path
Replace: /mounted-directory-path with the path of the folder where you have actually mounted the image file.
4 thoughts on “How to mount Virtual Hard disk (VHD) file in Ubuntu Linux?”
sudo guestfish – -ro -a WD\ NVMe\ Win10\ quite\ fresh\ +\ installed-0.VHDX
tells me
guestfish: invalid option — ‘o’
Try `guestfish –help’ for more information.
The correct command would be
sudo guestfish –ro -a WD\ NVMe\ Win10\ quite\ fresh\ +\ installed-0.VHDX
Wrong is the space at “-_-ro” Reply
Leave a Comment Cancel reply
This site uses Akismet to reduce spam. Learn how your comment data is processed.
Overview
vmdk ’s, the underlying filesystem commonly used in vmware , can be mounted on a Linux server using the qemu utilities. In this example, I downloaded an ova , unarchived it, and retrieved the vmdk files. Once exposed, I am able to mount the filesystems embedded within the vmdk .
In this example, the ova is a virtual “appliance” which prohibits access a low level root shell. By mounting the vmdk file system directly, we can take a peek at the hidden secrets the vendor keeps under lock and key.
Details
sudo apt install qemu-utils Load the network block device module:
jemurray@home-server:~/ib$ sudo modprobe nbd Create the network block devices from the vmdk image:
jemurray@home-server:~/ib$ sudo qemu-nbd -r -c /dev/nbd1 ./vnios-disk.vmdk Examine the images qemu created:
jemurray@home-server:~/ib$ ls -al /dev/nbd1p* brw-rw---- 1 root disk 43, 33 Jan 9 14:28 /dev/nbd1p1 brw-rw---- 1 root disk 43, 34 Jan 9 14:28 /dev/nbd1p2 brw-rw---- 1 root disk 43, 35 Jan 9 14:28 /dev/nbd1p3 brw-rw---- 1 root disk 43, 36 Jan 9 14:28 /dev/nbd1p4 brw-rw---- 1 root disk 43, 37 Jan 9 14:28 /dev/nbd1p5 brw-rw---- 1 root disk 43, 38 Jan 9 14:28 /dev/nbd1p6 brw-rw---- 1 root disk 43, 39 Jan 9 14:28 /dev/nbd1p7 Create mount points for the new filesystems:
jemurray@home-server:~/ib$ mkdir p1 jemurray@home-server:~/ib$ mkdir p2 jemurray@home-server:~/ib$ mkdir p3 jemurray@home-server:~/ib$ mkdir p4 jemurray@home-server:~/ib$ mkdir p5 jemurray@home-server:~/ib$ mkdir p6 jemurray@home-server:~/ib$ mkdir p7 Attempt to mount each individual directory:
jemurray@home-server:~/ib$ sudo mount /dev/nbd1p1 ./p1 mount: /home/jemurray/ib/p1: WARNING: device write-protected, mounted read-only. jemurray@home-server:~/ib$ sudo mount /dev/nbd1p2 ./p2 mount: /home/jemurray/ib/p2: WARNING: device write-protected, mounted read-only. jemurray@home-server:~/ib$ sudo mount /dev/nbd1p3 ./p3 NTFS signature is missing. Failed to mount '/dev/nbd1p3': Invalid argument The device '/dev/nbd1p3' doesn't seem to have a valid NTFS. Maybe the wrong device is used? Or the whole disk instead of a partition (e.g. /dev/sda, not /dev/sda1)? Or the other way around? jemurray@home-server:~/ib$ sudo mount /dev/nbd1p4 ./p4 mount: /home/jemurray/ib/p4: WARNING: device write-protected, mounted read-only. jemurray@home-server:~/ib$ sudo mount /dev/nbd1p5 ./p5 mount: /home/jemurray/ib/p5: WARNING: device write-protected, mounted read-only. jemurray@home-server:~/ib$ sudo mount /dev/nbd1p6 ./p6 mount: /home/jemurray/ib/p6: WARNING: device write-protected, mounted read-only. jemurray@home-server:~/ib$ sudo mount /dev/nbd1p7 ./p7 mount: /home/jemurray/ib/p7: unknown filesystem type 'swap'. jemurray@home-server:~/ib/p1$ ls -al total 104 drwxr-xr-x 23 root root 4096 Oct 8 12:42 . drwxrwxr-x 9 jemurray jemurray 4096 Jan 9 14:31 .. drwxr-xr-x 2 root root 4096 Oct 8 12:41 bin drwxr-xr-x 4 root root 4096 Oct 8 12:42 boot drwxr-xr-x 4 root root 4096 Oct 8 12:41 dev drwxr-xr-x 29 root root 4096 Oct 8 12:42 etc drwxr-xr-x 2 root root 4096 Oct 8 12:41 home drwxr-xr-x 7 root root 4096 Oct 8 12:42 lib drwx------ 2 root root 16384 Oct 8 12:58 lost+found drwxr-xr-x 5 root root 4096 Oct 8 12:41 media drwxr-xr-x 2 root root 4096 Oct 8 12:41 mnt How to mount a virtual hard disk?
Have you searched Google? It abounds with guides on mounting VMDK, VDI, VHD, and raw disk image files on Ubuntu.
4 Answers 4
Linux and other Unix-like hosts can mount images created with the raw format type using a loopback device. From a root login (or using sudo), mount a loopback with an offset of 32,256.
mount -o loop,offset=32256 /path/to/image.img /mnt/mountpoint For other types of qemu images, you can use qemu-nbd
modprobe nbd max_part=16 qemu-nbd -c /dev/nbd0 image.qcow2 partprobe /dev/nbd0 mount /dev/nbd0p1 /mnt/image Plus, usually, you can convert image from one format to another.
raw - (default) the raw format is a plain binary image of the disc image, and is very portable. On filesystems that support sparse files, images in this format only use the space actually used by the data recorded in them. cloop - Compressed Loop format, mainly used for reading Knoppix and similar live CD image formats cow - copy-on-write format, supported for historical reasons only and not available to QEMU on Windows qcow - the old QEMU copy-on-write format, supported for historical reasons and superseded by qcow2 qcow2 - QEMU copy-on-write format with a range of special features, including the ability to take multiple snapshots, smaller images on filesystems that don't support sparse files, optional AES encryption, and optional zlib compression vmdk - VMware 3 & 4, or 6 image format, for exchanging images with that product vdi - VirtualBox 1.1 compatible image format, for exchanging images with VirtualBox. I found this solution for (VirtualBox) .VDI when I searched, on this website:
modprobe nbd max_part=16 qemu-nbd -c /dev/nbd0 /path/to/some.vdi mount -o loop /dev/nbd0p1 /mnt # do stuff umount /mnt qemu-nbd -d /dev/nbd0 rmmod nbd The same as «Qemu’s way» commands. No borders!
How to Mount VirtualBox Disk Image (VDI) to Access VM File-System in Ubuntu

This tutorial shows how to mount the VirtualBox virtual disk image in Ubuntu, so you can access the Guest OS file system with read and write permission, if it does not boot.
After misconfigured my VirtualBox Guest OS, it does not longer work. I know how to correct the issue to make it boot again, but firstly accessing to the file system is required!
Since the VBox user manual does not work, here’s what I did in Ubuntu 20.04 host with VirtualBox 6.1.x:
Before getting started, make sure Guest OS is shutdown. And the disk image is not in use. Also UN-MOUNT the disk once the job done.
1.) Firstly open terminal from system application launcher. When it opens, run command:
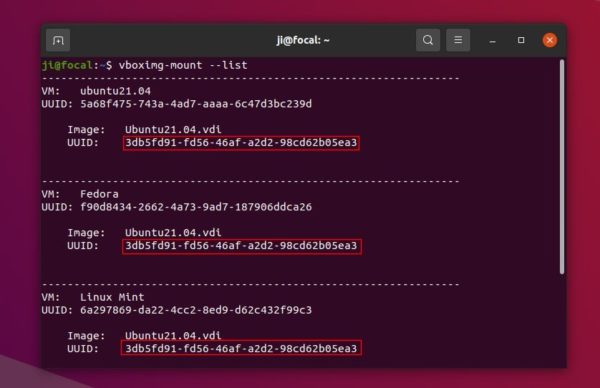
vboximg-mount is a utility to make VBox disk images available to the host. With —list , it list all Disk Images as well as the UUID.
In the case, I have all Guest OSes on single Disk Image (.vdi). And the uuid is: “3db5fd91-fd56-46af-a2d2-98cd62b05ea3”
2.) Next perform a FUSE mount of the virtual disk image:
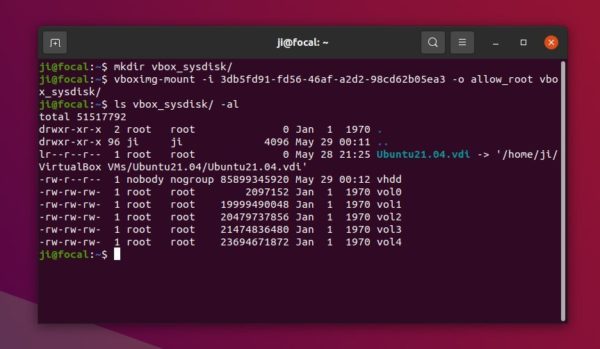
- First create a folder as mount point, vbox_sysdisk for instance:
vboximg-mount -i 3db5fd91-fd56-46af-a2d2-98cd62b05ea3 -o allow_root vbox_sysdisk
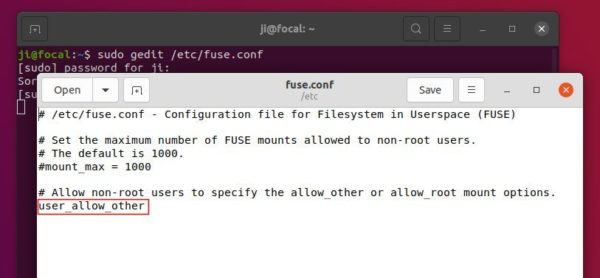
NOTE: You may need to edit the “/etc/fuse.conf” to make the -o allow_root flag work. To do so, run command sudo gedit /etc/fuse.conf and enable (remove # at its beginning) “user_allow_other” line.
3.) As the previous picture shows, I have 5 disk partitions: vol0, vol1, …, vol4. Now mount either partition (vol4 for instance) to /mnt via command:
sudo mount vbox_sysdis/vol4 /mnt
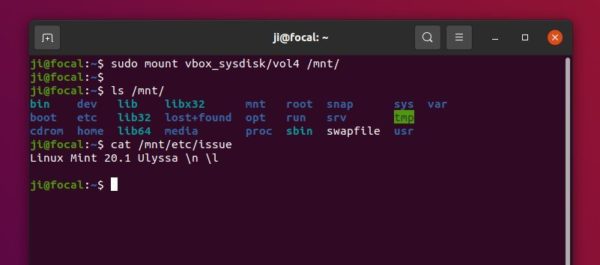
Finally go to /mnt directory and there you are.
Unmount:
To un-mount the guest os file system, run command:
To un-mount the VBox disk image, run command:
And you may finally remove that folder either from file manager or by running command in terminal:

Ji m
I’m a freelance blogger who started using Ubuntu in 2007 and wishes to share my experiences and some useful tips with Ubuntu beginners and lovers. Please comment to remind me outdated tutorial! And, notify me if you find any typo/grammar/language mistakes. English is not my native language. Contact me via [email protected] Buy me a coffee: https://ko-fi.com/ubuntuhandbook1