- Mount ntfs oracle linux
- No comments :
- About Us
- Mount ntfs oracle linux
- Как монтировать нестандартные файловые системы в Linux
- NTFS
- Установка компонентов
- Ручное монтирование
- Автоматическое монтирование
- GeeseFS (Yandex Cloud диск)
- Установка компонентов
- Авторизация
- Ручное монтирование
- Автоматическое монтирование
- How to Mount NTFS Partition in Linux
- Mount NTFS Partition with Read-Only Permission
- Identify NTFS Partition
- Create Mount Point and Mount NTFS Partition
- Mount NTFS Partition with Read-and-Write Permissions
- Update Package Repositories
- Install Fuse and ntfs-3g
- Mount NTFS Partition
Mount ntfs oracle linux
Today I wanted to pass an old disk in a usb-case to my son. It was from an old Windows Laptop and even though I’m administrator, I wasn’t able to read the documents in an other user’s folder.
So I thought, let’s do it from an Oracle Linux 7 VM, as root. But it turns out that Oracle linux did not support NTFS by default.
But with the trick in this link I managed to do it.
To sum up, especially for my self:
Add the EPEL-7 repository from Fedora:
# wget https://dl.fedoraproject.org/pub/epel/epel-release-latest-7.noarch.rpm # rpm -ivh epel-release-latest-7.noarch.rpm
This worked for me. Although I had to step over my issue that I add a Fedora repo to Oracle Linux. An other option could have been (probably if under Redhat Linux or CentOS:
# yum install epel-release . # yum clean all . # yum update .
Then I got to the FileManager and I could browse the disk. It was mounted at ‘/run/media/oracle/803638DB3638D3BE’.
No comments :
About Us
Darwin-IT Professionals is a Dutch Consulting Company.
As an intermediary in the Oracle world we focus on the growth of the Oracle professionals market. Our consultants can help you with the realization of your Oracle and Java projects and at the same time work on supporting of your workforce.
Through a combination of practical training and personal and subject-specific coaching our experienced professional support starting ICT-associates during the first phase of their carreer within your company.
This combination of experienced and starting consultants help you to perform your projects successfully and offers you the possibility to organize the acquisition of young, talented ICT-profesionals in a solid and smooth way.
Mount ntfs oracle linux
Initially you should check whether NTFS modules are already installed on your system.
$ ls -l /lib/modules/2.6.32-35-generic/kernel/fs/ | grep ntfs drwxr-xr-x 2 root root 4096 2011-11-08 09:12 ntfs
- NTFS-3G is an open source implementation of Microsoft’s NTFS file system that includes read and write support.
- NTFS-3G developers use the FUSE file system to facilitate development and to help with portability
fuse: get it from http://www.atrpms.net/dist/el5/fuse/ or http://sourceforge.net/projects/fuse/files/fuse-2.X/ ntfs-3g: You can download it from http://pkgs.repoforge.org/fuse-ntfs-3g/
# yum install fuse Loaded plugins: rhnplugin, security This system is not registered with ULN. ULN support will be disabled. Setting up Install Process Resolving Dependencies --> Running transaction check ---> Package fuse.i386 0:2.7.4-8.el5 set to be updated --> Finished Dependency Resolution Dependencies Resolved ================================================================================================ Package Arch Version Repository Size ================================================================================================ Installing: fuse i386 2.7.4-8.el5 ol5_u6_base 84 k Transaction Summary ================================================================================================ Install 1 Package(s) Upgrade 0 Package(s) Total download size: 84 k Is this ok [y/N]: y Downloading Packages: fuse-2.7.4-8.el5.i386.rpm | 84 kB 00:00 Running rpm_check_debug Running Transaction Test Finished Transaction Test Transaction Test Succeeded Running Transaction Installing: fuse 1/1 Installed: fuse.i386 0:2.7.4-8.el5 Complete! #
- If you can’t perform a yum installation, you can try installing fuse from your OEL media or performing a manual installation with the package downloaded from forgesource, as described here.
# rpm -Uvh fuse-ntfs-3g-2010.5.22-1.el5.rf.i386.rpm warning: fuse-ntfs-3g-2010.5.22-1.el5.rf.i386.rpm: Header V3 DSA signature: NOKEY, key ID 6b8d79e6 Preparing. ########################################### [100%] 1:fuse-ntfs-3g ########################################### [100%]
Как монтировать нестандартные файловые системы в Linux

Обновлено: 09.07.2023 Опубликовано: 09.08.2016
Данную инструкцию можно рассматривать как шпаргалку для работы с некоторыми файловыми системами в системах Linux. По мере возможности, список примеров будет пополняться.
NTFS
Установка компонентов
Для начала необходимо установить пакет ntfs-3g. В противном случае, при попытке запустить команду на монтирование раздела NTFS мы получим ошибку mount: unknown filesystem type ‘ntfs’.
Сначала устанавливаем расширенный репозиторий:
Затем сам пакет ntfs-3g
После установки данного пакета в системе появятся дополнительные команды mount.ntfs-fuse и mount.ntfs-3g., а также команда mount распознает опцию -t ntfs.
Ручное монтирование
Монтирование NTFS на чтение и запись выполняется любой из трех команд:
mount -t ntfs-3g /dev/sdb1 /mnt
* в данном примере, примотировано устройство /dev/sdb1 в раздел /mnt. Понять, какой устройство нужно монтировать можно при помощи команды fdisk -l
Автоматическое монтирование
Чтобы раздел автоматически монтировался при перезапуске компьютера, открываем на редактирование файл:
/dev/sdb1 /mnt ntfs defaults 0 0
* в данном примере мы раздел /dev/sdb1 будем монтировать в каталог /mnt.
Чтобы применить настройку и проверить ее, вводим:
Посмотреть примонтированные разделы и файловые системы можно командой:
GeeseFS (Yandex Cloud диск)
Установка компонентов
Сначала устанавливаем утилиты fuse и wget. В зависимости
yum install fuse fuse3 wget
Скачиваем geesefs и сохраняем ее в /usr/bin/geesefs:
wget https://github.com/yandex-cloud/geesefs/releases/latest/download/geesefs-linux-amd64 -O /usr/bin/geesefs
Выставляем разрешение утилиты geesefs на запуск:
Проверяем работу утилиты, посмотрев ее версию:
Мы должны увидеть что-то на подобие:
Авторизация
Yandex Cloud для монтирования диска требует прохождение аутентификации с помощью токена. Его мы получаем в личном кабинете хостера.
Для настройки доступа создаем каталог .aws в домашней директории пользователя, под которым будем монтировать диск. В моем случае, пользователь root:
После создаем файл с токеном:
[default]
aws_access_key_id = H. D
aws_secret_access_key = H. 7
Ручное монтирование
Для монтирования используем команду geesefs:
Автоматическое монтирование
Чтобы раздел автоматически монтировался при перезапуске компьютера, открываем на редактирование файл fstab:
fuse.geesefs _netdev,allow_other,—file-mode=0666,—dir-mode=0777 0 0
Если мы хотим, чтобы точке монтирования назвачался определенный владелец и группы, указываем опции uid и gid:
fuse.geesefs _netdev,allow_other,—file-mode=0666,—dir-mode=0777,—uid=1024,—gid=1024 0 0
Чтобы применить настройку и проверить ее, вводим:
How to Mount NTFS Partition in Linux
NTFS stands for New Technology File System. This file-storing system is standard on Windows machines, but Linux systems also use it to organize data.
Most Linux systems mount the disks automatically. However, in dual-boot setups, where file exchange is required between two systems with NTFS partitions, this procedure is performed manually.
This article will show you how to mount an NTFS partition in Linux with read-only or read-and-write permissions.
- A system running Linux
- A user account with sudo or root privileges
- Access to a terminal window / command line (Activities >Search >Terminal)
Mount NTFS Partition with Read-Only Permission
Follow the steps below to mount an NTFS partition with read-only access.
Note: A read-only partition allows users to read files. To enable writing to an NTFS partition, refer to the second section of the article.
Identify NTFS Partition
Before mounting an NTFS partition, identify it by using the parted command:
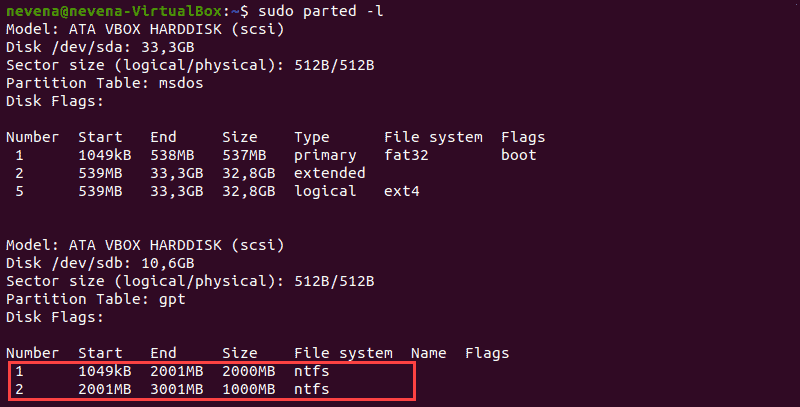
In the example above, two NTFS partitions are on the /dev/sdb disk. Note the partition number you want to mount before you proceed.
You can also use the fdisk and grep commands to show only NTFS partitions on a disk:
Create Mount Point and Mount NTFS Partition
In this example, we will mount the /dev/sdb1 partition with read-only permission.
First, create the mount point with the mkdir command:
Next, mount the partition to the directory you created. Use the mount command and the partition path you noted earlier:
sudo mount -t ntfs /dev/sdb1 /mnt/ntfs1Use the disk free tool to check the details of all filesystems and verify you mounted the partition successfully:
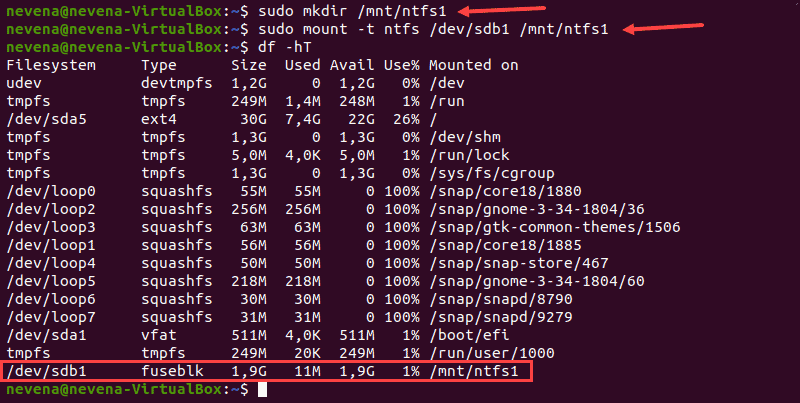
The /dev/sdb1 partition shows as mounted at the bottom of the list. You now have read-only access for this NTFS partition.
Mount NTFS Partition with Read-and-Write Permissions
To mount an NTFS partition with read-and-write permissions, you need to install fuse and ntfs-3 on your system.
Follow the steps below to complete the mounting process.
Note: Some Linux distributions may have fuse and ntfs-3g already installed by default.
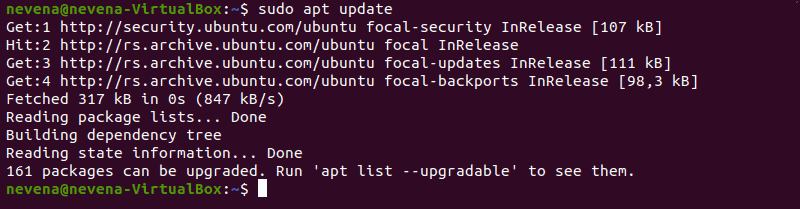
Update Package Repositories
Run the following command to download and update the package repositories:
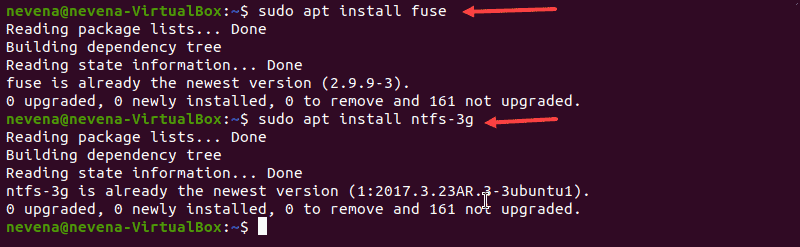
Install Fuse and ntfs-3g
To install fuse on your Linux system from the default repository, use the appropriate package manager. In our example, we use apt in Ubuntu.
When the installation completes, install ntfs-3g by running:
In case both fuse and ntfs-3g are already installed, the output looks similar to the one below:
Mount NTFS Partition
After you install the fuse and ntfs-3g software packages, mount your NTFS partition.
First, create a mount point by using the mkdir command :
Next, use the mount command to mount the partition you want. For example, /dev/sdb2 :
sudo mount -t ntfs-3g /dev/sdb2 /mnt/ntfs2/To check if the partition is mounted, run the df command:
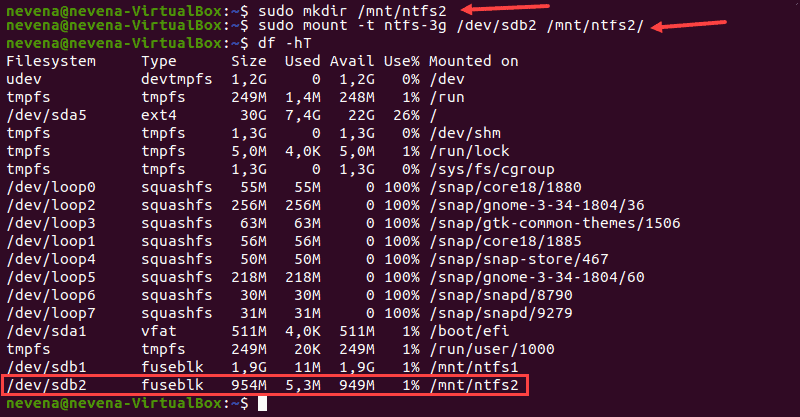
You now have the read/write permissions for the NTFS partition you mounted.
Note: Linux kernel version 2.6.20 or newer is recommended for mounting a partition via ntfs-3g. Learn on how to update the kernel on Ubuntu or how to update the kernel on CentOS.
After reading this article, you should have learned to mount an NTFS partition. Partition manipulation is crucial in a Linux system, and next, we recommend learning how to delete a partition in Linux and how to format disk partitions in Linux.
Dejan is the Head of Content at phoenixNAP with over 8 years of experience in Web publishing and technical writing. Prior to joining PNAP, he was Chief Editor of several websites striving to advocate for emerging technologies. He is dedicated to simplifying complex notions and providing meaningful insight into data center and cloud technology.
In Linux systems, in order to use storage devices such as Hard Drives and USB drives, you need to understand.
The ls command (short for ‘list’) lists information about directories and any type of files in the working.
A list of all the important Linux commands in one place. Find the command you need, whenever you need it or.