- How do I set read/write permissions my hard drives?
- 12 Answers 12
- You must log in to answer this question.
- Linked
- Related
- Hot Network Questions
- Subscribe to RSS
- How to Mount NTFS Partition in Linux
- Mount NTFS Partition with Read-Only Permission
- Identify NTFS Partition
- Create Mount Point and Mount NTFS Partition
- Mount NTFS Partition with Read-and-Write Permissions
- Update Package Repositories
- Install Fuse and ntfs-3g
- Mount NTFS Partition
How do I set read/write permissions my hard drives?
I’ve recently installed Ubuntu 11.10 on my laptop, but I can’t do anything with my 1.5TB external drive, and my 500GB because I don’t have write permission. Are there any specific commands I can use in the terminal to set the read/write permissions? The external is NTFS, and the 500GB is ext4.
12 Answers 12
for your 500 GB hard-drive (ext4) filesystem, you need to give the write and execute permission on /media/username/your_drive partition:-
sudo chmod ugo+wx /media/username/your_drive Brief Explanation:—
sudo :- it will elevate your priviledges to execute the command.
chmod:- command to change the permissions
/media/username/your_drive :- partition
For your NTFS partition please follow fossfreedom’s advice.
@loretoparisi try sudo chmod ugo+rwx /media/username/your_drive the r in the flags tells the computer to allow you to read as well as write and execute.
If you don’t mind the security problems you can do a recursive chmod in order to change the permissions of all the files.
cd /media/your_external_drive sudo chmod -R -v 777 * Also if your files were created in another OS like windows they will have different ownership you can do the same as above to change the ownership of the files
cd /media/your_external_drive sudo chown -R -v your_username:your_username * Thats the way I solved a similar problem for my friend after migrating from windows and also after migrating from Linux Mint to Ubuntu.
To only give yourself permission for the drive, but not for all of its contents, use: sudo chown -v your_username:your_username /media/your_external_drive
Please don’t recommend 0777 a.k.a. “please-hack-my-system-and-destroy-my-data” permissions for no apparent reason! There’s almost never a reason to do that because it can be avoided with more sensible modifications like changing (group) ownership. −1
To fix read/write issue ntfs, just install these packages:
sudo apt-get install ntfs-config ntfs-3g when installed, in the dash, type in and run: ntfs-config enter your password when prompted, and then you can enjoy read/write support for ntfs file systems.
Don’t mark all your files as executable as some answers suggest. Use 755 for directories and 644 for files. This will set the x bit for directories in order to list their contents but not for files.
find /path/to/drive \( -type d -exec chmod 0755 -- <> + \) -o \( -type f -exec chmod 0644 -- <> + \) @DavidFoerster Hi, thanks for the edit. This seems like a rather big change. Maybe it should be another answer instead?
Tell you what: I’ll meet you in the middle and change the find command so that it does exactly the same as your two find command but with only one pass through all directories.
I formatted my extended partition using GParted and the resulted drive had only root level access. In order to grant access to my username, I executed below command.
sudo chown -v username:username /media/username/disk-name I had the same problem and solved it with nautilus as root.
if nautilus is not installed:
sudo apt-get install nautilus Before running nautilus make sure the partition or hard disk is mounted.
Run nautilus as root with
Your partition or hard disk should appear on the left.
Right click on it -> select «Properties»
In the new window that appears, select the «Permissions» tab. From here you can change the owner if you need to, as well as the permission for a certain user, root, or others.
Welcome to Ask Ubuntu! I recommend to edit this answer to expand it with specific details about how to do this. (See also How do I write a good answer? for general advice about what sorts of answers are considered most valuable on Ask Ubuntu.)
I just keep getting Error setting permissions: Read only file system. if I try to change the permissions in Nautlius properties.
I was having a hard time solving the problem and this solution worked for me
- install physical storage device manger:
sudo apt-get install pysdm Note: if you can’t change files to binary executables, go to special files and check permit execution of files as binaries, and go to step 7
i installed pysdm before. Today, after a year or so i am trying to install pysdm again. I am getting Unable to locate package pysdm
Using Terminal (Use this when you are currently logged in Ubuntu):
- Quickly open the terminal or press Ctrl Alt T
- First you need to find out the partition’s name which you want to access, run the following command:
mount -t ntfs-3g -o rw /dev/sda1 /media/
Welcome to Ask Ubuntu! This looks like a copy-paste of this web page. When providing answers, please provide them in your own words. Also, please provide attribution to the sources you used.
I look around the forum for answers.
I have 3 users, «user1″ ,»user2», «user3»:
- user1 : is sudo user with most of the access
- user2 : is also sudo user with less access
- user3 : is just another user with no sudo access
Im trying to give access to partitions 1 and 2 to user1, user2 and user3 . The owner of the partition is root. the partitions are mounted at
Note : I tried to mount the partition using
sudo mkdir /media/IntHDD170 sudo mkdir /media/IntHDD171 Which created the directory to mount the partitions.
- Used nautilus as root.
- if nautilus is not installed: sudo apt-get install nautilus
- Before running nautilus make sure the partition or hard disk is mounted.
- Run nautilus as root with
From here you can change the owner if you need to, as well as the permission for a certain user, root, or others.
Note: The user1 ,user2 and user3 did not get access to the partitions yet
Step 2: Added User2 and user3 to group «user1».
usermod -aG user1 user2 usermod -aG user1 user3 chmod -R 777 /media/user2/1 chmod -R 777 /media/user2/2 LABEL=/dev/sda3 /media/$USER/1 auto nosuid,nodev,nofail,x-gvfs-show 0 0 LABEL=/dev/sda4 /media/$USER/2 auto nosuid,nodev,nofail,x-gvfs-show 0 0 And access partition 1 from user2.
I don’t know if this is the right way to do it. Just combined many responses and did. Somehow its working.
I had this problem in a dual boot (Mint + W10) when windows didn’t close down properly. I tried all the combinations to get rw permissions. Finally,
Going back to windows and turning off the pc did the job. Rights where restored! The fstab entries are written using ntfs-config.
If you are dualbooting windows and Ubuntu then there is an issue of improper dismount of hard-disks by windows. I observed this when I shut down from windows and switch to Ubuntu, I lose my write access to the disks even though I have Read and Write enabled. So, either you can turn off a feature of fast booting windows in the Power Options of Windows or you can Hibernate the windows and then switch to Ubuntu. This solved it for me. 🙂
These posts were very helpful fixing an old HDD for backup. Don’t format on Windows, use Ubuntu GPARTED, Previously I had formatted an old external HDD on Windows 7 as FAT but Ubuntu 20.04 ‘backup’ said it had no permissions to write, ‘backup fails’. ROOT is the owner and ‘Disks’ would not let me change owners to ‘me’ or change permissions . Solution: The HD was auto mounted to /dev and using ‘Disks’ I changed the mounting folder to /media/myname and the permissions automatically changed to ‘Me’ and then Ubuntu ‘backup’ executed fine.
This actually took about 6 hours to study and resolve.
You must log in to answer this question.
Linked
Related
Hot Network Questions
Subscribe to RSS
To subscribe to this RSS feed, copy and paste this URL into your RSS reader.
Site design / logo © 2023 Stack Exchange Inc; user contributions licensed under CC BY-SA . rev 2023.7.14.43533
Ubuntu and the circle of friends logo are trade marks of Canonical Limited and are used under licence.
By clicking “Accept all cookies”, you agree Stack Exchange can store cookies on your device and disclose information in accordance with our Cookie Policy.
How to Mount NTFS Partition in Linux
NTFS stands for New Technology File System. This file-storing system is standard on Windows machines, but Linux systems also use it to organize data.
Most Linux systems mount the disks automatically. However, in dual-boot setups, where file exchange is required between two systems with NTFS partitions, this procedure is performed manually.
This article will show you how to mount an NTFS partition in Linux with read-only or read-and-write permissions.
- A system running Linux
- A user account with sudo or root privileges
- Access to a terminal window / command line (Activities >Search >Terminal)
Mount NTFS Partition with Read-Only Permission
Follow the steps below to mount an NTFS partition with read-only access.
Note: A read-only partition allows users to read files. To enable writing to an NTFS partition, refer to the second section of the article.
Identify NTFS Partition
Before mounting an NTFS partition, identify it by using the parted command:
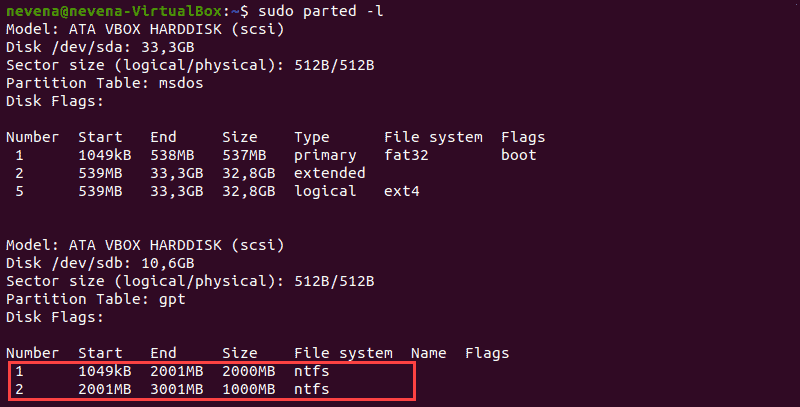
In the example above, two NTFS partitions are on the /dev/sdb disk. Note the partition number you want to mount before you proceed.
You can also use the fdisk and grep commands to show only NTFS partitions on a disk:
Create Mount Point and Mount NTFS Partition
In this example, we will mount the /dev/sdb1 partition with read-only permission.
First, create the mount point with the mkdir command:
Next, mount the partition to the directory you created. Use the mount command and the partition path you noted earlier:
sudo mount -t ntfs /dev/sdb1 /mnt/ntfs1Use the disk free tool to check the details of all filesystems and verify you mounted the partition successfully:
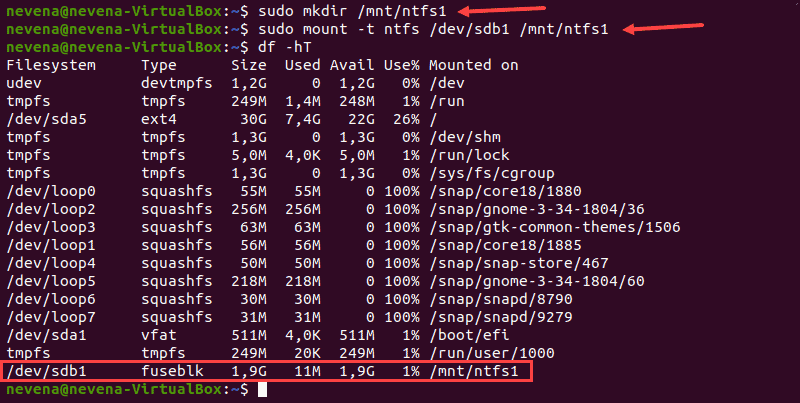
The /dev/sdb1 partition shows as mounted at the bottom of the list. You now have read-only access for this NTFS partition.
Mount NTFS Partition with Read-and-Write Permissions
To mount an NTFS partition with read-and-write permissions, you need to install fuse and ntfs-3 on your system.
Follow the steps below to complete the mounting process.
Note: Some Linux distributions may have fuse and ntfs-3g already installed by default.
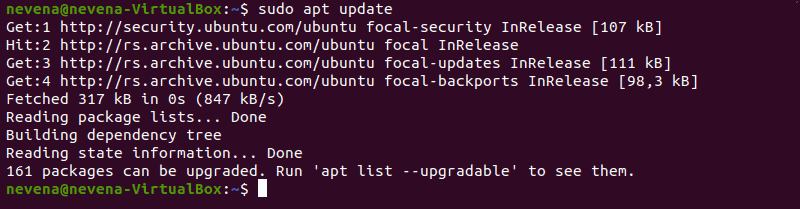
Update Package Repositories
Run the following command to download and update the package repositories:
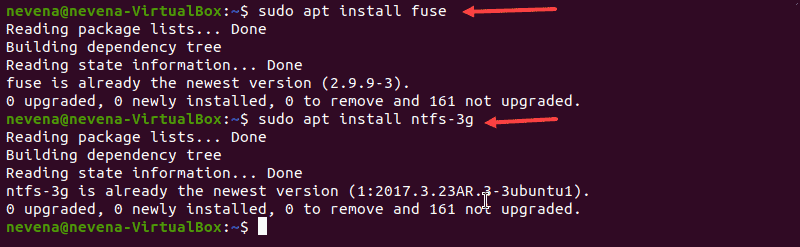
Install Fuse and ntfs-3g
To install fuse on your Linux system from the default repository, use the appropriate package manager. In our example, we use apt in Ubuntu.
When the installation completes, install ntfs-3g by running:
In case both fuse and ntfs-3g are already installed, the output looks similar to the one below:
Mount NTFS Partition
After you install the fuse and ntfs-3g software packages, mount your NTFS partition.
First, create a mount point by using the mkdir command :
Next, use the mount command to mount the partition you want. For example, /dev/sdb2 :
sudo mount -t ntfs-3g /dev/sdb2 /mnt/ntfs2/To check if the partition is mounted, run the df command:
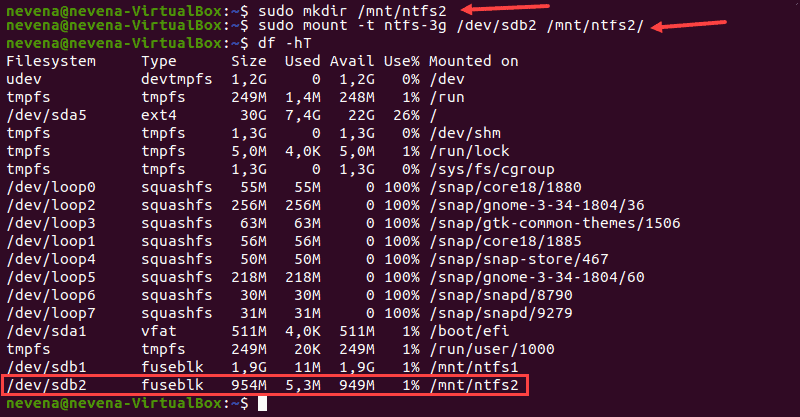
You now have the read/write permissions for the NTFS partition you mounted.
Note: Linux kernel version 2.6.20 or newer is recommended for mounting a partition via ntfs-3g. Learn on how to update the kernel on Ubuntu or how to update the kernel on CentOS.
After reading this article, you should have learned to mount an NTFS partition. Partition manipulation is crucial in a Linux system, and next, we recommend learning how to delete a partition in Linux and how to format disk partitions in Linux.
Dejan is the Head of Content at phoenixNAP with over 8 years of experience in Web publishing and technical writing. Prior to joining PNAP, he was Chief Editor of several websites striving to advocate for emerging technologies. He is dedicated to simplifying complex notions and providing meaningful insight into data center and cloud technology.
In Linux systems, in order to use storage devices such as Hard Drives and USB drives, you need to understand.
The ls command (short for ‘list’) lists information about directories and any type of files in the working.
A list of all the important Linux commands in one place. Find the command you need, whenever you need it or.