shamil / mount_qcow2.md
This is a quick guide to mounting a qcow2 disk images on your host server. This is useful to reset passwords, edit files, or recover something without the virtual machine running.
Step 1 — Enable NBD on the Host
Step 2 — Connect the QCOW2 as network block device
qemu-nbd --connect=/dev/nbd0 /var/lib/vz/images/100/vm-100-disk-1.qcow2 Step 3 — Find The Virtual Machine Partitions
Step 4 — Mount the partition from the VM
mount /dev/nbd0p1 /mnt/somepoint/ Step 5 — After you done, unmount and disconnect
umount /mnt/somepoint/ qemu-nbd --disconnect /dev/nbd0 rmmod nbd while doing step 4, i am getting the issue «mount: special device /dev/nbd1p2 does not exist». why am i getting this error?
after running «partx -a /dev/nbd0» also i am getting the error «partx: /dev/nbd1: failed to read partition table»
nbd module is not shipped with Fedora based distributions including centos/fedora/rhel. RedHat decided against shipping nbd kernel module due to security reasons. nbd module is only available on debian distributions.
Otherwise qemu-nbd is a nice tool to mount qcow2 images. The only other option is to use guestfish to mount and access individual files from qcow2 images.
$ lsb_release -a LSB Version: :core-4.1-amd64:core-4.1-noarch Distributor ID: Fedora Description: Fedora release 31 (Thirty One) Release: 31 Codename: ThirtyOne $ rpm -qf /usr/lib/modules/$(uname -r)/kernel/drivers/block/nbd.ko.xz kernel-core-5.3.16-300.fc31.x86_64 $ sudo modprobe nbd max_part=8 $ lsmod | grep nbd nbd 49152 0 I stand corrected then. I only tested with CentOS and Red Hat and I assumed Fedora falls into the same bucket. If nbd driver is available, then it is a better option than guest fish based mount.
Works perfectly on Debian 10.
It doesn’t work in my situation:
NTFS signature is missing. Failed to mount '/dev/nbd0p2': invalid arguments The device '/dev/nbd0p2' doesn't seem to have a valid NTFS. Maybe the wrong device is used? Or the whole disk instead of a partition (e.g. /dev/sda, not /dev/sda1)? Or the other way around?
sudo file -s /dev/nbd0p2 /dev/nbd0p2: data
lsmod |grep -i nbd nbd 45056 2 Thanks for the tip! There is another simple way to do this though:
guestmount -a path_to_image.qcow2 -i —ro /mount_point # safe, read only
guestmount -a path_to_image.qcow2 -i /mount_point # use only on not running vm image
guestmount utility can be found in libguestfs-tools package (on Debian and RHEL).
[root@rave-pony-1 ~]# cat /etc/redhat-release CentOS Linux release 7.8.2003 (Core) [root@rave-pony-1 ~]# uname -sr Linux 4.10.4-1.el7.elrepo.x86_64 [root@rave-pony-1 ~]# modprobe nbd max_part=8 [root@rave-pony-1 ~]# ls /dev/nbd* /dev/nbd0 /dev/nbd10 /dev/nbd12 /dev/nbd14 /dev/nbd2 /dev/nbd4 /dev/nbd6 /dev/nbd8 /dev/nbd1 /dev/nbd11 /dev/nbd13 /dev/nbd15 /dev/nbd3 /dev/nbd5 /dev/nbd7 /dev/nbd9 [root@virt-tool ~]# cat /etc/redhat-release CentOS Linux release 7.8.2003 (Core) [root@virt-tool ~]# uname -sr Linux 3.10.0-1127.el7.x86_64 [root@virt-tool ~]# modprobe nbd max_part=16 modprobe: FATAL: Module nbd not found. [root@virt-tool ~]# ls /dev/nbd* ls: cannot access /dev/nbd*: No such file or directory you kill my arch Linux angryangryangryangryangryangryangryangryangryangryangryangryangryangryangry
If you don’t know how to mount a filesystem then you shouldn’t use archlinux. Have a look at the documentation for the mount command to learn how to fix your problem.
I have some issues with step 4 .
step 3 output:
Disk /dev/nbd0: 8 GiB, 8589934592 bytes, 16777216 sectors Units: sectors of 1 * 512 = 512 bytes Sector size (logical/physical): 512 bytes / 512 bytes I/O size (minimum/optimal): 512 bytes / 512 bytes Disklabel type: gpt Disk identifier: 0CBEE71E-00C3-470C-B2C4-74D20202393E Device Start End Sectors Size Type /dev/nbd0p1 2048 4095 2048 1M BIOS boot /dev/nbd0p2 4096 2101247 2097152 1G Linux filesystem /dev/nbd0p3 2101248 16775167 14673920 7G Linux filesystem Then mount -o ro /dev/nbd0p1 /mnt/fs_mnt/
wrong fs type, bad option, bad superblock on /dev/nbd0p1, missing codepage or helper program, or other error. I guess, the issue is because it’s a GPT disk.
Any idea how this can be solved? (Tried fixing the drive with fsck , but it didn’t help.)
How to mount qcow2 image
I’ve read that with qemu-nbd and the network block device kernel module, I can mount a qcow2 image. I haven’t seen any tutorials on mounting a qcow2 via a loop device. Is it possible? If not, why? I don’t really understand the difference between a qcow2 and an iso.
You don’t mount a qcow2 image via a loop device; you mount it via the network block device (nbd). Not intuitive, but easy enough to find via your favourite search engine.
5 Answers 5
Step 1 — Enable NBD on the host
Step 2 — Connect the QCOW2 as a network block device
qemu-nbd --connect=/dev/nbd0 /var/lib/vz/images/100/vm-100-disk-1.qcow2 Step 3 — List partitions inside the QCOW2
Step 4 — Mount the partition from the VM
mount /dev/nbd0p1 /mnt/somepoint/ You can also mount the filesystem with normal user permissions, ie. non-root:
mount /dev/nbd0p1 /mnt/somepoint -o uid=$UID,gid=$(id -g) Step 5 — After you’re done, unmount and disconnect
umount /mnt/somepoint/ qemu-nbd --disconnect /dev/nbd0 rmmod nbd Thanks to Gilles for pointing out guestmount. Mounting a qcow2 image is very simple on RHEL/Centos/Fedora:
- First install guestmount (comes as part of libguestfs-tools in Centos6)
yum install libguestfs-tools libguestfs guestmount -a path_to_image.qcow2 -i --ro /mount_point Note: This only addresses the question title. Please see Peter’s answer for the differences between qcow2 and ISOs.
Ugh. Debian 11: apt-get install libguestfs-tools: 379 packages newly installed, 251 MB of archives, after unpacking 861 MB occupied. I’ll try to avoid that.
A loop device just turns a file into a block device. If the file has some special internal mapping of its blocks, the loop device won’t translate any of it. qcow2 is special. it has special mapping inside that handles different snapshots of the same blocks stored in different places. If you mount that as a loop device, you’ll just get one big block device that doesn’t represent the actual data in the image.
Another option is to convert to raw and mount as a loop device:
qemu-img convert -p -O raw oldfile.qcow2 newfile.raw But then you have to convert it back to qcow2 to use it again as before.
I think using qemu-nbd is not the most efficient IO, but is easy. Mounting it in a VM, like one booted with a live usb, is easy too. Converting doesn’t make much sense. it was just an example of how they’re different.
guestmount is the easy way! It does the mounting-in-a-vm under the hood, but it’s all wrapped up neatly.
There’s also a way to do this with FUSE with nbdfuse. It has the advantage that you do not need root access, but it won’t be as efficient as the NBD module approach given in other answers:
$ touch /tmp/file.raw $ nbdfuse /tmp/file.raw [ qemu-nbd -f qcow2 file.qcow2 ] & $ ls -l /tmp/file.raw -rw-rw-rw-. 1 nbd nbd 1073741824 Jan 1 10:10 /tmp/file.raw I could not make guestmount work on my VirtualBox machine and qemu-img convert was not an option or maybe I just did not know the way to convert into a format where the disk was not of full size defined for Qcow2 — it wanted to create 40GB of VDI apparently although there was only few GB of disk used.
So I looked for something different and found qemu-nbd to be a great alternative especially if you have many partitions on the disk. It is a bit more commands but it is still faster than the path I would have to go to make guestmount to work on my VirtualBox VM.
The manual for qemu-nbd is realtievely simple but you can see here for further advice.
It worked like a charm. So in case you cannot get over the mount error 1, you can try this.
How to mount qcow2 disk image on Linux
Question: I have a qcow2 -type disk image which is used by one my guest VMs on QEMU/KVM. I want to modify the content of the disk image without powering on the VM, and for this I need to mount the disk image somewhere. Is there a way to mount a qcow2 disk image on Linux?
When you run a guest virtual machine (VM) on a hypervisor, you create one or more disk images dedicated to the VM. As a virtual disk volume, a disk image represents the content and structure of a storage device (e.g., a hard disk drive or flash drive) attached to the VM. If you want to modify files in a VM’s disk image without powering on the VM, you could mount the disk image. You then would be able to modify the content of the disk image before unmounting it.
In Linux, there are ways to mount a disk image, and different types of disk images require different approaches. If you are using qcow2 -type disk images (used by QEMU/KVM), there are at least two ways to mount them on Linux.
Method One: libguestfs
The first method to mount a qcow2 disk image is by using libguestfs which provides (among other things) a suite of tools for accessing and editing VM disk images. libguestfs supports pretty much all kinds of disk images including qcow2 . You can install the libguestfs toolset on Linux as follows.
On Debian-based system:
$ sudo apt-get install libguestfs-tools
On Red Hat-based system:
$ sudo yum install libguestfs-tools
Once the libguestfs toolset is installed, you can mount a qcow2 image using a command-line tool called guestmount as follows. Note that when a VM is running, you must not mount its disk image in read-write mode. Otherwise, you run the risk of damaging the disk image. Thus, it is safe to always turn off a VM before mounting its disk image.
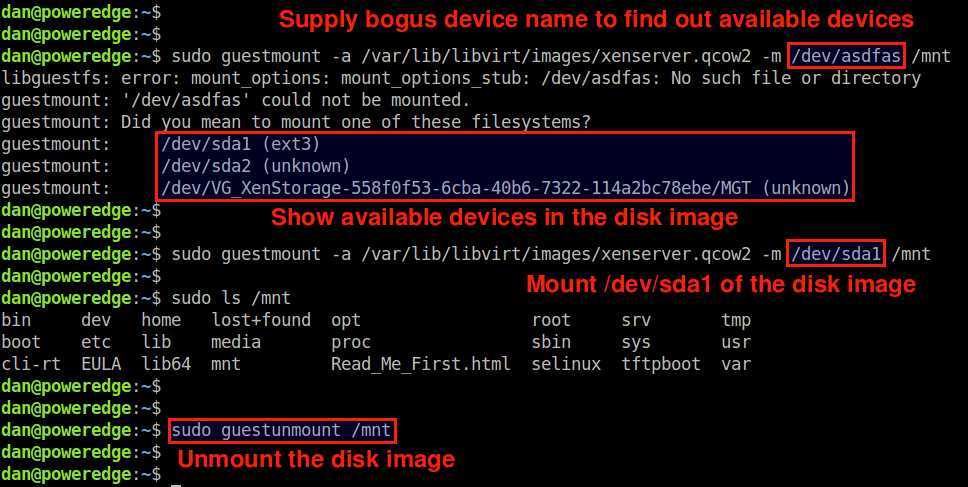
$ sudo guestmount -a /path/to/qcow2/image -m /path/to/mount/point
The -m option is used to specify a partition within the disk image, that you want to mount (e.g., /dev/sda1 ). If you are not sure what partitions exist in the disk image, you can supply any bogus device name. The guestmount tool will then show you available device names to choose from.
For example, to mount /dev/sda1 in the disk image xenserver.qcow2 at /mnt mount point, run the following.
$ sudo guestmount -a /var/lib/libvirt/images/xenserver.qcow2 -m /dev/sda1 /mnt
By default, the disk image is mounted in read-write mode. So you can modify any file in /mnt after mounting it.
If you want to mount it in read-only mode:
$ sudo guestmount -a /var/lib/libvirt/images/xenserver.qcow2 -m /dev/sda1 --ro /mnt
Method Two: qemu-nbd
Another method to mount a qcow2 disk image is via qemu-nbd , a command-line tool that exports a disk image as a network block device ( nbd ).
You can install qemu-nbd on Linux as follows.
On Debian-based system:
$ sudo apt-get install qemu-utils
On Red Hat-based system:
To mount a qcow2 disk image, first export the image to nbd as follows.
$ sudo modprobe nbd max_part=8 $ sudo qemu-nbd --connect=/dev/nbd0 /path/to/qcow2/image
The first command loads the nbd kernel module. The max_part=N option specifies the maximum number of partitions we want to manage with nbd . The second command exports the specified disk image as a network block device ( /dev/nbd0 ). As a network block device, you can use /dev/nbd0 , /dev/nbd1 , /dev/nbd2 , etc. whichever is unused. As for the disk image, make sure to specify its full path.
For example, to export the image xenserver.qcow2 as /dev/nbd0 :
$ sudo qemu-nbd --connect=/dev/nbd0 /var/lib/libvirt/images/xenserver.qcow2
After this, existing disk partitions in the disk image will be mapped to /dev/nbd0p1 , /dev/nbd0p2 , /dev/nbd0p3 , etc.
To check the list of nbd -mapped partitions, use fdisk :
Finally, choose any one partition (e.g., /dev/nbd0p1 ) and mount it to a local mount point (e.g., /mnt ).
Now you will be able to access and modify the content of the disk image’s mounted partition via /mnt mount point.
Once you are done, unmount it, and disconnect the disk image as follows.
$ sudo umount /mnt $ sudo qemu-nbd --disconnect /dev/nbd0

Support Xmodulo
This website is made possible by minimal ads and your gracious donation via PayPal or credit card
Please note that this article is published by Xmodulo.com under a Creative Commons Attribution-ShareAlike 3.0 Unported License. If you would like to use the whole or any part of this article, you need to cite this web page at Xmodulo.com as the original source.