- How do I mount an SD card?
- 7 Answers 7
- Format SD Card in Linux
- What Will We Talk About?
- Prerequisite:
- Looking for the SD Card Device
- A list of all block devices are printed by this command.
- Unmounting the Device
- Approach 1: Using the Disk Utility to Format an SD Card
- Approach 2: Using the Command Line to Format an SD Card
- Conclusion
- About the author
- Ali Imran Nagori
- Как вставить флешку под Линукс
- Шаг 1.
- Шаг 2
- Шаг 3
- Шаг 4 — Монтирование образа
How do I mount an SD card?
My computer has an SD card slot. When I put a working SD card into the slot, nothing happens. When I put a CD or DVD in, or plug in a USB drive, the medium is mounted and available. Is there something special I need to do for SD cards? Hardware specifics I am running 11.10 on a Dell XPS L502X. The card slot is marked «SDXC/MMC — MS/Pro» (which Wikipedia tells me are various SD card types).
Normally you don’t need to do anything special. Could you update the question to include the version of Ubuntu you’re using? Also, you can open a terminal (ctrl-alt-t), type «tail -f /var/log/syslog», insert an SD card, and see what messages pop up. If you don’t know what they mean you could paste the lines that appear when you insert the SD card in your question too. All this info is helpful to see what may be wrong with your card reader.
@roadmr I was going to post the results from syslog along with Huckle’s suggestions, but when I plugged the SD card in. nothing happened! I may be missing something, but based on the output from the commands below, I think it doesn’t even know the slot is there
Could you please update the question with your computer’s make/model, version of Ubuntu, as well as the output of running «sudo lspci -nn». We can then check if your card reader is supported by your Ubuntu version.
thanks, I don’t see the card reader in lspci output, so maybe it’s connected to the USB bus, could you post output of lsusb? then again, it’s rare for USB card readers to not work at all..
7 Answers 7
I have the same laptop, the slot does work on Ubuntu 12.04, but the OS doesn’t seem to find the card when it is inserted. It appears you have 2 options in the short term:
- Reboot with the SDcard in the slot.
- Do a PCI re-scan
echo 1 | sudo tee /sys/bus/pci/rescan The bug with the workaround is listed here.
There are a few things you can do to make sure everything is working as expected.
1) Verify that Ubuntu knows about your SD card slot and what to do with it
2) Verify that Ubuntu knows you inserted something
3) Verify that Ubuntu understands the filesystem on the thing you inserted.
1) Check the outputs of the commands sudo lspci -v -nn , sudo lsusb , and sudo lshw on the command line. Here is a good guide for understanding lshw which lists an example SD Card reader.
2) Then run the following command before inserting the SD card and a few seconds after inserting it: ls -la /dev/sd* . This command lists all of the hard drives, CDs, DVDs, floppies, SD cards, etc that Ubuntu knows about. (These are called Block Devices).
Ideally you will see a few entries on the second run that you don’t see on the first. For example:
$ls -la /dev/sd* brw-rw---- 1 root disk 8, 0 2012-01-14 11:27 /dev/sda brw-rw---- 1 root disk 8, 16 2012-01-14 11:27 /dev/sdb brw-rw---- 1 root disk 8, 32 2012-01-14 11:27 /dev/sdc brw-rw---- 1 root disk 8, 33 2012-01-14 11:27 /dev/sdc1 brw-rw---- 1 root disk 8, 34 2012-01-14 11:27 /dev/sdc2 brw-rw---- 1 root disk 8, 35 2012-01-14 11:27 /dev/sdc3 brw-rw---- 1 root disk 8, 36 2012-01-14 11:27 /dev/sdc4 brw-rw---- 1 root disk 8, 37 2012-01-14 11:27 /dev/sdc5 (Now insert the SD card) $ls -la /dev/sd* brw-rw---- 1 root disk 8, 0 2012-01-14 11:27 /dev/sda brw-rw---- 1 root disk 8, 16 2012-01-14 11:27 /dev/sdb brw-rw---- 1 root disk 8, 32 2012-01-14 11:27 /dev/sdc brw-rw---- 1 root disk 8, 33 2012-01-14 11:27 /dev/sdc1 brw-rw---- 1 root disk 8, 34 2012-01-14 11:27 /dev/sdc2 brw-rw---- 1 root disk 8, 35 2012-01-14 11:27 /dev/sdc3 brw-rw---- 1 root disk 8, 36 2012-01-14 11:27 /dev/sdc4 brw-rw---- 1 root disk 8, 37 2012-01-14 11:27 /dev/sdc5 brw-rw---- 1 root disk 8, 64 2012-01-14 11:28 /dev/sdd See that extra one at the end /dev/sdd that is the SD card.
3) Check that Ubuntu understands the filesystem on the drive. I would bet it is either Fat32 or NTFS. You can check if your copy of Ubuntu understands those filesystems (it should) by running this command: cat /proc/filesystems . In this list vfat is Fat32 and (for all intents and purposes) fuse is NTFS. **Note: this list is not extensive.
A better way is to simply try to mount the SD card manually. Run the following commands in order until one works (replace the X in /dev/sdX1 with the letter from step 2):
sudo mount /dev/sdX1 /mnt sudo mount -t vfat /dev/sdX1 /mnt sudo mount -t ntfs /dev/sdX1 /mnt sudo mount -t msdos /dev/sdX1 /mnt No output means it worked, and you should be able to navigate to your SD card with nautilus at /mnt . If none of them worked, try plugging your SD card into a windows machine and running chkdsk on it, or verify the filesystem type.
Format SD Card in Linux
![]()
An SD card must be formatted and partitioned before it can be used. Almost all SD cards come with the FAT file system that is already set up so they don’t need to be formatted the first time. Yet, there are times when formatting the drive is necessary.
You can format an SD drive and create the necessary partitions using a graphical tool like GParted or with command-line tools like fdisk or parted.
What Will We Talk About?
In this article, we will show you how to format an SD card on a Linux operating system. Specifically, we will use an Ubuntu 20.04 system for this article.
Prerequisite:
For this tutorial, you should have the following basic prerequisites:
- The user should have superuser privileges on the system.
- Basic knowledge of the Linux command line and partition management.
Warning: Formatting is a destructive process and deletes all data on the device. Make sure that you have a backup of important files that are stored on the SD card.
Looking for the SD Card Device
We need to find our target device on the system before we can move on. For this, run the following command before plugging in the SD card:
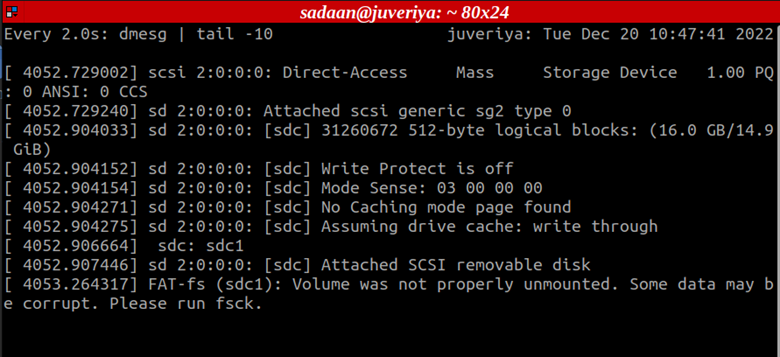
Now, we insert the SD card and watch the output of the previous command. It prints a message which confirms that the device is attached. We can also use the lsblk command to verify the device:
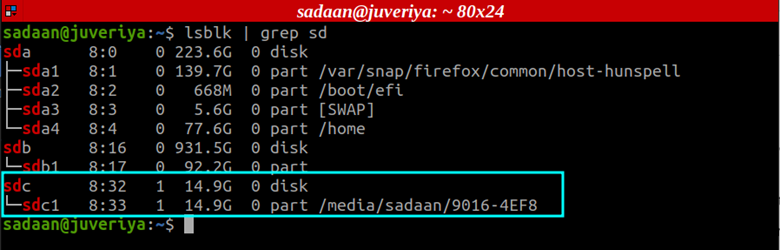
A list of all block devices are printed by this command.
In our case, the name of the device is /dev/sdc. The name can be different depending on the distribution in use.
Unmounting the Device
There may be existing partitions on the target SD card. We can find them using the command:
If the output shows the device names with number suffixes, this means that there are formatted partitions. Again, please take a look at the previous warning in red.
Let’s unmount these partitions using the following command:
Approach 1: Using the Disk Utility to Format an SD Card
To format the SD card using the Disk Utility, follow the provided steps:
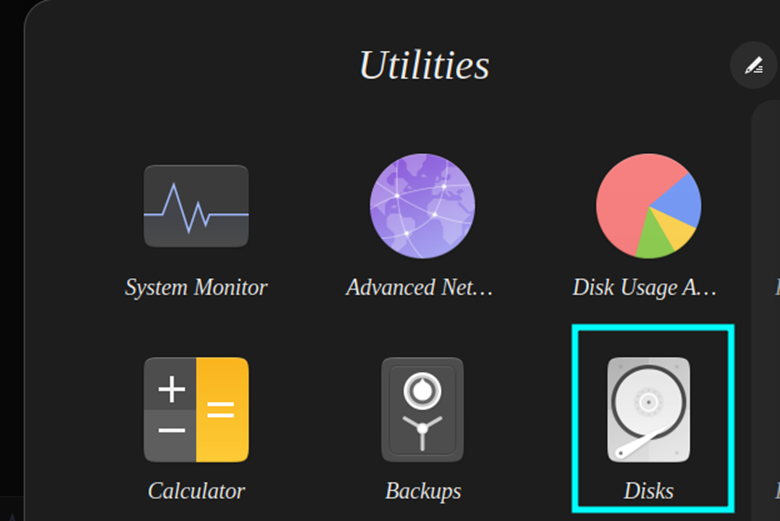
Step 1. Open the Disk Utility program from the Applications folder.
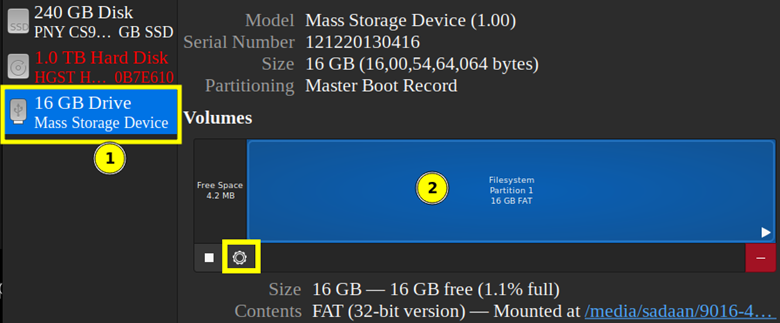
Step 2. From the pop-up window, select the target device from the list on the left. Now, from the right tab, select the partition which contains a filesystem. Then, left-click the gear icon and select the “Format Partition” option.
In order to make sure that no data remains on the device, you can also permanently delete the partition using the parted tool:
Step 3. Now, a new window appears where you can give a name to your SD card (volume). Also, if you want to overwrite all existing data, you can turn on the Erase switch.
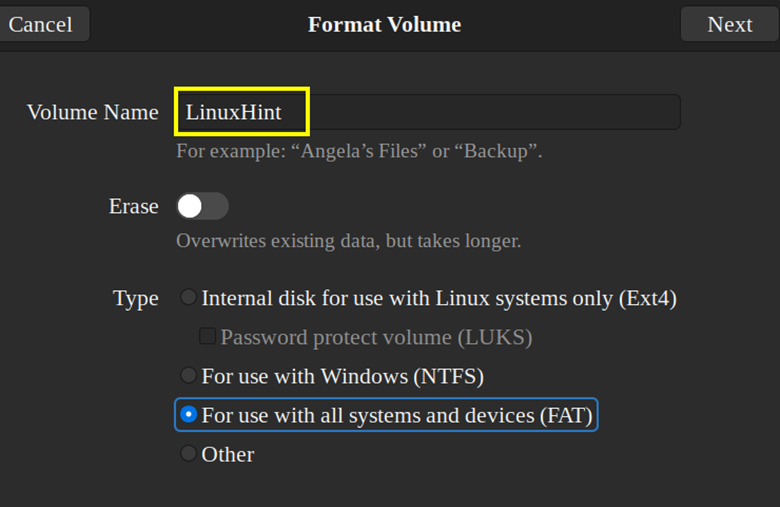
For the “Type” block, you can select Ext4, FAT, NTFS, or any other available format. Now, press the Next button.
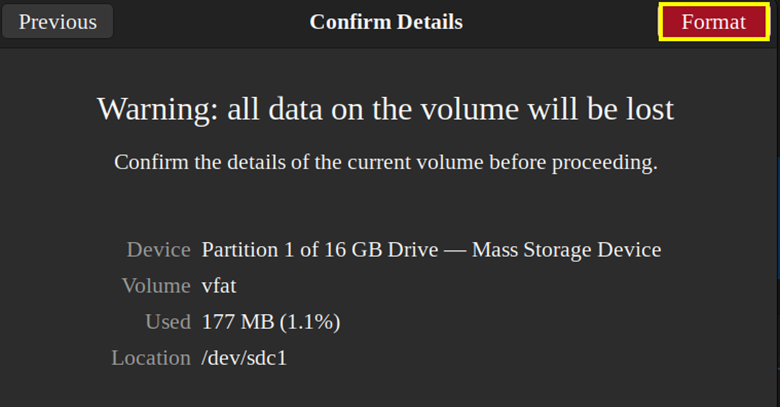
Step 4. Finally, click the Format button on the next window to start the process.
Your SD card is finally formatted and ready for use. You can mount it and start creating files and directories.
Approach 2: Using the Command Line to Format an SD Card
Let’s look at how to format an SD card from the command line.
Step 1. First, open the terminal and check the disk to be formatted:
To complete the task, it is important to select the appropriate disk.
Step 2. Now, as we mentioned earlier in the “Unmounting the Device” section, unmount the SD card (skip this step if it is not mounted).
Step 3. Let’s create a new partition from the terminal with the GNU parted command. For this tutorial, we create a single partition that occupies the whole drive. The disk size in our case is 16 GB. The mklabel msdos parameter tells us that the standard for our partitions is MBR.
To use the GNU Parted command here, enter “parted” followed by the device filename for the target disk such as /dev/sdc.

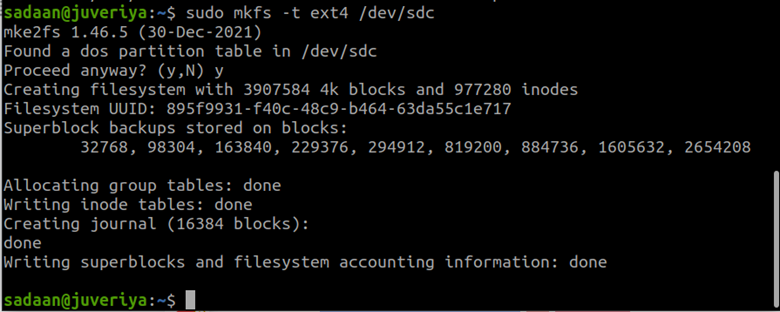
Step 4. In Linux, simply creating the partitions is not enough to render them useful. As a result, we must format them and create a file system for them. You can now format the SD card in any format that you need. For example, to use the ext4 format, we use the following command:
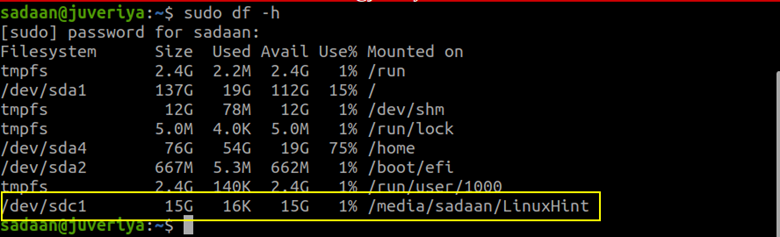
Step 5. Next, mount the new partition on the filesystem, say /mnt. Also, verify using the following lsblk command:

That’s all we have to do to format an SD card on Linux.
Conclusion
In this article, we looked at how to use the different file systems to format and mount an SD card disk in Linux. While formatting the disks under Linux is simple (assuming you know what you’re doing), any misstep might result in the loss of data.
About the author
Ali Imran Nagori
Ali imran is a technical writer and Linux enthusiast who loves to write about Linux system administration and related technologies. You can connect with him on LinkedIn
.
Как вставить флешку под Линукс

Не претендую на энциклопедичность, просто привожу команды которыми пользуюсь сам.
Это все делать надо под рутом, может это и не обязательно, но у меня по умолчанию так.
Шаг 1.
Перед установкой флешки ввести команду
ls это, как я понимаю, от слова list т.е. список
dev — device устройство
/dev — это каталог, в который монтируется виртуальная файловая система устройств
Может быть: devfs или как и у всех современных дистров — udevfs.
sd — говорит о том что это sata (то ли sata device то ли sata drive)
« скорее от слова SCSI, ну эт так, мелочи)»
* — это опция поиска — т.е. будет список типа sda, sda1, sdb и т.д.
«ЗЫ устройство может быть каким нидь sdriveofsupernewtechnology в деве) т.е. начало sd к скази не привязано, это так, для общего понимания)»
Если нужно посмотреть не sata, а IDE диски, то писать следует, например, не sda а hda
Обратите внимание, что после ls нужен пробел, т.к. ls это команда а всё остальное — её параметры, а между командой и параметрами всегда должен стоять пробел (по крайней мере я пока не встречал случая где это не так)
таких случаев в шелле не существует) ну на крайняк табуляция)
Синий начал думать на эту тему и выдал следующее:
« придумал как после команды пробел не ставитьmount|grepПРАБЕЛsd, но это не перед параметром»
Шаг 2
Физическая установка флешки в USB порт.
Шаг 3
Все новое по сравнению с предыдущим разом и есть ваша флешка. Причем, если появилось, например, sdb и sdb1, то sdb — это флешка в целом (не знаю как это понять), а sdb1 — и есть раздел, который нужно будет монтировать.
Шаг 4 — Монтирование образа
Само слово «монтирование» может смутить начинающего пользователя.
Смысл всей манипуляции — показать системе как связать какой-то из видимых дисков с какой-то папкой. Также есть момент с файловой системой, но я в эти тонкости пока не лезу.
Итак, предположим, что новый диск который мы нашли в Шаг 3. называется sdb, а папку которую мы для него создаем хочется назвать, например, flashcard.
Если папки flashcard у вас нет — её нужно создать, пишем
Это обычно надо делать под рутом.
mount /dev/sdb1 /mnt/flashcard
Если нужно указать файловую систему, то пишем например
mount -t vfat /dev/sdb /mnt/flashcard
где vfat — это указание файловой системы (fat)
Нашел в блогах вполне адекватный пост про все это дело. Предупреждаю сразу: там букв намного больше. mydebianblog
- Поиск по сайту
- aofeed — Telegram канал чтобы следить за выходом новых статей
- aofeedchat — задать вопрос в Телеграм-группе