- Mounting a windows share in Windows Subsystem for Linux
- 5 Answers 5
- Как в Linux монтировать шару CIFS
- Подготовка
- Установка пакетов
- Сетевые порты
- Синтаксис
- Ручное монтирование
- Автоматическое монтирование CIFS через fstab
- Примеры использования опций
- Версии SMB
- Монтирование от гостевой учетной записи
- Права на примонтированные каталоги
- How to Mount Windows SMB Share on Linux with CIFS
- Mount Windows Share on Linux with Cifs-util
- Automatically Mount Network SBM Shares on Linux
- How to Access Windows Share on Linux with a Samba Client
Mounting a windows share in Windows Subsystem for Linux
I can’t say I really use WSL much, so this is one of the first questions I had.. but then when I browsed to my /mnt directory, I realized all of my Windows drives are auto-mounted. Maybe this wasn’t the case when WSL just came out but seems to be default behavior now. Just FYI. Thanks!
5 Answers 5
Assuming the host Windows OS can access a file share at «\\servername\sharename», try this command in bash. You will need to be root:
mkdir /mnt/mountedshare mount -t drvfs '\\servername\sharename' /mnt/mountedshare The single quotes are important!
Worked for me with a SharePoint Online UNC path. The permissions are screwy though. I can navigate through the folders and see the filenames, but I can’t read files. So need to figure out the permissions thing. Let me know if you get anywhere with that.
I knew that mount -t drvfs ‘
I don’t know about the rest of you, but the only option to connect to SMB share from WSL is to use the drive letter syntax (as answered by gabuzo below). If I use the unc drive syntax in single quotes ‘\\uncsharename\z’, I get this error (i’m using WSL2 from Windows 10 v2004 Ubuntu 16 LTS) mount: /mnt/z: wrong fs type, bad option, bad superblock on \\uncsharename\z, missing codepage or helper program, or other error.<3>init: (8787) ERROR: UtilCreateProcessAndWait:489: /bin/mount failed with status 0x2000No error information
Actually if your windows share is already mapped to a drive in the Windows host, it can be even simpler. Let’s suppose you already mounted the share on Z: . In that case the following will work:
sudo mkdir /mnt/z sudo mount -t drvfs 'Z:' /mnt/z Mounting an SMB server share should be straightforward, I tested this on Windows build 1909 and WSL 2.0 Ubuntu 20.04.1 LTS (GNU/Linux 4.19.128-microsoft-standard x86_64). You use mount just as usual:
sudo mount -t drvfs '\\server\share' /your/mount/folder Nothing too hard, the source path of the mount is the regular UNC pathname. The important bits are the file system type («drive filesystem»?) and the fact that you need to enclose the server path in single quotes (on the command line). As usual, your mount folder must also exist.
On this WSL issue I found good options (-o) that seem to work very well with creating, reading and writing files without sudo as well as reading correct modification/creation dates:
metadata,rw,noatime,uid=1000,gid=1000,umask=22,fmask=11 Because I like to have this server mounted always, I put the mount instruction into /etc/fstab to have it auto-mounted by WSL:
\\server\share /your/mount/folder drvfs metadata,rw,noatime,uid=1000,gid=1000,umask=22,fmask=11 0 0 (you can reload fstab with sudo mount -a )
Note that I have logged into the server on Windows itself and made it remember the user and password. @David C. Rankin’s answer has some info on how to specify username and password if you need to do it separately.
Как в Linux монтировать шару CIFS

Обновлено: 01.05.2023 Опубликовано: 18.07.2016
Что такое Linux и CIFS простыми словами. Работа с общими папками Windows происходит с использованием протокола CIFS (SMB). Все примеры в данном руководстве выполняются на Linux Ubuntu и CentOS.
Подготовка
Установка пакетов
Сетевые порты
Синтаксис
* вместо mount.cifs можно написать mount -t cifs.
mount.cifs //192.168.1.1/public /mnt
* простой пример монтирования папки public на сервере 192.168.1.1 в локальный каталог /mnt.
Если нам не известны расшаренные папки на сервере, мы можем воспользоваться утилитой smbclient. Для начала установим ее.
а) на RPM (Rocky Linux / РЕД ОС / Red Hat / CentOS / Fedora):
б) на Deb (Debian / Ubuntu / Astra Linux / Mint):
или, при необходимости авторизоваться на файловом сервере:
smbclient -L 192.168.1.1 -U username
Ручное монтирование
Теперь монтирование можно выполнить следующей командой:
mount.cifs //192.168.1.10/share /mnt -o user=dmosk
* в данном примере будет примонтирован каталог share на сервере 192.168.1.10 в локальную папку /mnt под учетной записью dmosk.
То же самое, с использованием домена:
mount.cifs //192.168.1.10/share /mnt -o user=dmosk,domain=dmosk.local
Автоматическое монтирование CIFS через fstab
Для начала создаем файл, в котором будем хранить данные авторизации при подключении к общей папке:
И добавляем в него данные следующего вида:
username=dmosk
password=dPassw0rd
domain=dmosk.local
* в этом примере создана пара логин/пароль — dmosk/dPassw0rd; domain указывать не обязательно, если аутентификация выполняется без него.
Задаем права на созданный файл, чтобы доступ был только у пользователя, скажем, root:
chown root:root /root/.smbclient
Теперь открываем конфигурационный файл fstab:
и добавляем в него следующее:
//192.168.1.10/share /mnt cifs user,rw,credentials=/root/.smbclient 0 0
* в данном примере выполняется монтирование общей папки share на сервере с IP-адресом 192.168.1.10 в каталог /mnt. Параметры для подключения — user: позволяет выполнить монтирование любому пользователю, rw: с правом на чтение и запись, credentials: файл, который мы создали на предыдущем шаге.
Чтобы проверить правильность настроек, вводим следующую команду:
Примеры использования опций
Версии SMB
Если на стороне Windows используется старая или слишком новая версия протокола SMB, при попытке монтирования мы можем получить ошибку mount error(112): Host is down. Чтобы это исправить, указываем версию:
mount.cifs //192.168.1.10/share /mnt/ -o vers=1.0
* монтирование по протоколу SMB1.0
Монтирование от гостевой учетной записи
Если сервер принимает запросы без логина и пароля, то клиент подключается, как гость:
mount.cifs //192.168.1.10/share /mnt -o guest
//192.168.1.10/share /mnt cifs guest 0 0
Права на примонтированные каталоги
При монтировании папки мы можем указать определенные права:
mount.cifs //192.168.1.10/share /mnt -o file_mode=0777,dir_mode=0777
Для указания владельца, который будет назначен для примонтированного каталога, используем:
mount.cifs //192.168.1.10/share /mnt -o uid=33,gid=33
* чтобы посмотреть идентификаторы пользователя, вводим id -u и id -g .
How to Mount Windows SMB Share on Linux with CIFS
In this article, we’ll look at how to mount a shared network folder hosted on a Windows computer in Linux. Windows uses the SMB (Server Message Block) protocol, formerly known as CIFS (Common Internet File System) to share and access shared folders over the network. On Linux, you can use the cifs-utils or Samba client to access Windows network shares via SMB protocol.
Hint. Port TCP/445 is used to access the shared network folder via SMB/CIFS. UDP ports 137, 138, and TCP ports 139 are used for name resolution. If these ports are closed, you will only be able to connect to a shared folder on Windows by using a host IP address.
Mount Windows Share on Linux with Cifs-util
You can mount a shared folder hosted on a Windows computer using the tools in the cifs-util package. Run this command to install the package:
$ sudo apt-get install cifs-utils$ sudo dnf install cifs-utilsYou can now mount the SMB share from a Windows computer using the User03 account:
$ sudo mount.cifs //192.168.31.33/backup /mnt/share -o user=User03You must have a Windows user password to connect to a shared folder.
![]()
You can set additional parameters when mounting a network SMB folder:
$ sudo mount -t cifs -o username=User03,password=PasswOrd1,uid=1000,iocharset=utf8 //192.168.31.33/backup /mnt/share- //192.168.31.33/backup – shared network folder in Windows;
- /mnt/share – mount point;
- -t cifs – specify the type of file system to mount;
- -o mount options (this option can only be used as root, so sudo is used in the command above);
- username=User03,password=PasswOrd1 – Name and password of the Windows user who has permission to access the share. If anonymous access to the network folder is allowed on Windows, you can specify the guest username here;
- iocharset=utf8 – enable support for UTF8 encoding to display the name of files on SMB shares;
- uid=1000 – use this Linux user as the owner of the files in the mounted folder.

By default, Windows shares will be mounted on Linux with full permissions (0755). Add the following options to the command if you want to change the default mount permissions:
Add the following line to the /etc/hosts file if you want to use the computer name instead of the IP address when mounting a Windows share:
If you do not want to enter Windows user credentials in the mount command, you can save them to a file.
$ mcedit ~/.windowscredentials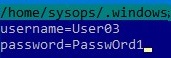
If you need to use a user account from an Active Directory domain, you will need to add a third line to the file:
$ chmod 600 ~/.windowscredentialsWhen mounting a shared folder, you can now specify the file path instead of the plaintext credentials:
$ sudo mount -t cifs -o credentials=/home/sysops/.windowscredentials,uid=1000,iocharset=utf8 //192.168.31.33/backup /mnt/shareUnmount a shared SMB folder:
Automatically Mount Network SBM Shares on Linux
The /etc/fstab file can be used to enable the automatic mounting of a Windows-shared folder on Linux.
Add the following string to the file to connect the SMB shared folder:
//192.168.31.33/backup /mnt/share cifs user,rw,credentials=/home/sysops/.windowscredentials,iocharset=utf8,nofail,_netdev 0 0
- rw – mount SBM folder in read/write mode
- nofail – resume Linux boot if file system mount fails
- _netdev – indicates that the filesystem is network connected. Linux will not mount such filesystems until networking has been successfully initialized on the host.
You can specify the version of the SMB protocol to be used for the connection (SMB version 1.0 is insecure and disabled by default in modern Windows versions). Add the parameter vers=3.0 to the end of the cifs connection string.
//192.168.31.33/backup /mnt/share cifs user,rw,credentials=/home/sysops/.windowscredentials,iocharset=utf8,nofail,_netdev,vers=3.0 0 0
If an incompatible (old version) of SMB is used on the remote Windows host, a connection error will occur:
mount error(112): Host is down
or
mount error(95): Operation not supported
To immediately mount a shared folder from the fstab configuration file
How to Access Windows Share on Linux with a Samba Client
Install the samba-client on Linux:
$ sudo apt-get install smbclient$ sudo dnf install smbclientTo view the SMB hosts on the local network:
List the SMB folders that are available on a remote Windows host:
If you have disabled anonymous access in Windows, you will get an error:
session setup failed: NT_STATUS_ACCESS_DENIED
In this case, you must specify the Windows user account that you want to use to access the shared folder:
$ smbclient -L //192.168.31.33 -U User03Add the -W option if you want to use a domain user account:
$ smbclient -L //192.168.31.33 -U User03 –W Domain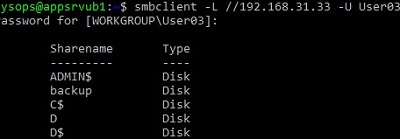
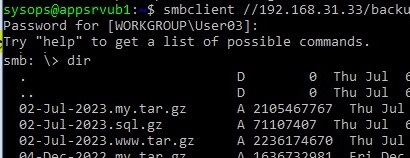
To establish an interactive connection to a Windows network share, use the following command
$ smbclient //192.168.31.33/backup -U User03 -W Domain$ smbclient //192.168.31.33/backup -U User03To access the SMB folder anonymously:
$ smbclient //192.168.31.33/backup -U EveryoneAfter logging in, the following prompt will appear:
List the files in a shared SMB folder:
Download the file from the Windows shared folder:
get remotefile.txt /home/sysops/localfile.txtSave a local file from Linux to an SMB directory:
put /home/sysops/localfile.txt remotefile.txtYou can run multiple smbclient commands one after the other:
$ smbclient //192.168.31.33/backup -U User03 -c "cd MyFolder; get arcive.zip /mnt/backup/archive.zip"You can use the help command to display a full list of commands in smbclient. The syntax of the smbclient commands is similar to the ftp client commands.
An error may occur when using the smbclient command:
Unable to initialize messaging context
smbclient: Can’t load /etc/samba/smb.conf — run testparm to debug it.
Create the file /etc/samba/smb.conf to fix the error.
If the SMB 1.0 protocol is disabled on the Windows host, the smbclient connection will fail:
Reconnecting with SMB1 for workgroup listing.
protocol negotiation failed: NT_STATUS_CONNECTION_RESET
Unable to connect with SMB1 — no workgroup available.