- Как примонтировать флешку в Linux
- Монтирование флешки в Linux
- Автоматическое монтирование флешки в Linux
- Выводы
- USB storage devices
- Auto-mounting with udisks
- Manual mounting
- Getting a kernel that supports usb_storage
- Identifying device
- Mounting USB memory
- Allow writing by regular users
- As normal user with fstab
- Mount tools
- Troubleshooting
- No USB storage devices are detected
- Device not shutting down after unmounting all partitions
- Device is detected but does not register as mountable
- How to Manually Mount/UnMount a USB Device on Ubuntu
- How to mount a USB drive on Ubuntu
- How to unmount a USB drive on Ubuntu
- Search
- About This Site
- Latest Tutorials
Как примонтировать флешку в Linux
В наши дни очень большую популярность у пользователей набрали USB флешки. Они используются для обмена файлами, различными фильмами и документами, установки операционных систем, а также восстановления системы после сбоя. Чтобы работать с флешкой в Linux ее нужно примонтировать в корневую файловую систему.
Дело в том, что организация файловой системы Linux немного отличается от того, что мы привыкли видеть в Winodws. Здесь нет никаких дисков C,D,E и так далее, есть только корень, самая верхняя точка файловой системы, в подкаталоги которой подключаются все жесткие диски и внешние носители.
Если в системе используется окружение рабочего стола, то оно, как правило, берет на себя всю низкоуровневую работу чтобы выполнить монтирование флешки в linux. Система обнаруживает подключенную флешку и в системном лотке всплывает уведомление о подключенном устройстве. Дальше остается кликнуть по значку флешки, чтобы система выполнила все нужные для ее монитрования действия. Но если окружение рабочего стола не запущенно или вам нужно работать в консоли можно выполнить все действия по монтированию флешки вручную.
В этой инструкции мы рассмотрим монтирование usb флешки в linux через терминал, а также настройку автоматического монтирования для оконных менеджеров, которые не поддерживают такую возможность.
Монтирование флешки в Linux
Самое первое, что нужно сделать после того, как вы подключили флешку — узнать имя ее файла в системе. В Unix все устройства имеют свои файлы и именно через эти файлы система и программное обеспечение взаимодействуют с ними.
Файлы флешек и других устройств хранения данных находятся в каталоге /dev. Устройства нумеруются по алфавиту sda, sdb, sdc, sdd и т д. Так как флешка подключается последней у нее будет старшая буква. Например, sdb или sdc. Имя sda принадлежит жесткому диску. Можно, конечно, просто посмотреть содержимое каталога /dev/, но такой способ ненадежный. Мы воспользуемся утилитой fdisk.
Подключите флешку и выполните:
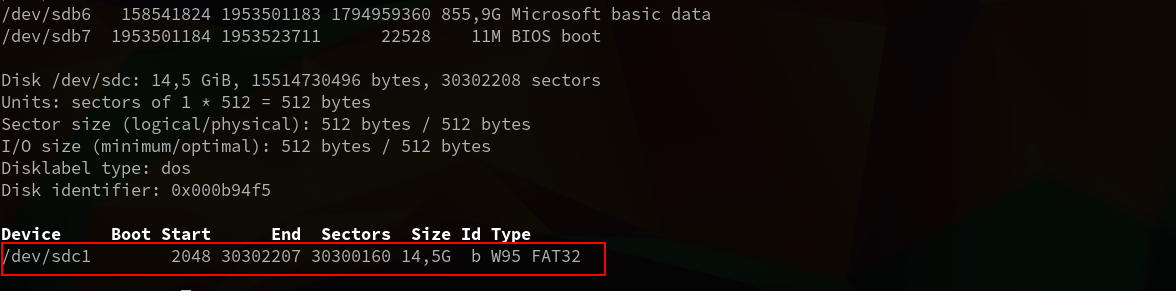
Как видите, здесь мы можем посмотреть детальную информацию об устройстве. Имя файла, список разделов, формат таблицы разделов, список разделов. А главное для нас, размер раздела и его файловую систему. Теперь не сложно понять какая из них флешка. В этом примере это /dev/sdc1
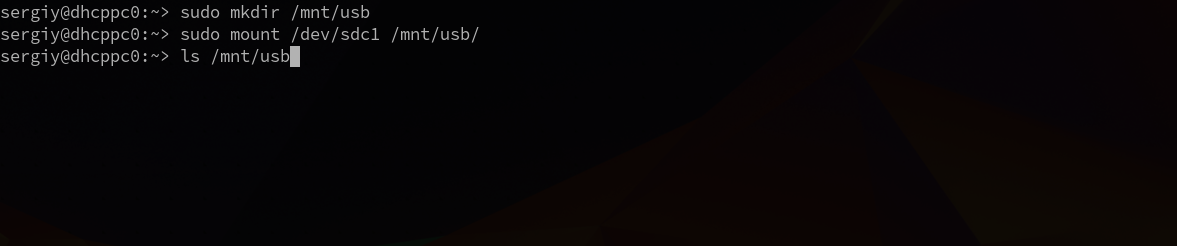
Создаем папку для монтирования:
Теперь монтируем флешку с помощью команды mount:
sudo mount /dev/sdc1 /mnt/usb
Если знаете файловую систему флешки, то лучше ее указать с помощью опции -t. Чаще всего используется FAT, так как ее легко открывают как Windows так и Linux системы:
sudo mount -t vfat /dev/sdc1 /mnt/usb
Монтирование осуществляется от суперпользователя, но если нужно чтобы отмонитровать флешку мог любой нужно указать опцию users:
sudo mount -t vfat -o users /dev/sdc1 /mnt/usb
По умолчанию владельцем файлов на флешке при монтировании устанавливается root, поэтому если вы захотите работать с флешкой через файловый менеджер, то нужно будет его запускать с правами суперпользователя или же сразу примонтировать флешку в linux таким образом, чтобы владельцем был ваш пользователь. Для этого укажите группу и id своего пользователя в опциях uid и gid:
sudo mount -o users,uid=1000,gid=1000 /dev/sdc1 /mnt/usb
Удостовериться что флешка подключена можно посмотрев содержимое каталога, в который мы ее монтировали:
Или выполнив команду mount:

После завершения работы с флешкой не забудьте ее отмонтировать. Потому что иначе данные могут быть не сохранны или вообще повреждена файловая система флешки:
Автоматическое монтирование флешки в Linux
Популярные окружения рабочего стола выполняют монтирование флешки linux автоматически, как только она подключена к системе или по клику на ярлыке. Мы можем это реализовать с помощью службы udisks2.
Udisks — это служба dbus, позволяющая другим программам и пользователю взаимодействовать с udev. Мы можем получать сообщения о только что подключенных устройствах, выполнять их монтирование и отключение. Окружения рабочего стола используют именно этот сервис для монтирования устройств.
Мы тоже можем использовать его для ручного монтирования. Здесь даже есть несколько плюсов. Во-первых, мы можем монтировать без прав суперпользователя, во-вторых, не нужно создавать папку.
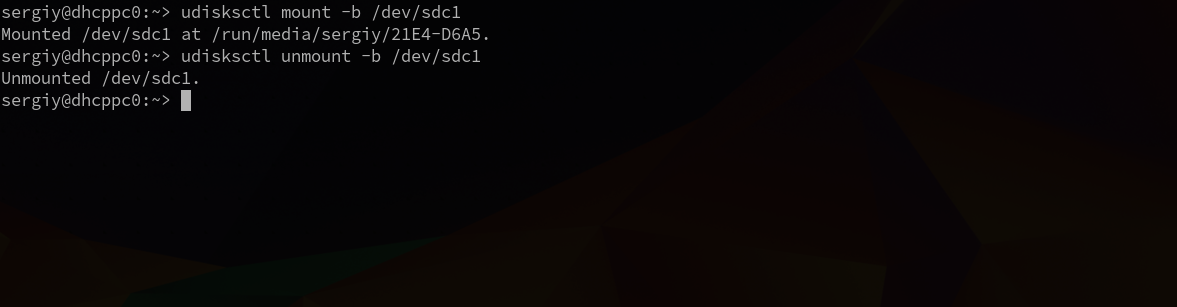
Для монтирования используется такая команда:
udisksctl mount -b /dev/sdc1

Здесь /dev/sdc1 — файл нашей флешки, а опция -b указывает, что нужно монтировать блочное устройство. Так же как и в mount здесь можно задать опции монтирования -o и файловую систему -t. Флешка будет примонтирована в папку /run/имя_пользователя/uuid-флешки/
Для размонтирования используется аналогичная команда:
udisksctl unmount -b /dev/sdc1
Автоматическое монтирование usb флешки в linux можно настроить с помощью утилиты udiskie. Все новые подключенные флешки будут автоматически подключаться, после подключения устройства будет всплывать окно с предложением открыть файловый менеджер, а также значок, с помощью которого можно получить доступ к каждому из устройств.
Устанавливается утилита в Ubuntu командой:
Дальше остается запустить программу:
Теперь все подключаемые устройства будут автоматически монтироваться с помощью udisks. Рассмотрим что значат опции:
- -a — выполнять автоматическое монтирование
- -n — показывать всплывающее уведомление
- -t — показывать значок в трее.
Выводы
Теперь монтирование флешки linux не вызовет у вас проблем. Даже если у вас не будет работать окружение рабочего стола и придется делать все вручную. Если остались еще вопросы, спрашивайте в комментариях.
Обнаружили ошибку в тексте? Сообщите мне об этом. Выделите текст с ошибкой и нажмите Ctrl+Enter.
USB storage devices
This document describes how to use the popular USB memory sticks with Linux. However, it is also valid for other devices such as digital cameras that act as if they were just a USB storage device.
If you have an up-to-date system with the standard Arch kernel and a modern desktop environment, your device should just show up on your desktop, with no need to open a console.
Auto-mounting with udisks
This is the easiest and most frequently used method. It is used by many desktop environments, but can be used separately too.
See Udisks for detailed information, including list of mount helpers.
Manual mounting
Note: Before you decide that Arch Linux does not mount your USB device, be sure to check all available ports. Some ports might not share the same controller, preventing you from mounting the device.
Getting a kernel that supports usb_storage
If you do not use a custom-made kernel, you are ready to go, for all Arch Linux stock kernels are properly configured. If you do use a custom-made kernel, ensure it is compiled with SCSI-Support, SCSI-Disk-Support and usb_storage. If you use the latest udev, you may just plug your device in and the system will automatically load all necessary kernel modules.
Identifying device
The first thing one needs to access a storage device is its identifier assigned by kernel. See File systems#Identify existing file systems for details.
Newly plugged-in devices are usually shown in the journal.
Mounting USB memory
If mount does not recognize the file system of the device you can try to use the -t argument, see mount(8) for details. If mounting does not work, you can try to recreate the file system or even repartition the disk.
Allow writing by regular users
If you want non-root users to be able to write to the USB stick, you can issue the following command:
# mount -o gid=users,fmask=113,dmask=002 /dev/sda1 /mnt/usbstick
If it does not work, make sure that the file system is mountable and writable as root, see the previous section for details.
As normal user with fstab
See FAT#Writing to FAT32 as normal user if you want normal user to do the mount/unmount action.
Mount tools
Multiple mount tools facilitate mounting as a regular user.
Troubleshooting
No USB storage devices are detected
If you have connected your USB storage device and it is not listed by lsblk but appears in the journal without being assigned a block device, see General troubleshooting#Cannot use some peripherals after kernel upgrade.
Also ensure that your BIOS has both XHCI Handoff and EHCI Handoff enabled, but this is usually not an issue with most modern devices.
Device not shutting down after unmounting all partitions
This article or section needs expansion.
Reason: Please advise how to automatically shut down devices after unmounting (Discuss in Talk:USB storage devices)
Failure to power off a device might result in:
- a hard disk drive not parking its head, making a faint scratching sound while spinning out and degrading the device [2], or
- a solid-state drive (especially older) not flushing its cache buffers or updating its mapping tables, and losing data [3].
When you unmount the partitions, the device is still powered on. You should ask the system to turn it off first in order to safely remove it: [4]
# echo 1 > /sys/block/disk_name/device/delete
If you use udisks, you can use these commands: [5]
$ udisksctl unmount -b /dev/sdXY $ udisksctl power-off -b /dev/sdX
Device is detected but does not register as mountable
udev is shipped with a default set of rules, found in /usr/lib/udev/rules.d/ , including one for ignoring some specific devices for various reasons. Some hardware devices, such as digital cameras, portable recorders, etc., may format usb storage in a way that results in the ignore rules to be triggered. You can check if one of these rules was applied with the following command and then find the corresponding conditions in the defaults:
$ udevadm info --attribute-walk --name=device_name | grep UDISKS_IGNORE
If this is the case and your device has this property set to «1», you can override it with a custom rule, following the udev page.
How to Manually Mount/UnMount a USB Device on Ubuntu

When you connect a USB drive to our system, it is usually mounted automatically and a directory with your user name is created under the media folder. You can also access it through your system’s file manager. Unfortunately, this is not always the case; sometimes, you need to manually mount the USB drive in your system to access it.
In this tutorial, we will explain how to manually mount and unmount a USB drive to your system. The commands and steps described in this article will work on any recent Ubuntu version including Ubuntu 22.04.
How to mount a USB drive on Ubuntu
Let us follow these steps to mount a USB drive manually to your system:
Step1: Plug in the USB drive to an available port.
Step2: Run the following command as sudo in your Terminal application in order to check the available storage devices on your system and the file system they are using:

Your USB device will usually be listed at the end of the output mostly as sdb-(number). In our case it is listed as sdb1, running a FAT32 file system.

Step3: Create a mount point for your USB device through the following command:
$ sudo mkdir /media/[mountPointName]
Note: The name of your mount point can not include spaces; you can seperate the words through an underscore ‘_’.

The mount point will now be created.
Step4: Now we shall mount the USB storage device to the mount point that we created. We will use the following command in order to mount a FAT32 device:
$ sudo mount -t vfat /dev/sdb1 /media/USB -o [securityoption]
The security option is mandatory and allows you to give/gain access to the USB by specifying one of the following values for permission;
In this example, I am giving access control to a user (the current user) by specifying the user id:

For NTFS, use the following command:
$ sudo mount -t ntfs-3g /dev/sdb1 /media/USB
Step5: Your USB has now been mounted. You can access it through your media folder.

You can also access USB through the file manager. In the following image, the 16 GB Volume listed right above Other Locations is my mounted USB storage.

How to unmount a USB drive on Ubuntu
If you have mounted a USB manually, it is best to even unmount it manually.
Step1: Use the following command in order to unmount your USB:
In the above command, specify the mount point if it is something other than the ‘USB’ mount point I have used.
Your USB will be unmounted from your system:

Step2: You will need to remove the USB mount point directory manually as follows if you don’t plan to reuse it in the future:

Step3: Unplug the USB from your system.
After following the steps described in this article, you will be successfully able to mount and unmount a USB storage device to and from your system. This will help you if your system fails to automatically make the USB available for access and use.
Search
About This Site
Vitux.com aims to become a Linux compendium with lots of unique and up to date tutorials.