Mount vhdx in linux
Here’s the situation — you’re on a network and you find a Network Attached Storage device with a share protected using a weak password. You brute force the password and once you login, you find a WindowsImageBackup directory which houses the data from a Windows Server Backup. When we view the contents, we’re interested in the files with the VHD or VHDX extension. VHDX is essentially the same as VHD but the size limit on VHDX was increased to 2TB. That’s neither here nor there, what we really want is inside the file.
We could copy the file over to our machine but depending on the location of the file with respect to your attacking system, that could be a problem. What we really want to do is to mount that file in its current location and access what’s inside.
My Kali box is already setup so in this example, I’m using Ubuntu 18 but the steps are the same regardless of whether it’s Kali or not.
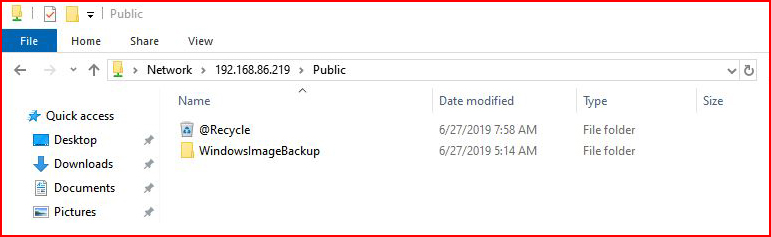
Starting from the top, we find our share:
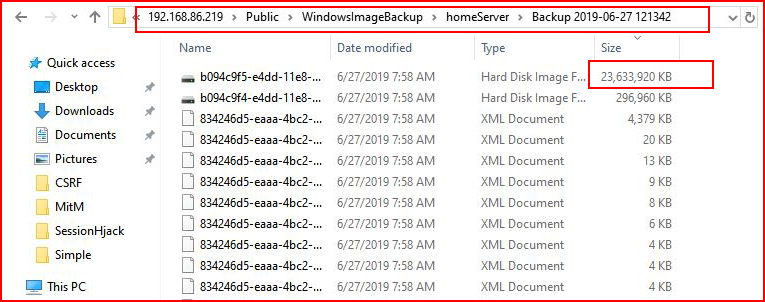
When we traverse into the directory, we find two VHDX files. The larger of the two (23GB) is the one we want:
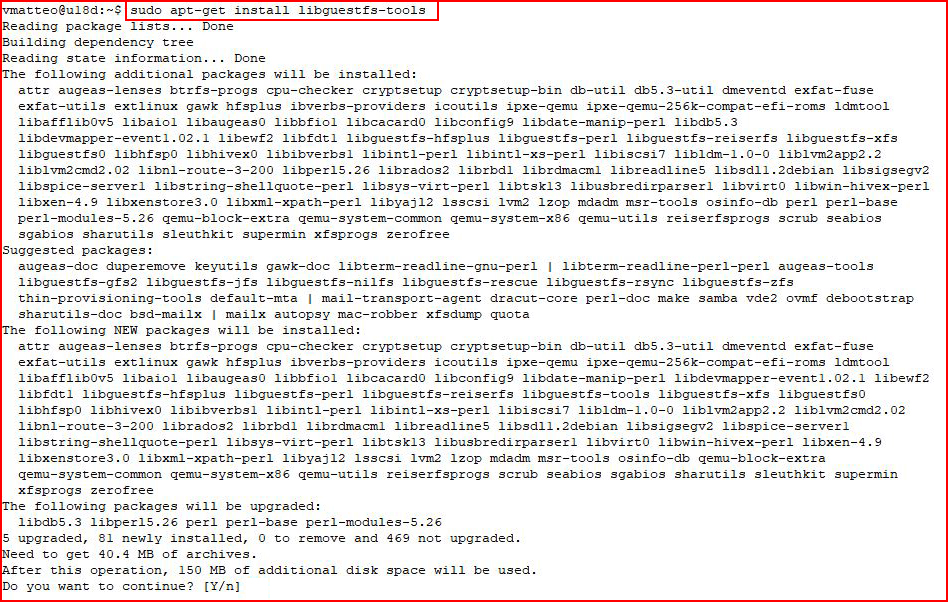
Before we can access the file, we need to perform a few steps. First, we’re going to install the libguestfs tools which allow us to access virtual disk images:
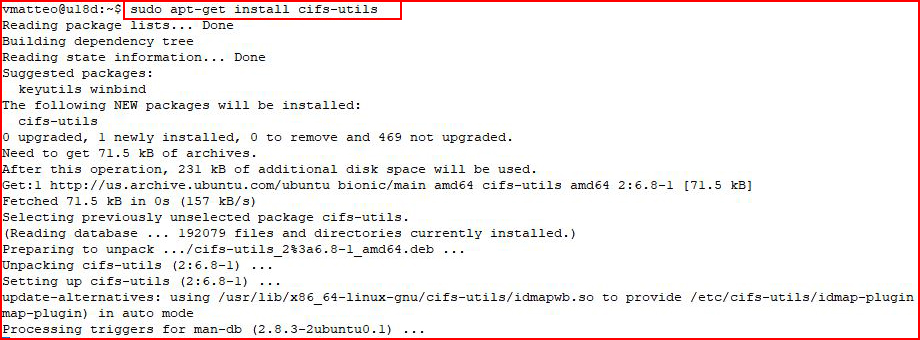
This second install might already exist on your system but if not, we’ll need the CIFS utils which we’ll use to access SMB/CIFS shares:
Next, we’ll need to create a directory for the share, a directory for the VHD, and we’ll need to issue mount commands for both:
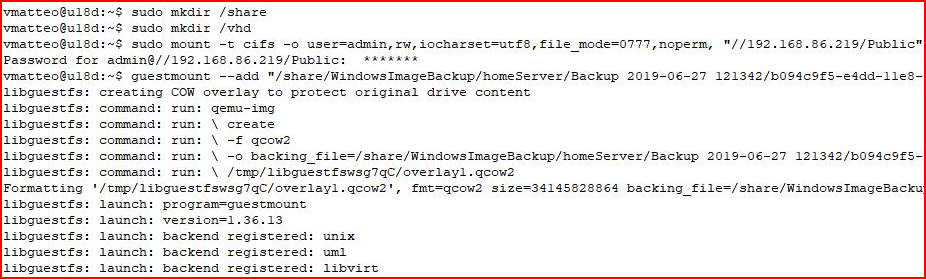
The second mount command for the VHD is long-winded. Truncating for the sake of not creating a very long screenshot:
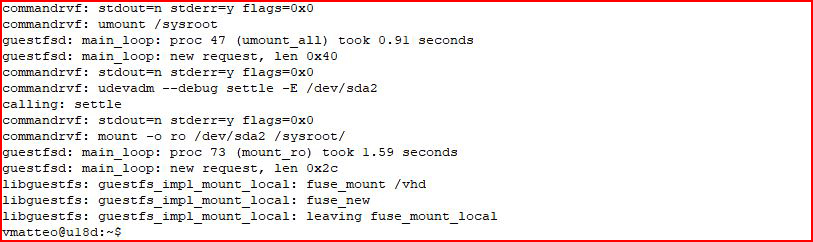
When it’s finished, we should see data in both the /share and /vhd directory. We’re interested in /vhd because that’s where our backup data exists:
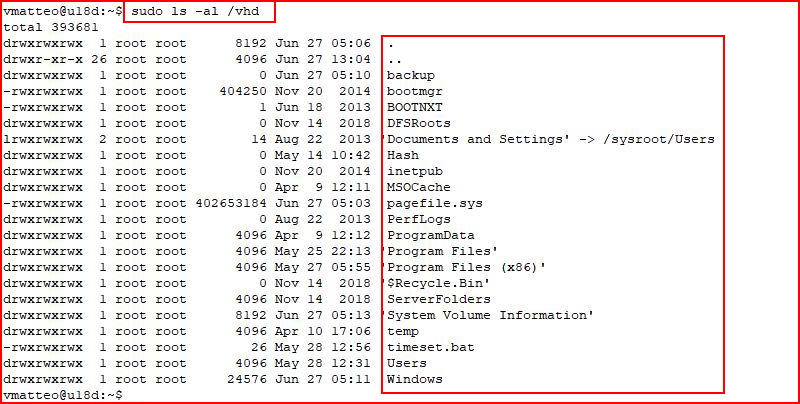
When we list the contents of the directory, we see the the data and we can traverse through the directories without issue. Here are all of the commands I used:
sudo apt-get install libguestfs-tools
sudo apt-get install cifs-utils
sudo mkdir /share
sudo mkdir /vhd
sudo mount -t cifs -o user=admin,rw,iocharset=utf8,file_mode=0777,noperm, «//192.168.86.219/Public» /share
sudo guestmount —add «/share/WindowsImageBackup/homeServer/Backup 2019-06-27 121342/b094c9f5-e4dd-11e8-80b3-806e6f6e6963.vhdx»
—inspector —ro /vhd -v
mount vdhx image on ubuntu (data recovery)
I used to use windows 10 and made a backup (vdhx) of it on a external drive. Under the naive impression that data recovering from this image to ubuntu would be more straight forward I changed to ubuntu and now it is not straight forward. Could someone explain to me how I can mount this image in ubuntu to look through my stuff and get what I need? Since I am a new to ubuntu a gui option would be highly appreciated but comandline would (with help) also work. I already tried this (among others):
guestmount -a /path_to_external_drive/file.vhdx --inspector --ro mnt/vhd/ 3 Answers 3
Here are examples for a file that is called myvhdxfile.vhdx that is mounted to /mnt/vhdxdrive
Example 1. Where guestmount is inspecting (-i) the disks looking for an operating system and mount filesystems:
- Install sudo apt-get install libguestfs-tools
- Create a mountpoint e.g. sudo mkdir /mnt/vhdxdrive
- Run sudo guestmount —add myvhdxfile.vhdx -i —rw /mnt/vhdxdrive
- (optional when you are done inspecting the files) To unmount run sudo guestunmount /mnt/vhdxdrive
Example 2. If you run into the error: guestmount: no operating system was found on this disk you can mount individual partitions by following these steps:
- Run sudo guestfish —rw -a myvhdxfile.vhdx
- Type in run and hit enter
- Type in list-filesystems and hit enter and note the path to the partition
- Type in exit and hit enter
The output of the above steps might look like this:
> run > list-filesystems /dev/sda2: ntfs > exit Finally, you can mount the partition /dev/sda2 by running:
If you got a different partition path from running the list-filesystems command in guestfish than you should replace /dev/sda2 with this path in the above command.
Example 3. If you want the mounted partition to pup up in files (nautilus) and be able to access it with your personal user account:
- Create a mountpoint in media sudo mkdir /media/vhdxdrive
- Mount with user permissions sudo guestmount —add myvhdxfile.vhdx -o uid=1000 -o gid=1000 -o allow_other —rw /media/vhdxdrive -m /dev/sda2
Change the uid and gid values to the corresponding ids of your user in above command.
allenyllee / install_tools.sh
This file contains bidirectional Unicode text that may be interpreted or compiled differently than what appears below. To review, open the file in an editor that reveals hidden Unicode characters. Learn more about bidirectional Unicode characters
| #! /bin/bash |
| # install qemu utils |
| sudo apt install qemu-utils |
| # install nbd client |
| sudo apt install nbd-client |
This file contains bidirectional Unicode text that may be interpreted or compiled differently than what appears below. To review, open the file in an editor that reveals hidden Unicode characters. Learn more about bidirectional Unicode characters
| #! /bin/bash |
| VHDX_IMG= » $1 « |
| MOUNT_POINT= » $2 « |
| # [ubuntu] How do you mount a VHD image |
| # https://ubuntuforums.org/showthread.php?t=2299701 |
| # |
| # Load the nbd kernel module. |
| sudo rmmod nbd ; sudo modprobe nbd max_part=16 |
| # mount block device |
| sudo qemu-nbd -c /dev/nbd0 » $VHDX_IMG « |
| # reload partition table |
| sudo partprobe /dev/nbd0 |
| # mount partition |
| sudo mount -o rw,nouser /dev/nbd0p1 » $MOUNT_POINT « |
This file contains bidirectional Unicode text that may be interpreted or compiled differently than what appears below. To review, open the file in an editor that reveals hidden Unicode characters. Learn more about bidirectional Unicode characters
| #! /bin/bash |
| MOUNT_POINT= » $1 « |
| # unmount & remove nbd module |
| sudo umount » $MOUNT_POINT » && sudo qemu-nbd -d /dev/nbd0 && sudo rmmod nbd |
On Arch and Manjaro, you will need the following packages:
sudo pacman -S qemu-headless nbd Thank you very much, worked perfectly on artix.
If you are mounting a win10 backup, be sure to select the good file and partiton (often nbd0p2 ), multiple vhdx are generated.
Thank you. This allowed me to mount WSL2 partitions from native linux after running into errors with libguestfs.
Simmilar to @stewSquared I mounted a WSL2 partion aswell. The only thing I had to change was the last command of the mount script, because in my case there were no partitions just /dev/nbd0 so I my command was:
sudo mount -o rw,nouser /dev/nbd0 «$MOUNT_POINT» (notice the missing p1 )
allenyllee / install_tools.sh
This file contains bidirectional Unicode text that may be interpreted or compiled differently than what appears below. To review, open the file in an editor that reveals hidden Unicode characters. Learn more about bidirectional Unicode characters
| #! /bin/bash |
| # install qemu utils |
| sudo apt install qemu-utils |
| # install nbd client |
| sudo apt install nbd-client |
This file contains bidirectional Unicode text that may be interpreted or compiled differently than what appears below. To review, open the file in an editor that reveals hidden Unicode characters. Learn more about bidirectional Unicode characters
| #! /bin/bash |
| VHDX_IMG= » $1 « |
| MOUNT_POINT= » $2 « |
| # [ubuntu] How do you mount a VHD image |
| # https://ubuntuforums.org/showthread.php?t=2299701 |
| # |
| # Load the nbd kernel module. |
| sudo rmmod nbd ; sudo modprobe nbd max_part=16 |
| # mount block device |
| sudo qemu-nbd -c /dev/nbd0 » $VHDX_IMG « |
| # reload partition table |
| sudo partprobe /dev/nbd0 |
| # mount partition |
| sudo mount -o rw,nouser /dev/nbd0p1 » $MOUNT_POINT « |
This file contains bidirectional Unicode text that may be interpreted or compiled differently than what appears below. To review, open the file in an editor that reveals hidden Unicode characters. Learn more about bidirectional Unicode characters
| #! /bin/bash |
| MOUNT_POINT= » $1 « |
| # unmount & remove nbd module |
| sudo umount » $MOUNT_POINT » && sudo qemu-nbd -d /dev/nbd0 && sudo rmmod nbd |