- How to Mount Windows NTFS Partition in Linux
- Prerequisites
- Install NTFS-3g on Linux
- Find available NTFS partitions
- Mount NTFS partition to Linux system
- Troubleshoot
- Wrap Up
- Как смонтировать раздел NTFS в Linux
- Смонтировать раздел NTFS с разрешением только для чтения
- Определить раздел NTFS
- Создать точку монтирования и смонтировать раздел NTFS
- Смонтировать раздел NTFS с разрешениями на чтение и запись
- Обновить репозитории пакетов
- Установите Fuse и ntfs-3g
- Смонтировать раздел NTFS
- How to Mount Windows/USB NTFS Partition in RHEL Systems
- How to Mount Windows NTFS Partition in Linux
- What is NTFS3G
- Identify NTFS Partition
- Mount NTFS Partition in Linux
- Unmount NTFS Partition in Linux
How to Mount Windows NTFS Partition in Linux
This is quite common for Dual Boot users who use Windows and Linux simultaneously for their work. You can easily mount Windows partitions through File Manager.
When you try to mount the NTFS partition from a terminal, you will encounter an error “The disk contains an unclean file system (0, 0).
Metadata kept in Windows cache, refused to mount.
Falling back to read-only mount because the NTFS partition is in an
unsafe state. Please resume and shutdown Windows fully (no hibernation
or fast restarting.)” or “mount: unknown filesystem type ‘ntfs’”.
In this article, we will see How to mount the NTFS filesystem in Linux and How to resolve and make the drive read and write.
Prerequisites
Install NTFS-3g on Linux
NTFS-3g is an open-source tool that helps the Linux Operating system to support read and write, and without this utility, you will not be able to write data on it.
ntfs-3g is already installed in some of the Linux Distributions to check whether it is installed or not type the following command:
$ ntfs-3g --versionIf you are not able to get the version, it means you need to install it from the official repository.
One can easily install ntfs-3g from the Official repository. For that, pass the below command as per respective distributions available:
Debian and Ubuntu users
$ sudo apt install ntfs-3gCentos/RHEL/Fedora users
$ sudo yum install ntfs-3gOnce you install the above utility, you are one step ahead to mount the NTFS drive to your Linux system.
Find available NTFS partitions
This is an important step if you don’t know which partition is NTFS format fdisk or parted utility will help to know partition details like Device, Size, and File system Type.
$ sudo fdisk -l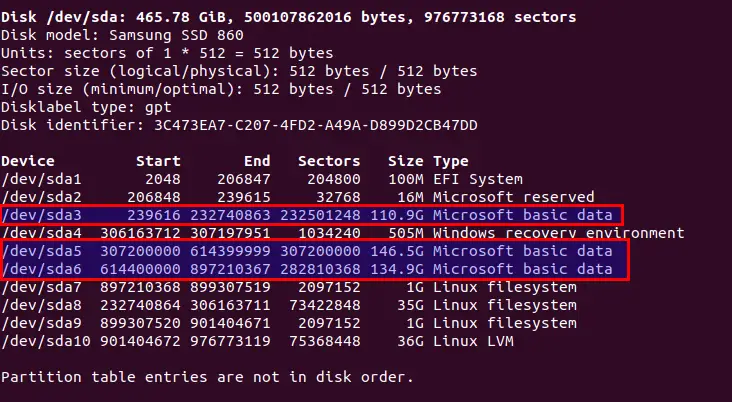
The above command output shows the 3 Microsoft basic data or NTFS file systems are available to our specific drive, and please note the Device details of which you like to mount.
For example, I want to mount a partition which size is 146.5G, and the Device name or location is /dev/sda5.
Mount NTFS partition to Linux system
Once you know the partition you want to mount with the device name, you can move ahead. Before this, you need to use ntfsfix command it will fix common NTFS problems.
Make sure to use this command; otherwise, you will end up with read access only.
To avoid this issue, pass the following command and obviously change the XY with the device name unless you will get an unwanted error.
$ sudo ntfsfix /dev/sdXY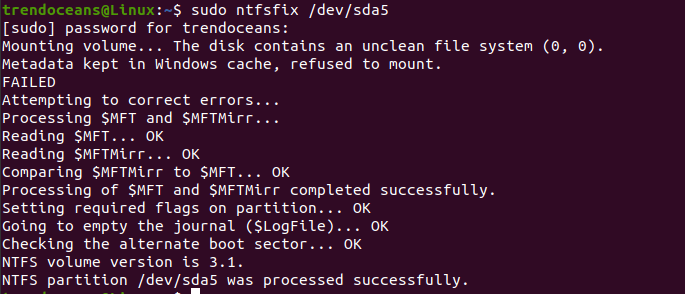
After this, create a mount point in any specific location, but it advises you to create a mount point at /mnt directory.
It’s not necessary to create a specific mount point; however you can mount the partition at any location, forsake of organizing data, you should create a mount point.
To create mount point under /mnt copy paste the below command:
$ sudo mkdir -p /mnt/ntfsdriveWhen you complete the above process, type the below command in your terminal screen to mount the partition:
$ sudo mount.ntfs-3g /dev/sda5 /mnt/ntfsdrive/Hold on. If you didn’t get the how-to-use above command, we would explain the command in detail.
- mount.ntfs-3g This command is used to mount partitions with the NTFS file system.
- /dev/sda5 Over-here you can provide noted partitions path.
- /mnt/ntfsdrive/ This is the location where partitions will get the mount.
In case everything goes as per our intend, you will not get any confirmation output, so we have to check the status, whether it’s mounted or not.
To check the mount location of partitions, copy-paste the below command:
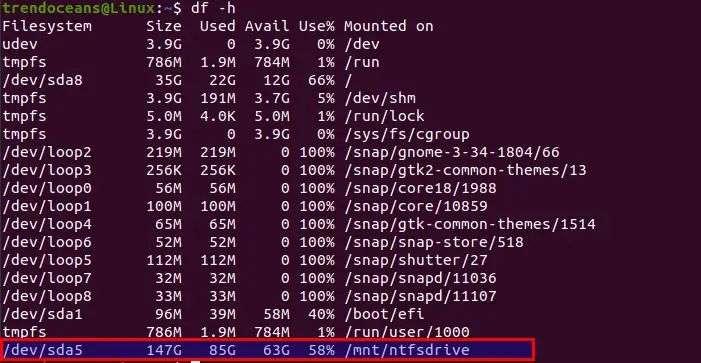
As you can see /dev/sda5 is mounted at the given location /mnt/ntfsdrive . It shows ntfs file system is mounted successfully.
Troubleshoot
Suppose you get the error “Mount is denied because the NTFS volume is already exclusively opened. The volume may be already mounted, or another software may use it which could be identified for example by the help of the ‘fuser’ command.”
To resolve this issue first we need to check where the partition is previously mounted after that simply do unmount:
From the above command output, it’s show /dev/sda5 is mounted at /mnt/ntfsdrive . To unmount we can use device location or mount location, I’ll show you the options to unmount:
$ sudo umount /dev/sda5$ sudo umount /mnt/ntfsdriveWrap Up
That’s all my friend to Mount NTFS partition in Linux. In case you need some assistance from my end, feel free to comment Down.
In case you know any other way to mount partitions with read and write access, please let us know.
If you want to share some feedback or any topic feel free to comment down.
A man with a tech effusive who has explored some of the amazing technology stuff and is exploring more. While moving towards, I had a chance to work on Android development, Linux, AWS, and DevOps with several open-source tools.
Как смонтировать раздел NTFS в Linux
![]()
NTFS — это система хранения файлов, стандартная для компьютеров Windows, но системы Linux также используют ее для организации данных.
Большинство систем Linux монтируют диски автоматически. Однако в конфигурациях с двойной загрузкой, где требуется обмен файлами между двумя системами с разделами NTFS, эта процедура выполняется вручную.
Эта статья покажет вам, как смонтировать раздел NTFS в Linux с разрешениями только для чтения или чтения и записи.
Смонтировать раздел NTFS с разрешением только для чтения
Выполните следующие действия, чтобы смонтировать раздел NTFS с доступом только для чтения.
Примечание. Раздел только для чтения позволяет пользователям читать файлы. Чтобы включить запись в раздел NTFS, обратитесь ко второму разделу статьи.
Определить раздел NTFS
Перед монтированием раздела NTFS определите его с помощью команды parted :
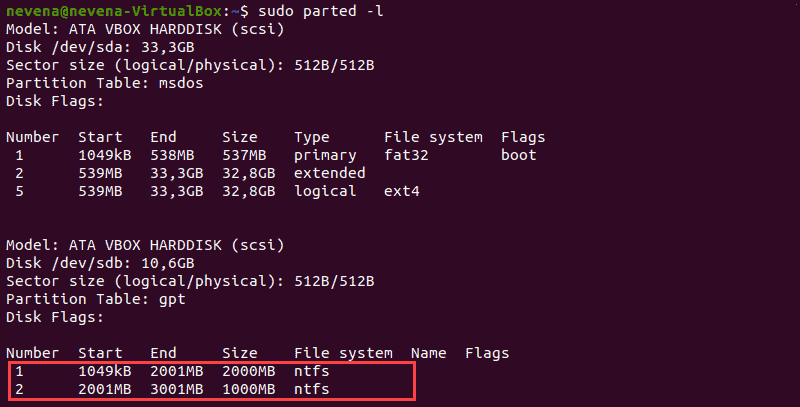
В приведенном выше примере два раздела NTFS находятся на диске /dev/sdb . Прежде чем продолжить, запишите номер раздела, который вы хотите смонтировать.
Вы также можете использовать команды fdisk и grep , чтобы показать на диске только разделы NTFS:
Создать точку монтирования и смонтировать раздел NTFS
В этом примере мы смонтируем раздел /dev/sdb1 с разрешением только для чтения.
Сначала создайте точку монтирования с помощью команды mkdir :
Затем смонтируйте раздел в созданный вами каталог. Используйте команду mount и путь к разделу, который вы указали ранее:
sudo mount -t ntfs /dev/sdb1 /mnt/ntfs1
Используйте инструмент для освобождения диска, чтобы проверить подробную информацию обо всех файловых системах и убедиться, что вы успешно смонтировали раздел:
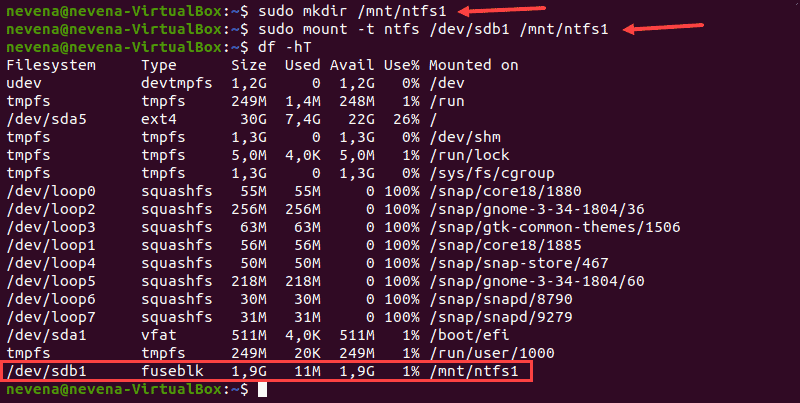
Раздел /dev/sdb1 отображается как смонтированный в нижней части списка. Теперь у вас есть доступ только для чтения к этому разделу NTFS.
Смонтировать раздел NTFS с разрешениями на чтение и запись
Чтобы смонтировать раздел NTFS с разрешениями на чтение и запись, вам необходимо установить fuse и ntfs-3 в вашей системе.
Выполните следующие действия, чтобы завершить процесс монтирования.
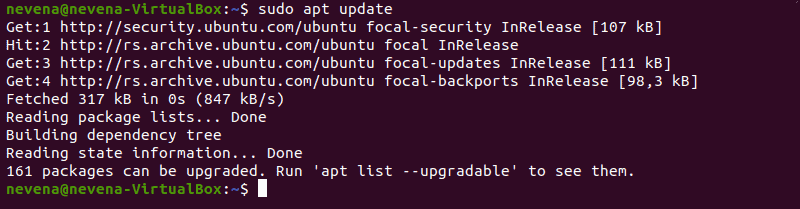
Обновить репозитории пакетов
Выполните следующую команду, чтобы загрузить и обновить репозитории пакетов:
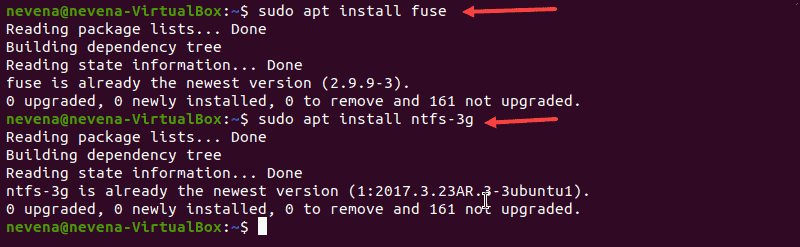
Установите Fuse и ntfs-3g
Чтобы установить fuse в вашей системе Linux из репозитория по умолчанию, используйте соответствующий менеджер пакетов. В нашем примере мы используем apt в Ubuntu.
Когда установка завершится, установите ntfs-3g , запустив:
В случае, если fuse и ntfs-3g уже установлены, вывод выглядит примерно так, как показано ниже:
Смонтировать раздел NTFS
После установки пакетов программного обеспечения fuse и ntfs-3g смонтируйте раздел NTFS.
Сначала создайте точку монтирования с помощью команды mkdir :
Затем используйте команду mount , чтобы смонтировать нужный раздел. Например, /dev/sdb2 :
sudo mount -t ntfs-3g /dev/sdb2 /mnt/ntfs2/
Чтобы проверить, смонтирован ли раздел, выполните команду df :

Теперь у вас есть права на чтение и запись для подключенного раздела NTFS.
How to Mount Windows/USB NTFS Partition in RHEL Systems
Are you trying to access an NTFS partition or NTFS formatted USB drive on an RHEL-based operating system, and have encountered an error?
Do not worry, all will be fine once you finish reading this guide where we will show how to mount and access Windows/USB partitions formatted with NTFS file system type, on RHEL-based systems such as CentOS, Fedora, Rocky, and AlmaLinux.
The following screenshot shows an error encountered while mounting a Windows NTFS partition in Rocky Linux, an RHEL-based system developed as a replacement for CentOS.
mount: /media: unknown filesystem type 'ntfs'.

This guide assumes that you are logged in as a root user and will run commands with root user privileges, otherwise, use the sudo command where necessary.
How to Mount Windows NTFS Partition in Linux
To mount any NTFS-based partition in RHEL-based systems, you need to install and use a package called NTFS-3G.
What is NTFS3G
NTFS-3G is an open-source cross-platform NTFS driver that works on Linux and other Unix-like operating systems. It supports mounting and accessing NTFS partitions using the FUSE (Filesystem in Userspace) interface, which then enables a user to create, delete, rename, and move files, directories, hard links, streams, and much more within the mount point.
The NTFS-3G package is available in the EPEL (Extra Packages for Enterprise Linux) Repository. To install it, first enable the EPEL repository on your machine as follows:
----------- On RHEL-based Linux 9 Release ----------- # yum install https://dl.fedoraproject.org/pub/epel/epel-release-latest-9.noarch.rpm ----------- On RHEL-based Linux 8 Release ----------- # yum install https://dl.fedoraproject.org/pub/epel/epel-release-latest-8.noarch.rpm ----------- On RHEL-based Linux 7 Release ----------- # yum install https://dl.fedoraproject.org/pub/epel/epel-release-latest-7.noarch.rpm
Next, run the following yum command to install the ntfs-3g package on your system, follow any prompts on the screen to import the GPG key for signing the package:

Identify NTFS Partition
Now plug your USB drive into the computer and check for all connected block devices using the fdisk command. Your USB device should be listed in the output as highlighted in the following screenshot.
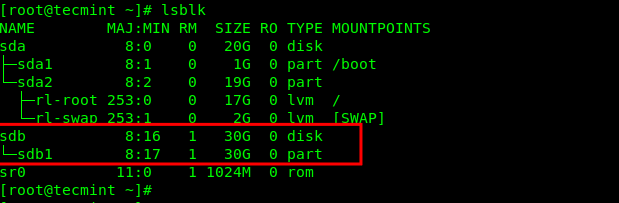
This command will also enable you to get the device name under the /dev directory. In this example, the device name is /dev/sdb and the first mountable partition is /dev/sdb1.
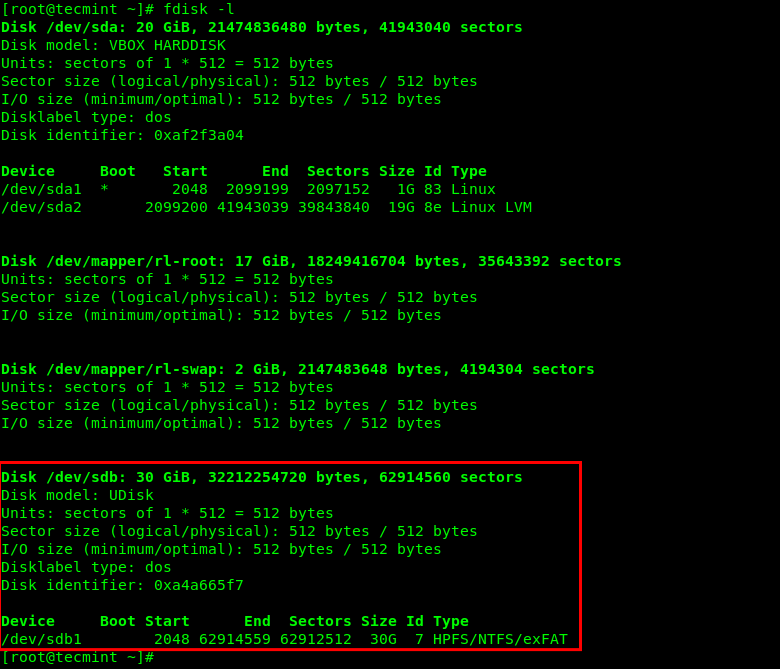
Alternatively, you can use the lsblk command to list all block devices connected to your computer:
Mount NTFS Partition in Linux
Now it’s time to mount your USB drive by creating a new directory under /media, for example, /media/myusb. Then mount the USB drive using the mount command with -t flag, which is used to specify the filesystem type, which is ntfs-3g in this case:
# mkdir -p /media/myusb # mount -t ntfs-3g /dev/sdb1 /media/myusb/

You can check if the USB drive has been mounted successfully to the defined location by running the mount command and filtering its output via the grep command as shown:

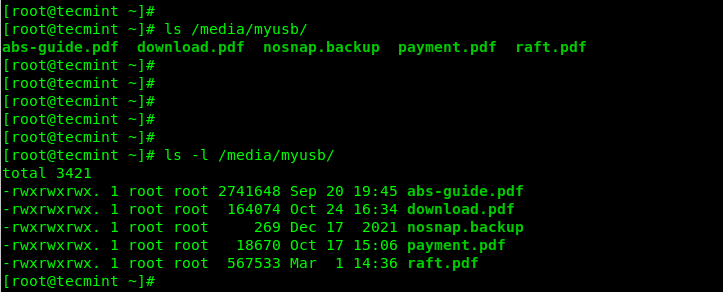
Next, run the ls command in the mount location to view files stored in the USB drive. The -l flag allows for a long listing of files with their permissions and size, and more:
# ls /media/myusb/ OR # ls -l /media/myusb/
To mount a Windows NTFS partition at boot time, add the following line in your /etc/fstab file. Make sure to replace /dev/sdb1 and /media/myusb with the device name and mount point respectively:
/dev/sdb1 /media/myusb auto defaults 0 0
Unmount NTFS Partition in Linux
To unmount the /media/myusb mount point, use the umount command as shown.
You might also like:
We have come to the end of this guide where we showed how to mount and access Windows NTFS partitions in RHEL systems by using the ntfs-3g driver. Share your feedback concerning this topic via the comment section below.