- How to Mount Remote Windows Share on Linux
- Step 1: Install the Required Packages
- Step 2: Create a Mount Point
- Step 3: Mount the Remote Windows Share
- Step 4: Verify the Mount
- Step 5: Configure Automatic Mounting
- Step 6: Troubleshooting
- Conclusion
- How to Mount Windows SMB Share on Linux with CIFS
- Mount Windows Share on Linux with Cifs-util
- Automatically Mount Network SBM Shares on Linux
- How to Access Windows Share on Linux with a Samba Client
How to Mount Remote Windows Share on Linux
In today’s interconnected world, the need to access shared resources across different operating systems is essential. Mounting remote Windows shares on Linux allows users to access files and folders on Windows machines from their Linux systems. This article will provide a step-by-step guide to mounting remote Windows shares on Linux using the Common Internet File System (CIFS) protocol.
Step 1: Install the Required Packages
To mount a remote Windows share on Linux, you will need to install the CIFS-utils package, which provides tools for mounting and managing CIFS shares. Use the following commands to install the package on your Linux distribution:
sudo apt updatesudo apt install cifs-utils
sudo yum updatesudo yum install cifs-utils
sudo dnf updatesudo dnf install cifs-utils
Step 2: Create a Mount Point
A mount point is a directory on your Linux system where the remote Windows share will be mounted. Create a new directory to serve as the mount point using the following command:
sudo mkdir /mnt/windows-share Replace “windows-share” with a name that best describes the shared resource.
Step 3: Mount the Remote Windows Share
Use the following command to mount the remote Windows share to the mount point you created in the previous step:
sudo mount -t cifs //WINDOWS_MACHINE_IP_ADDRESS/SHARE_NAME /mnt/windows-share -o username=YOUR_USERNAME,password=YOUR_PASSWORD Replace the following placeholders with the appropriate information:
- `WINDOWS_MACHINE_IP_ADDRESS`: The IP address or hostname of the remote Windows machine.
- `SHARE_NAME`: The name of the shared folder on the Windows machine.
- `YOUR_USERNAME`: Your Windows username for accessing the share.
- `YOUR_PASSWORD`: Your Windows password for accessing the share.
After executing the command, the remote Windows share should now be mounted to the specified mount point on your Linux system. You can access the files and folders in the Windows share by navigating to the mount point directory.
Step 4: Verify the Mount
To verify that the remote Windows share is mounted correctly, use the df command to display information about mounted filesystems:
You should see an entry for the remote Windows share in the output, with its mounted location on your Linux system.
Step 5: Configure Automatic Mounting
If you want the remote Windows share to be mounted automatically at system startup, you need to add an entry to the “/etc/fstab” file. First, create a credentials file to securely store your Windows login information:
sudo nano /etc/cifs-credentials Add the following lines to the file, replacing “YOUR_USERNAME” and “YOUR_PASSWORD” with your actual Windows username and password:
Save and close the file, and then set the appropriate permissions to secure the credentials file:
sudo chmod 600 /etc/cifs-credentials Next, open the “/etc/fstab” file with your preferred text editor:
Add the following line at the end of the file:
// WINDOWS_MACHINE_IP_ADDRESS / SHARE_NAME / mnt / windows — share cifs credentials =/ etc / cifs — credentials , uid = 1000 , gid = 1000 0 0
Replace “WINDOWS_MACHINE_IP_ADDRESS”, “SHARE_NAME”, and “/mnt/windows-share” with the appropriate information as before. The “uid” and “gid” options are set to 1000 to map the share’s ownership to the first non-root user on the Linux system. Adjust these values if necessary for your system.
Save and close the /etc/fstab file. To test the new configuration, reboot your system or use the following command to mount all filesystems listed in the /etc/fstab file:
Step 6: Troubleshooting
If you encounter any issues while mounting the remote Windows share, check the following:
- Ensure that the Windows machine’s firewall is not blocking access to the shared folder.
- Verify that the shared folder’s permissions on the Windows machine allow access to your user account.
- Review the /var/log/syslog file for any error messages related to the mount operation.
Conclusion
Mounting remote Windows shares on Linux is a useful skill for accessing shared resources in a heterogeneous network environment. This step-by-step guide has shown you how to install the required packages, create a mount point, mount the remote Windows share, configure automatic mounting, and troubleshoot potential issues. With this knowledge, you can seamlessly integrate your Linux and Windows systems and improve cross-platform collaboration.
How to Mount Windows SMB Share on Linux with CIFS
In this article, we’ll look at how to mount a shared network folder hosted on a Windows computer in Linux. Windows uses the SMB (Server Message Block) protocol, formerly known as CIFS (Common Internet File System) to share and access shared folders over the network. On Linux, you can use the cifs-utils or Samba client to access Windows network shares via SMB protocol.
Hint. Port TCP/445 is used to access the shared network folder via SMB/CIFS. UDP ports 137, 138, and TCP ports 139 are used for name resolution. If these ports are closed, you will only be able to connect to a shared folder on Windows by using a host IP address.
Mount Windows Share on Linux with Cifs-util
You can mount a shared folder hosted on a Windows computer using the tools in the cifs-util package. Run this command to install the package:
$ sudo apt-get install cifs-utils$ sudo dnf install cifs-utilsYou can now mount the SMB share from a Windows computer using the User03 account:
$ sudo mount.cifs //192.168.31.33/backup /mnt/share -o user=User03You must have a Windows user password to connect to a shared folder.
![]()
You can set additional parameters when mounting a network SMB folder:
$ sudo mount -t cifs -o username=User03,password=PasswOrd1,uid=1000,iocharset=utf8 //192.168.31.33/backup /mnt/share- //192.168.31.33/backup – shared network folder in Windows;
- /mnt/share – mount point;
- -t cifs – specify the type of file system to mount;
- -o mount options (this option can only be used as root, so sudo is used in the command above);
- username=User03,password=PasswOrd1 – Name and password of the Windows user who has permission to access the share. If anonymous access to the network folder is allowed on Windows, you can specify the guest username here;
- iocharset=utf8 – enable support for UTF8 encoding to display the name of files on SMB shares;
- uid=1000 – use this Linux user as the owner of the files in the mounted folder.

By default, Windows shares will be mounted on Linux with full permissions (0755). Add the following options to the command if you want to change the default mount permissions:
Add the following line to the /etc/hosts file if you want to use the computer name instead of the IP address when mounting a Windows share:
If you do not want to enter Windows user credentials in the mount command, you can save them to a file.
$ mcedit ~/.windowscredentials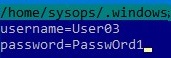
If you need to use a user account from an Active Directory domain, you will need to add a third line to the file:
$ chmod 600 ~/.windowscredentialsWhen mounting a shared folder, you can now specify the file path instead of the plaintext credentials:
$ sudo mount -t cifs -o credentials=/home/sysops/.windowscredentials,uid=1000,iocharset=utf8 //192.168.31.33/backup /mnt/shareUnmount a shared SMB folder:
Automatically Mount Network SBM Shares on Linux
The /etc/fstab file can be used to enable the automatic mounting of a Windows-shared folder on Linux.
Add the following string to the file to connect the SMB shared folder:
//192.168.31.33/backup /mnt/share cifs user,rw,credentials=/home/sysops/.windowscredentials,iocharset=utf8,nofail,_netdev 0 0
- rw – mount SBM folder in read/write mode
- nofail – resume Linux boot if file system mount fails
- _netdev – indicates that the filesystem is network connected. Linux will not mount such filesystems until networking has been successfully initialized on the host.
You can specify the version of the SMB protocol to be used for the connection (SMB version 1.0 is insecure and disabled by default in modern Windows versions). Add the parameter vers=3.0 to the end of the cifs connection string.
//192.168.31.33/backup /mnt/share cifs user,rw,credentials=/home/sysops/.windowscredentials,iocharset=utf8,nofail,_netdev,vers=3.0 0 0
If an incompatible (old version) of SMB is used on the remote Windows host, a connection error will occur:
mount error(112): Host is down
or
mount error(95): Operation not supported
To immediately mount a shared folder from the fstab configuration file
How to Access Windows Share on Linux with a Samba Client
Install the samba-client on Linux:
$ sudo apt-get install smbclient$ sudo dnf install smbclientTo view the SMB hosts on the local network:
List the SMB folders that are available on a remote Windows host:
If you have disabled anonymous access in Windows, you will get an error:
session setup failed: NT_STATUS_ACCESS_DENIED
In this case, you must specify the Windows user account that you want to use to access the shared folder:
$ smbclient -L //192.168.31.33 -U User03Add the -W option if you want to use a domain user account:
$ smbclient -L //192.168.31.33 -U User03 –W Domain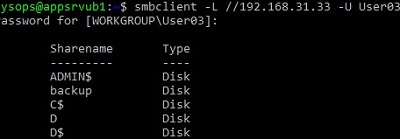
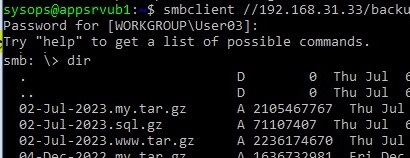
To establish an interactive connection to a Windows network share, use the following command
$ smbclient //192.168.31.33/backup -U User03 -W Domain$ smbclient //192.168.31.33/backup -U User03To access the SMB folder anonymously:
$ smbclient //192.168.31.33/backup -U EveryoneAfter logging in, the following prompt will appear:
List the files in a shared SMB folder:
Download the file from the Windows shared folder:
get remotefile.txt /home/sysops/localfile.txtSave a local file from Linux to an SMB directory:
put /home/sysops/localfile.txt remotefile.txtYou can run multiple smbclient commands one after the other:
$ smbclient //192.168.31.33/backup -U User03 -c "cd MyFolder; get arcive.zip /mnt/backup/archive.zip"You can use the help command to display a full list of commands in smbclient. The syntax of the smbclient commands is similar to the ftp client commands.
An error may occur when using the smbclient command:
Unable to initialize messaging context
smbclient: Can’t load /etc/samba/smb.conf — run testparm to debug it.
Create the file /etc/samba/smb.conf to fix the error.
If the SMB 1.0 protocol is disabled on the Windows host, the smbclient connection will fail:
Reconnecting with SMB1 for workgroup listing.
protocol negotiation failed: NT_STATUS_CONNECTION_RESET
Unable to connect with SMB1 — no workgroup available.