- Mounting an ISO Image in Linux
- Create a Mount Point for ISO Image
- Mount an ISO File in Linux
- Verify that ISO File is Mounted
- Unmount an ISO File in Linux
- How to Mount and Unmount an ISO Image in Linux
- How to Mount an ISO Image in Linux
- How to Unmount an ISO Image in Linux
- How to Mount ISO Images Files in Linux
- Mount Command
- Mount / Extract Using Archive Managers
- GNOME Disks
- P7zip-full
- Conclusion
- About the author
- Nitesh Kumar
- Как смонтировать ISO-файл в Linux
- Как смонтировать файлы ISO с помощью командной строки
- Монтирование файлов ISO с помощью Gnome
- Выводы
Mounting an ISO Image in Linux
You can easily access an ISO image of a CD or DVD (e.g. RHEL DVD) from the command line in Linux.
To access an ISO disc image, you have to create a mount point (empty folder that will be used as a root filesystem) and mount an ISO file to it.
In this article, i’ll show how to Mount and Unmount an ISO file from the Linux Command Line (CentOS, RHEL, Fedora, Ubuntu, Debian, Mint etc.).
To mount an ISO image in Linux, you must be a root or use sudo.
Create a Mount Point for ISO Image
A mount point – is a directory (typically an empty folder) from which the content of an ISO disc image will be accessible.
$ sudo mkdir -p /mnt/mount_point
Mount an ISO File in Linux
Mount an ISO file /home/user/disk.iso to the mount point /mnt/mount_point :
$ sudo mount -o loop /home/user/disk.iso /mnt/mount_point
After ISO disk is mounted, you will receive the following message: ‘mount: warning: /mnt/mount_point seems to be mounted read-only‘.
You can ignore it, because according to the ISO 9660 standard, ISO images are always mounted in read-only mode.
Verify that ISO File is Mounted
List mounted devices to verify that ISO image has successfully been mounted:
Below you should see a line like the following:
/home/user/disk.iso on /mnt/mount_point type iso9660 (ro)
Now you can access the mount point and list the files stored on the ISO disk image:
Unmount an ISO File in Linux
Use the following command to unmount an ISO disc image:
$ sudo umount /mnt/mount_point
How to Mount and Unmount an ISO Image in Linux
An ISO image or .iso (International Organization for Standardization) file is an archive file that contains a disk image called ISO 9660 file system format.
Every ISO file has .iso an extension has a defined format name taken from the ISO 9660 file system and is specially used with CD/DVD ROMs. In simple words, an iso file is a disk image.
I have seen most of the Linux operating system images that we download from the internet are .ISO format. Typically an ISO image contains the installation of software such as operating system installation files, games installation files, or any other applications.
Sometimes it happens that we need to access files and view content from these ISO images, but without wasting disk space and time by burning them onto CD/DVD or USB drives using our tools.
This article describes how to mount and unmount an ISO image on a Linux Operating system to access and list the content of files.
How to Mount an ISO Image in Linux
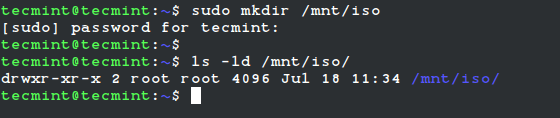
To mount an ISO image on RedHat-based or Debian-based Linux distributions, you must be logged in as a “root” user or switch to “sudo” and run the following commands from a terminal to create a mount point.
# mkdir /mnt/iso OR $ sudo mkdir /mnt/iso
Once you created a mount point, use the “mount” command to mount an iso file called “Fedora-Server-dvd-x86_64-36-1.5.iso“.
# mount -t iso9660 -o loop /home/tecmint/Fedora-Server-dvd-x86_64-36-1.5.iso /mnt/iso/ OR $ sudo mount -t iso9660 -o loop /home/tecmint/Fedora-Server-dvd-x86_64-36-1.5.iso /mnt/iso/

Where Options
- -t – This argument is used to indicate the given filesystem type.
- ISO 9660 – It describes the standard and default filesystem structure to be used on CD/DVD ROMs.
- -o – Options are necessary with a -o argument followed by a separated comma string of options.
- loop -The loop device is a pseudo-device that is often used for mounting CD/DVD ISO images and makes those files accessible as a block device.
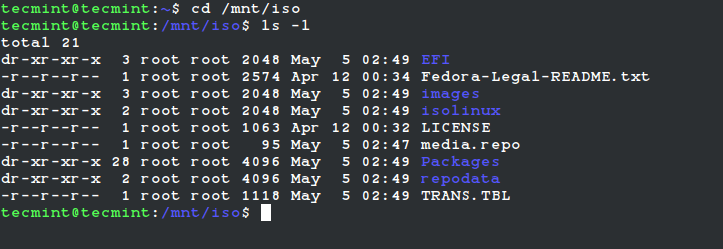
After the ISO image is mounted successfully, go to the mounted directory at /mnt/iso and list the content of an ISO image. It will only mount in read-only mode, so none of the files can be modified.
You will see the list of files of an ISO image, that we have mounted in the above command. For example, the directory listing of a Fedora-Server-dvd-x86_64-36-1.5.iso image would look like this.
total 21 dr-xr-xr-x 3 root root 2048 May 5 02:49 EFI -r--r--r-- 1 root root 2574 Apr 12 00:34 Fedora-Legal-README.txt dr-xr-xr-x 3 root root 2048 May 5 02:49 images dr-xr-xr-x 2 root root 2048 May 5 02:49 isolinux -r--r--r-- 1 root root 1063 Apr 12 00:32 LICENSE -r--r--r-- 1 root root 95 May 5 02:47 media.repo dr-xr-xr-x 28 root root 4096 May 5 02:49 Packages dr-xr-xr-x 2 root root 4096 May 5 02:49 repodata -r--r--r-- 1 root root 1118 May 5 02:49 TRANS.TBL
How to Unmount an ISO Image in Linux
Simply run the following command from the terminal either “root” or “sudo” to unmount a mounted ISO image.
# umount /mnt/iso OR $ sudo umount /mnt/iso
How to Mount ISO Images Files in Linux
![]()
This article will list a few methods using which you can mount ISO image files in Linux. After mounting these ISO image files, you will be able to browse their contents and copy / extract data from the mount point to your local file system.
Mount Command
The mount command, as the name suggests, allows you to mount a variety of filesystems. Once you mount a ISO image filesystem using the mount command, you will be able to explore its content using a graphical file manager or command line. To mount an ISO image file, use the following two commands in succession:
Replace “file.iso” with the name of your own ISO image file. You can change “mountpoint” to any other name. It represents the name of the folder where the ISO image filesystem will be mounted. In this case, a new folder is created in the home directory. On certain Linux distributions, you may have to prefix “mount” command with “sudo” to run the command as root.
To check if the ISO image file has been successfully mounted or not, you can run the following command:
If the command above returns a list of files and directories, then you can safely assume that the ISO image filesystem has been successfully mounted. You can now copy contents from the mount point to your local filesystem. Do note that most of the time, this mounted filesystem may be in read-only mode. If you want to modify the contents of the ISO image file, you may have to remove the write-protection mechanism and may have to use some external tools to repackage the ISO image file.
To unmount the mount point created in previous command, use the command specified below:
You may have to run it with “sudo” depending on configuration of your Linux distribution. It is highly recommended that you manually unmount the mount point once your work is done to avoid file corruption.
You can know more about “mount” command by running these two commands in a terminal:
Mount / Extract Using Archive Managers
File managers in almost all major Linux distributions come with an integrated plugin for extracting and managing compressed archives. You can use these archive managers to mount or extract content from ISO image files.
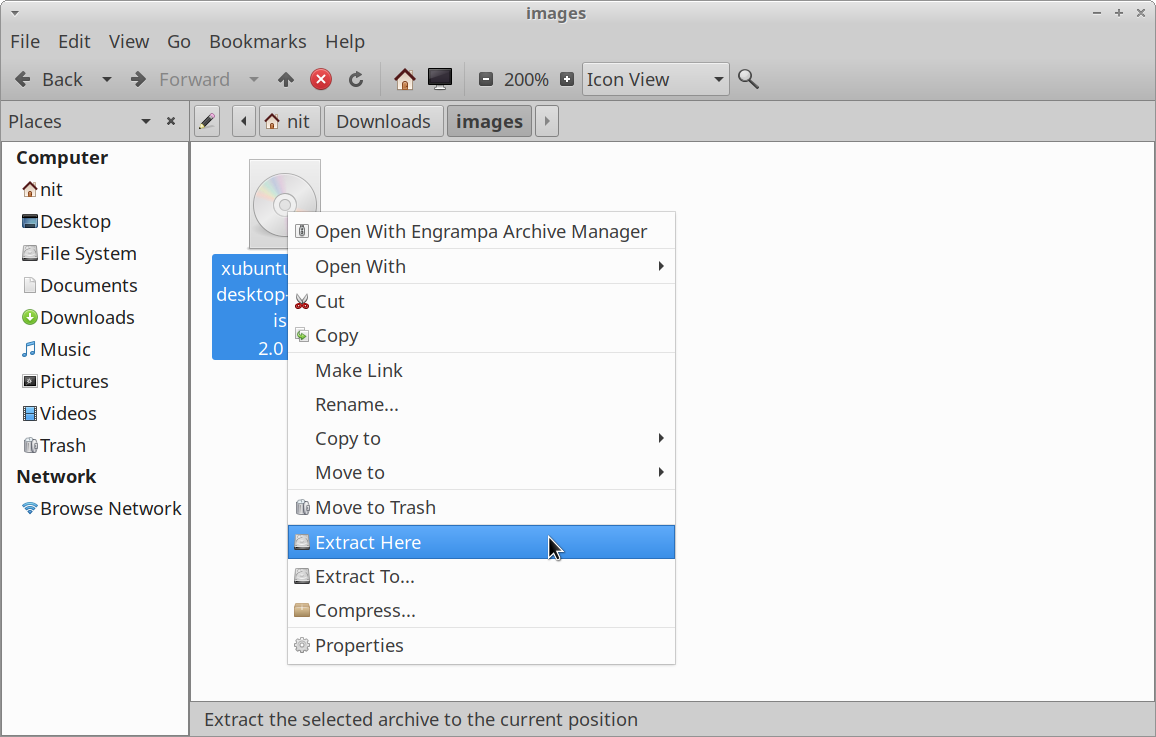
If for some reason your file manager doesn’t have a dedicated archive manager plugin, you can install such archive managers in your Linux distributions by searching for “archive manager”, “file roller”, “archivemount” and “engrampa” terms in the package manager. Once these packages are installed, just right click on an ISO image file and click on the menu entry that allows you to explore the archive.
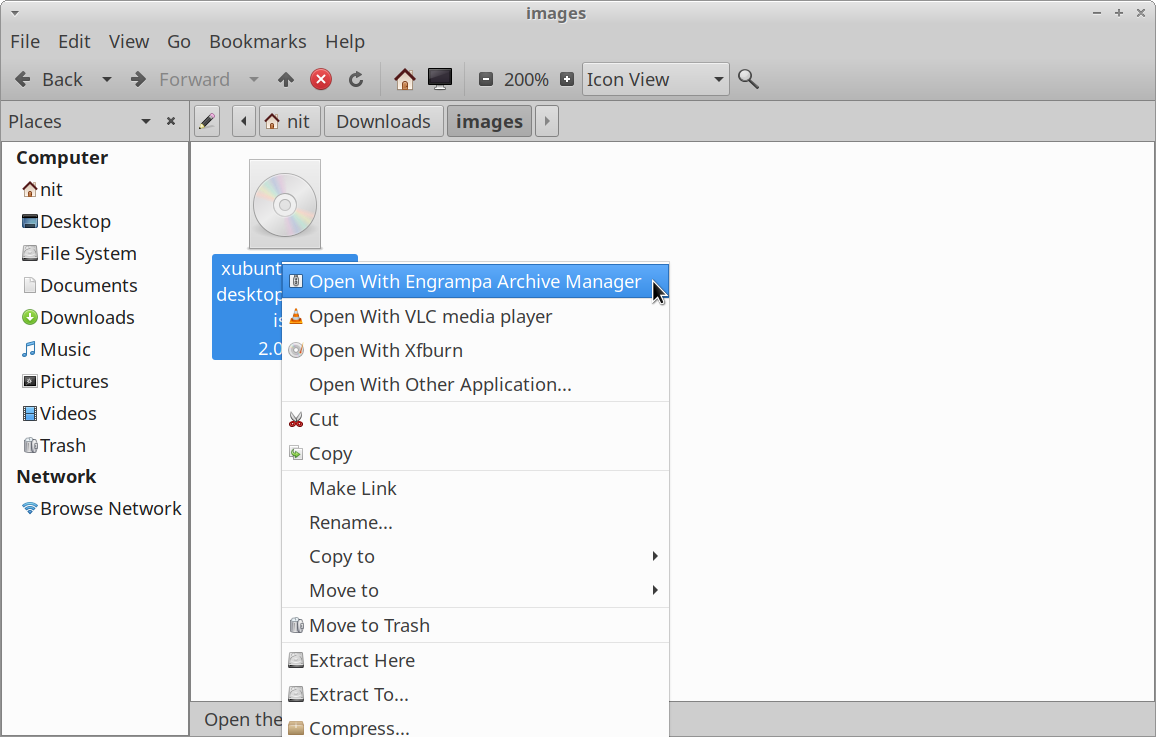
Depending on the archive manager plugin you are using, the ISO image filesystem may be mounted or it may be opened in the archive manager GUI window. Once mounted, a new filesystem entry should appear in the sidebar of your file manager. Just click on the sidebar entry to explore its content. When your work is done, unmount it manually to avoid file corruption.
GNOME Disks
GNOME Disks or GNOME Disk Utility is a comprehensive utility for managing storage devices, local filesystems, partitions and disk image files. You can use it to mount an ISO image file and browse its contents. To install GNOME Disks in Ubuntu, use the command specified below:
You can install GNOME Disks from the package manager in other Linux distributions. Source code is available here.
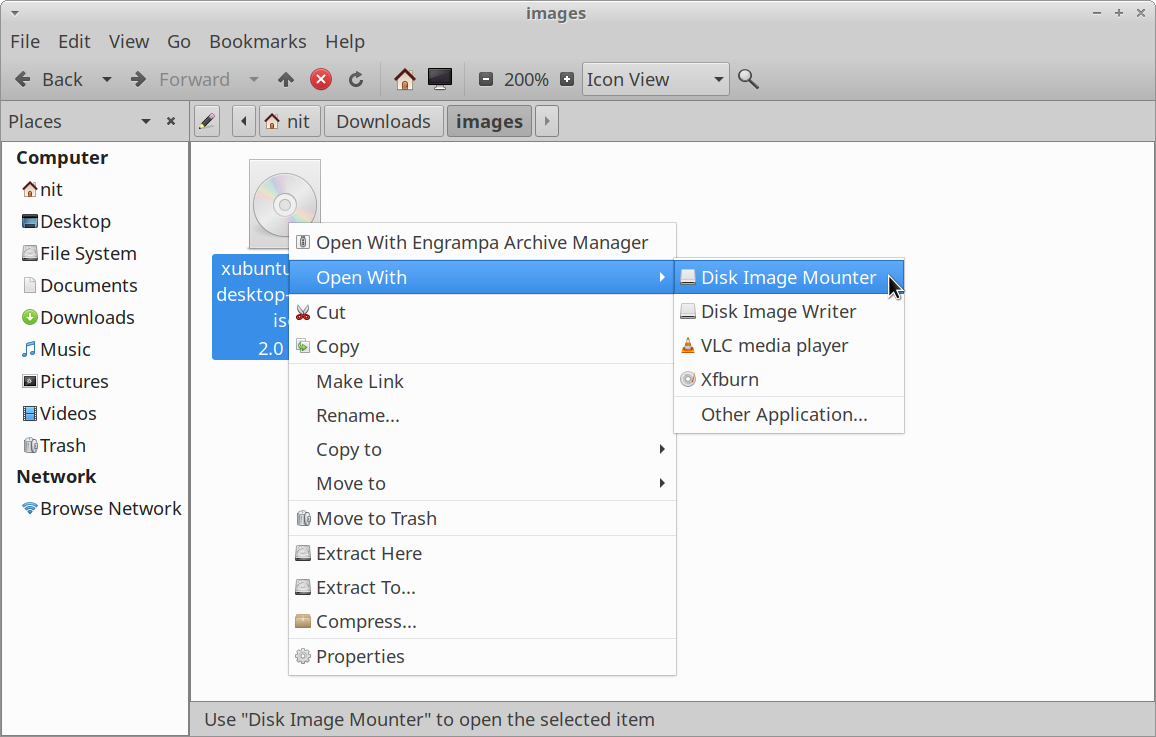
You can follow two approaches to mount an ISO image file using GNOME Disks. After installing GNOME Disks, a new right click menu entry called “Disk Image Mounter” may appear in your file manager. Just click on the menu entry to mount the ISO image file.
If the right click entry doesn’t appear in your file manager, launch “Disks” application from the main application menu and click on the “Attach Disk Image” menu option to mount your desired ISO image file.

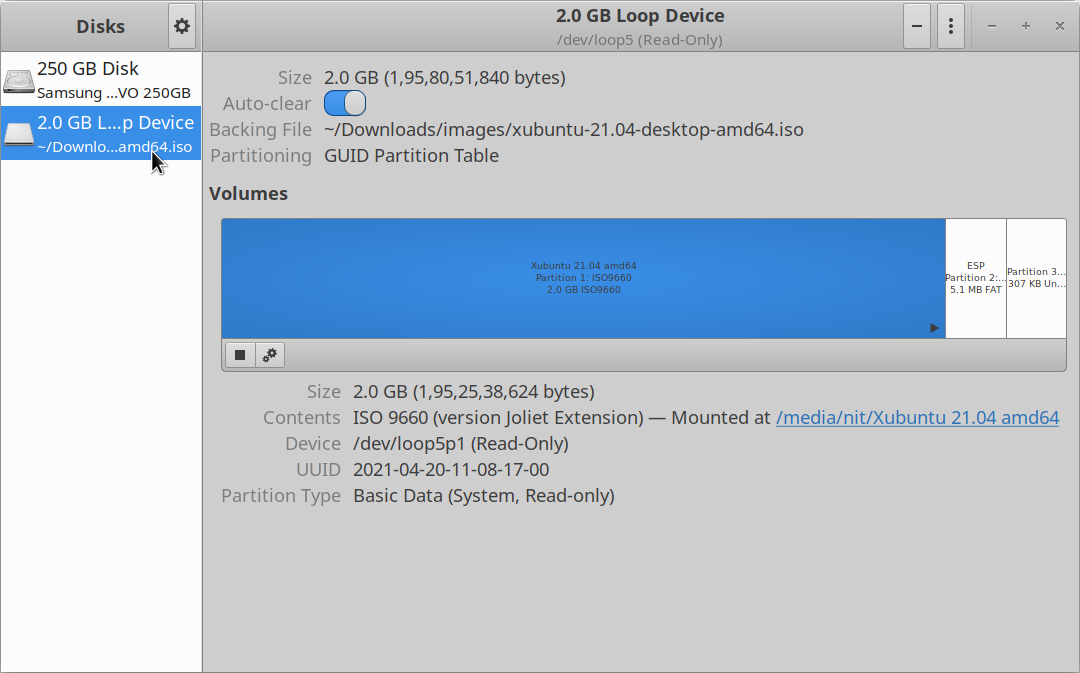
Once mounted, the newly created mount point should automatically appear in the GNOME Disks and your file manager.
P7zip-full
P7zip-full is an open source implementation of “7z” file format and archive management utility. You can use it to extract contents of an ISO image file.
To install P7zip-full in Ubuntu, use the command specified below:
You can install P7zip-full from the package manager in other Linux distributions. Additional packages and source code is available here.
Once installed, run the following command to extract content from an ISO image file (replace “file.iso” with your desired filename):
You can know more about “7z” command by running these two commands in a terminal:
Depending on the file manager you are using, you may get a new menu entry in the right click menu to extract the ISO archive.
Conclusion
These are some of the ways you can mount ISO image files in your Linux distribution. Some Linux distributions come with a dedicated, pre-installed utility for mounting and burning CD / DVD disks. You can also use these applications to explore the data contained in an ISO image file.
About the author
Nitesh Kumar
I am a freelancer software developer and content writer who loves Linux, open source software and the free software community.
Как смонтировать ISO-файл в Linux
Файл ISO — это архивный файл, который обычно содержит полный образ компакт-диска или DVD. Например, большинство операционных систем, таких как Windows, Linux и macOS, распространяются в виде образов ISO.
Файлы ISO можно извлечь с помощью популярных архивных программ, смонтировать на устройстве с петлей и записать на USB-накопитель или пустой компакт-диск.
В этом руководстве мы объясним, как монтировать файлы ISO в Linux.
Как смонтировать файлы ISO с помощью командной строки
Команда mount позволяет прикреплять (монтировать) файлы ISO в определенной точке монтирования в дереве каталогов.
Инструкции в этом разделе должны работать с любым дистрибутивом Linux, включая Ubuntu, Debian и CentOS.
- Начните с создания точки монтирования, это может быть любое место, которое вы хотите:
sudo mount /path/to/image.iso /media/iso -o loopМонтирование файлов ISO с помощью Gnome
Если вы используете дистрибутив Linux, который использует Gnome в качестве среды рабочего стола, вы можете смонтировать файл ISO с помощью приложения для монтирования образа диска Gnome.
Найдите ISO-файл, который вы хотите смонтировать, и щелкните его правой кнопкой мыши. В контекстном меню выберите «Открыть с помощью Disk Image Mounter».
После подключения образа на рабочем столе должен появиться значок устройства. Дважды щелкните по нему, и откроется файловый менеджер Gnome.
Чтобы отключить файл ISO, щелкните правой кнопкой мыши значок устройства и выберите «Размонтировать».
Выводы
В Linux вы можете монтировать файлы ISO с помощью команды mount . Пользователи настольных компьютеров могут использовать графические инструменты, такие как Gnome Disk Image Mounter.
Если у вас есть какие-либо вопросы или отзывы, не стесняйтесь оставлять комментарии.