How to Mount IMG Files in Linux
ISO images are often used to contain CD-ROM or DVD data, but Linux users will occasionally find themselves working with IMG files instead. These contain direct disk images, which can be worked with in a similar way. At one point these were generally used for writing an entire file system directly to a discrete diskette, but few people would ever wish to do that in today’s world. There are two major reasons modern Linux users would need to work with them, however. One is if an IMG file was used to distribute a driver or other piece of an operating system that needed to be restored. The IMG file can be mounted and the individual file from inside of it’s contained system could then be copied over to a booted file structure. The other reason, which is becoming extremely popular, is for working with virtual machines and other forms of hardware virtualization.
Linux provides several different ways to work with these contained structures. Depending on your distribution, you might be able to work with them in a purely graphical environment. The same CLI tools that mount ISO images could also mount IMG if this isn’t possible for you, however.
Method 1: Mount With Graphical Menus
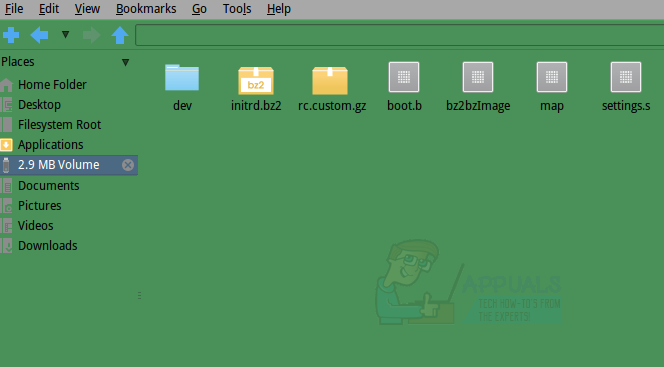
If you’re using PCManFM or another file manager that supports mounting an image directly via the /media folder with a menu driven system such as some versions of Nautilus, then you should hold launch your manager to start. You’ll either need to launch this from the Panel Menu in LXDE or from the Applications menu in GNOME. Once you’re open, navigate to the Downloads folder by clicking the link in the left panel and then right click on the disk image you downloaded. It’s generally smart to have ensured that your browser didn’t detect any malware before proceeding.
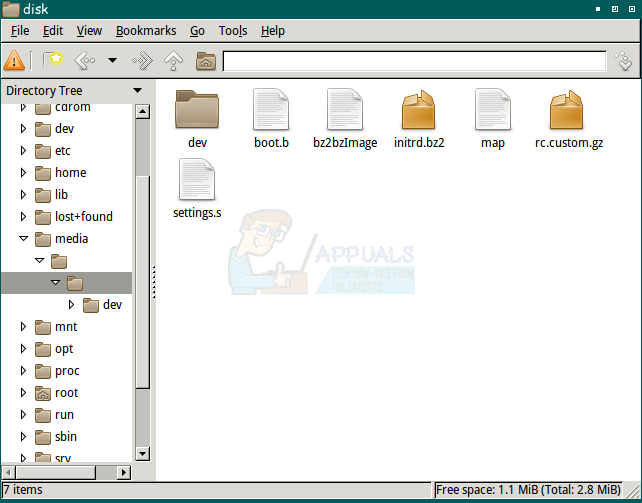
Once the context menu appears, select the “mount disk image” option. The label for this command will change depending on your particular distribution. The image will automatically mount at /media/USERNAME/disk, with USERNAME being replaced with your actual user name. Click on the left panel of the file manager where it reads the size of the image in question. In our example we used an image of an older Linux distribution called tomsrtbt (pronounced Tom’s Root Boot), which fit an entire operating system in less than three megabytes. Hence the “2.9 MB Volume” label refers to the image in question.
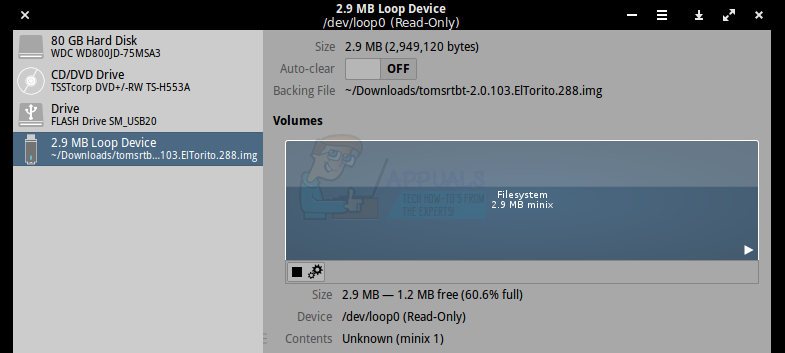
You may now drag or right click and copy any of these files to any other section of your file system for safekeeping. When you’re done you can click on the X logo next to the label to close it. If you’re using a file manager that doesn’t support this method of unmounting an image, then start the GNOME Disks utility from the Panel Menu or the Applications tab. Click on the device that has the same name as the label from the file manager and then click on the square stop button to close down the file system.
Method 2: Via the Loopback Device
Disk images could be mounted via the loopback device as well, in much the same way as ISO images can be. This technique will be necessary if you use Thunar, Konqueror or any other file manager that doesn’t support direct mounting via graphical techniques. If you haven’t been able to mount an image graphically, then hold down CTRL, ALT and T at the same time. Type ls /mnt to make sure your /mnt directory is empty. If it’s not or if you don’t feel comfortable using it directly, then you can use sudo mkdir /mnt/toms to create a mountable directory. You could theoretically call the directory whatever you’d like. Type sudo mount -o loop tomsrtbt-2.0.103.ElTorito.288.img /mnt and press enter. You will be prompted to enter your password, which you will be required to do. The /mnt directory can then be explored via the CLI or the file manager you prefer. Naturally you’ll need to replace tomsrtbt-2.0.103.ElTorito.288.img with the image you’re using and /mnt with the directory tree segment you’re using.
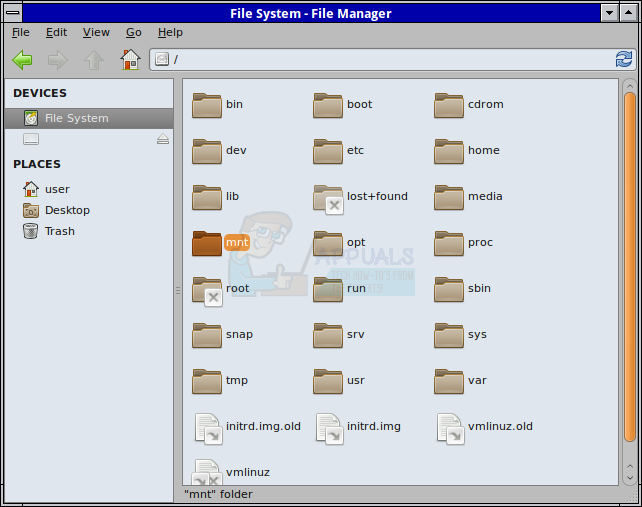
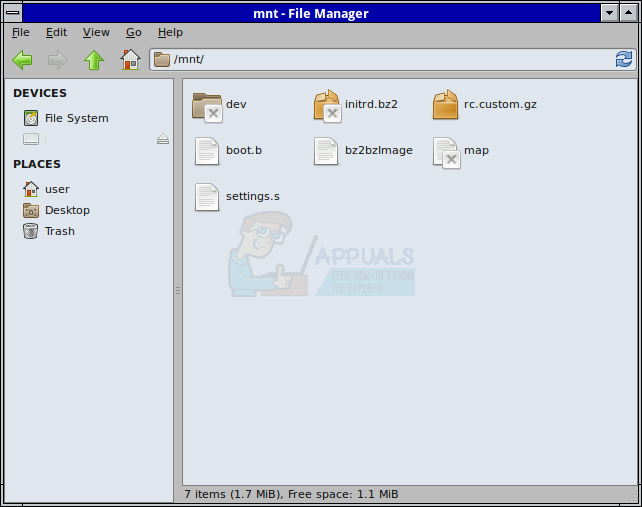
Hold down CTRL and E to open your graphical manager or start it from the Applications or Whisker menu depending on which desktop environment you are using. Select the File System option from the left pain, navigate to /mnt and then select the /mnt folder. You’ll now be able to examine the contents of the image file.
At the CLI type sudo umount /mnt and press enter to umount the image. You would need to substitute whatever mount point you used for /mnt when you do so.
Create, Mount And Unmount .img Files In Ubuntu
Recently I moved from Windows to Ubuntu on one of my laptops and since then I was trying to look for the way to create a VHDs or some sort of image files that I can use as a container. So I looked up for the solution and found a working solution scattered though places. So here I am putting it in a blog post to have all it in one place.
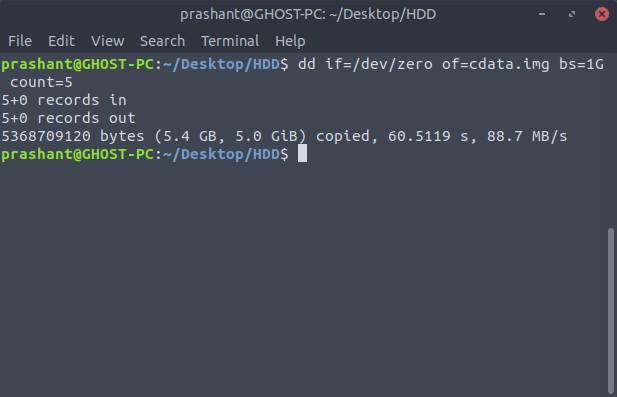
First we need to create an image file (.img) by using the dd command. The dd command is used to copy and convert the file. The reason it is not called cc is because it is already being used by C compiler. Here goes the command.
$ dd if=/dev/zero of=cdata.img bs=1G count=5
Note: The command execution time depends on the size of the image you have opted out for.
The if param stands for input file to refer the input file. As if , of stands for output file and this will create the .img file with the name you specify. The third param bs stands for block size . This will let you set the size of the image file. The G in the above command stands for GigaByte (GB). You can set the image size by specifying the block size. In this case G stands for GigaBytes (GB), K for KiloBytes (KB), T for TeraBytes (TB), P for Petabytes (PB) and so on. Here I am creating a 5 blocks of 1 GB each for the image file name cdata .
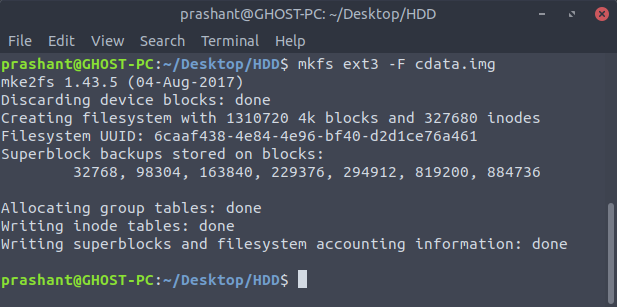
This command will create the .img file but you cannot mount this file as of yet. To do that you have to format the image so that it can have a file system. To do this make use of mkfs command.
I am creating an ext3 filesystem on my image file. -F is to force the operation. Here is the output of the command.
Now we can mount the image file by using the mount command:
$ sudo mount -o loop cdata.img ~/Desktop/HDD/
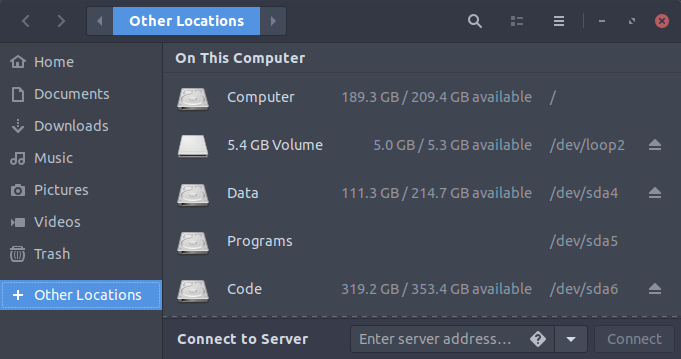
With the success of the above command, you can see the image mounted on your desktop. You can unmount the image by clicking the eject or unmount button as shown in the below screenshot or you can execute the umount command to do that.
Unmounting the image by using command line.
How to mount a disk image from the command line?
I know how to mount a drive that has a corresponding device file in /dev, but I don’t know how to do this for a disk image that does not represent a physical device and does not have an analogue in /dev (e.g. an ISO file or a floppy image). I know I can do this in Mac OS X by double-clicking on the disk image’s icon in Finder, which will mount the drive automatically, but I would like to be able to do this from the terminal. I’m not sure if there is a general Unix way of doing this, or if this is platform-specific.
Do you mean you want to do it on the command line on OS X? You mention it, but it might be better to be explicit if the question is specific to a certain os. Also, what type of a disk image do you mean? .iso?
4 Answers 4
If it was a hard-drive image with a MBR partition table, I would fdisk the image to find the offset for the partition I need to mount.
Then I would mount it passing the offset.
mount -o loop,offset=xxxx /path/disk.img /mnt/disk.img.partition The offset value is in bytes, whereas fdisk shows a block count, so you should multiply the value from the «Begin» or «Start» column of the fdisk output by 512 (or whatever the block size is) to obtain the offset to mount at.
+1 This is the solution that worked for me. Thank you for including details on how to calculate the offset as well.
On most modern GNU system the mount command can handle that:
mount -o loop file.iso /mnt/dir to unmount you can just use the umount command
If your OS doesn’t have this option you can create a loop device:
losetup -f # this will print the first available loop device ex:/dev/loop0 losetup /dev/loop0 /path/file.iso #associate loop0 with the specified file mount /dev/loop0 /mnt/dir #It may be necessary specify the type (-t iso9660) umount /mnt/dir losetup -d /dev/loop0 If the file have partitions, example a HD image, you can use the -P parameter (depending on you OS), it will map the partitions in the file content:
losetup -P /dev/loop0 /path/file.iso # will create /dev/loop0 ls /dev/loop0p* #the partitions in the format /dev/loop0pX losetup and mount -o loop are Linux specific. It won’t work on GNU distributions using a different kernel (like hurd, illumos or kFreeBSD though illumos and FreeBSD will have the equivalent with a different syntax)
I don’t understand the meaning of a «loop device» nor why you need -o loop to mount the image file as one. Can you explain please? I see the Wikipedia link but still don’t understand. I have an embedded Linux rootfs.ext2 roof filesystem image, and it doesn’t seem to make any difference when I mount it with vs without -o loop to inspect the files.
losetup -P automation for multi partition images
How to mount a disk image from the command line? | Unix & Linux Stack Exchange mentioned losetup -P , and here are some handy Bash functions to further automate things. Usage:
$ los my.img /dev/loop0 /mnt/loop0p1 /mnt/loop0p2 $ ls /mnt/loop0p1 /whatever /files /youhave /there $ sudo losetup -l NAME SIZELIMIT OFFSET AUTOCLEAR RO BACK-FILE DIO /dev/loop1 0 0 0 0 /full/path/to/my.img $ # Cleanup. $ losd 0 $ ls /mnt/loop0p1 $ ls /dev | grep loop0 loop0 los() ( img="$1" dev="$(sudo losetup --show -f -P "$img")" echo "$dev" for part in "$dev"?*; do if [ "$part" = "$p*" ]; then part="$" fi dst="/mnt/$(basename "$part")" echo "$dst" sudo mkdir -p "$dst" sudo mount "$part" "$dst" done ) losd() ( dev="/dev/loop$1" for part in "$dev"?*; do if [ "$part" = "$p*" ]; then part="$" fi dst="/mnt/$(basename "$part")" sudo umount "$dst" done sudo losetup -d "$dev" ) How to find the type of an img file and mount it?
I have to mount a .img file but I don’t know what type of .img it is. How can I figure out what type of .img file it is?
# mount -t auto -o ro,loop gmapsupp.img /mnt/iso/ mount: you must specify the filesystem type # file -k gmapsupp.img gmapsupp.img: x86 boot sector, code offset 0x0 # 7 Answers 7
Try running the command fdisk -l . Typically if the .img files are entire disks from say a KVM VM then they’re technically a virtual disk.
Example
I’ve got a CentOS KVM VM which shows up like so with the file command:
$ file centostest.img centostest.img: x86 boot sector; partition 1: active, starthead 1, startsector 63, 208782 sectors; partition 2: starthead 0, startsector 208845, 20755980 sectors, code offset 0x48 $ sudo /sbin/fdisk -lu /kvm/centostest.img last_lba(): I don't know how to handle files with mode 81ed You must set cylinders. You can do this from the extra functions menu. Disk /kvm/centostest.img: 0 MB, 0 bytes 255 heads, 63 sectors/track, 0 cylinders, total 0 sectors Units = sectors of 1 * 512 = 512 bytes Device Boot Start End Blocks Id System /kvm/centostest.img1 * 63 208844 104391 83 Linux /kvm/centostest.img2 208845 20964824 10377990 8e Linux LVM Partition 2 has different physical/logical endings: phys=(1023, 254, 63) logical=(1304, 254, 63) If you’d like to mount one of these partitions you can do so as follows:
- block-size of 512 bytes and the start-block is 63.
- The offset is 512 * 63 = 32256.
- block-size of 512 bytes and the start-block is 1.
- The offset is 512 * 1 = 512.
So the mount command would be:
in cylinders
$ mount -o loop,offset=32256 centostest.img /mnt/tmp To mount the other partition (512 * 208845 = 106928640):
$ mount -o loop,offset=106928640 centostest.img /mnt/tmp $ mount -o loop,offset=512 centostest.img /mnt/tmp To mount the other partition (512 * 14 = 7168):
$ mount -o loop,offset=7168 centostest.img /mnt/tmp NOTE
This will only work if mount can determine the type of filesystem within the «partition» you’re attempting to mount. You may need to include -t auto , or be specific and tell mount that’s it’s -t ext4 for example.
