- Mounting shared folder vmware linux
- Mounting shared folder vmware linux
- Mounting VMware Shares from the Command Line on Linux VM
- Adding a Share to the VMware VM:
- Installing Open VM Tools:
- Mounting VMware Shares on Linux VM:
- Automatically Mount VMware Shares:
- About the author
- Shahriar Shovon
- Общая папка VMware в Linux
- Настройка общей папки VMware в Linux
Mounting shared folder vmware linux
You are using an outdated browser. Please upgrade your browser to improve your experience.
After you enable a shared folder, you can mount one or more directories or subdirectories in the shared folder to any location in the file system in addition to the default location of /mnt/hgfs .
Depending on the kernel version of the Linux guest operating system, VMware Tools uses different components to provide shared-folder functionality. In Linux kernels prior to version 4.0, the VMware Tools services script loads a driver that performs the mount. Linux kernels 4.0 and later use a FUSE file system component.
You can use different mount commands to mount all shares, one share, or a subdirectory within a share to any location in the file system. The commands also vary depending on the Linux-kernel version of the guest.
| Linux Kernel Prior to 4.0 | Linux Kernel 4.0 and Later | Description |
|---|---|---|
| mount -t vmhgfs .host:/ /home/user1/shares | /usr/bin/vmhgfs-fuse .host:/ /home/user1/shares -o subtype=vmhgfs-fuse,allow_other | Mounts all shares to /home/user1/shares |
| mount -t vmhgfs .host:/foo /tmp/foo | /usr/bin/vmhgfs-fuse .host:/foo /tmp/foo -o subtype=vmhgfs-fuse,allow_other | Mounts the share named foo to /tmp/foo |
| mount -t vmhgfs .host:/foo/bar /var/lib/bar | /usr/bin/vmhgfs-fuse .host:/foo/bar /var/lib/bar -o subtype=vmhgfs-fuse,allow_other | Mounts the subdirectory bar within the share foo to /var/lib/bar |
For Linux kernel prior to version 4.0, you can use VMware-specific options in addition to the standard mount syntax. Enter the command /sbin/mount.vmhgfs -h to list the options.
For Linux kernel version 4.0 or later, enter the command /usr/bin/vmhgfs-fuse -h to list the available options.
Note: The mount can fail if shared folders are disabled or if the share does not exist. You are not prompted to run the VMware Tools vmware-config-tools.pl configuration program again.
Mounting shared folder vmware linux
You are using an outdated browser. Please upgrade your browser to improve your experience.
After you enable a shared folder, you can mount one or more directories or subdirectories in the shared folder to any location in the file system in addition to the default location of /mnt/hgfs .
Depending on the kernel version of the Linux guest operating system, VMware Tools uses different components to provide shared-folder functionality. In Linux kernels prior to version 4.0, the VMware Tools services script loads a driver that performs the mount. Linux kernels 4.0 and later use a FUSE file system component.
You can use different mount commands to mount all shares, one share, or a subdirectory within a share to any location in the file system. The commands also vary depending on the Linux-kernel version of the guest.
| Linux Kernel Prior to 4.0 | Linux Kernel 4.0 and Later | Description |
|---|---|---|
| mount -t vmhgfs .host:/ /home/user1/shares | /usr/bin/vmhgfs-fuse .host:/ /home/user1/shares -o subtype=vmhgfs-fuse,allow_other | Mounts all shares to /home/user1/shares |
| mount -t vmhgfs .host:/foo /tmp/foo | /usr/bin/vmhgfs-fuse .host:/foo /tmp/foo -o subtype=vmhgfs-fuse,allow_other | Mounts the share named foo to /tmp/foo |
| mount -t vmhgfs .host:/foo/bar /var/lib/bar | /usr/bin/vmhgfs-fuse .host:/foo/bar /var/lib/bar -o subtype=vmhgfs-fuse,allow_other | Mounts the subdirectory bar within the share foo to /var/lib/bar |
For Linux kernel prior to version 4.0, you can use VMware-specific options in addition to the standard mount syntax. Enter the command /sbin/mount.vmhgfs -h to list the options.
For Linux kernel version 4.0 or later, enter the command /usr/bin/vmhgfs-fuse -h to list the available options.
Note: The mount can fail if shared folders are not enabled or if the share does not exist. You are not prompted to run the VMware Tools vmware-config-tools.pl configuration program again.
Mounting VMware Shares from the Command Line on Linux VM
![]()
In this article, I am going to show you how to share a directory/folder to a VMware Virtual Machine (VM) and how to mount the VMware share from the command line on a Linux VMware Virtual Machine (VM). So, let’s get started.
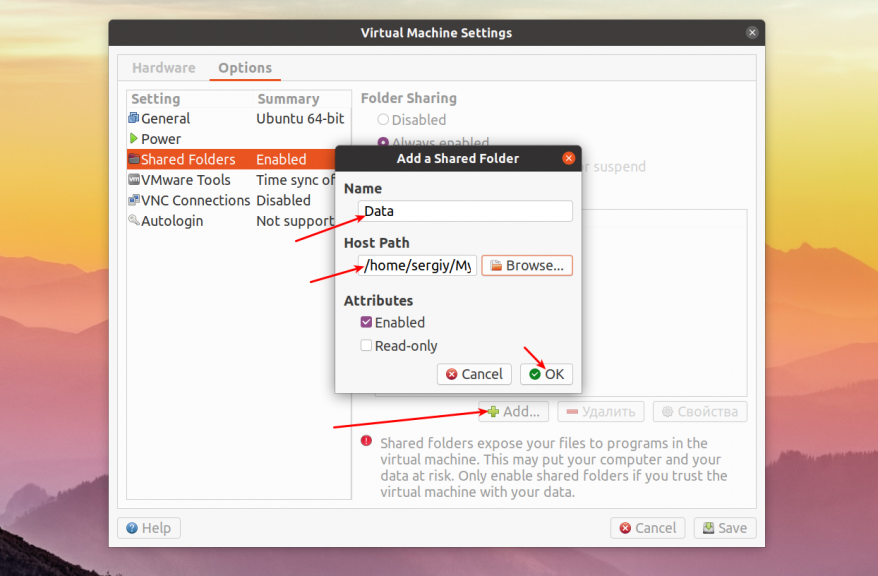
Adding a Share to the VMware VM:
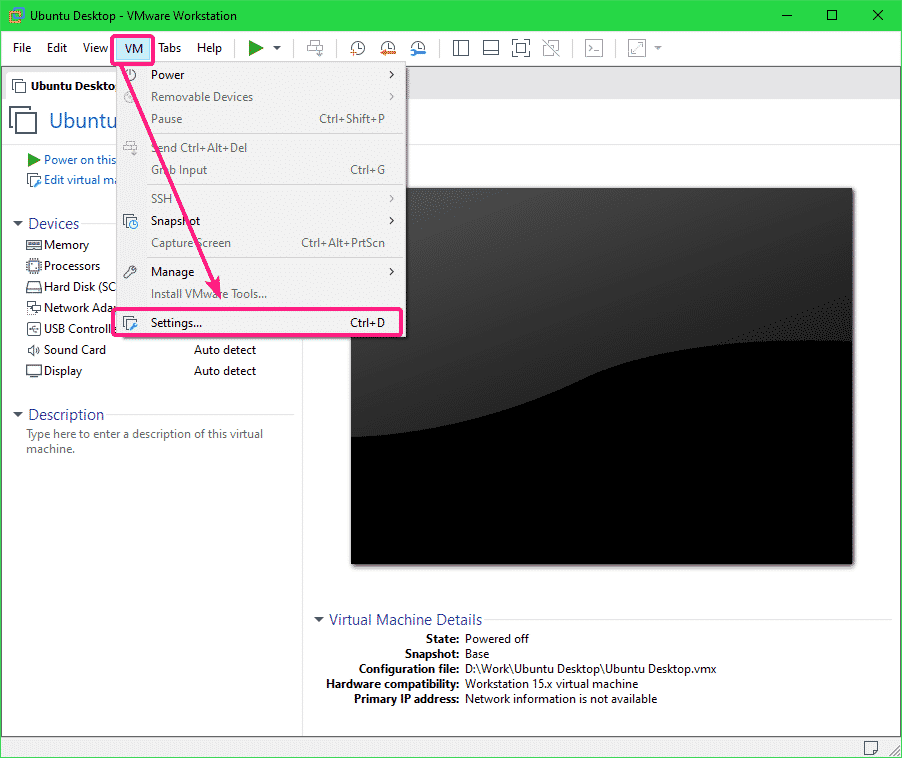
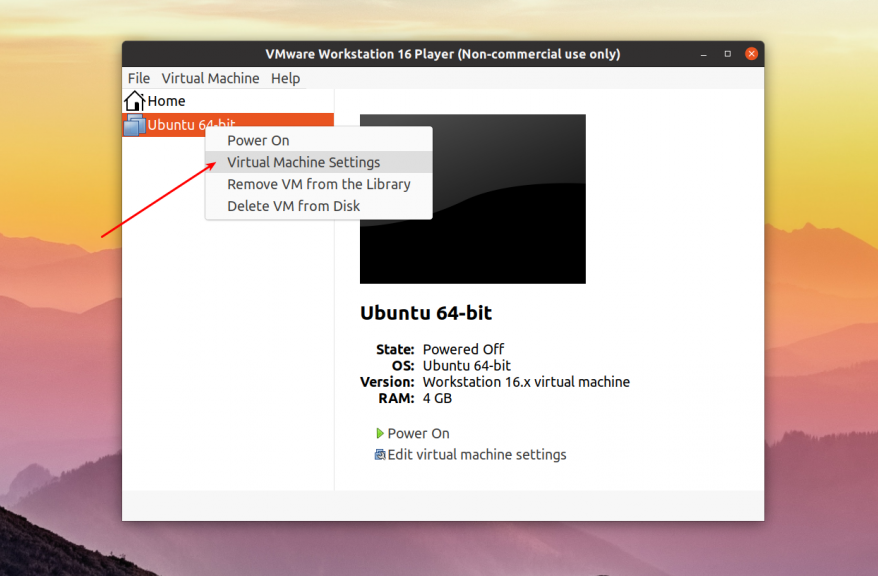
To share a directory/folder from the host to a VMware VM, open the VM, make sure the VM is not powered on and go to VM > Settings.
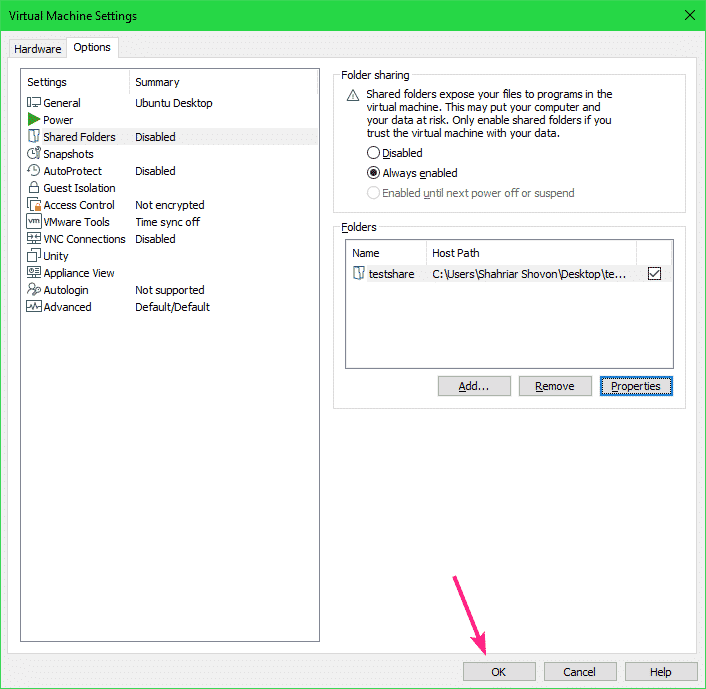
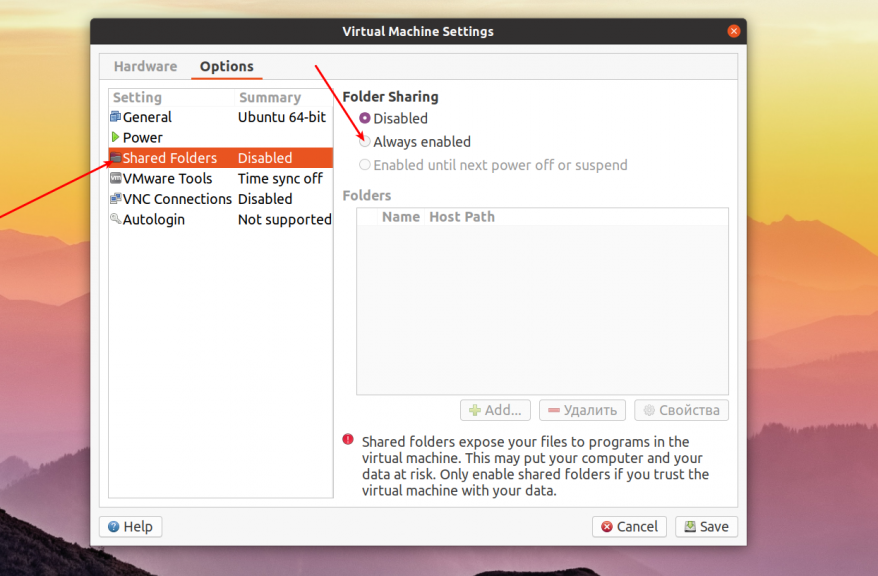
Then, go to the Options tab and click on Shared Folders.
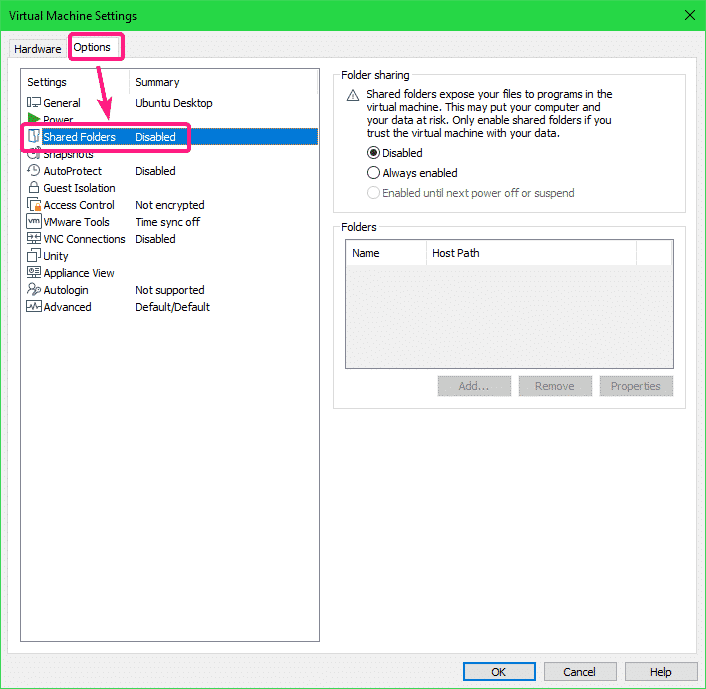
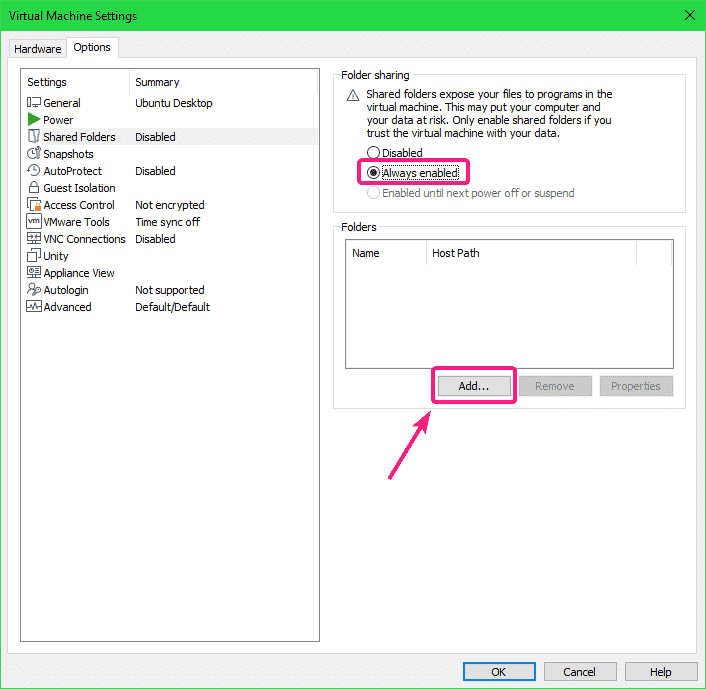
By default, Shared Folders is Disabled. To enable Shared Folders, select Always enabled.
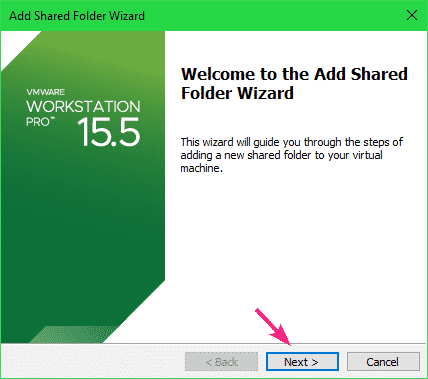
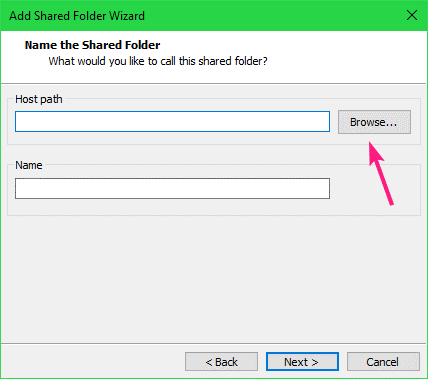
Now, you can add shared folders. To add a shared folder, click on Add…
Now, click on Next.
Now, click on Browse to select a directory/folder from your host computer.
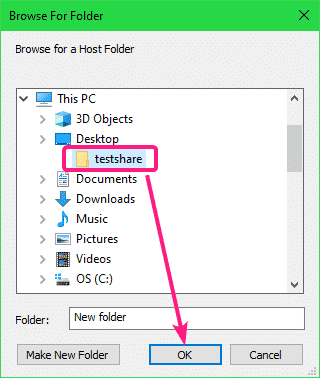
Select a directory/folder that you want to share to the VMware VM and click on OK.
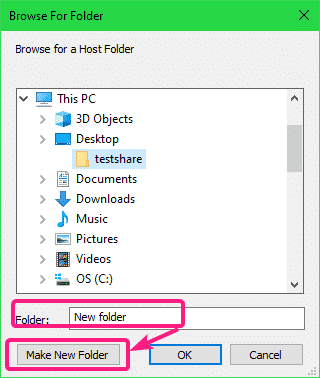
If you want to create a new directory, select a directory (parent) where you want to create a new directory, type in a Folder name and click on Make New Folder. Once the directory/folder is created, you should be able to select it for sharing.
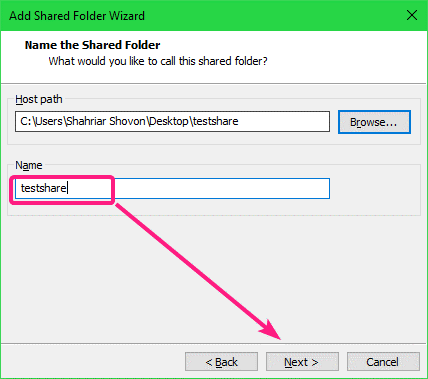
By default, the Name of the shared folder should be the name of the directory you’ve selected. If you want, you can change it. I recommend you not to add spaces in the share Name.
Once you’re done, click on Next.
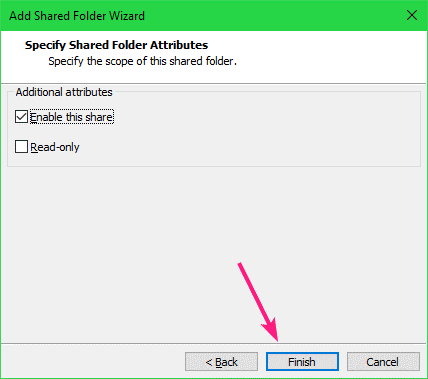
Make sure Enable this share checkbox is checked.
If you want this share to be read only, check the Read-only checkbox.
Once you’re done, click on Finish.
The share should be added to the VM.
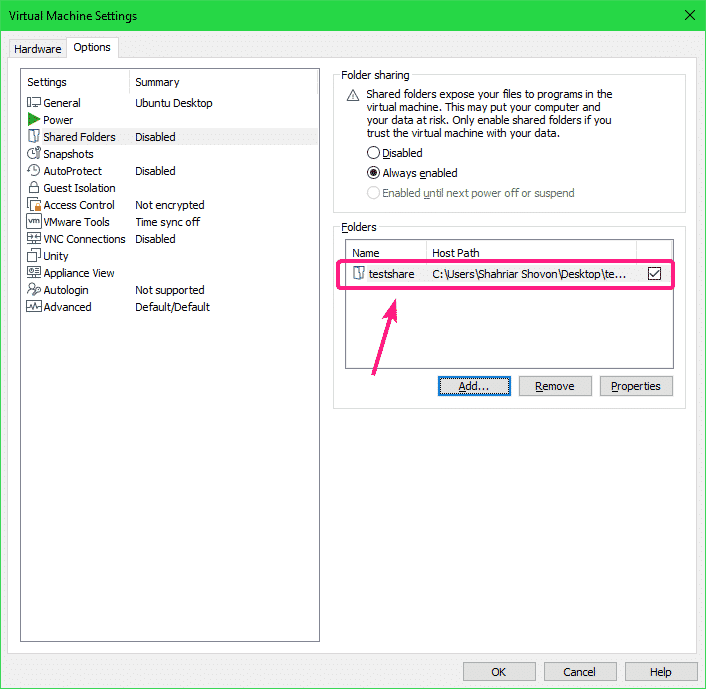
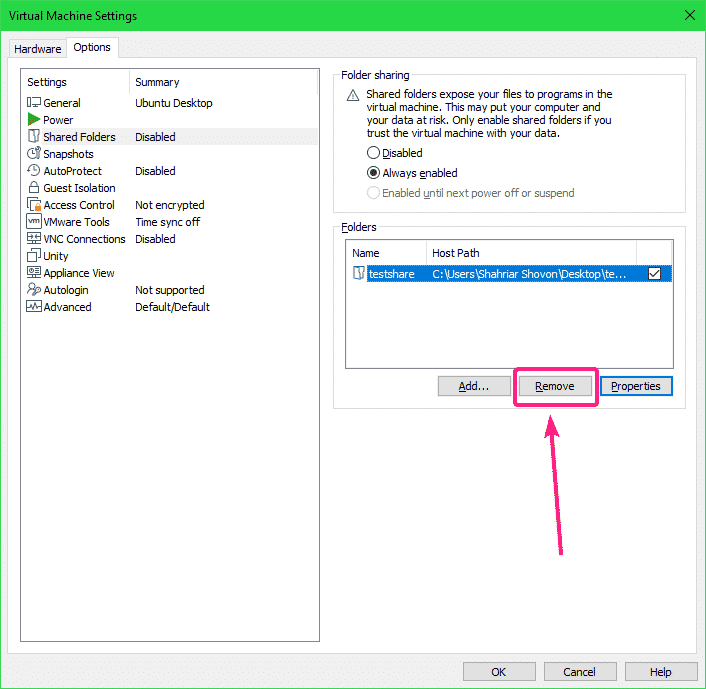
If you want to remove a share, select it and click on Remove.
If you want to change any property of the share, select the share and click on Properties.
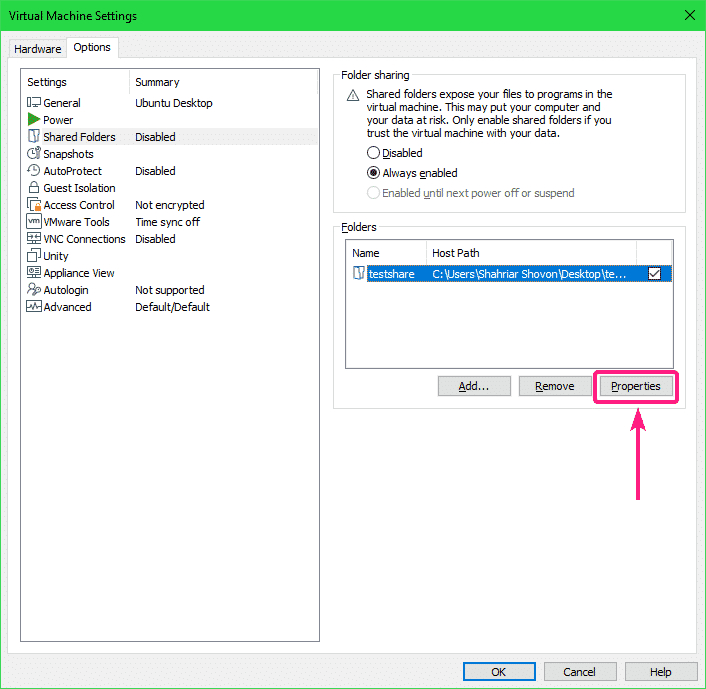
You can modify the Name, the Host path, share attributes from here. Once you’re done, click on OK for the changes to take effect.
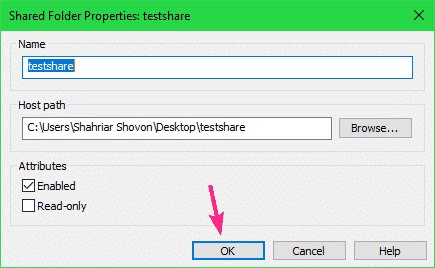
Now, click on OK.
Now, power on the virtual machine.
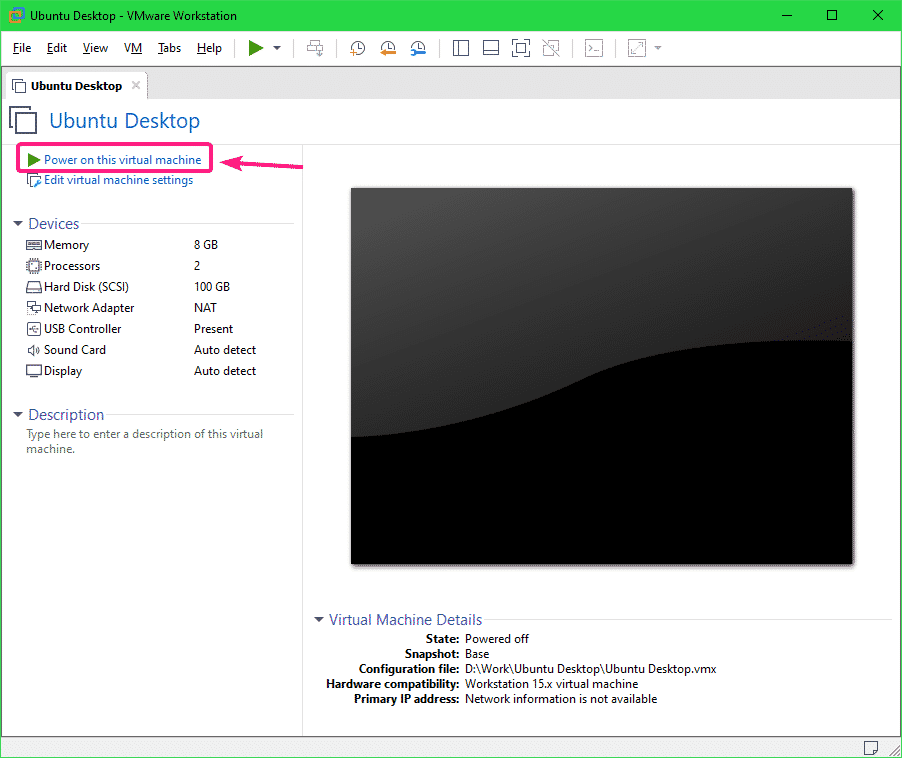
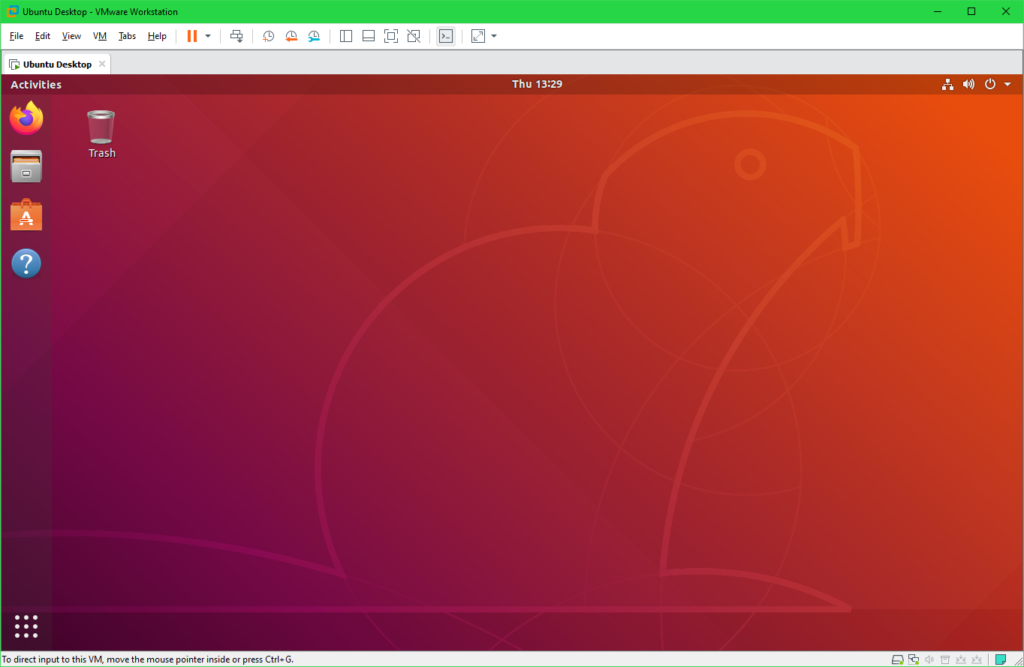
The virtual machine should start.
Installing Open VM Tools:
In order to mount VMware shares on Linux, you must have Open VM Tools or VMware Tools installed on your Linux VM.
If you’re using a Ubuntu/Debian or any Ubuntu/Debian based operating system in the VMware VM, then check How to Install VMware Tools on Ubuntu/Debian VMware Virtual Machine.
Mounting VMware Shares on Linux VM:
First, make a directory (let’s say ~/testshare) on the Linux VM where you want to mount the VMware share with the following command:

The command to mount a VMware share on a Linux VM is:
To mount the VMware share testshare on the ~/testshare directory, run the following command:

The VMware share testshare should be mounted on the ~/testshare directory.
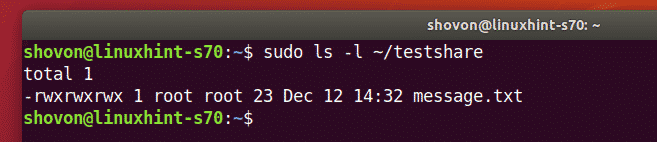
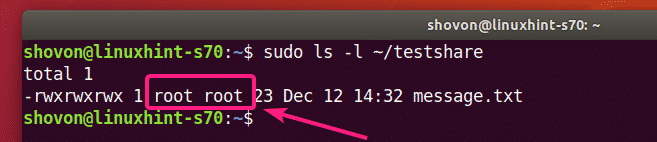
By default, the VMware shares mounted on the Linux VM is only accessible to the root user as you can see in the screenshot below. I will show you how to solve this problem. So, don’t worry.
You can unmount the VMware share mounted in the ~/testshare directory with the following command:

To allow any user on the Linux VM to access the mounted VMware share, use the allow_other mount option while mounting the VMware share.

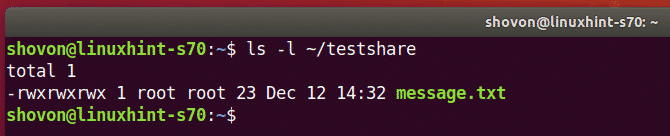
Now, you should be able to access the mounted VMware share without sudo or superuser privileges.
But, the files and directories on the share are still owned by root.
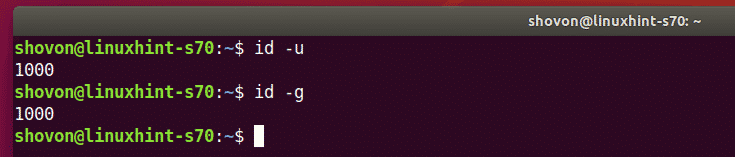
If you want the VMware share files to be accessible to your login user and also be owned by your login user, then mount the VMware share with the uid and gid mount options as follows:
$ sudo mount -t fuse.vmhgfs-fuse -o allow_other, uid =$ ( id -u ) , gid =$ ( id -g )
.host: / testshare ~ / testshare
As you can see, the VMware share files and directories are now accessible to my login user and also owned by my login user.

Automatically Mount VMware Shares:
If you want the VMware Linux VM to automatically mount the VMware share on boot, then you have to add a new line to the /etc/fstab file.
First, open the /etc/fstab file with the following command:

You may want to use vi text editor for editing the /etc/fstab file. In that case, run the following command:
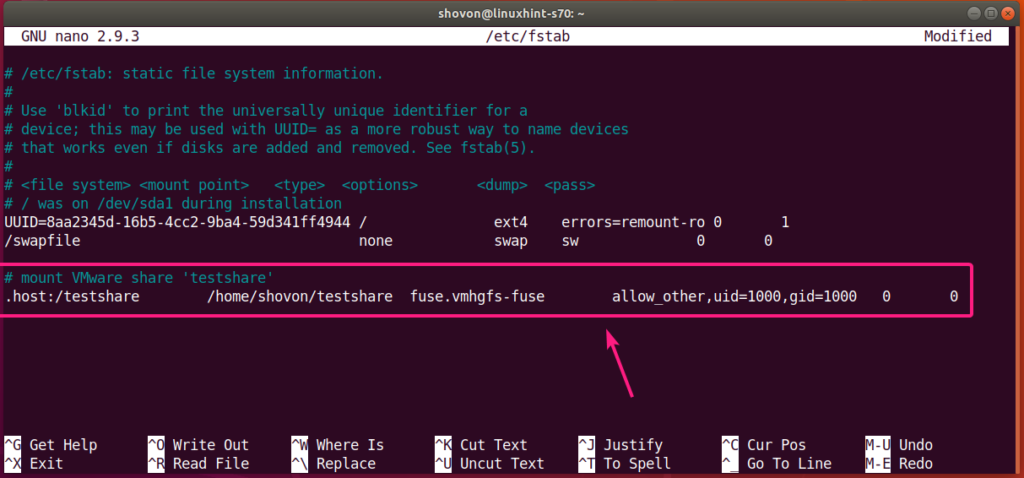
Now, add the following line at the end of the /etc/fstab file:
Note: Make sure to replace , , and .
You can find with the id -u command and with the id -g command.
In my case, I added to the following line to the /etc/fstab file:
.host: / testshare / home / shovon / testshare fuse.vmhgfs-fuse
allow_other, uid = 1000 , gid = 1000 0 0
Once you’re done, save the /etc/fstab file.
Now, reboot your Linux VM with the following command:

Once your Linux VM starts, run the following command to verify whether the VMware share is mounted on the Linux VM:
As you can see, the VMware share testshare is mounted correctly in the ~/testshare directory.

I can access the VMware share as usual.

So, that’s how you share a directory/folder from the host to your Linux VMware VM and mount it from the command line on your Linux VM. Thanks for reading this article.
About the author
Shahriar Shovon
Freelancer & Linux System Administrator. Also loves Web API development with Node.js and JavaScript. I was born in Bangladesh. I am currently studying Electronics and Communication Engineering at Khulna University of Engineering & Technology (KUET), one of the demanding public engineering universities of Bangladesh.
Общая папка VMware в Linux
Общая папка для виртуальной машины и основной системы очень часто необходима для обмена файлами между хостовой и гостевой операционной системой. В одной из прошлых статей мы говорили о том как настроить общую папку VirtualBox. Но VMware — это тоже очень популярная виртуальная машина.
Поэтому в сегодняшней статье мы рассмотрим как сделать общую папку VMware Player в вашей системе. Я буду подразумевать, что обе операционные системы, хост и гость — это какой-либо дистрибутив Linux. В данном случае это Ubuntu.
Настройка общей папки VMware в Linux
Начать надо с настройки самой виртуальной машины. Запустите VMware и откройте контекстное меню для нужной машины. В нём выберите Virtual Machine Settings:
В открывшемся окне перейдите на вкладку Options:
На этой вкладке откройте пункт Shared Folders, а значение переключателя Folder Sharing установите в положение Always enabled:
Затем надо добавить общую папку. Для этого кликните по кнопке Add. , в открывшемся окне введите название общей папки, а затем введите или выберите путь к нужной папке в основной системе. Затем нажмите кнопку OK и Save внизу окна чтобы всё сохранить.
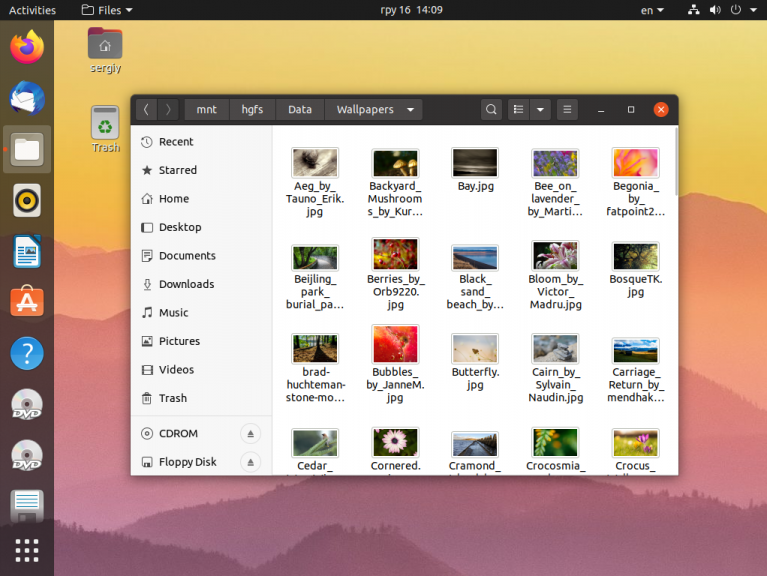
После этого можно запускать виртуальную машину. В самой виртуальной машине общая папка должна монтироваться в /mnt/hgfs. Если такой папки нет проверьте установлены ли пакеты open-vm-tools и open-vm-tools-desktop:
sudo apt install open-vm-tools open-vm-tools-desktop
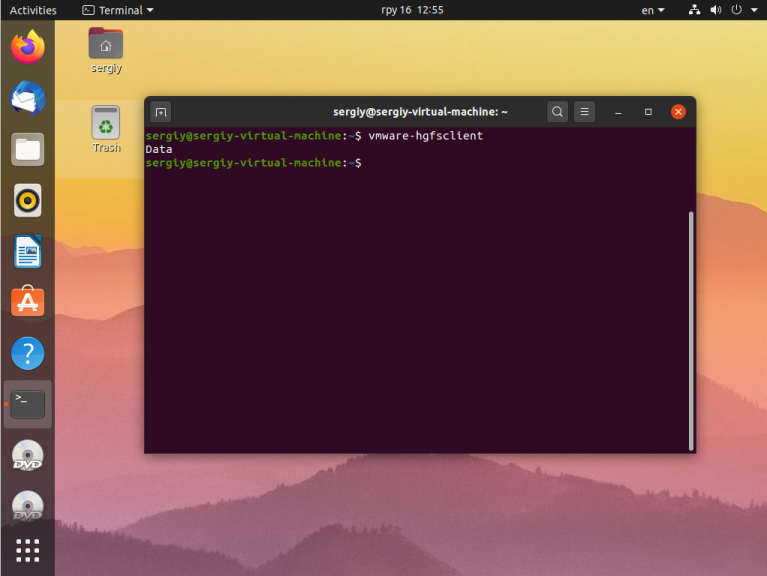
Затем с помощью такой команды, вы можете проверить видна ли ваша общая папка в гостевой системе:
Затем можно смонтировать попытаться смонтировать все общие папки в /mnt. Для этого сначала создайте папку /mnt/hgfs, если она не существует:
Затем осталось выполнить монтирование с помощью утилиты vmhgfs-fuse:
sudo vmhgfs-fuse .host: /mnt/hgfs -o allow_other -o uid=1000
Кроме, непосредственно, пути к точке монтирования надо передать опцию allow_other чтобы все пользователи могли получить доступ к папке, а владельцем папки сделать пользователя с идентификатором 1000, обычно это идентификатор первого зарегистрированного в системе пользователя, если у вас другой идентификатор замените на свой. Это позволит этому пользователю записывать файлы в эту папку.
Теперь можно посмотреть её содержимое:
Теперь, чтобы эта папка монтировалась всегда при запуске системы надо добавить такую строчку в /etc/fstab:
.host: /mnt/hgfs fuse.vmhgfs-fuse defaults,allow_other,uid=1000,nonempty 0 0
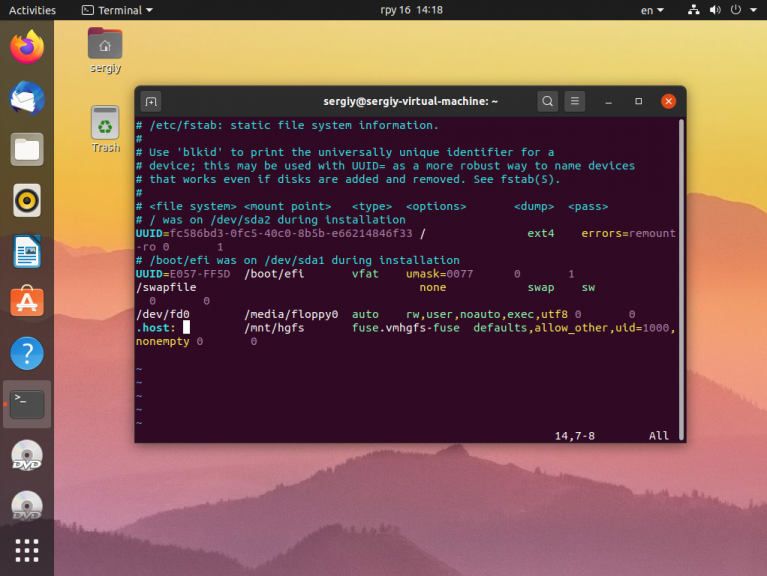
Или если вы хотите монтировать только определённую общую папку, например, Data, то надо указать её имя после адреса .host:
.host:/Data /mnt/hgfs fuse.vmhgfs-fuse defaults,allow_other,uid=1000,nonempty 0 0
Вот и всё. Теперь вы знаете как настраивается общая папка VMware в Linux, а также как смонтировать её, если автоматическое монтирование не работает. Как видите, всё довольно просто.
Обнаружили ошибку в тексте? Сообщите мне об этом. Выделите текст с ошибкой и нажмите Ctrl+Enter.