- Introduction
- Required: Virtualbox Guest Additions
- Creating a shared folder
- Prepare the folder
- Linux
- Windows
- Troubleshooting
- The name was not valid
- Ubuntu 10.04 host
- Mount VirtualBox shared folder on Ubuntu or Linux guest
- Mount VirtualBox Shared Folder on Ubuntu
- Mount VBox Shared Folders Ubuntu / Debian Guest
- VitualBox Shared Folder Permissions
- Manually Mount VBox Shared Folder on Ubuntu
Introduction
This explains how to share files and folders (directories) between host and guest. (Files are shared over a network, in other words, you access remote files. For virtual machines, the network between host and guest is virtual since they are on the same real machine. But the steps you take are similar to setting up file sharing over real networks.)
Required: Virtualbox Guest Additions
Before sharing folders, you must install Guest Additions. For instructions on how to do this, see Guest Additions.
Creating a shared folder
- Create a folder on the Host computer (ubuntu) that you would like to share, for example ~/share
- Boot the Guest operating system in VirtualBox.
- Select Devices -> Shared Folders.
- Choose the ‘Add’ button.
- Select ~/share
- Optionally select the ‘Make permanent’ option
Prepare the folder
Linux
With a shared folder named share, as above, the folder can be mounted as the directory ~/host with the command
sudo mount -t vboxsf -o uid=$UID,gid=$(id -g) share ~/host
Windows
Now anything placed in this folder should be visible from the host in the ~/share folder.
Troubleshooting
This can be done more generically with the following:
sharename="whatever.you.want.to.call.it"; sudo mkdir /mnt/$sharename sudo chmod 777 /mnt/$sharename sudo mount -t vboxsf -o uid=1000,gid=1000 $sharename /mnt/$sharename ln -s /mnt/$sharename $HOME/Desktop/$sharename
For the above command if you get the following error:
mount: unknown filesystem type 'vboxsf'
Then just change the vboxsf to vboxfs
If you want to have it mount automatically upon each boot, put the mount command in /etc/rc.local Debian distros (e.g. Ubuntu 10.04 and later) HOWTO Use Shared Folders
See Section 4.4 «Folder Sharing» in the VirtualBox documentation.
Note: if you want to mount the directory as owned and writable only by root, omit the -o uid=1000,gid=1000 option to the mount command
/sbin/mount.vboxsf: mounting failed with the error: Protocol error
The above error could be one of the following.
The name was not valid
Make sure you specified the right name on the bash commands. If the guest machine is expecting «share» (as we did in the Prepare Host section) and you wrote
sharename="donotshare" sudo mkdir /mnt/$sharename sudo chmod 777 /mnt/$sharename sudo mount -t vboxsf -o uid=1000,gid=1000 $sharename /mnt/$sharename ln -s /mnt/$sharename $HOME/Desktop/$sharename
Ubuntu 10.04 host
Note: Running on Ubuntu 10.04 host and Mint 14 as virtual system, the system would not accept a ~/share. It complained that it was not an absolute address. I entered /home/jim/share and it worked fine.
- Create a folder on the Host computer (ubuntu) that you would like to share, for example ~/share
- Boot the Guest operating system in VirtualBox.
- Select Devices -> Shared Folders.
- Choose the ‘Add’ button.
- Select ‘/home//share‘ for Folder Path
- Select ‘share’ for Folder Name
- Optionally select the ‘Make permanent’ option
VirtualBox/SharedFolders (последним исправлял пользователь dyn005202 2014-09-26 15:49:59)
The material on this wiki is available under a free license, see Copyright / License for details
You can contribute to this wiki, see Wiki Guide for details
Mount VirtualBox shared folder on Ubuntu or Linux guest
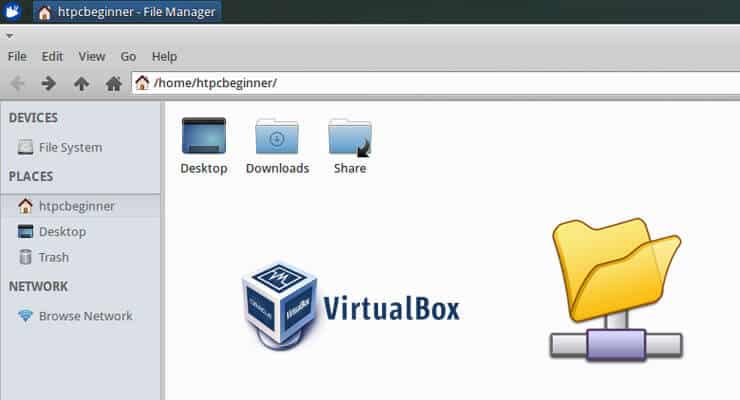
You may have setup VirtualBox shared folder as we had previous described but you cannot use it or copy files to it until you mount VirtualBox shared folder on Ubuntu or Linux guest OS. Setting up a shared VBox folder allows you to easily share files between host OS and guest OS. This post shows how to mount VBox shared folder on Ubuntu guest. This method works on almost all Linux distributions.
Mount VirtualBox Shared Folder on Ubuntu
The steps for mounting VBox shared folders is different for Windows and Ubuntu / Debian. Windows guide for mapping VBox shared folder will be published next. This guide only shows how to mount VirtualBox shared folder on Ubuntu and other Linux guest OSes. Host OS on which Oracle VirtualBox VM is installed can be anything.
Before you try to mount a shared folder as described in this guide, make sure that you have setup shared folder on VirtualBox.
Recommended HTPC / Home Server Builds:
Mount VBox Shared Folders Ubuntu / Debian Guest
Mounting VirtualBox shared folders is easy on Linux guest OSes. If you enabled Auto-mount while creating shared folder then it should automatically be mounted to /media/USER/sf_ShareName or /media/sf_ShareName , depending on your guest OS.
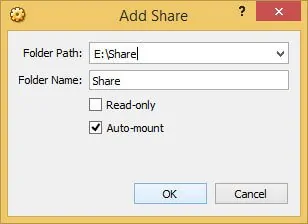
In the example shared folder shown in the picture above, Folder Name is also known as ShareName . Its mount point will be: /media/htpcbeginner/sf_Share or /media/sf_Share , depending on the guest OS. Username htpcbeginner will be different in your case. Navigate to these folders to access the files.
VitualBox Shared Folder Permissions
You may encounter permissions issues when trying to access VirtualBox shared folder on Ubuntu (or other Linux distros). The shared folder is mounted with 770 permissions with root user and vboxsf as the group. Therefore, you need to enable root (administrator privileges) to access the shared files. But this can be inconvenient and you may want to the current user (you) to be able to access the files without having to enable root or opening your file explorer with root privileges.
To mount VirtualBox shared folder on Ubuntu and access everything within the shared folder as the user, in this example htpcbeginner , you will have to manually add the user to vboxsf group using the following command:
sudo usermod -a -G vboxsf USER
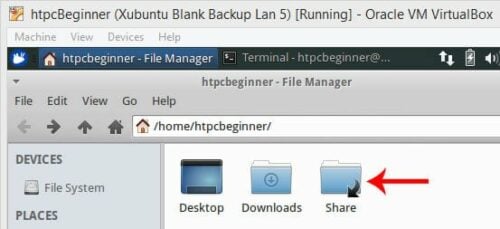
Of course, replace USER with your username. Once done, the user will have read/write access to the VBox shared folder. For easy access / convenience, you may create a symbolic link to the mounted shared folder in your home folder:
sudo ln -s /media/htpcbeginner/sf_Share /home/htpcbeginner/Share
Note that /media/htpcbeginner/sf_Share could be /media/sf_Share depending on how your Linux OS mounts VBox shared folder. Also, replace htpcbeginner with your username. Once done, you will have a symbolic link created to the Vbox VM shared folder in your home directory as shown below.
Manually Mount VBox Shared Folder on Ubuntu
Now what if, you did not automount the shared folder? You may go to Device -> Shared Folder Settings , edit the shared folder, and enable Auto-mount. You may also check «Make Permanent» if you want the mounting to stick on reboot. Alternatively, you may manually mount VirtualBox shared folder on Ubuntu or Linux, anytime, using the following command:
sudo mount -t vboxsf -o uid=$UID,gid=$(id -g) ShareName NewFolder
Replace ShareName with Folder Name from the first picture and NewFolder with desired folder name (could be same as ShareName ). Using this command to mount VirtualBox shared folder on Ubuntu / Debian will automatically enable read/write permissions for the current user. These mounting instructions work on all Linux distributions.
Using fstab to auto-mount VirtualBox shared folders during boot does not work in recent versions of Ubuntu as VirtualBox services start after the filesystem is mounted. You may encounter «no such device» error as OS cannot find the shared folder to mount. The OS may stop booting. Hence, enabling Auto-mount in the Shared Folder Settings and adding the user to vboxsf group is the way to setup automount during boot with required permissions. So there you go, mount VBox shared folder on Ubuntu or other Linux guest OSes, and enjoy seamlessly sharing files between the two OSes.
Complete Guide to Setting Up a Home Server on VirtualBox Virtual Machine:
- Install VirtualBox — Windows 7/8/10 / Ubuntu/Debian
- Install VirtualBox Extension Pack — Linux and Windows Host
- Install Guest OS on Virtual Box — Ubuntu Server
- Install VirtualBox Guest Additions — Windows Guest / Linux Guest
- Update VirtualBox Guest Additions — Windows Guest / Linux Guest
- Setup VirtualBox Shared Folder — Windows and Linux
- Mount VirtualBox Shared Folder — Windows Guest / Ubuntu Guest
- Access USB Drive on VM — Windows and Linux Guest
- Configure Home Server on VirtualBox — Ubuntu Server