- Mounting/opening virtualbox disk image (vdi) on linux host
- 3 Answers 3
- How to Mount VirtualBox Disk Image (VDI) to Access VM File-System in Ubuntu
- Unmount:
- Ji m
- Mount a VHD or VDI in Linux with vdfuse
- 3 Responses to “Mount a VHD or VDI in Linux with vdfuse”
- How to mount a virtual hard disk?
- 4 Answers 4
- MNorin.com
- Блог про Linux, Bash и другие информационные технологии
- Использование образов дисков VDI в Linux
- Установка пакета
- Подключение диска
- Параметры командной строки vdfuse
- Похожие посты:
- Использование образов дисков VDI в Linux : 2 комментария
Mounting/opening virtualbox disk image (vdi) on linux host
Is it possible to mount vdi like for example iso? Or open it with some archive program? If yes, how? edit: My vdi is dynamically expanding storage and i have snapshots too.
Is this the subset of a larger problem? Are you trying to access data for a VM you don’t want to start for some reason? If it is running and you to access the data, some sort of file sharing from the VM is probably the best solution.
3 Answers 3
For both fixed and dynamic-sized images:
On Linux you can use qemu-nbd . On Debian it’s in the qemu-tools package. It’s likely in a similar package for other distros. It will let you mount any disk image recognised by qemu, which includes VDI.
Install it, modprobe nbd to make sure it’s loaded, then do a qemu-nbd -c /dev/nbd0 to make it available. It will show up as /dev/nbd0p? for each of the partitions in the image unless told to do otherwise. See the man page for further details.
When finished, a qemu-nbd -d /dev/nbd0 will detach it.
Be sure you don’t have it attached in multiple places at once! This WILL cause problems!
Tool for fixed size Disk Drives:
It can be done with static vdi images (Fixed Size, not dynamically expanding). It is a matter of finding the offset in the image where the partition starts.
Here is page that has a shell script that automates the process for you.
If Dynamic:
Method 1
If you are using a dynamically size image, convert it to a fixed size image (make sure you have the HD space) and then use the above tool (reference):
vditool COPYDD myDynamicDisk.vdi static_dump.vdi Method 2
Reading up it seems vditool is no longer included. A simple way to create the partition image would be to use gparted iso as a boot disc inside of the Virtualbox VM to create the image of the partition to a location on your network, and then mount that image.
Fuse Module:
There is also a fuse file system for this called vdimount that does this, but I am not sure how well it works.
How to Mount VirtualBox Disk Image (VDI) to Access VM File-System in Ubuntu

This tutorial shows how to mount the VirtualBox virtual disk image in Ubuntu, so you can access the Guest OS file system with read and write permission, if it does not boot.
After misconfigured my VirtualBox Guest OS, it does not longer work. I know how to correct the issue to make it boot again, but firstly accessing to the file system is required!
Since the VBox user manual does not work, here’s what I did in Ubuntu 20.04 host with VirtualBox 6.1.x:
Before getting started, make sure Guest OS is shutdown. And the disk image is not in use. Also UN-MOUNT the disk once the job done.
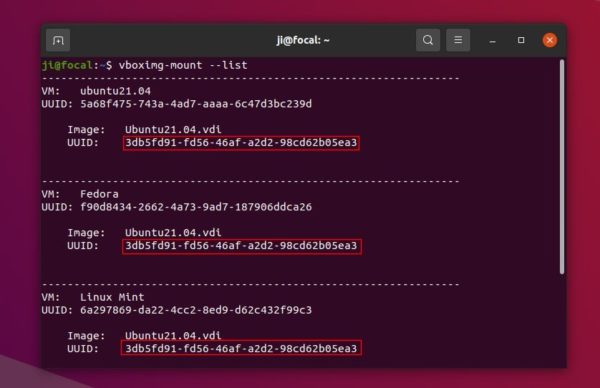
1.) Firstly open terminal from system application launcher. When it opens, run command:
vboximg-mount is a utility to make VBox disk images available to the host. With —list , it list all Disk Images as well as the UUID.
In the case, I have all Guest OSes on single Disk Image (.vdi). And the uuid is: “3db5fd91-fd56-46af-a2d2-98cd62b05ea3”
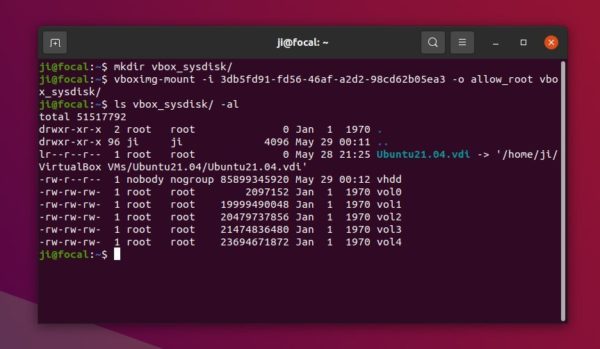
2.) Next perform a FUSE mount of the virtual disk image:
- First create a folder as mount point, vbox_sysdisk for instance:
vboximg-mount -i 3db5fd91-fd56-46af-a2d2-98cd62b05ea3 -o allow_root vbox_sysdisk
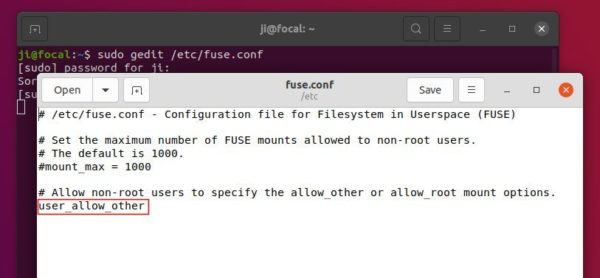
NOTE: You may need to edit the “/etc/fuse.conf” to make the -o allow_root flag work. To do so, run command sudo gedit /etc/fuse.conf and enable (remove # at its beginning) “user_allow_other” line.
3.) As the previous picture shows, I have 5 disk partitions: vol0, vol1, …, vol4. Now mount either partition (vol4 for instance) to /mnt via command:
sudo mount vbox_sysdis/vol4 /mnt
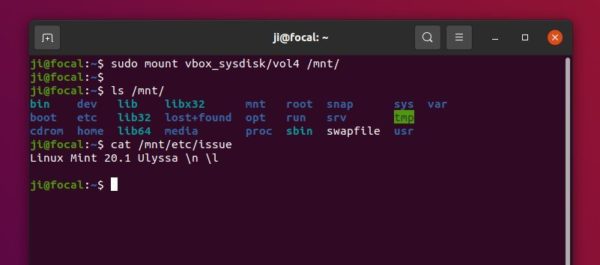
Finally go to /mnt directory and there you are.
Unmount:
To un-mount the guest os file system, run command:
To un-mount the VBox disk image, run command:
And you may finally remove that folder either from file manager or by running command in terminal:

Ji m
I’m a freelance blogger who started using Ubuntu in 2007 and wishes to share my experiences and some useful tips with Ubuntu beginners and lovers. Please comment to remind me outdated tutorial! And, notify me if you find any typo/grammar/language mistakes. English is not my native language. Contact me via [email protected] Buy me a coffee: https://ko-fi.com/ubuntuhandbook1
Mount a VHD or VDI in Linux with vdfuse
Posted September 14th, 2014 by epb & filed under linux.
My old post on mounting VHDs in Linux is rather outdated. I don’t think it even works anymore. So revisiting this on a newer Ubuntu version now. These instructions are for Ubuntu 14.04, so for other OS installs. You’ll also need your compiler installed, so you may need to run sudo apt-get install build-essential to get them before proceeding.
First we need some prequisites, you’ll need the virtualbox and libfuse-dev packages to be installed.
sudo apt-get install virtualbox libfuse-dev
Now you should get vdfuse for the newer versions of VirtualBox. It’s available in this github repo here: https://github.com/Thorsten-Sick/vdfuse
If you have git, simply run this command:
git clone https://github.com/Thorsten-Sick/vdfuse.git
Next change directory into vdfuse (e.g. cd vdfuse )
NOTE: The following example commands reference a specific version of VirtualBox, if you download a different version, be sure to replace the version number in the following commands.
Now we need the includes folder from the source. Again, this uses VirtualBox 4.3.16, so replace with the current version number. (Instead of using wget, you can also download the source with your browser which removes the need to figure out what the current version of VirtualBox is. )
wget http://download.virtualbox.org/virtualbox/4.3.16/VirtualBox-4.3.16.tar.bz2 tar xvjf VirtualBox-4.3.16.tar.bz2 VirtualBox-4.3.16/include
sh vdbuild_new VirtualBox-4.3.16/include vdfuse.c
If all went well, you should now have an executable called vdfuse in your vdfuse folder. Optionally, you can now copy it to /usr/local/bin or /usr/bin so any user on the system can use it. We’re almost done, there’s one fuse configuration change that is required.
First, we make sure that users other than root can read /etc/fuse.conf
sudo chmod o+r /etc/fuse.conf
And then you need to edit /etc/fuse.conf to have a line that reads user_allow_other .
Once you have done that, you should now be able to actually run your vdfuse executable. The entire disk and it’s partions are exposed as regular files in the target mount point. These can be loopback mounted like any other file.
An example from my machine:
vdfuse -f "~/VirtualBox VMs/Test/Test.vdi" ~/Test ls -l ~/Test -rw------- 1 1001 1001 144570624 Sep 14 12:18 EntireDisk -rw------- 1 1001 1001 93214208 Sep 14 12:18 Partition1 -rw------- 1 1001 1001 51323392 Sep 14 12:18 Partition2
3 Responses to “Mount a VHD or VDI in Linux with vdfuse”
- Artem July 18th, 2015 Hi! Thank you for useful and straight manual. I’ve encountered one problem when building vdfuse with VB 4.3.26, gcc 4.9.2. Your build script gave me:
/usr/bin/ld: cannot find -l:/usr/lib/virtualbox/VBoxDDU.so
though the file is there. I changed the compiler invocation command to:
gcc «$» -o «$» \
`pkg-config —cflags —libs fuse` \
-I»$» \
-Wl,-rpath,»$» \
-L»$» \
-l:VBoxDDU.so \
-Wall $
(note -L added and -l changed). Then it builds with success. - asdf May 23rd, 2016 FUSE headers not found. Are they installed?
For a Centos Machine - epbOctober 4th, 2016 I believe you need to use yum to install the fuse-devel package.
How to mount a virtual hard disk?
Have you searched Google? It abounds with guides on mounting VMDK, VDI, VHD, and raw disk image files on Ubuntu.
4 Answers 4
Linux and other Unix-like hosts can mount images created with the raw format type using a loopback device. From a root login (or using sudo), mount a loopback with an offset of 32,256.
mount -o loop,offset=32256 /path/to/image.img /mnt/mountpoint For other types of qemu images, you can use qemu-nbd
modprobe nbd max_part=16 qemu-nbd -c /dev/nbd0 image.qcow2 partprobe /dev/nbd0 mount /dev/nbd0p1 /mnt/image Plus, usually, you can convert image from one format to another.
raw - (default) the raw format is a plain binary image of the disc image, and is very portable. On filesystems that support sparse files, images in this format only use the space actually used by the data recorded in them. cloop - Compressed Loop format, mainly used for reading Knoppix and similar live CD image formats cow - copy-on-write format, supported for historical reasons only and not available to QEMU on Windows qcow - the old QEMU copy-on-write format, supported for historical reasons and superseded by qcow2 qcow2 - QEMU copy-on-write format with a range of special features, including the ability to take multiple snapshots, smaller images on filesystems that don't support sparse files, optional AES encryption, and optional zlib compression vmdk - VMware 3 & 4, or 6 image format, for exchanging images with that product vdi - VirtualBox 1.1 compatible image format, for exchanging images with VirtualBox. I found this solution for (VirtualBox) .VDI when I searched, on this website:
modprobe nbd max_part=16 qemu-nbd -c /dev/nbd0 /path/to/some.vdi mount -o loop /dev/nbd0p1 /mnt # do stuff umount /mnt qemu-nbd -d /dev/nbd0 rmmod nbd The same as «Qemu’s way» commands. No borders!
MNorin.com
Блог про Linux, Bash и другие информационные технологии
Использование образов дисков VDI в Linux
![]()
VDI — это формат образов дисков, используемых системой виртуализации VirtualBox. О том, как использовать реальный диск на виртуальной машине, я уже писал, теперь посмотрим, как можно реализовать обратный процесс — использование виртуального диска в реальной системе. Таким образом вы можете получить доступ к данным, находящимся на диске виртуальной машины без необходимости ее запускать. Использование образов дисков VDI в Linux сводится к установке пакета и двухэтапному монтированию, после чего содержимое можно использовать точно так же, как и содержимое любой другой файловой системы.
Для подключения виртуального диска в формате VDI используется программа vdfuse, входящая в состав пакета virtualbox-fuse.
Установка пакета
В Debian/Ubuntu пакет устанавливается командой
apt-get install virtualbox-fuse
Если у вас установлена версия VirtualBox от Oracle, может потребоваться установить по зависимостям VirtualBox OpenSource Edition (virtualbox-ose).
Подключение диска
На первом этапе монтируется образ VDI. Это можно сделать следующей командой:
sudo vdfuse -w -f ./webserver.vdi /mnt/vdi
Таким образом мы получим доступ к разделам, которые присутствуют на виртуальном диске. На втором этапе монтируется необходимый раздел:
sudo mount -t auto /mnt/vdi/Partition1 /mnt/vdi-part1 -o loop
После этого можно работать с файловой системой на виртуальном разделе.
Параметры командной строки vdfuse
В общем виде формат выглядит так:
vdfuse [опции] -f образ-диска.vdi точка-монтирования
Вот какие опции есть у vdfuse:
| Опция | Значение |
| -h | Помощь |
| -r | Монтировать только для чтения |
| -t | Указать тип образа диска (VDI, VMDK, VHD, или raw). Значение по умолчанию — auto |
| -f | Указать имя файла образа диска |
| -a | Разрешить всем пользователям читать диск |
| -w | Разрешить всем пользователям читать диск и писать на него |
| -g | Работать как приложение (не в фоновом режиме) |
| -v | Выводить дополнительную информацию |
| -d | Включить режим отладки |
Похожие посты:
Использование образов дисков VDI в Linux : 2 комментария
- FiveFiveFive03.10.2018 в 18:18 да не плохая статья и была бы полезна если бы этот пакет до сиих пор был бы в репозитариях. но к сожалению на дебиан 9 и репозитарии сайта виртуал бокса больше такого пакета не имеют. можэт подскажете альтернативный пакет в стрейче. так бы ваша статья стала актуальной и сейчас. а я пока продолжаю искать актуальные пакеты на сегодняшний день. всего хорошего.
- Maxim Norin Автор записи 04.10.2018 в 11:07 Да, есть такое дело. Нет больше такого пакета в репозиториях. Тем не менее, есть как минимум два варианта, которые можно попробовать.
1) Сконвертировать образ в RAW формат и смонтировать его
VBoxManage clonehd —format RAW disk.vdi disk.img
mount -t ext4 -o loop,rw ./disk.img /mnt
2) Использовать команду qemu-nbd из пакета qemu-kvm
qemu-nbd -c /dev/nbd0 /home/user/disk.vdi
Потом посмотреть разделы, которые есть на диске
sudo fdisk -l /dev/nbd0
И смонтировать те, которые нужно