- Step Up Your Multi-Computer Setup By Sharing Mouse and Keyboard Between Systems
- KVM Switches
- debauchee / barrier
- Open-source KVM software
- Barrier
- Contact info:
- CI Build Status
- What is it?
- Barrier Configuration
- What now?
- Совместное использование клавиатуры и мыши
- Осведомленность о багах
- Сервер Synergy:
- Установка:
- Конфигурация:
- Synergy.conf
- Клиент(-ы) Synergy:
- Клиентский /etc/hosts:
- ~/.xinitrc
- Заключение:
- Install / Setup Barrier to Share Mouse & Keyboard Between Your Computers
- 1. How to Install Barrier
- 2. Setup Barrier server and client.
- Setup the server.
- Setup the client.
- Ji m
- 3 responses to Install / Setup Barrier to Share Mouse & Keyboard Between Your Computers
Step Up Your Multi-Computer Setup By Sharing Mouse and Keyboard Between Systems
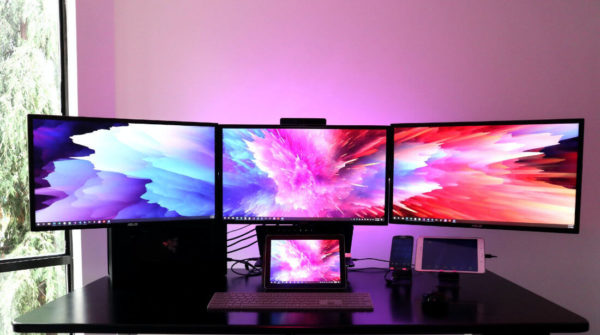
Last week, I finished setting up my main computer, which uses Ubuntu, and today I needed to work with my MacBook Pro to be able to work with the iOS simulator. I placed it in my desk and after using both computers for a few hours, I noticed that this could be better if both systems shared the same keyboard and mouse. Well, seems like I wasn’t the only one to think about that.
KVM Switches
KVM Switches (KVM stands for keyboard, video and mouse), allow you to share these peripherals between multiple systems. In general, there are two types, hardware and software KVM switches. Clearly, the first thing I did was to look for a software solution, and I decided to try with Barrier.
debauchee / barrier
Open-source KVM software
Barrier
Eliminate the barrier between your machines Find releases for windows and macOS here Your distro probably already has barrier packaged for it, see distro specific packages below for a list. Alternatively, we also provide a flatpak and a snap.
Contact info:
CI Build Status
Master branch overall build status:
Our CI Builds are provided by Microsoft Azure Pipelines, Flathub, and Canonical.
What is it?
Barrier is software that mimics the functionality of a KVM switch, which historically would allow you to use a single keyboard and mouse to control multiple computers by physically turning a dial on the box to switch the machine you’re controlling at any given moment. Barrier does this in software, allowing you to tell it which machine to control by moving your mouse to the edge of the…
Barrier Configuration
Installing Barrier was easy, they provide a snap package for Ubuntu and also pre-built binaries for OS X and Windows.
Barrier uses a Client-Server architecture, and because of that, the first thing we’re going to configure is the server. The server is the machine that will «own» the keyboard and the mouse, while the clients will receive information about what is going on and then act accordingly.
- Open the Barrier app in the machine that you picked to be the server. Select the Configure interactively option and click in the button that says Configure Server.
- That will open a new window where you can modify the layout of screens by using drag and drop. In my case, I added it to the left of my main computer.
- Double click the new added screen and give it a name. The name is important because it has to match the name of the client you’re going to configure next. To check the client name, open the Barrier app in the client and check the name there.

- Save all this configuration and start the server.
- Take a look to the IP addresses in the server, one of them should be bold, that’s the IP of our server and we need to use it in order to configure our clients. Go to your client and configure them, you can first check if the auto config works for you, otherwise just fill the Server IP with the one you got earlier.

And that’s it, with this you just configured a KVM switch and it should be working now!
What now?
This KVM switch uses your LAN network to establish the Client-Server communication, there are multiple things that can result in a degraded experience.
Barrier is the program I chose, but there are others that may work better for your system, if this one doesn’t do it, just keep looking, and remember, there are hardware KVM switches too!
Follow me on Twitter if you want to know about my future articles, projects or whatever I come up with!
Совместное использование клавиатуры и мыши
Теперь я могу использовать свои любимые клавиатуру и мышь для управления двумя компьютерами (synergy подойдёт и для большего количества компьютеров, если они у вас есть) по одному, конечно.
Если две машины настроены на загрузку synergy при загрузке, то не имеет значения, в каком порядке загружается сервер или клиент.
Synergy практически не использует системные ресурсы и даже совместно использует буфер обмена!
Осведомленность о багах
Запустив Openbox, я не могу использовать синергию, пока не загрузится OB. Но в некоторых менеджерах дисплеев Linux вы можете использовать её до этого.
Хотя это уже должно быть исправлено — существует старая ошибка, которая может приводить к 1-2 секундным черным экранам. Для большинства это исправляется путем выполнения команды
При необходимости команду можно поместить в ~/.xinitrc, чтобы проблема никогда не возникала.
Сервер Synergy:
Установка:
Вместо того, чтобы дублировать его — Archwiki имеет отличную страницу по установке Synergy.
Конфигурация:
Далее следует мой файл /etc/hosts, который должен говорить сам за себя:
192.168.1.3 rightpc.localdomain rightpc ## HP server 192.168.1.6 leftpc.localdomain leftpc ## iMac client
Synergy.conf
Вот отличное начало (полное решение в моем случае) для очень хорошо работающей пары машин (легко редактируется для большего количества), через одну мышь и клавиатуру, подключенную к серверу synergy — этот synergy.conf является файлом конфигурации сервера, который для меня делает работу безупречно:
#synergy.conf section: screens leftpc: halfDuplexCapsLock = false halfDuplexNumLock = false halfDuplexScrollLock = false xtestIsXineramaUnaware = false switchCorners = none +top-left +top-right +bottom-left +bottom-right switchCornerSize = 0 rightpc: halfDuplexCapsLock = false halfDuplexNumLock = false halfDuplexScrollLock = false xtestIsXineramaUnaware = false switchCorners = none +top-left +top-right +bottom-left +bottom-right switchCornerSize = 0 end section: aliases leftpc: 192.168.1.6 rightpc: 192.168.1.3 end section: links leftpc: right = rightpc rightpc: left = leftpc end section: options heartbeat = 1000 relativeMouseMoves = false screenSaverSync = false win32KeepForeground = false switchCorners = none +top-left +top-right +bottom-left +bottom-right switchCornerSize = 4 end
Этот файл synergyc.conf идеально подходит для моих целей, я нашел его на Arch wiki, и он не нуждался в функциональной модификации. Я поместил его в /home/handy как файл , т.е. ~/.synergy.conf .
Клиент(-ы) Synergy:
Клиентский /etc/hosts:
Отредактируйте файл /etc/hosts, мой файл находится ниже для тех, кому нужна ссылка, и если вы это сделаете, убедитесь, что сравнили его с файлом на стороне сервера, опубликованным ранее на этой странице:
192.168.1.6 leftpc.localdomain leftpc ## iMac client 192.168.1.3 rightpc.localdomain rightpc ## HP server [/code]
~/.xinitrc
Добавьте следующее в файл ~/.xinitrc (угадайте, как я его скопировал?):
Заключение:
Самая сложная работа — это сервер, а дальше все сводится к тому, чтобы отсортировать автозапуск так, чтобы он работал независимо от того, какая машина (машины) и в каком порядке включается. Для меня вышеописанное работает идеально после загрузки Openbox.
Cookie-файлы помогают нам предоставлять наши услуги. Используя наши сервисы, вы соглашаетесь с использованием cookie-файлов.
Install / Setup Barrier to Share Mouse & Keyboard Between Your Computers
![]()
Barrier is a free and open-source solution forked from Synergy. It makes it easy to share mouse & keyboard, over local network, between machines running Windows, Linux, Mac OS, FreeBSD. Either wired, wireless, or laptop’s built-in keyboard and touchpad can be shared with the software.
1. How to Install Barrier
Barrier is a popular software that most Linux Distros have it in the main repositories. So you can install it in Linux either via system package manager or Distro’s own command line installer (e.g., apt install , dnf install , and pacman -S )
For Ubuntu 20.04 & higher, Linux Mint 20, and current Debian releases, open terminal and run command to install it:
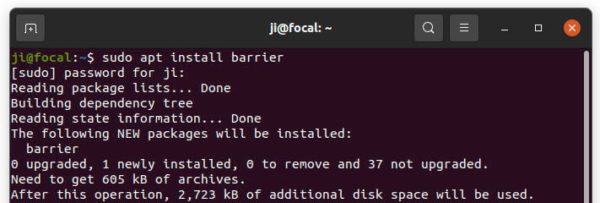
Since Ubuntu 20.04 has version 2.3.2, you can alternatively install the latest v2.3.3 using the Flatpak or Snap package.
For Windows and Mac OS, the latest packages are available to download at the link below:
2. Setup Barrier server and client.
Install Barrier in all the machines! When done, open it, choose your language and then select either Server or Client.
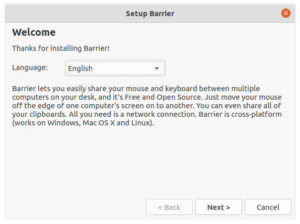
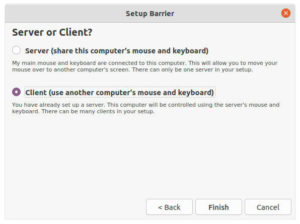
Select “Server” on the machine that connected with the mouse and keyboard. And all others set to “Client”.
Setup the server.
On the server computer, click on “Configure Server…” button.

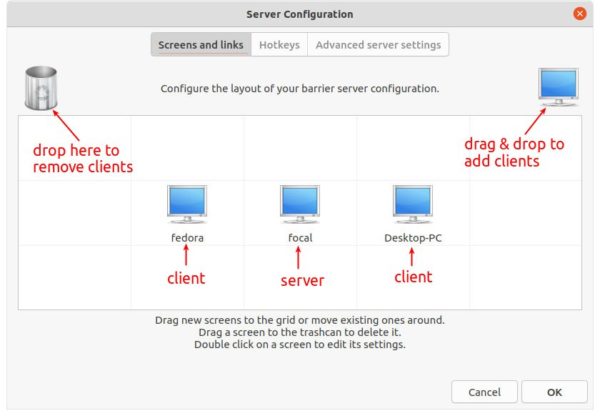
In the screen configuration page, you have to drag and drop small “computer” icon into the grid to add clients.
- The center one is the server screen.
- Drag & drop ‘computer’ icon to create client screens.
- Double-click to rename client screen name (check in client machines, usually computer name).
- Move client screens around the server (left, right, top, bottom).
In the case (as picture shows), when I move the mouse cursor to the left screen edge in server, the mouse & keyboard will take control of “fedora” machine. In “fedora”, move to the right screen edge will go back to server machine.
As well, move the cursor to the right edge in server will go to “Desktop-PC”.
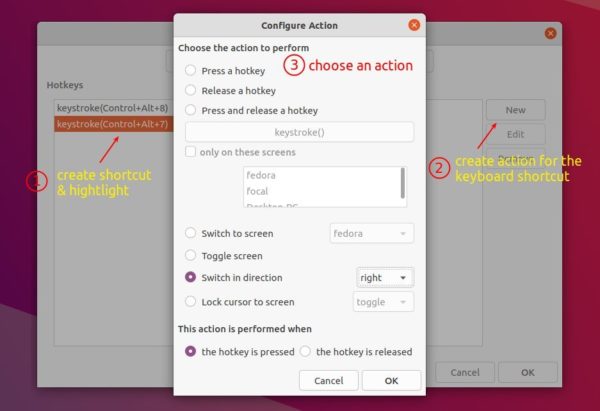
In the “Hotkeys” tab, you can configure keyboard shortcut to switch screens.
- First click ‘New’ and create a shortcut key.
- Second highlight the key you created.
- Click ‘New’ in right to specify an action to perform.
And you can get optional settings in the ‘Advanced server settings’ page.
Setup the client.
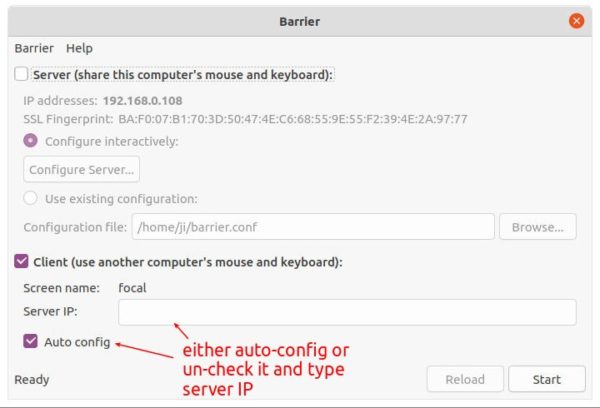
It’s easy to configure the clients since it supports ‘auto config’. Just click start, it will automatically connect to the server if available, and prompt you to trust the fingerprint if SSL enabled.
By disabling ‘Auto config’, you can type server IP manually. And a dialog will pop-up indicates you connected successfully.
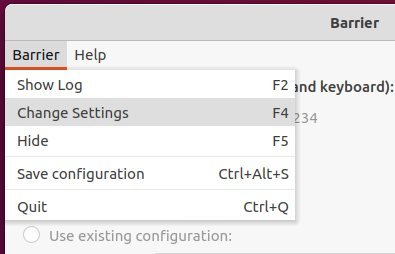
For connecting issues, check the log from menu. As well, you can change the listening port, toggle SSL via settings menu.
In my case, server refused to connect before I disabled SSL :-/

Ji m
I’m a freelance blogger who started using Ubuntu in 2007 and wishes to share my experiences and some useful tips with Ubuntu beginners and lovers. Please comment to remind me outdated tutorial! And, notify me if you find any typo/grammar/language mistakes. English is not my native language. Contact me via [email protected] Buy me a coffee: https://ko-fi.com/ubuntuhandbook1
3 responses to Install / Setup Barrier to Share Mouse & Keyboard Between Your Computers
Very helpful in explaining how to actually connect screens using the hotkeys. It’s not as intuitive as mouse without borders in that regard. Thanks!
For my case, i have to disable ssl in server and client sides, then client can connect to server successfully in my home networking. Otherwise, it fails with a key file cannot found in client side.