- Mpv config file linux
- Contents
- What it is and isn’t [ edit ]
- Installing mpv [ edit ]
- Some configuration is recommended [ edit ]
- mpv.conf for older and weak Intel iGPU systems and older AMD APUs, specially older laptops [ edit ]
- mpv.conf for typical Intel iGPU systems and AMD APUs [ edit ]
- mpv.conf for dedicated AMD graphics cards [ edit ]
- mpv.conf files for Windows [ edit ]
- Input configuration [ edit ]
- Expanding mpv with javascript and/or lua userscripts [ edit ]
- Links [ edit ]
- Alternatives [ edit ]
- Navigation menu
- Page actions
- Page actions
- Personal tools
- Search
- Navigation
- fun free games
- software benchmarks
- educational videos
- Comparisons
- Great software
- for beginners
- cheat sheets
- HOWTO
- 한국어
- confused?
- feed reader feeds
- try your luck
- logs
- Tools
- Customize MPV player for better usability
- Installing MPV player
- Customizing MPV player
- Summary
Mpv config file linux
mpv is the best pure no-fuzz video player for Linux. It will play anything video file you throw at it. It is also available for Windows, MacOS and Android. It is just a video player, it does not have menus or toolbars or things of that nature. Basics controls are available in a on-screen overlay display.
Contents
What it is and isn’t [ edit ]

mpv is a video player which will open a video and play it. It does not have additional features. At all. There is no graphical playlist function, there is no button for open files or network URLs or anything like that. You can open a file using your file manager or a terminal and play it with mpv and that is how you use it. You can play network URLs and playlists with it using those things and command-line arguments.
Moving the mouse above a video playing in mpv makes a on-screen navigational interface appear. It is limited to jumping to a specific time on a timeline, play, pause, volume and mute, toggling subtitles on or off and there is also a fullscreen toggle button. Not that you’ll need it, pressing f to toggle f ullscreen is quicker.
There are more feature-rich programs like SMPlayer which use mpv for the actual video playback while providing a graphical interface with menus and toolbars and icons.
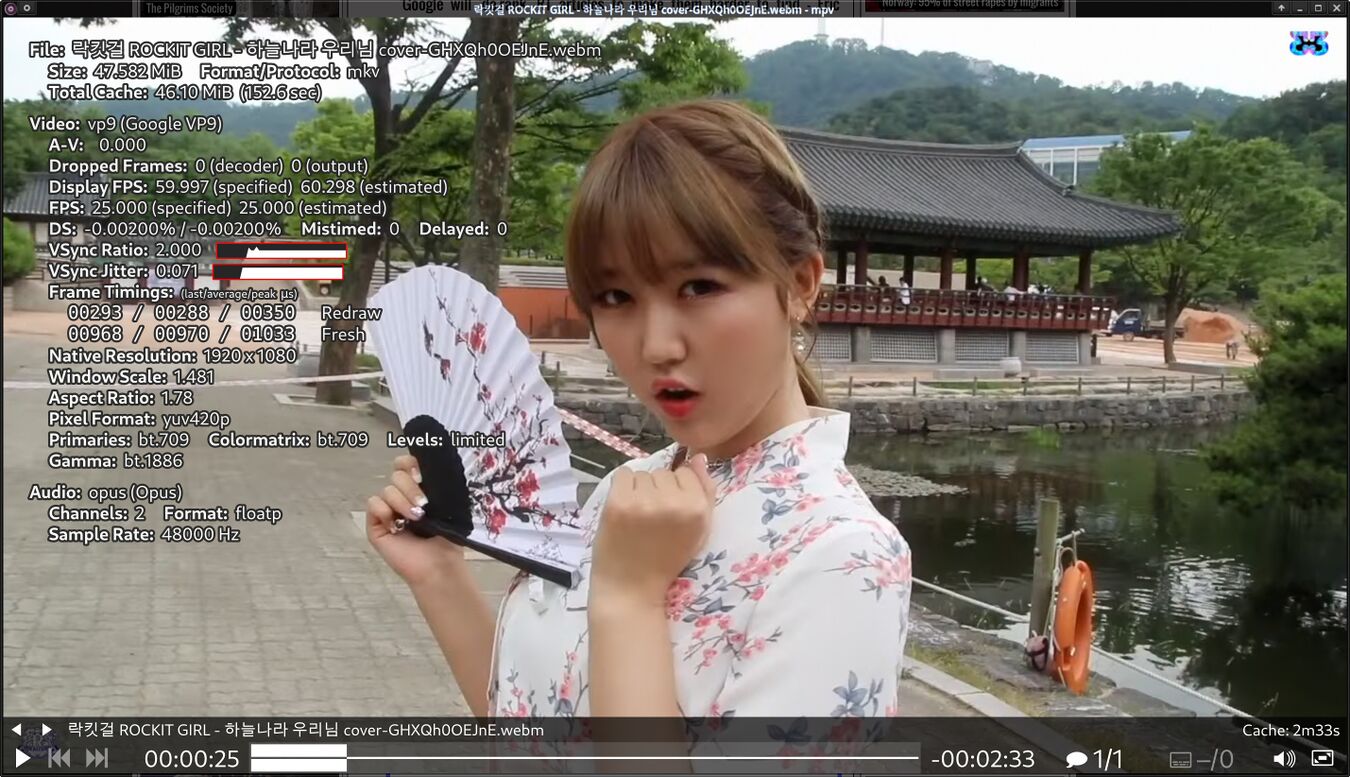
mpv playing a Rockit Girl music video with on-screen information display enabled by pressing i .
Installing mpv [ edit ]
You will probably have to add a third party repository to your distribution to get (a proper) mpv. That would be rpmfusion in the case of Fedora and CentOS.
Some configuration is recommended [ edit ]
mpv is highly configurable using the configuration file $HOME/.config/mpv/mpv.conf and there are a lot of examples of mpv configuration files floating around the Internets. While you strictly do not need to have a mpv.conf you may want to consider using the following examples if you do not have one.
All the examples use hwdec=vaapi . vaapi is Intel technology but it is also the best interface for hardware decoding on AMD graphics because vdpau can not do 10-bit HEVC video and vaapi can.
mpv.conf for older and weak Intel iGPU systems and older AMD APUs, specially older laptops [ edit ]
We recommend this configuration file for very weak machines and older laptops:
vo=vaapi hwdec=vaapi ao=pulse video-sync=display-resample # Limit network video playback to 1080p, do not use VP9 ytdl-format=bestvideo[heightThis configuration requests that vaapi is used for both hardware video decoding when available and video output. This is the least possible resource-demanding vo= option. It is more battery-friendly than using vo=gpu . Using vo=vaapi is not recommended unless your hardware is weak enough to warrant it.
mpv.conf for typical Intel iGPU systems and AMD APUs [ edit ]
vo=gpu hwdec=vaapi # Required for hwdec=vaapi to work when using vo=gpu gpu-context=x11egl ao=pulse # Resample audio to catch up if audio/video go out of sync video-sync=display-resample # # bilinear is fastest and also the lowest quality. # spline36 for medium quality/speed. # ewa_lanczossharp is best but really resource-demanding scale=bilinear cscale=bilinear # # Limit network video playback to 1080p, do not use VP9 ytdl-format=bestvideo[heightThis is fine for newer desktops and laptops with a Intel iGPU as well as AMD APUs.
mpv.conf for dedicated AMD graphics cards [ edit ]
vo=gpu hwdec=vaapi # Required for hwdec=vaapi to work when using vo=gpu gpu-context=x11egl # Enable High Quality GPU profile # Run mpv --show-profile=gpu-hq to see what settings # this activates and --profile=help to see available profiles profile=gpu-hq video-sync=display-resample interpolation tscale=oversample # https://bugs.freedesktop.org/show_bug.cgi?id=107666 # hwdec=vdpau ao=pulse ## Network playback configuration # No limits on quality, 4k 60fps is fine. #ytdl-format=bestvideo+bestaudio/best # For 4k video but not 60fps above 1440p #ytdl-format=bestvideo[height>=1440][fpsWhile there is a placebo visual benefit there is also a very real cost. profile=gpu-hq will give you scale=spline36 and cscale=spline36 (and dscale=mitchell). spline36 is visually fine while not being too resource-intensive at 4K. Using ewa_lanczossharp will result in stuttering playing 1440p video on a RX560 and put fairly high load on a RX580 too. Even if you have a high-end GPU, do you really need or want your GPU to be working as if it was running a FPS game, making noise from the fans, when you are just using it to watch a video?
mpv.conf files for Windows [ edit ]
Input configuration [ edit ]
mpv has some features which do not have any default key-bindings. It is possible to configure (a lot) more keyboard shortcuts using a configuration file called input.conf in $HOME/.config/mpv .
Alt+RIGHT add video-rotate 90 Alt+LEFT add video-rotate -90 Alt+- add video-zoom -0.25 Alt+= add video-zoom 0.25 Alt+j add video-pan-x -0.05 Alt+l add video-pan-x 0.05 Alt+i add video-pan-y 0.05 Alt+k add video-pan-y -0.05 Alt+BS set video-zoom 0; set video-pan-x 0; set video-pan-y 0 n cycle interpolation ctrl+f vf toggle hflip alt+f vf toggle vflip ctrl+r cycle_values video-rotate "90" "180" "270" "0"Expanding mpv with javascript and/or lua userscripts [ edit ]
It is possible to expand mpv's functionality with userscripts. These can add useful features like playlist management, automatic cropping of black bars when detected and much, much more.
Links [ edit ]
- mpv's homepage is at https://mpv.io/
- There is a mpv keyboard-shortcut cheat-sheet at https://i.imgur.com/LNGJf4u.png
- you can read the fine manual at https://man.linuxreviews.org/man1/mpv.1.html
Alternatives [ edit ]
| Program | rating | framework | backend | highlights |
|---|---|---|---|---|
| Celluloid | GTK | mpv | Has a playlist. Otherwise very limited. | |
| GNOME Videos | GTK/GNOME | GStreamer | Useless GUI, problems playing a lot of files | |
| mpv | libmpv | On-screen controls. No playlist, no GUI. Plays everything. | ||
| Parole | GTK | GStreamer | Very basic media player. No features what so ever. | |
| SMPlayer | Qt | mpv | Fully featured. Playlist, advanced playback options, easy to use. | |
| VLC | libvlc | Fully featured. Playlist, advanced playback options, video conversion, live stream recording |
Navigation menu
Page actions
Page actions
Personal tools
Search
Navigation
fun free games
software benchmarks
educational videos
Comparisons
Great software
for beginners
cheat sheets
HOWTO
한국어
confused?
feed reader feeds
try your luck
logs
Tools
Customize MPV player for better usability

MPV player is one of the most widely used media players used on Windows, Linux and macOS. It is an extremely lightweight player, and you have to customize it according to your need. We have already discussed the differences between the VLC media player and an MPV player, so if you are not into customizations and just need to have a video player that “just works,” then the MPV player might not be for you.
As a user who has used a VLC media player his whole life, I found certain things which I didn’t like about this player, such as the Keyboard shortcuts and the overall look of the player. So I changed it using Lua scripts available on GitHub and a few custom key bindings. In this tutorial, we are going to discuss exactly those customizations which will make it feel more like a VLC player.
Installing MPV player
This is the starting point, let’s first install it on your distribution before doing anything. Open a Terminal and type the following commands, depending upon your distribution :
# On Debian and Ubuntu based distributions sudo apt update && sudo apt install mpv # On Arch Linux based distribution sudo pacman -S mpv # On Fedora Workstation sudo dnf install mpv
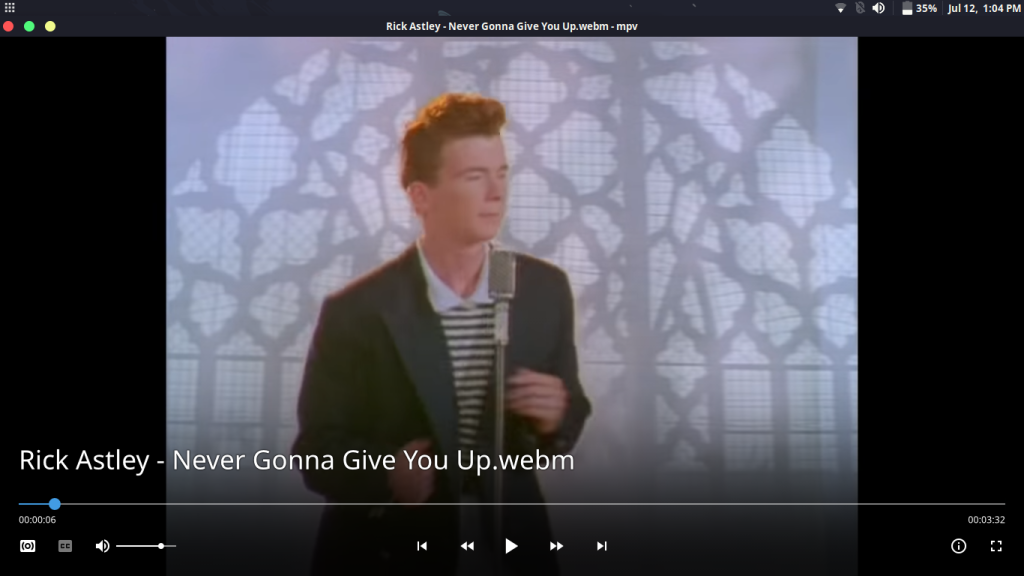
When you first play any file using this player, you will be greeted with an Interface which looks something like this :
Customizing MPV player
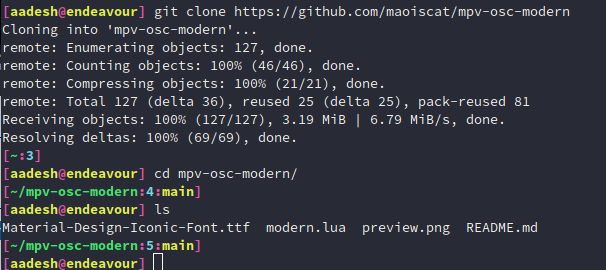
Now, let’s start customizing, open your terminal and type the following command to clone scripts from GitHub :
git clone https://github.com/maoiscat/mpv-osc-modern
You can use any theme listed on this page.
Now, let’s create a directory which will store all of our scripts and will be utilized by MPV :
Now, from the cloned directory, let’s move the Lua scripts into our newly created directory. Type :
mv mpv-osc-modern/modern.lua ~/.config/mpv/scripts
Create another directory which will host the font required by this script :
Again, move the font in this directory by typing :
mv mpv-osc-modern/Material-Design-Iconic-Font.ttf ~/.config/mpv/fonts
Well, that’s it, open any file now to check what mp looks like now :
I’ve also added other scripts such as file-browser, autoload, and cover-art. You can add them using the above method.
There are many more scripts listed on this page, so you can install any of them that suits your needs.
Now, This part is optional, but I have also changed the key bindings of various actions, you can also do this by creating a file named input.conf using your favourite text editor, type :
# For Vim users vim ~/.config/mpv/input.conf # For nano users nano ~/.config/mpv/input.conf
Press ‘I’ to get into insert mode if you are using vim. My config file looks something like this :
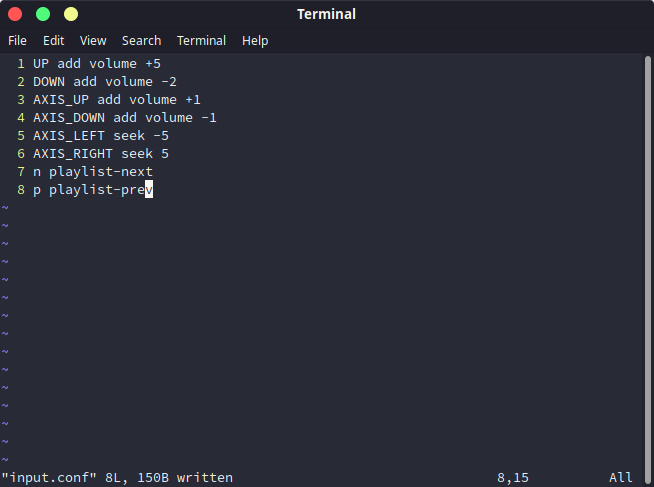
The above configuration does the following :
- ‘The up arrow key’ increase the volume by 5 units
- ‘Down arrow key’ decreases by 5 units
- ‘Mouse/Touchpad scroll up’ increases the volume
- ‘Mouse/Touchpad Scroll down’ decreases the volume
- ‘Swiping left on touchpad’ goes 5 seconds back
- ‘Swiping right on touchpad’ goes 5 seconds forward
- ‘n’ Key will play the next media in the playlist
- ‘p’ key will play the previous file in the playlist
If you are using vim, then press the Escape key and type :wq to save and exit. If you are using nano editor, then press Ctrl+O and Ctrl+X to save and exit.
You should also edit the mpv.conf file to suit your needs, open it in either vim or nano using :
vim ~/.config/mpv/mpv.conf # OR nano ~/.config/mpv/mpv.conf
save-position-on-quit=yes # The default volume of mpv when you open it volume=90 blend-subtitles=yes screenshot-directory=~/Pictures/Screenshots screenshot-format=png osc=no # You should read about Hardware acceleration on mpv to choose your correct settings hwdec=vaapi # Display English Subtitles if available slang=en # Defalt audio language alang=en
Press Ctrl+O and Ctrl+X to save and exit if you are using nano and press the Escape key and then type :wq to save and exit out of vim editor.
Enable the ‘autoload’ script by adding a file named autoload.conf file in the script-opts directory :
vim ~/.config/mpv/script-opts/autoload.conf # Or nano ~/.config/mpv/script-opts/autoload.conf
disabled=no images=yes videos=yes audio=yes ignore_hidden=yes
Again, save and exit out of your editor.
If you have enabled the file-browser script, then you can access the file browser from the terminal by pressing Ctrl+O key, and navigating between the directories using the arrow keys on your keyboard.
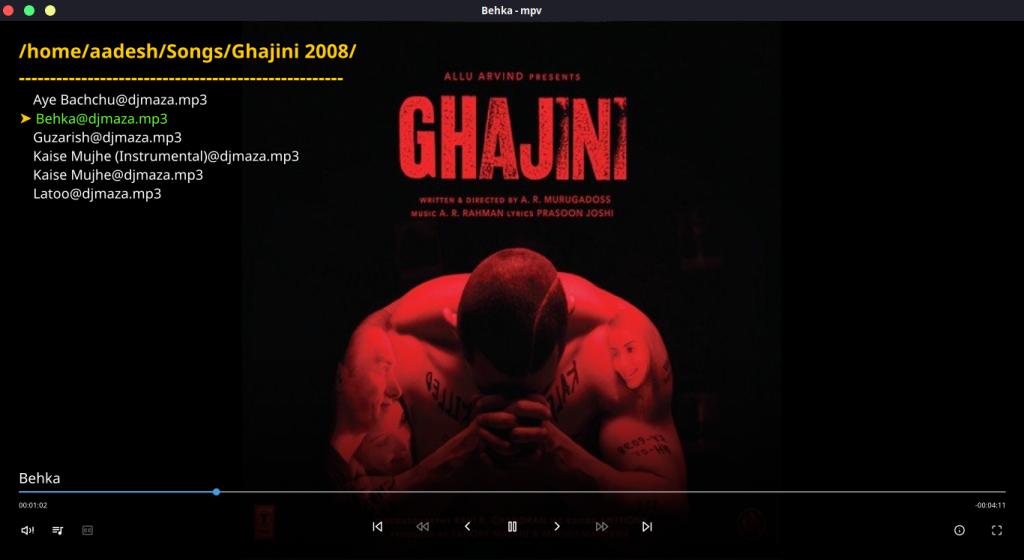
In the above screenshot, I have used a theme named modern-x-compact, and you can get it from here.
Summary
The possibilities are endless here, you can basically add scripts to download subtitles automatically, stream torrents and many more. You can even use an MPV player as an Image viewer. The functionality is definitely much more that a VLC media player, but that requires spending time in the Terminal, which is why many people choose to go with VLC. Hopefully, this tutorial helped you with making MPV more beautiful to look at and easy to use.