- How to Create Multiboot USB, Linux and Windows in 1 Flash Drive with Ventoy
- Ventoy Bootable USB Solution
- Ventoy Main Features
- Creating Multiboot USB on Linux
- #1 Find The Drive Name
- #2 Install Ventoy to USB
- #3 Copy Some ISO to USB
- Multibooting linux and windows
- Подготовка к установке
- Процесс установки и создания мультизагрузочной флешки
- Для систем семейства Windows
- Для Linux-based образов
- Проверка работоспособности флешки
- Как сменить фоновую картинку под меню загрузки
How to Create Multiboot USB, Linux and Windows in 1 Flash Drive with Ventoy
Linuxslaves.com — If you are looking to create all-in-one USB drives to install multiple OS?. This guide explains how to create any number of bootable in a USB drive from Linux, Ventoy is awesome tool you should give a try.
Creating a bootable USB on Linux to install any operating system is easy as taking candy from a baby. It usually involves reformatting the drive, flash the ISO image, and then just boot it.
But if you want to make another, you’ll have to repeat the same process and lose the operating system already on the drive.
That’s why Sardu, MultiBootUSB, Yumi (Your Universal Multiboot Installer), MultiSystem, Xboot, Ventoy, and other multiboot creator apps exist. In my opinion, Ventoy is one of the best tools you can get.
Ventoy Bootable USB Solution
Ventoy is a fairly new open source tool to create bootable USB drives using Linux or Microsoft Windows ISO files. You install this tool to a USB drive, then simply copy some ISO files to the USB drive.
It has been tested with hundreds of ISO files, including Debian, Ubuntu (and its flavors), CentOS, RHEL, Deepin, Fedora, SLES, openSUSE, MX Linux, Manjaro, Linux Mint, Pop!_OS, Elementary OS, Solus OS, Zorin, Arch Linux, Puppy Linux, Tails, Slax, Kali Linux, KDE Neon, as well as Windows 7, Windows 8 / 8.1, Windows 10, and Windows Server 2012 / 2012 RS, 2016 and 2019.
Ventoy Main Features
- 100% free open source
- Simple to use
- Fast (limited only by the speed of copying iso file)
- Directly boot from ISO / WIM / IMG / VHD(x) / EFI file, no extraction needed
- Legacy + UEFI supported in the same way
- UEFI Secure Boot supported (since 1.0.07+)
- Persistence supported (since 1.0.11+)
- MBR and GPT partition style supported (1.0.15+)
- WIM files boot supported (Legacy + UEFI) (1.0.12+)
- IMG files boot supported (Legacy + UEFI) (1.0.19+)
- Auto installation supported (1.0.09+)
- File injection supported (1.0.16+)
- ISO files larger than 4GB supported
- Native boot menu style for Legacy and UEFI
- Windows / WinPE / Linux / Unix / Vmware / Xen are supported
- More than 550 ISO files tested
- Not only boot but also complete installation process
- ISO files can be listed in List mode / TreeView mode
- «Ventoy Compatible» concept
- Plugin Framework
- Menu Alias / Menu Style / Customized Menu supported
- USB drive write-protected support
- USB normal use unaffected
- Data nondestructive during version upgrade
- No need to update Ventoy when a new distro is released
Creating Multiboot USB on Linux
For the Windows version, there is a handy Graphical User Interface (GUI) tool to make Ventoy even easier. Unfortunately, the Linux version comes with command line-only. But don’t worry, Ventoy is extremely easy to use.

First, you have to download Ventoy. Just head to its official website at ventoy.net or grab the latest release from the github releases page.
Extract the downloaded package using Archive Manager, open extracted folder, and you’ll see the bash script called Ventoy2Disk.sh.
#1 Find The Drive Name
Plug your USB flash drive in > right click on an empty space > choose Open in Treminal > run sudo fdisk -l command in the to check the drive name.
$ sudo fdisk -l [. ] Disk /dev/sdb: 29,9 GiB, 32086425600 bytes, 62668800 sectors Units: sectors of 1 * 512 = 512 bytes Sector size (logical/physical): 512 bytes / 512 bytes I/O size (minimum/optimal): 512 bytes / 512 bytes Disklabel type: dos Disk identifier: 0x00001000 Device Boot Start End Sectors Size Id Type /dev/sdb1 * 2048 62668766 62666719 29,9G c W95 FAT32 (LBA)In the example output above you can find the USB device name by looking under Disk. In my case, my Samsung Flash Drive Bar is /dev/sdb.
#2 Install Ventoy to USB
It’s important to note that all the data on your flash drive will be lost. So make sure to backup and enter the correct drive name, so you don’t accidentally lose the data from a hard drive.
Now run sudo ./Ventoy2Disk.sh -i /your/drive-name to install Ventoy. If you need Secure Boot support, simply add argumen -s, so it should be sudo ./Ventoy2Disk.sh -i -s /your/drive-name .
So, here’s sample output after running that command :
$ sudo ./Ventoy2Disk.sh -i /dev/sdb ********************************************** Ventoy: 1.0.20 longpanda admin@ventoy.net https://www.ventoy.net ********************************************** Disk : /dev/sdb Model: Samsung Flash Drive (scsi) Size : 29 GB Style: MBR Attention: You will install Ventoy to /dev/sdb. All the data on the disk /dev/sdb will be lost. Continue? (y/n) y All the data on the disk /dev/sdb will be lost. Double-check. Continue? (y/n) y Create partitions on /dev/sdb by parted in MBR style . Done mkfs on disk partitions . create efi fat fs /dev/sdb2 . mkfs.fat 3.0.28 (2015-05-16) success mkexfatfs 1.3.0 Creating. done. Flushing. done. File system created successfully. writing data to disk . sync data . esp partition processing . If you see Install Ventoy to /dev/sdb successfully finished message, then Ventoy is installed on your USB drive.
#3 Copy Some ISO to USB
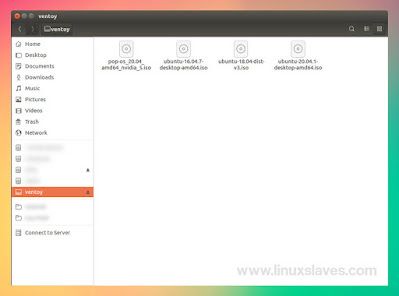
The next thing what we have to do is simply copying any number of Linux distributions or Windows 10 / 8.1 / 8 / 7 ISO files onto your USB drive.
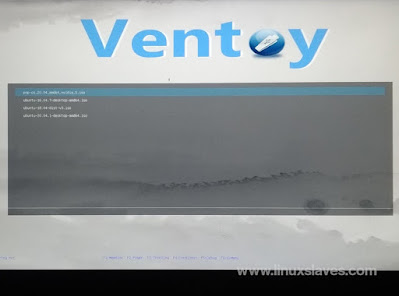
Once it’s completes, now you can boot from this USB drive and you’ll see a list of ISO files that are available on it.
UPDATE: If you think that the default theme isn’t really actractive for your eyes, you don’t have to worry because we can customize Ventoy with GRUB theme.
So, these were all I can share. I hope you enjoy reading it as much as I enjoyed writing it. Don’t forget to follow me on YouTube and Twitter. See ya.
Multibooting linux and windows
В этой статье приведена инструкция по созданию мультизагрузочной флешки с помощью программы MultiBoot USB. Программа работает с NTFS и FAT32, так что можно использовать не только флешку, но и внешний жесткий диск.
Подготовка к установке
1. Для начала возьмем флешку такого размера, чтоб на нее поместились все запланированные образы.
2. Скачиваем программу MultiBoot USB и устанавливаем.С программой в комплекте идет наглядная инструкция на русском языке: Readme.pdf.
В образе, создаваемом данной программой, предустановлены следующие программы:
- FreeDOS — Загрузка в режиме командной строки, включает DOS-Navigator и VC
- Универсальный загрузочный диск v3.7 — Работа с разделами NTFS в MS-DOS
- NT Password & Registry Editor — Смена пароля и редактирование реестра Windows XP
- Active@ Boot Disk Professional v2.1 — Восстановление удалённых файлов
- QuickTech Pro v5.8 — Тестирование и диагностика железа и его компонентов
- MemTest86 v4.20 — Тестирование и диагностика оперативной памяти
- MHDD v4.6 — Тестирование и диагностика жёстких дисков
- Victoria v3.52 — Тестирование и сервисное обслуживание IDE и Serial ATA HDD
- HDD Regenerator v2011 — Устранение физических повреждений на HDD
- Symantec Ghost v11.0 — Работа с разделами жёстких дисков.
Кроме перечисленных выше утилит, в состав пакета можно добавить ISO-образы (для них уже созданы необходимые пункты меню, и файлы-пустышки, которые нужно заменить на настоящие образы):
- Windows XPE — Мини версия
- Windows 7PE — Мини версия
- Acronis Disk Director & True Image — Работа с разделами жёстких дисков.
Процесс установки и создания мультизагрузочной флешки
1. Для начала запускаем утилиту HP USB Disk Storage Format Tool, выбираем устройство, ставим галочку «QuickFormat» и форматируем (желательно под NTFS, чтобы в случае чего не возникло проблем с большими файлами образов).
2. Далее устанавливаем grub4dos. Запускаем Grub4Dos Installer, в поле «DeviceName» выбираем Disk, и своё устройство (название устройства не отображается, только размер в мегабайтах). Жмем «Install«.
3. Далее следует распаковать на флешку набор файлов и утилит. Через кнопку «Обзор…» указываем путь к флешке и нажимаем «Извлечь». На вопрос: «Вы хотите заменить существующий файл?» отвечаем «Да».
Технически флешка уже стала мультизагрузочной, но кроме утилит, которые мы распаковали, на ней ничего нет.
Дополним комплект образами операционных систем. Для удобства можно создать в корне папку «iso», где будут расположены все образы дисков.
Для систем семейства Windows
Для установки Windows 7, Windows 8, Windows 8.1, следуем пункту 4.1 инструкции, выбирая соответствующий (2й) чекбокс:
Для Linux-based образов
Открываем на флешке файл menu.lst (в корне) блокнотом и заменяем пункты по умолчанию на желаемые, например:
title Загрузка Ubuntu 11.10 — i386 // название пункта меню find --set-root /iso/ubuntu1110i386.iso // где «/iso/ubuntu1110i386.iso» путь к образу map /iso/ubuntu1110i386.iso (0xff) || map --mem /iso/ubuntu1110i386.iso (0xff) map --hook chainloader (0xff)Проверка работоспособности флешки
Для проверки работы запускаем WinSetupFromUSB, в поле с устройством выбираем созданную флешку, и ставим галочку «TestinQEMU». По нажатию на «GO» будет произведен запуск загрузки с флешки в вииртуальной среде без перезагрузки системы.
Как сменить фоновую картинку под меню загрузки
1. Вам понадобится макет фоновой картинки в PSD и архив для перепаковки скинов. Отредактируйте PSD файл и сохраните в BMP (возможно придется пересохранить сторонней программой).
2. Готовый файл копируем в папку «Files» из архива «SkinsRepack», и запускаем файл «Упаковать.cmd». Получаем файл Skins без расширения. Этот файл копируем на флешку, и в файлах menu.lst и /boot/menu_u.lst во второй строчке указываем путь к скину:
Проверить как выглядит ваш новый скин также можно в эмуляторе.
После всех действий на флешке будут две папки и четыре файла, впрочем их можно пометить как скрытые, что никак не отразится на работе устройства.
Проверка в эмуляторе не даёт 100% гарантии того, что конкретный образ заработает в реальных условиях. Проверки на виртуальных машинах VirtualBox или VMWare также не всегда могут сработать корректно, так что лучше всего проверять на реальном железе.
Для примера вы можете скачать готовый файл menu.lst с прописанными в загрузке:
- Microsoft Windows XP SP2 x86
- Microsoft Windows 7
- Windows 8
- Ubuntu 14.04
- Debian Live 7.5.0
- Linux Mint 17
- Fedora 20
- Acronis Disk Director & True Image
- Hirens BootCD 15.1
- Kaspersky Rescue LiveCD


