- Xorg/Multiple monitors
- Installation
- USE flags
- Emerge
- Configuration
- Simple
- More complex cases
- Different resolutions
- Troubleshooting
- How to Setup Dual Monitor on Ubuntu
- METHOD 1: How to setup dual monitors on Ubuntu
- Requirements
- METHOD 2: How to setup dual monitors on Ubuntu (VirtualBox)
- Conclusion
- About the author
- Alishba Iftikhar
- Подключение дополнительного монитора к компьютеру
- Режимы отображения
- Добавление нескольких мониторов
- Дополнительная информация
Xorg/Multiple monitors
Important
Anything passing for a modern Xorg has autoconfiguration and RandR extension which means that it should just work and any configuration can be done either via xrandr command line tool or a graphical tool provided by your desktop environment assuming you’re using one. Nevertheless this article can prove useful for legacy or advanced use cases.
This page describes the setup of multiple monitors under Xorg. Multihead support in X has luckily progressed in recent versions, so it is pretty easy to set up. Usually it is as simple as defining monitors in Xorg configuration files.
Installation
USE flags
Be aware, most desktop environments, window managers, and graphical toolkit require the xinerama USE flag to be enabled in order to support multiple monitors. When preparing to add second (or third!) monitor to the system, be sure to add this flag to /etc/portage/make.conf :
Emerge
Configuration
Simple
The basic procedure is defining one «Monitor» section per Monitor and then tying everything together in a «Device» section that specifies the video chip driving the monitor(s). For the following examples, Xorg’s configuration is presumed to be stored in /etc/X11/xorg.conf.d (no /etc/X11/xorg.conf file will be used). Alternatively, if the user desires, all files defined in the xorg.conf.d folder can be combined together to form an xorg.conf . The following example is the basic version for two monitors of the same resolution.
Section "Monitor" Identifier "DVI" EndSectionSection "Monitor" Identifier "DP" Option "LeftOf" "DVI" EndSectionEach "Monitor" section must contain an Identifier, everything else is optional. The identifier may be freely chosen. The placement of the monitors is done relatively with one of the keywords RightOf , LeftOf , Above , or Below . Additionally there is a Relative keyword for fancy cases, however this article avoids using it. Each monitor can receive custom options (e.g. resolution) in its configuration.
Next the monitors need to be mapped to the outputs. This is done in the Device section describing the video chip and driver. The Device section of the two monitor example (using an Intel video card) would look like the following.
Section "Device" Identifier "Device0" Option "Monitor-DVI2" "DVI" Option "Monitor-DP1" "DP" Driver "intel" EndSectionImportant
The Driver keyword has to be updated using the system's video card. Common options are intel , radeon or nouveau .The names of the monitors are in the form "Monitor-". The port each monitor was on was determined by running the xrandr -q command. This should be everything needed for a basic setup.
More complex cases
Sometimes more complex layouts will be needed. A third example of a monitor file, with resolution options could look like the following.
FILE /etc/X11/xorg.conf.d/43-lvds-monitor.conf Advanced configuration with resolution defined
Section "Monitor" Modeline "1280x800x60" 71.00 1280 1328 1360 1440 800 803 809 823 Option "PreferredMode" "1280x800" Identifier "LVDS" Option "RightOf" "DVI" VendorName "CMO" EndSectionIt is possible to see in the example above that manufacturer names can be used to get a single config file attached to a single device.
Next a more complete example of the video configuration for x11-drivers/xf86-video-intel package will be provided:
Section "Device" Option "Monitor-DVI2" "DVI" Option "Monitor-DP1" "DP" Option "Monitor-LVDS2" "LVDS" Option "AccelMethod" "sna" Option "TearFree" "true" Option "DRI" "True" Option "XvMCSurfaces" "6" Identifier "GMA-X4500" Driver "intel" EndSectionThe following was made for the x11-drivers/xf86-video-ati radeon driver. Notice the change of the video output name on the same laptop.
Section "Device" Option "Monitor-DVI-0" "DVI" Option "Monitor-HDMI-0" "DP" Option "Monitor-LVDS" "LVDS" Option "AccelMethod" "EXA" Option "ClockGating" "On" Option "ForceLowPowerMode" "On" Option "VGAAccess" "On" Identifier "HD3450" Driver "radeon" Option "MonitorLayout" "LVDS, AUTO" EndSectionNote
If the x11-drivers/ati-drivers package is being used, to increase the Virtual in xorg.conf it must be an exact multiple of the highest resolution monitor. For instance, if the largest monitor is 1920x1080, enter 3840 2160 for Virtual. This will enable xrandr to work properly. This is a problem and appears to be a bug.Different resolutions
Xrandr-1.3 is a little deficient in this regard. X can precisely probe the screen devices, but xrandr will get/display the minimum resolution fitted to the smallest screen attached to the machine. This is annoying because it creates a debug situation. Xorg.0.log has to be read in order to get possible monitor resolutions, define a few modes with xrandr, and then choose a video mode with xrandr. There is nothing user friendly about the process. The process usually takes matter of minutes, but is annoying when a user desires to attach a bigger screen to a computer for a simple event like watching a movie. The latter can be achieved, somewhat, with the following example.
Section "Monitor" Option "SyncOnGreen" "True" Modeline "1280x1024x85" 157.50 1280 1344 1504 1728 1024 1025 1028 1072 Modeline "1600x1200x85" 229.50 1600 1664 1856 2160 1200 1201 1204 1250 Modeline "1600x1200x75" 202.50 1600 1664 1856 2160 1200 1201 1204 1250 Option "PreferredMode" "1600x1200" Identifier "VGA" VendorName "GSM" EndSectionTroubleshooting
Bug: Anyone can notice the level of fine probing X server does (or rather x11-drivers/xf86-input-evdev). Numerous handy details are provided (numerous screen resolutions, gamma values, and other obscure values). One can pick any defined video mode on the list and X server display it. Now, whenever anyone desires to change the video mode of a particular display xrandr will complain about non-existant modes. What? The video modes vanished somewhere? The only that remain are the ones that can fit to the biggest resolution on the smallest display. To get more video modes copy/paste some preferred video modes like in the example above.
How to Setup Dual Monitor on Ubuntu
Dual Monitor setup is connecting two monitors to your computer or laptop. Most people now require numerous screens or monitors connected to their computer as minimal need for multitasking. We can set up dual monitors in both Windows and Linux. Here I will provide you the procedure on how to set up a dual monitor on Ubuntu (Linux).
Two approaches are provided below to setup a dual monitor on Ubuntu, you can choose the one you find convenient for you.
METHOD 1: How to setup dual monitors on Ubuntu
This method is focusing on setting up a dual monitor if your PC is Ubuntu based:
Requirements
- One external monitor
- PC with Ubuntu (Linux OS) installed
Step1: Firstly, connect your external monitor with your PC.
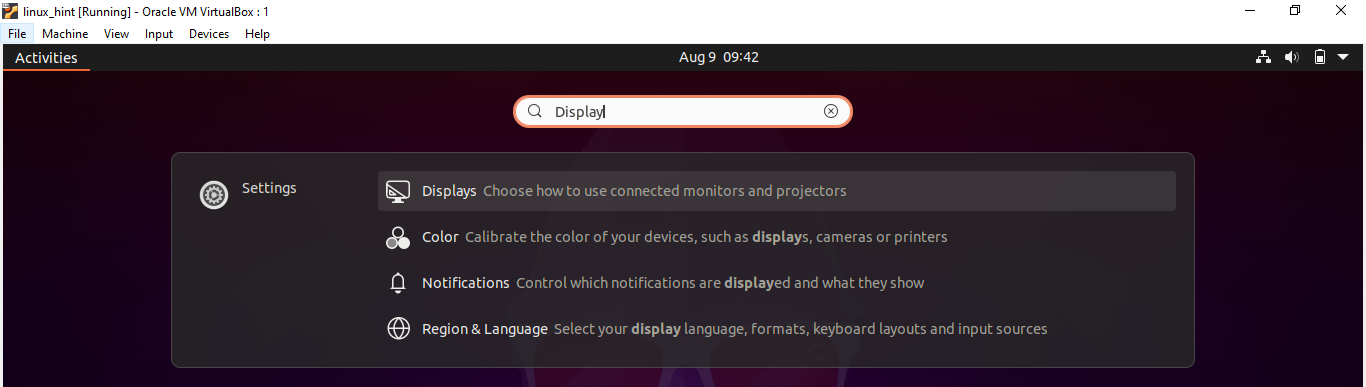
Step 2: Now open the activity overview on Ubuntu.
Step 3: Write Display in the search bar, click on Displays and the display setting will be opened.
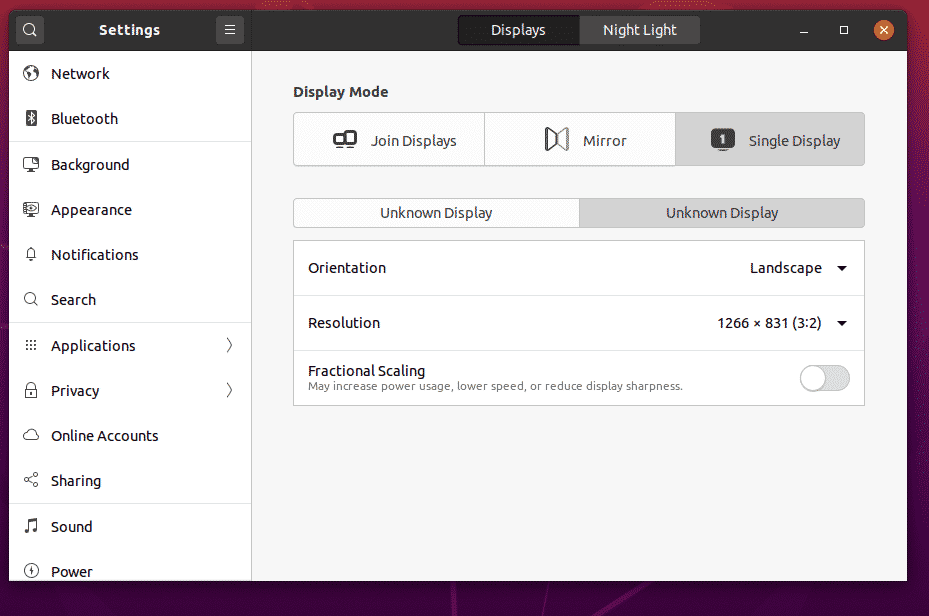
Step 4: You can now set the display position of screens by dragging them to the position of your choice.
There are three display modes in Ubuntu:
Join Displays: In this display mode the screen edges will be linked and things can pass from one screen to the other one.
Mirror: It will set the same resolution and orientation for both displays and alike content will be shown on both screens.
Single Display: Only one display is set up, effectively shutting down the other.
Choose any of the displays from above, you can also set resolution, scale or orientation of screens.
Step 5: Now click on Apply to save the changes.
METHOD 2: How to setup dual monitors on Ubuntu (VirtualBox)
If you are accessing Ubuntu as guest operating system using VirtualBox then follow the below-mentioned approach:
STEP 1: First turn off the virtual machine.
Step 2: Go to the virtual box setting of the particular machine in which you want to set up a dual monitor.
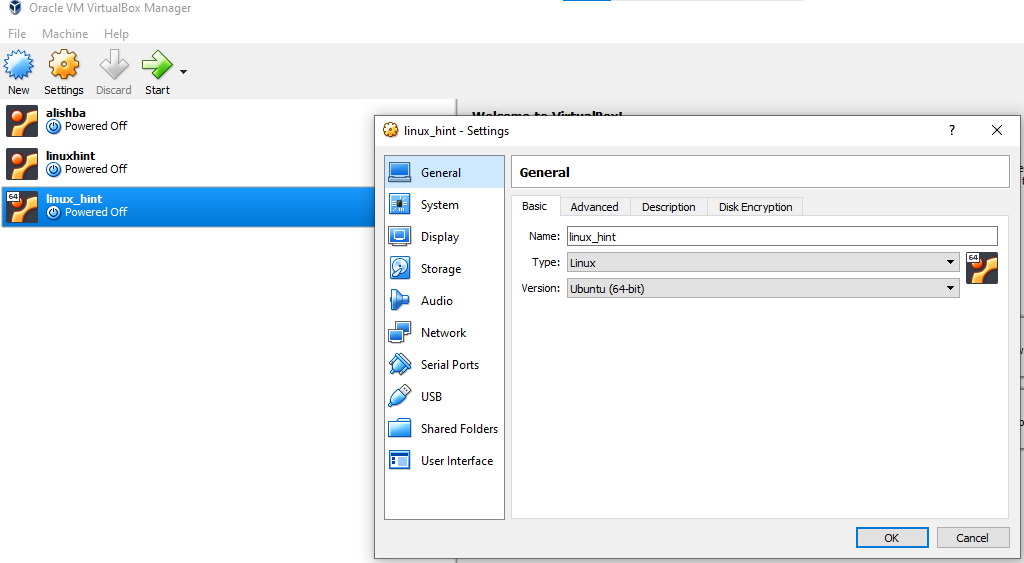
STEP 3: Now click on Display in settings and the display panel will be opened:
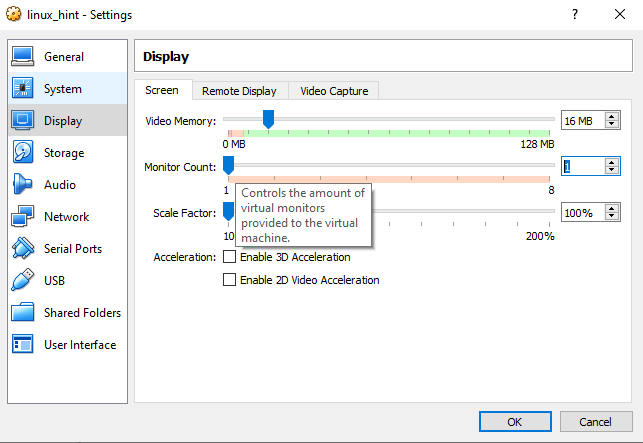
Step 4: Now increase the monitor count to 2 by sliding the bar:
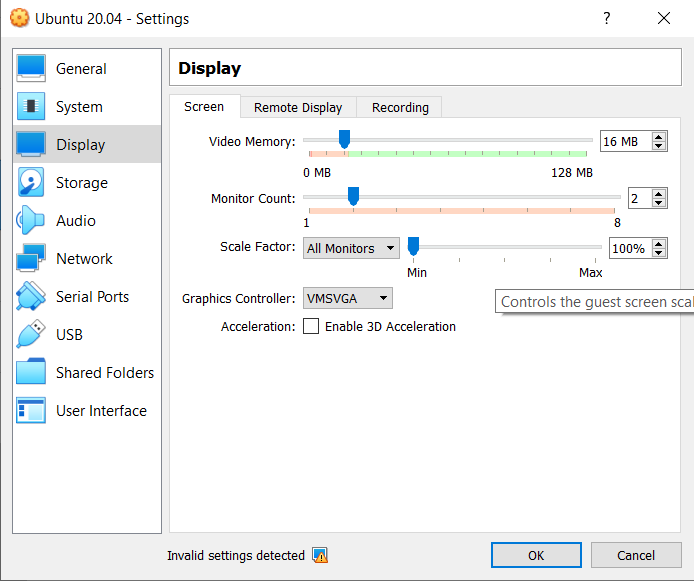
Click on OK to save the changes.
Step 5: Run the virtual machine in which you apply the above changes.
Step 6: Go to the view setting and at the end you can see two virtual Screen 1 and virtual Screen 2 labels.
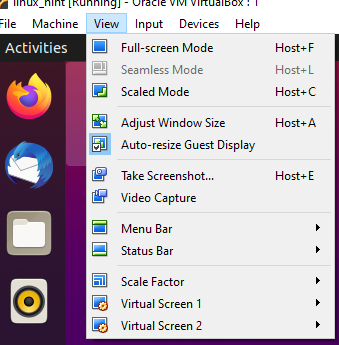
STEP 7: By clicking on Virtual Screen 1 and Virtual Screen 2, two screens will be opened.

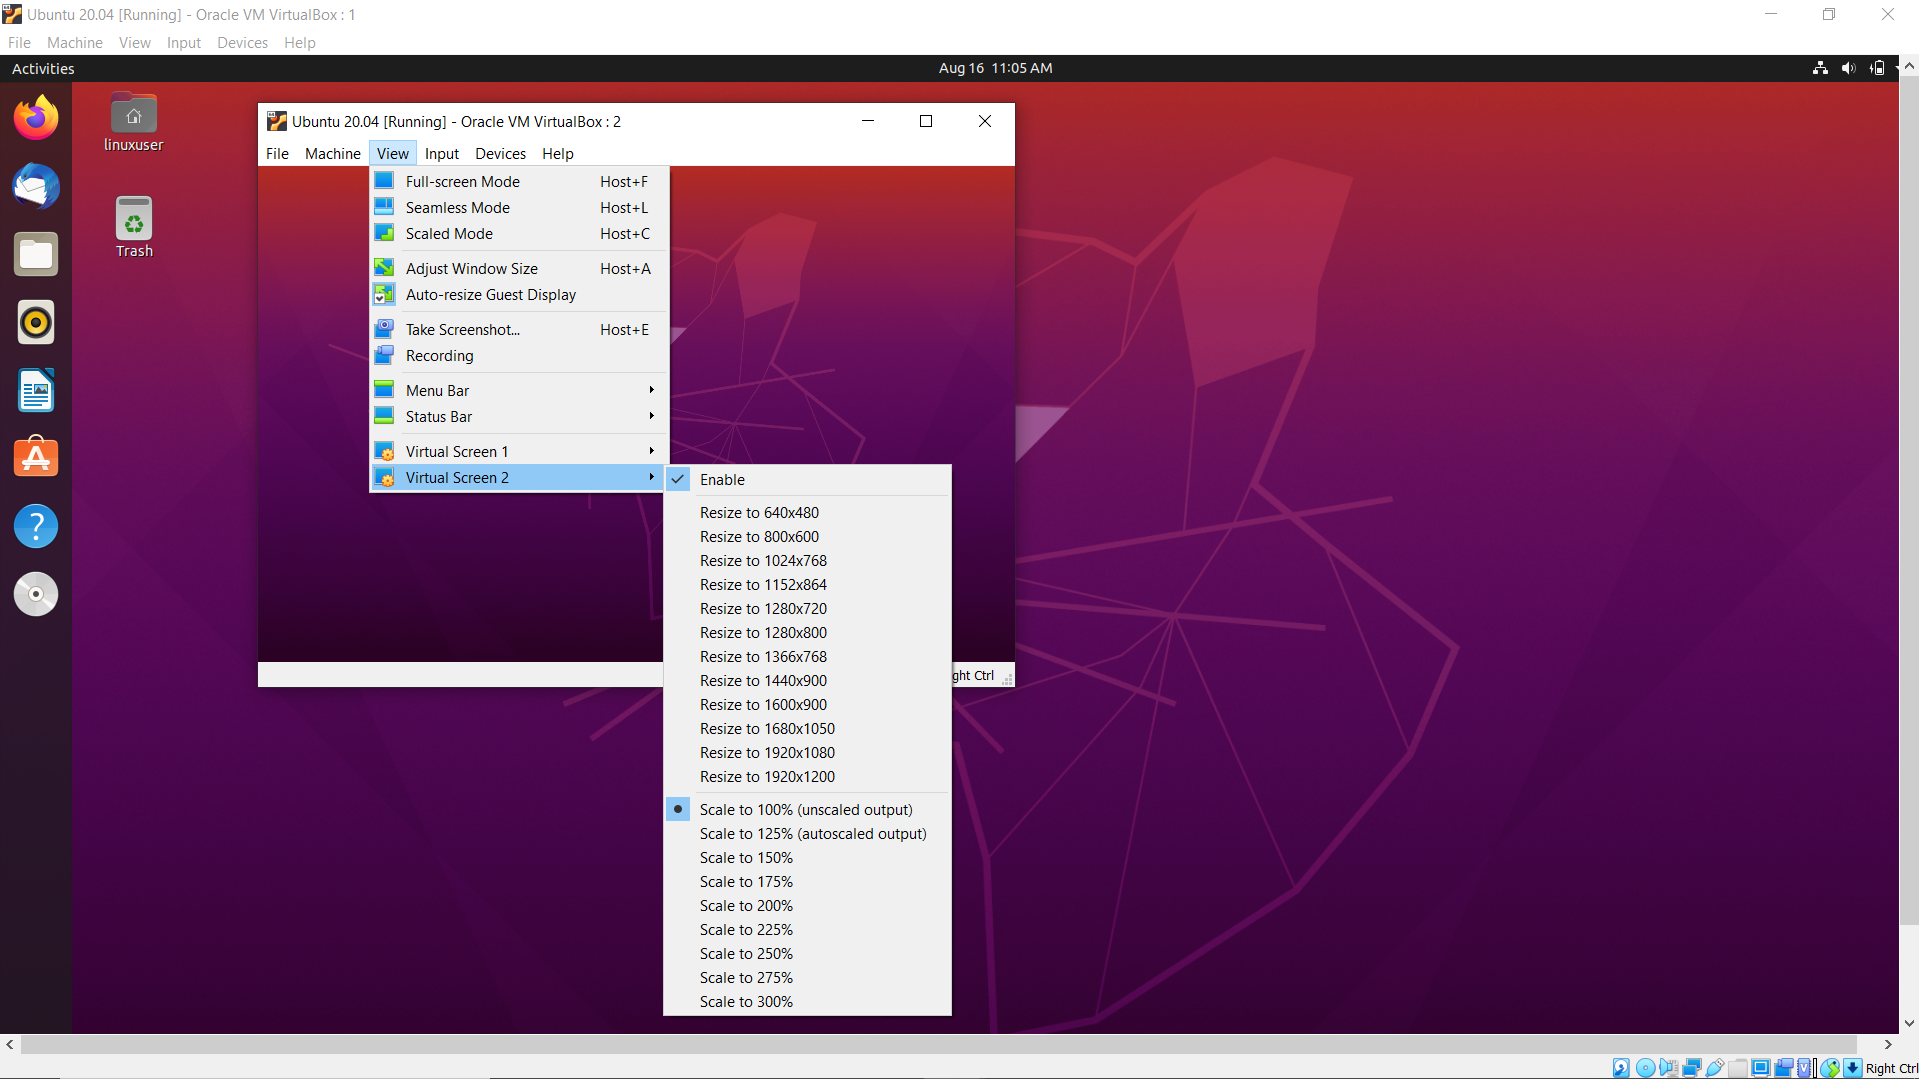
Screen resolutions of both screens can be adjusted. If you want to change the screen size of the virtual screen, simply click on the “View” settings then in the drop-down menu hover mouse on the Virtual Screen, a context menu will appear. Now click the preferred size from the menu.
Conclusion
Dual monitor setup makes everything convenient whether you are a programmer or a post-production team member. This write up is about how to set up a dual monitor on Ubuntu. Setting up Dual Monitor is an efficient approach for multitasking, we discussed two approaches in this write up one is through the display setting of virtual box and one is through display setting of ubuntu.
About the author
Alishba Iftikhar
I am currently an undergraduate student in my 1st year. I am an internee author with Linuxhint and loved learning the art of technical content writing from senior authors. I am looking forward to opting my career as a full time Linux writer after I graduate.
Подключение дополнительного монитора к компьютеру
Чтобы настроить дополнительный монитор, подключите монитор к компьютеру. Если система не распознала его сразу, или если вы хотите изменить его параметры:
- Откройте Обзор и начните вводить: Мониторы .
- Нажмите Мониторы , чтобы открыть этот раздел настроек.
- На схеме расположения мониторов мышью перетащите мониторы в желаемые для вас позиции.
Режимы отображения
Для двух экранов доступны следующие режимы отображения:
- Объединить дисплеи - края экрана соединяются, чтобы объекты могли переходить с одного экрана на другой.
- Зеркальное отображение - одна и та же информация отображается на двух экранах с одинаковым разрешением и ориентацией.
Когда требуется только один дисплей, например, внешний монитор, подключенный к ноутбуку с закрытой крышкой, другой монитор можно отключить. В списке выберите монитор, который вы хотите отключить, и выключите его.
Добавление нескольких мониторов
При наличии более двух экранов единственным доступным режимом является - Объединить дисплеи .
- Нажмите кнопку дисплея, который вы хотите настроить.
- Перетащите экраны в необходимые позиции.
Дополнительная информация
You can choose the displayed language by adding a language suffix to the web address so it ends with e.g. .html.en or .html.de.
If the web address has no language suffix, the preferred language specified in your web browser's settings is used. For your convenience:
[ Change to English Language | Change to Browser's Preferred Language ]
The material in this document is available under a free license, see Legal for details.
For information on contributing see the Ubuntu Documentation Team wiki page. To report errors in this documentation, file a bug.