- MX Linux Forum
- [solved]demo password not accepted
- [solved]demo password not accepted
- Re: demo password not accepted
- Re: demo password not accepted
- Re: demo password not accepted
- Re: demo password not accepted
- Re: demo password not accepted
- Re: demo password not accepted
- Re: demo password not accepted
- Re: demo password not accepted
- How to Install MX Linux on Oracle virtualbox
MX Linux Forum
Important information
—If in starting your system it boots to an unwanted Desktop, right click desktop, then select leave and logout. At the
login screen there is a session chooser at the top of the screen.
News
— MX Linux on social media: here
— New Forum Features, Marking Solved and Referencing a User: here
[solved]demo password not accepted
[solved]demo password not accepted
#1 Post by hwms » Tue Nov 12, 2019 11:14 pm
I am attempting to install MX 19 64 bit on a dell vostro 260 with 250 gb hd and 4 gb ram. After hitting F4 and typing sudo mininstall and then entering ‘demo’ as the password it is not accepted. What am I missing or doing incorrectly?
Re: demo password not accepted
#2 Post by asqwerth » Tue Nov 12, 2019 11:16 pm
it’s minstall, not mininstall.
Desktop: Intel i5-4460, 16GB RAM, Intel integrated graphics
Clevo N130WU-based Ultrabook: Intel i7-8550U (Kaby Lake R), 16GB RAM, Intel integrated graphics (UEFI)
ASUS X42D laptop: AMD Phenom II, 6GB RAM, Mobility Radeon HD 5400
Re: demo password not accepted
#3 Post by Adrian » Wed Nov 13, 2019 12:08 am
Also, don’t start minstall with «sudo minstall» it doesn’t work well in MX-19, use the icon or type minstall-pkexec
Re: demo password not accepted
#4 Post by oops » Wed Nov 13, 2019 6:48 am
hwms wrote: ↑ Tue Nov 12, 2019 11:14 pm I am attempting to install MX 19 64 bit on a dell vostro 260 with 250 gb hd and 4 gb ram. After hitting F4 and typing sudo mininstall and then entering ‘demo’ as the password it is not accepted. What am I missing or doing incorrectly?
. Also hint F2 before for the right language/keybord . I already have this behavior with my azerty keybord (instead US querty) . so password «demo» becomes «de,o» in this case 😉
For root and root password (for azerty & quety) it is OK for both.
Pour les nouveaux utilisateurs: Alt+F1 pour le manuel, ou FAQS, MX MANUEL, et Conseils Debian — Info. système “quick-system-info-mx” (QSI) . Ici: System: MX-19_x64 & antiX19_x32
Re: demo password not accepted
#5 Post by hwms » Wed Nov 13, 2019 12:02 pm
I started root user and typed ‘minstall -pkexec. I told the install program to auto install using the entire disk. Clicked ‘yes’ to format sda for MX-Linux. After that I get a message, «Failed to format required partitions». I have gotten this far 2 or 3 times.
Re: demo password not accepted
#6 Post by Adrian » Wed Nov 13, 2019 12:22 pm
Just to clarify it’s «minstall-pkexec» in one word (-pkexec is part of the name it’s not an option)
Probably you did that but just to clarify for people who read this. If you have an installation failure please post here the installation log: /var/log/minstall.log
Re: demo password not accepted
#7 Post by hwms » Wed Nov 13, 2019 12:25 pm
Re: demo password not accepted
#8 Post by hwms » Wed Nov 13, 2019 12:27 pm
Re: demo password not accepted
#9 Post by Adrian » Wed Nov 13, 2019 12:31 pm
How to Install MX Linux on Oracle virtualbox
MX Linux is a Debian based Linux operating system using core antiX components. MX Linux uses the Xfce desktop environment and comes with UEFI installer (64bit & 32bit), automatic enabling of most Broadcom drivers, LUKS encrypted root, home, and swap partition options.In this Install MX Linux on Oracle virtualbox tutorial i am using the below softwares to test it.
Windows 10 (64bit) with RAM 4GB
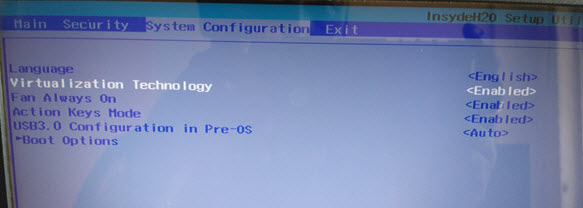
Note: If you are using 64-bit guests, you need to enable hardware virtualization in the BIOS on your host system. Boot to your bios settings and find the virtualization or virtualization technology or hardware virtualization or VT-x or AMD-V option and Enable it. For reference see the below image.
First download and install the latest version Oracle VirtualBox from the above download link.

Install MX Linux:
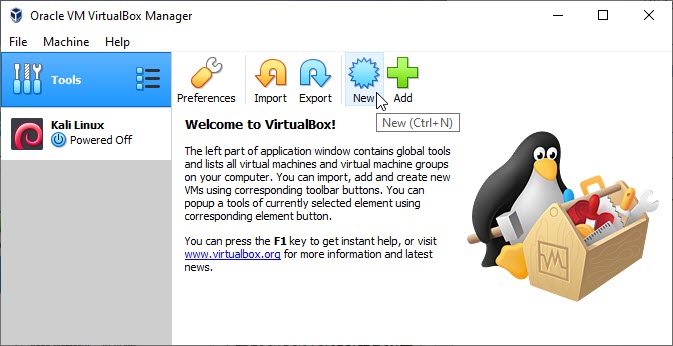
After the successful installation of Oracle VM VirtualBox, open it and click New to create a new virtual machine in your OS.
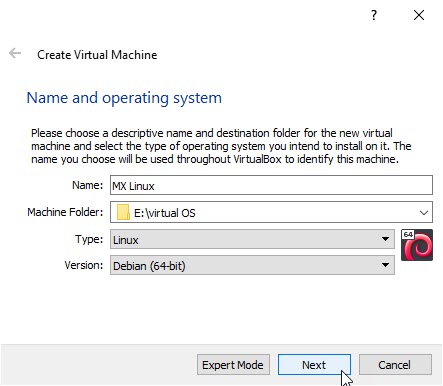
Name your MX Linux OS as MX Linux, then choose your Virtual machine path where you want to save the virtual OS. Select Linux as Type from the drop down and select Debian(64bit) as version and click Next button.
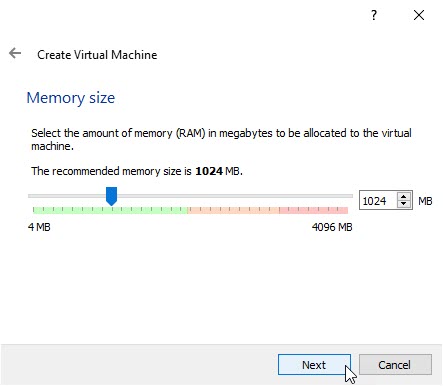
The minimum system requirements for MX Linux is 512 MB of RAM memory and recommended size is 2 GB Ram. So set 1024 MB or more than 2048 MB as RAM based on your system memory and click Next button. If you don’t have much memory just leave the option as default 1024 MB.
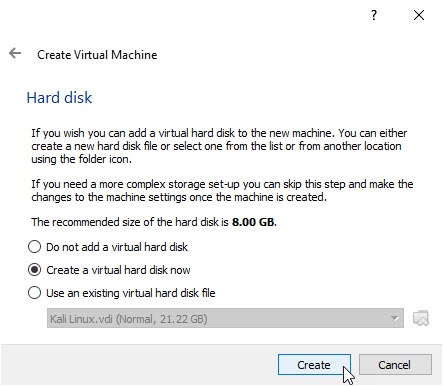
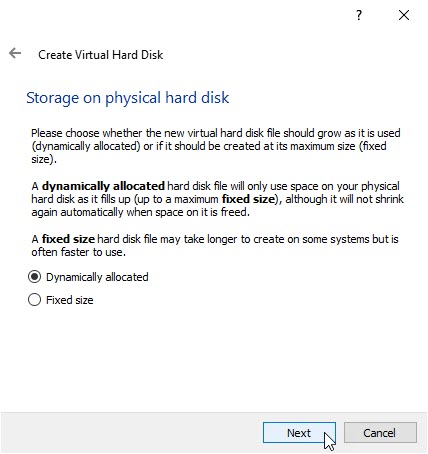
Select Create a virtual hard drive now option and click Create button. And then select VDI (VirtualBox Disk Image) and click Next button.

Select Dynamically allocated and click Next.
Also Read: How to Solve Your Port 80 is actually used by Microsoft IIS — Fix Apache not Running on WAMP
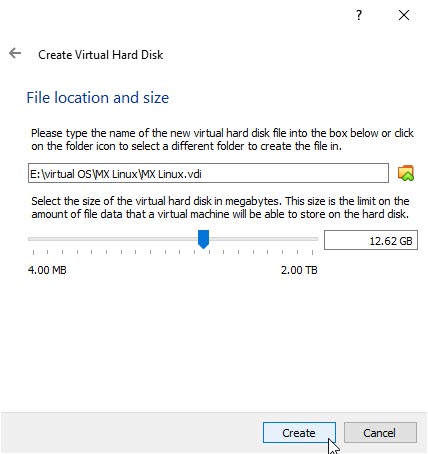
Type any name and select location of new virtual hard drive by clicking the folder icon. And select the size. Recommended size is a minimum of 12 GB of disk space for MX Linux. The good option is 20 GB and more. And then click create button. It will create MX Linux virtual hard drive on your system.
Now select MX Linux and click the settings button.
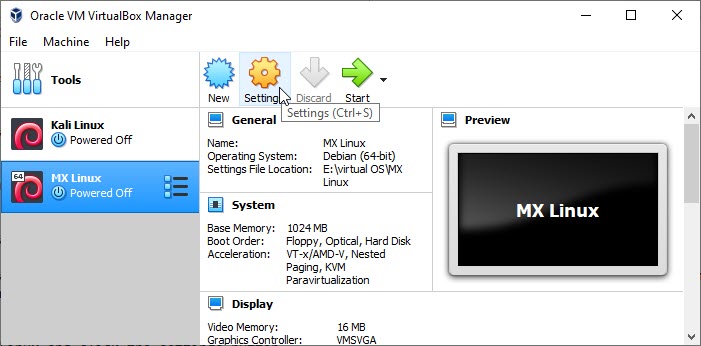
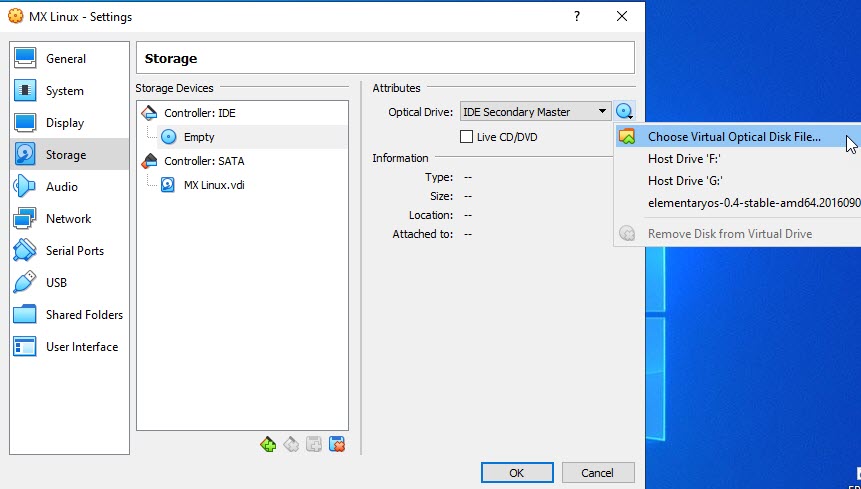
It will open the settings window. In this window select Storage from left sidebar menu and select Empty under Controller:IDE. Then click the CD icon under CD/DVD Drive and select choose a virtual CD/DVD disk file. And browse the downloaded MX linux ISO file that is MX-18.3_x64.iso file.
Then go to System tab from left sidebar menu and under Motherboard tab enable the Input/Output APIC. Then click the Acceleration tab and check/enable the hardware virtualization features VT-x/AMD-V and Nested paging . Then go to the Processor tab and enable/check the PAE/NX feature and click Ok button.
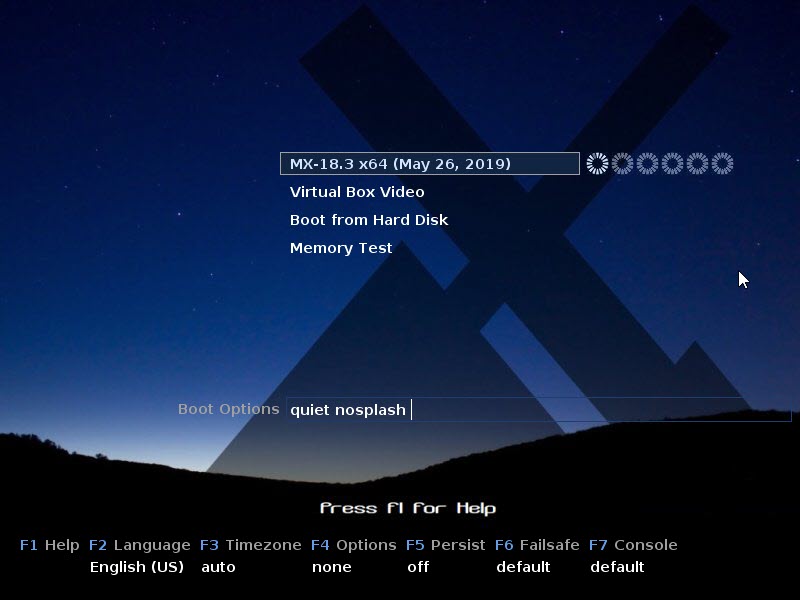
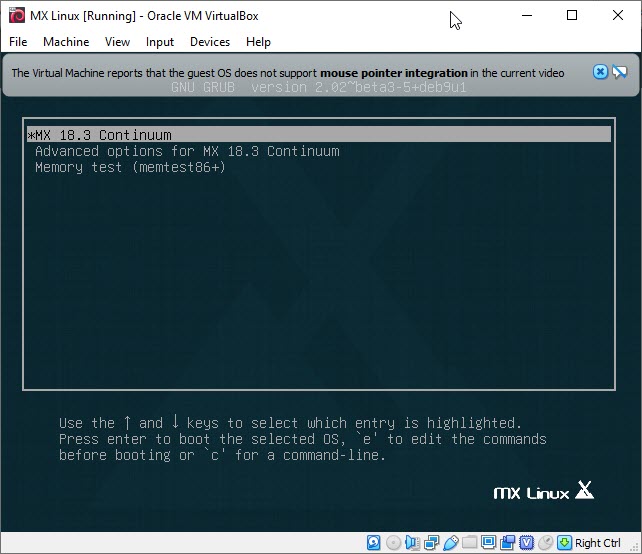
Select the MX linux from the left side menu and click the Start button. It will start the MX Linux boot menu select MX-18.3 to start MX Linux live MX Linux .
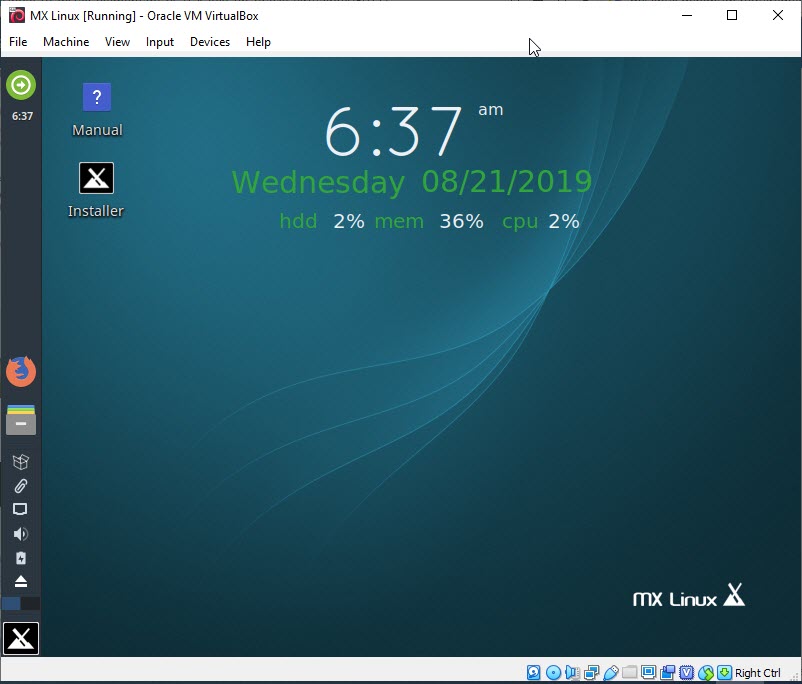
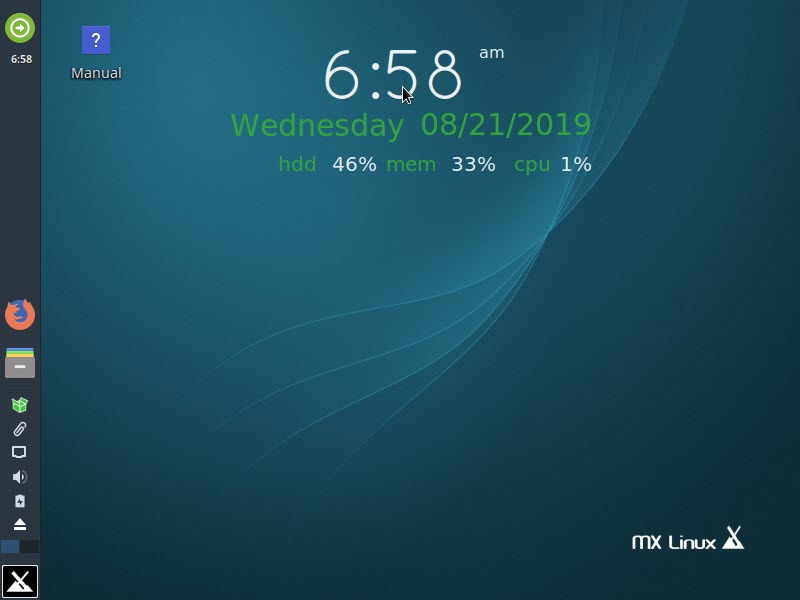
For the live MX Linux the default username and password is demo and root password is root. Just close this window and run the Installer from the desktop Installer icon to install MX Linux on your virtual machine.
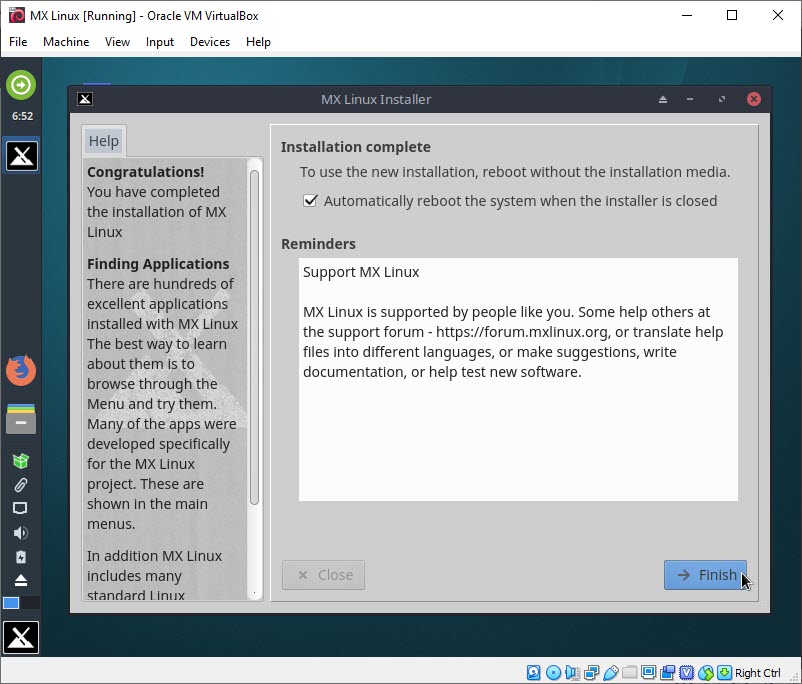
And complete the installation with your details and click the finish button in final step. It will reboot your MX linux. That’s all the MX Linux installation is complete.
If you liked this article, please subscribe to our YouTube Channel. You can also stay connected with us on Twitter and Facebook.