- Настройка виртуальных хостов Apache в Ubuntu 20.04
- Установка Apache
- Настройка межсетевого экрана
- Проверка доступности веб-сервера
- Настройка хостов
- Apache Virtual Hosting: IP Based and Name Based Virtual Hosts in RHEL/CentOS/Fedora
- Types of Virtual Host
- How to Setup IP Based and Name Based Apache Virtual Hosts
- Setup Name Based Virtual Host
- Hello, Welcome to www.example1.com.
- Hello, Welcome to www.example2.com.
- Setup IP Based Virtual Hosting Linux
- Reference Links
Настройка виртуальных хостов Apache в Ubuntu 20.04
Данное руководство поможет вам увидеть то, как происходит настройка виртуальных хостов Apache на серверах Ubuntu 20.04.
Для начала необходимо произвести установку и первоначальную настройку Apache на вашем VPS.
Установка Apache
Apache можно установить из стандартных репозиториев Ubuntu, поэтому для запуска установки зарегистрируйтесь в системе учётной записью, входящей в группу sudo , и наберите в командной строке:
$sudo apt update$sudo apt install apache2
Настройка межсетевого экрана
Перед запуском Apache следует произвести некоторые изменения в настройках брандмауэра на вашем сервере. В качестве упрощённого интерфейса для настройки межсетевого экрана в Ubuntu 20.04 как правило используется Uncomplicated Firewall или UFW.
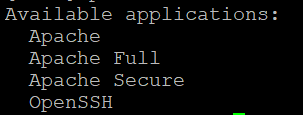
Для открытия доступа к серверу со стороны Apache, нужно выдать этому приложению разрешение на доступ, зарегистрировав его в UFW. Список знакомых утилите UFW приложений можно посмотреть командой:
Чтобы разрешить доступ только трафику без шифрования, вам нужно открыть на UFW только порт 80 или профиль ‘ Apache ‘:
Проверьте статус интерфейса UFW:
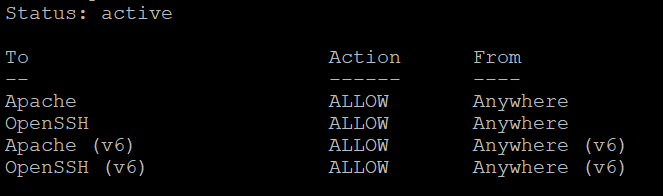
Если статус UFW – не активный, брандмауэр следует активировать:
Проверка доступности веб-сервера
Сейчас проверьте статус Apache:
$ sudo systemctl status apache2 
И теперь, если в браузере вы введёте IP-адрес вашего VPS, вы увидите стартовую страницу установленного веб-сервера:

Настройка хостов
И вот, настало время посмотреть, как непосредственно осуществляется настройка виртуальных хостов Apache в Ubuntu 20.04. В качестве домена используйте имя своего зарегистрированного сайта (в примере это – my-domain.host ). Учитывая это, необходимо произвести следующие действия:
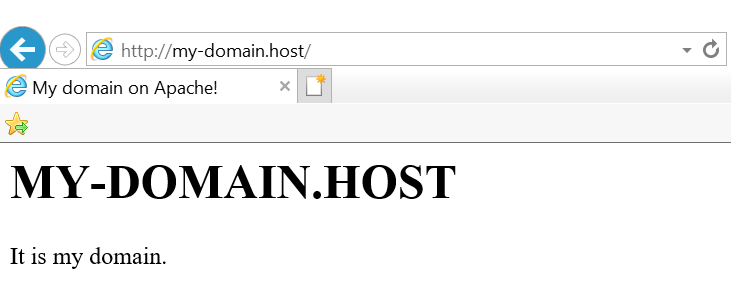
$ sudo mkdir /var/www/my-domain.host $ sudo chown -R $USER:$USER /var/www/my-domain.host $ sudo chmod -R 755 /var/www/my-domain.host $ sudo nano /var/www/my-domain.host/index.html MY-DOMAIN.HOST
It is my domain.
- Перед закрытием файла не забудьте сохранить внесённые изменения (если вы используете nano , нажмите Ctrl+X , Y и Enter ).
- Следующим действием необходимо создать файл конфигурации настраиваемого хоста:
$ sudo nano /etc/apache2/sites-available/my-domain.host.conf - Вставьте в него следующий текст (замените my-domain.host на имя своего домена, а в строку ServerAdmin введите доступный вам E-mail):
ServerAdmin mail@my-domain.host ServerName my-domain.host ServerAlias www.my-domain.host DocumentRoot /var/www/my-domain.host ErrorLog $/error.log CustomLog $/access.log combined Теперь созданный виртуальный хост необходимо активировать:
$ sudo a2ensite my-domain.host.conf А дефолтный домен нужно отключить:
$ sudo a2dissite 000-default.conf Теперь необходимо протестировать синтаксис конфигурации хоста:
$ sudo apache2ctl configtest 
Теперь произведите перезапуск Apache:
$ sudo systemctl restart apache2 И теперь, если в браузере вы введёте имя своего домена, браузер должен показать вам то, что вы сохранили в файле index.html :
Таким образом, вы произвели настройку хоста Apache на вашем VPS для одного из ваших сайтов. Вы вполне можете поместить на этот же сервер ещё один или даже несколько ваших доменов. Для чего необходимо ещё раз произвести действия, описанные в разделе “Настройка хостов”, но при этом, каждый раз вам нужно использовать уже другое доменное имя для добавления хоста Apache в систему.
Apache Virtual Hosting: IP Based and Name Based Virtual Hosts in RHEL/CentOS/Fedora
As we all are aware that Apache is a very powerful, highly flexible and configurable Web server for Nix OS. Here in this tutorial, we are going to discuss one more feature of Apache which allows us to host more than one website on a single Linux machine. Implementing virtual hosting with Apache web server can help you to save costs you are investing on your server maintenance and their administration.

Concept of Shared web hosting and Reseller web hosting is based on this facility of Apache only.
Types of Virtual Host
There are two types of virtual hosting is available with Apache.
Name Based Virtual Hosting
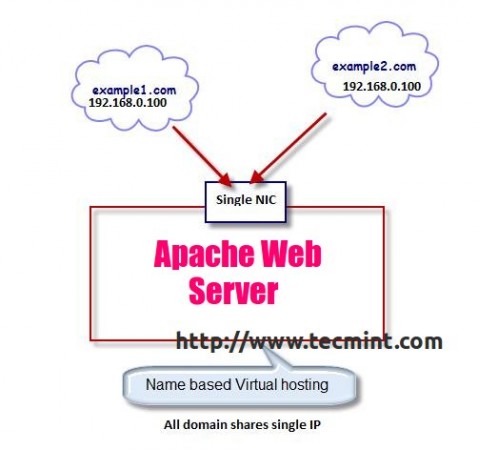
With the name based virtual hosting you can host several domains/websites on a single machine with a single IP. All domains on that server will be sharing a single IP. It’s easier to configure than IP based virtual hosting, you only need to configure DNS of the domain to map it with its correct IP address and then configure Apache to recognize it with the domain names.
IP Based Virtual Hosting
With the IP based virtual hosting, you can assign a separate IP for each domain on a single server, these IP’s can be attached to the server with single NIC cards and as well as multiple NICs.
Lets set up Name Based Virtual Hosting and IP based Virtual hosting in RHEL, CentOS and Fedora.
Testing Environment
How to Setup IP Based and Name Based Apache Virtual Hosts
Before setting up virtual hosting with Apache, your system must have Apache Web software installed. if not, install it using default package installer called yum.
Setup Name Based Virtual Host
But, before creating a virtual host, you need to create a directory where you will keep all your website’s files. So, create directories for these two virtual hosts under /var/www/html folder. Please remember /var/www/html will be your default Document Root in the Apache virtual configuration.
[[email protected] ~]# mkdir /var/www/html/example1.com/ [[email protected] ~]# mkdir /var/www/html/example2.com/
To set up Name based virtual hosting you must need to tell Apache to which IP you will be using to receive the Apache requests for all the websites or domain names. We can do this with NameVirtualHost directive. Open Apache main configuration file with VI editor.
Search for NameVirtualHost and uncomment this line by removing the # sign in front of it.
Next add the IP with possible in which you want to receive Apache requests. After the changes, your file should look like this:
NameVirtualHost 192.168.0.100:80
Now, it’s time to setup Virtual host sections for your domains, move to the bottom of the file by pressing Shift + G. Here in this example, We are setting up virtual host sections for two domains
Add the following two virtual directives at the bottom of the file. Save and close the file.
ServerAdmin [email protected] DocumentRoot /var/www/html/example1.com ServerName www.example1.com ErrorLog logs/www.example1.com-error_log CustomLog logs/www.example1.com-access_log common ServerAdmin [email protected] DocumentRoot /var/www/html/example2.com ServerName www.example2.com ErrorLog logs/www.example2.com-error_log CustomLog logs/www.example2.com-access_log common
You are free to add as many directives you want to add in your domains virtual host section. When you are done with changes in httpd.conf file, please check the syntax of files with following command.
It is recommended to check the syntax of the file after making some changes and before restarting the Web server because if any syntax goes wrong Apache will refuse to work with some errors and eventually affect your existing web server go down for a while. If syntax is OK. Please restart your Web server and add it to chkconfig to make your web server start in runlevel 3 and 5 at the boot time only.
[[email protected] ~]# service httpd restart Stopping httpd: [ OK ] Starting httpd: [ OK ]
[[email protected] ~]# chkconfig --level 35 httpd on
Now it’s time to create a test page called index.html add some content to the file so we will have something to check it, when the IP calls the virtual host.
[[email protected] ~]# vi /var/www/html/example1.com/index.html
Hello, Welcome to www.example1.com.
[[email protected] ~]# vi /var/www/html/example2.com/index.html
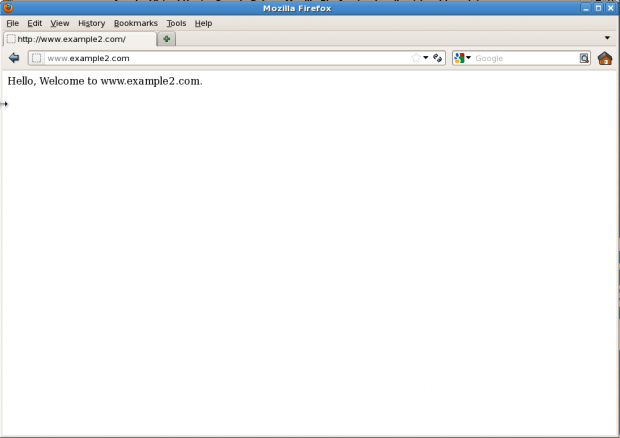
Hello, Welcome to www.example2.com.
Once you’re done with it, you can test the setup by accessing both the domains in a browser.
http://www.example1.com http://www.example2.com
Preview: www.example1.com

Preview: www.example2.com
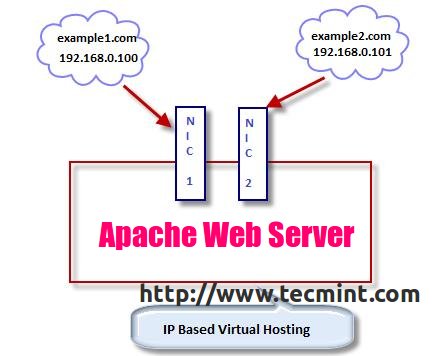
Setup IP Based Virtual Hosting Linux
To setup IP based virtual hosting, you must have more than one IP address/Port assigned to your server or your Linux machine.
It can be on a single NIC card , For example: eth0:1, eth0:2, eth0:3 … so forth. Multiple NIC cards can also be attached. If you don’t know how to create multiple IP’s on single NIC, follow the below guide, that will help you out in creating.
Purpose of implementing IP based virtual hosting is to assign implementing for each domain and that particular IP will not be used by any other domain.
This kind of set up required when a website is running with SSL certificate (mod_ssl) or on different ports and IPs. And You can also run multiple instances of Apache on a single machine. To check the IPs attached in your server, please check it using ifconfig command.
Sample Output
eth0 Link encap:Ethernet HWaddr 08:00:27:4C:EB:CE inet addr:192.168.0.100 Bcast:192.168.0.255 Mask:255.255.255.0 inet6 addr: fe80::a00:27ff:fe4c:ebce/64 Scope:Link UP BROADCAST RUNNING MULTICAST MTU:1500 Metric:1 RX packets:17550 errors:0 dropped:0 overruns:0 frame:0 TX packets:15120 errors:0 dropped:0 overruns:0 carrier:0 collisions:0 txqueuelen:1000 RX bytes:16565983 (15.7 MiB) TX bytes:2409604 (2.2 MiB) eth0:1 Link encap:Ethernet HWaddr 08:00:27:4C:EB:CE inet addr:192.168.0.101 Bcast:192.168.0.255 Mask:255.255.255.0 UP BROADCAST RUNNING MULTICAST MTU:1500 Metric:1 lo Link encap:Local Loopback inet addr:127.0.0.1 Mask:255.0.0.0 inet6 addr: ::1/128 Scope:Host UP LOOPBACK RUNNING MTU:16436 Metric:1 RX packets:1775 errors:0 dropped:0 overruns:0 frame:0 TX packets:1775 errors:0 dropped:0 overruns:0 carrier:0 collisions:0 txqueuelen:0 RX bytes:3416104 (3.2 MiB) TX bytes:3416104 (3.2 MiB)
As you can see in above output, two IPs 192.168.0.100 (eth0) and 192.168.0.101 (eth0:1) is attached to the server, both IPs are assigned to the same physical network device (eth0).
Now, assign a specific IP/Port to receive http requests, you can simply do it by changing Listen directive in httpd.conf file.
Search for word “Listen”, You find a section where the short description about Listen directive is written. In that section, comment the original line and write your own directive below that line.
# Listen 80 Listen 192.168.0.100:80
Now, create a Virtual host sections for both the domains. Go the bottom of the file and add the following virtual directives.
ServerAdmin [email protected] DocumentRoot /var/www/html/example1 ServerName www.example1.com ErrorLog logs/www.example1.com-error_log TransferLog logs/www.example1.com-access_log ServerAdmin [email protected] DocumentRoot /var/www/html/example2 ServerName www.example2.com ErrorLog logs/www.example2.com-error_log TransferLog logs/www.example2.com-access_log
Now, since you have modified main Apache conf file, you need to restart the http service like below.
[[email protected] ~]# service httpd restart Stopping httpd: [ OK ] Starting httpd: [ OK ]
Test your IP based Virtual hosting setup by accessing the URLs on web browser as shown below.
http://www.example1.com http://www.example2.com
That’s all with Apache virtual host today, If you’re looking to secure and harden your Apache configuration, then read our article that guides.
Reference Links
I’ll be again come with some other Apache tips and trick in my future articles, till then Stay Geeky and connected to Tecmint.com. Do not forget to leave your suggestions about the article in our comment section below.