- How to change mysql default data directory in Ubuntu
- How to Change a Default MySQL/MariaDB Data Directory in Linux
- Changing the default MySQL/MariaDB Data Directory
- Step 1: Identify Current MySQL Data Directory
- Step 2: Copy MySQL Data Directory to a New Location
- Step 3: Configure a New MySQL Data Directory
- Step 4: Set SELinux Security Context to Data Directory
- Step 5: Create MySQL Database to Confirm Data Directory
- A Comprehensive Guide to Changing the Default MySQL Data Directory on Ubuntu & Debian
- Step 1: Preparing the New Data Directory
- Step 2: Stop the MySQL Service
- Step 3: Copy the Existing Data to the New Directory
- Step 4: Update the MySQL Configuration
How to change mysql default data directory in Ubuntu
In this tutorial we will learn how to change the default path of mysql data directory.
The mysql server bydefault keep the data in /var/lib/mysql . If you want to change its path follow the given below steps.
Lets have an overview for changing mysql data directory method:
(1) Copy the new mysql directory to new location in server
(2) edit the my.cnf file and give new mysql data directory path
(3) edit /etc/apparmor.d/usr.sbin.mysqld file and add 2 lines for new mysql data directory.
(4) Restart the apparmor service
(5) Restart the mysql server service.
For reference purpose I will copy the /var/lib/mysql to /var/lib/mysqlnew .
Note:
(a) Inside /var/lib/mysql . the new database will be in directory with same name. for eg. If my database name is linuxdb then same name of directory you will find i.e /var/lib/mysql/linuxdb . Hence same databases should be exist in new mysql data dir.
(b) Given below are the important files that should be present in new mysql data dir.
ibdata1,ib_logfileN,mysql_upgrade_info,debian-5.5.flag
-rw-r–r– 1 mysql mysql 0 May 1 14:54 debian-5.5.flag
-rw-rw—- 1 mysql mysql 27262976 May 18 12:58 ibdata1
-rw-rw—- 1 mysql mysql 5242880 May 18 12:58 ib_logfile0
-rw-rw—- 1 mysql mysql 5242880 Mar 5 11:07 ib_logfile1
-rw-rw—- 1 mysql mysql 6 May 1 14:55 mysql_upgrade_info
(c) The ownership and group of entire /var/lib/mysql is mysql:mysql . Just as u can see in above box.
Now follow the given below steps to change mysql data directory
Step1: Copy the /var/lib/mysql to new name /var/lib/mysqlnew
cp -prvf /var/lib/mysql /var/lib/mysqlnew
check the ownsership and group of new dir mysqlnew. It should mysql:mysql
root@sharad-sapplica:/var/lib# ls -ld mysqlnew/
drwx—— 7 mysql mysql 4096 May 18 13:00 mysqlnew/
root@sharad-sapplica:/var/lib# ls -la mysqlnew/
total 36896
drwx—— 7 mysql mysql 4096 May 18 13:00 .
drwxr-xr-x 83 root root 4096 May 18 12:56 ..
-rw-r–r– 1 mysql mysql 0 May 1 14:54 debian-5.5.flag
-rw-rw—- 1 mysql mysql 27262976 May 17 19:31 ibdata1
-rw-rw—- 1 mysql mysql 5242880 May 18 13:00 ib_logfile0
-rw-rw—- 1 mysql mysql 5242880 Mar 5 11:07 ib_logfile1
drwx—— 2 mysql mysql 4096 May 1 14:55 mysql
-rw-rw—- 1 mysql mysql 6 May 1 14:55 mysql_upgrade_info
drwx—— 2 mysql mysql 4096 May 1 14:55 performance_schema
drwx—— 2 mysql mysql 4096 Mar 5 11:07 test
root@sharad-sapplica:/var/lib#
Step 2: Now edit my.cnf file
and change the value of datadir with new path of mysql data directory.
Then save and exit
vi /etc/mysql/my.cnf
#datadir = /var/lib/mysql
datadir = /var/lib/mysqlnew
Note: After doing step 2, if you try to restart the mysql service it will not start and give some error in /var/log/syslog .
For reference below is the syslog details.
# tail -3 /var/log/syslog
May 18 12:58:19 mypc kernel: [ 7780.046897] type=1400 audit(1368862099.538:51): apparmor=”STATUS” operation=”profile_replace” name=”/usr/sbin/mysqld” pid=8171 comm=”apparmor_parser”
May 18 12:58:19 mypc kernel: [ 7780.065904] type=1400 audit(1368862099.558:52): apparmor=”DENIED” operation=”mknod” parent=1 profile=”/usr/sbin/mysqld” name=”/var/lib/mysqlnew/mypc.lower-test” pid=8175 comm=”mysqld” requested_mask=”c” denied_mask=”c” fsuid=0 ouid=0
May 18 12:58:19 mypc kernel: [ 7780.065975] type=1400 audit(1368862099.558:53): apparmor=”DENIED” operation=”mknod” parent=1 profile=”/usr/sbin/mysqld” name=”/var/lib/mysqlnew/mypc.lower-test” pid=8175 comm=”mysqld” requested_mask=”c” denied_mask=”c” fsuid=0 ouid=0
May 18 12:58:19 mypc kernel: [ 7780.069767] type=1400 audit(1368862099.562:54): apparmor=”DENIED” operation=”open” parent=1 profile=”/usr/sbin/mysqld” name=”/var/lib/mysqlnew/mysql/plugin.frm” pid=8175 comm=”mysqld” requested_mask=”r” denied_mask=”r” fsuid=121 ouid=121
Step 3: After reading the syslog we get to know apparmor is denying the new configuration for mysql. To rectify this issue we will edit the file /etc/apparmor.d/usr.sbin.mysqld. And paste the new path of mysql data directory.
And restart the apparmor service.
# vi /etc/apparmor.d/usr.sbin.mysqld
/var/lib/mysql/ r,
/var/lib/mysql/** rwk,
/var/lib/mysqlnew/ r,
/var/lib/mysqlnew/** rwk,Note: I kept the 2 lines for /var/lib/mysql in file as it is.Only added new 2 lines.(see the Bolded 2 lines)
# /etc/init.d/apparmor restart
Step 4: Now restart the mysql service .And try to connect the mysql-server.
Note: Do not apply the steps directly in Live Production servers. First test the method in staging or test machines.
It depend upon the scenario on which you are working either you are copying the same data dir within same system or copying it from another server to new server.
The above given eg. is just for an reference.
How to Change a Default MySQL/MariaDB Data Directory in Linux
After installing the components of a LAMP stack on a CentOS/RHEL 7 server, there are a couple of things you may want to do.
Some of them have to do with increasing the security of the Apache and MySQL / MariaDB, while others may be applicable or not according to our setup or needs.
For example, based on the expected use of the database server, we may want to change the default data directory ( /var/lib/mysql ) to a different location. This is the case when such a directory is expected to grow due to high usage.
Otherwise, the filesystem where /var is stored may collapse at one point causing the entire system to fail. Another scenario where changing the default directory is when we have a dedicated network share that we want to use to store our actual data.
For this reason, in this article, we will explain how to change the default MySQL / MariaDB data directory to a different path on a CentOS/RHEL 7 server and Ubuntu/Debian distributions.
Although we will use MariaDB, the concepts explained and the steps taken in this article apply both to MySQL and to MariaDB unless noted otherwise.
Changing the default MySQL/MariaDB Data Directory
Note: We are going to assume that our new data directory is /mnt/mysql-data . It is important to note that this directory should be owned by mysql:mysql .
# mkdir /mnt/mysql-data # chown -R mysql:mysql /mnt/mysql-data
For your convenience, we’ve divided the process into 5 easy-to-follow steps:
Step 1: Identify Current MySQL Data Directory
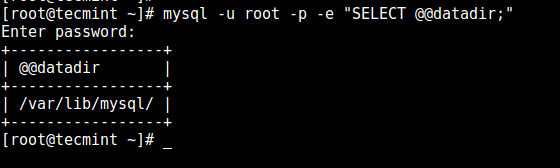
To begin, it is worthy and well to identify the current data directory using the following command. Do not just assume it is still /var/lib/mysql since it could have been changed in the past.
# mysql -u root -p -e "SELECT @@datadir;"
After you enter the MySQL password, the output should be similar to.
Step 2: Copy MySQL Data Directory to a New Location
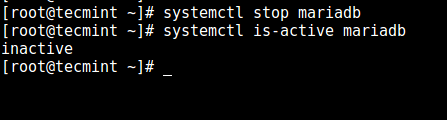
To avoid data corruption, stop the service if it is currently running before proceeding. Use the systemd well-known commands to do so:
------------- On SystemD ------------- # systemctl stop mariadb # systemctl is-active mariadb ------------- On SysVInit ------------- # service mysqld stop # service mysqld status OR # service mysql stop # service mysql status
If the service has been brought down, the output of the last command should be as follows:
Then copy recursively the contents of /var/lib/mysql to /mnt/mysql-data preserving original permissions and timestamps:
# cp -R -p /var/lib/mysql/* /mnt/mysql-data

Step 3: Configure a New MySQL Data Directory
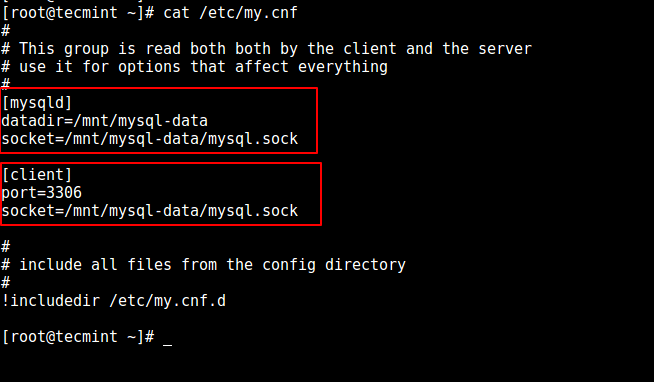
Edit the configuration file ( my.cnf ) to indicate the new data directory ( /mnt/mysql-data in this case).
# vi /etc/my.cnf OR # vi /etc/mysql/my.cnf
Locate the [mysqld] and [client] sections and make the following changes:
Under [mysqld]: datadir=/mnt/mysql-data socket=/mnt/mysql-data/mysql.sock Under [client]: port=3306 socket=/mnt/mysql-data/mysql.sock
Save the changes and then proceed with the next step.
Step 4: Set SELinux Security Context to Data Directory
This step is only applicable to RHEL/CentOS and its derivatives.
Add the SELinux security context to /mnt/mysql-data before restarting MariaDB.
# semanage fcontext -a -t mysqld_db_t "/mnt/mysql-data(/.*)?" # restorecon -R /mnt/mysql-data
Next restart the MySQL service.
------------- On SystemD ------------- # systemctl stop mariadb # systemctl is-active mariadb ------------- On SysVInit ------------- # service mysqld stop # service mysqld status OR # service mysql stop # service mysql status
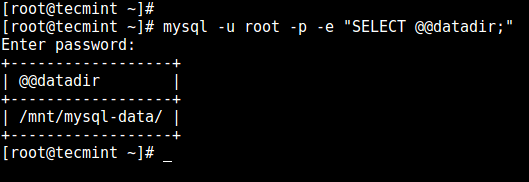
Now, use the same command as in Step 1 to verify the location of the new data directory:
# mysql -u root -p -e "SELECT @@datadir;"
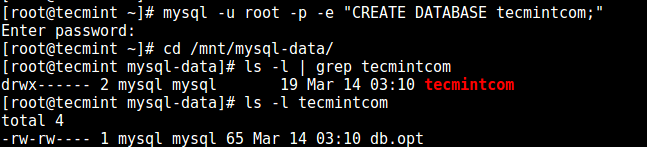
Step 5: Create MySQL Database to Confirm Data Directory
Login to MariaDB, create a new database and then check /mnt/mysql-data :
# mysql -u root -p -e "CREATE DATABASE tecmint;"
Congratulations! You have successfully changed the data directory for MySQL or MariaDB.
Summary
In this post, we have discussed how to change the data directory in a MySQL or MariaDB server running on CentOS/RHEL 7 and Ubuntu/Debian distributions.
Do you have any questions or comments about this article? Feel free to let us know using the form below – we are always glad to hear from you!
A Comprehensive Guide to Changing the Default MySQL Data Directory on Ubuntu & Debian
MySQL is a widely-used open-source relational database management system (RDBMS) that powers numerous web applications and services. By default, MySQL stores its data in a predefined directory on Ubuntu and Debian systems, which may not always be suitable for your requirements. For instance, you might want to move the data directory to another location for better performance, security, or to utilize a separate disk or partition.
In this comprehensive guide, we will walk you through the process of changing the default MySQL data directory on Ubuntu and Debian systems, ensuring a smooth transition with minimal downtime.
Step 1: Preparing the New Data Directory
The first step is to create a new directory where you want to store the MySQL data. Ensure that the new location has adequate storage space for your current and future data requirements. Create the new directory using the following command, replacing /disk2/mysql/data with your desired path:
sudo mkdir -p /disk2/mysql/data Next, set the ownership and permissions for the new directory to match those of the default MySQL data directory:
sudo chown -R mysql:mysql /disk2/mysql/datasudo chmod 750 /disk2/mysql/data
Step 2: Stop the MySQL Service
Before making any changes to the MySQL configuration, you must stop the MySQL service to avoid data corruption or loss. Use the following command to stop the service:
sudo systemctl stop mysql Step 3: Copy the Existing Data to the New Directory
Now that the MySQL service is stopped, it is safe to copy the existing data to the new directory. To preserve file permissions and ownership, use the rsync command:
sudo rsync -av /var/lib/mysql/ /disk2/mysql/data Replace /var/lib/mysql/ with the current MySQL data directory path if it differs on your system.
Step 4: Update the MySQL Configuration
To inform MySQL of the new data directory, you must update the configuration file. Open the MySQL configuration file (typically located at /etc/mysql/mysql.conf.d/mysqld.cnf on Ubuntu and /etc/mysql/mariadb.conf.d/50-server.cnf on Debian) using your preferred text editor:
sudo nano /etc/mysql/mysql.conf.d/mysqld.cnf Locate the [mysqld] section and update the datadir and socket options to point to the new directory: