- Introduction
- Installation
- Set up MySQL default password
- Create SQL Databases and tables
- User creation and privileges
- Eclipse
- Setting up the user to use JDBC
- Testing in Java
- JDBC and MySQL
- Installation
- Installing MySQL
- Installing JDBC
- Testing
- Creating the test database
- Creating the test program
- Running the program
- MySql JDBC Driver & How to Connect
- What is the JDBC URL?
- MySql JDBC Driver
- Solving Common Connectivity Issues
- Enable Remote Access on MySql Server
- MySql Installation Tips
- Connect to MySql using DbSchema
- The Coded One
- Share this:
- Like this:
- Related
- 26 Responses
Introduction
This document explains how to set up Java applications to communicate with the MySQL Database. This can be used either in Java development, or applications which use JDBC such as OpenOffice.Org. See Using MySQL, JDBC and OpenOffice for more information.
This document was written originally for 5.10, but has been updated for 6.06. Changes required for 5.10 are shown in italics
It has also been checked against 6.10 (Edgy Eft) and 7.04 (Feisty Fawn), which should be installed as for 6.06
Installation
Install mysql client, server and the jdbc connector, either via synaptic or by using the following
sudo apt-get install mysql-server sudo apt-get install mysql-client sudo apt-get install libmysql-java
On 5.10 you may need select «No configuration» for postfix if it is installed.
Set up MySQL default password
Set up the password for the root user as ‘root’ or whatever you want. The last entry is the password
mysqladmin -u root password root
Check you can connect to mysql
then enter the password you just set and press return again. In this case it would be «root».
Create SQL Databases and tables
Create databases and tables or whatever, so you have some data to work with. You can disconnect and use mysql-query-browser for this if you wish. For the sample code below just enter
create database emotherearth;
User creation and privileges
Create a user with access to that table. Replace the items in square brackets by the database name, and the chosen user and password. Don’t type in the square brackets !
grant all privileges on [database].* to [user]@localhost identified by "[password]"; flush privileges;
Note: Ubuntu 5.10 requires localhost.localdomain
This is required because when you connect using «mysql -u root -p» it connects directly to the Sql Server. The «grant» line creates access via 127.0.0.1 (localhost). This is no longer an issue on 6.10.
This will work only for the user you have just «granted», not for root. Counter-intuitively, the ‘default’ server and localhost/127.0.0.1 aren’t the same thing
Eclipse
For those who are using Eclipse, you will likely to have a ‘Class Not Found’ exception. To fix this, go to: Project, click Properties, select Java Build Path, and choose the Libraries tab. Then select ‘Add External JARs’, and find ‘/usr/share/java/mysql-connector-java.jar’.
Setting up the user to use JDBC
Add these two lines to /home/[user]/.bashrc. I am running Java 5 which doesn’t require the current directory to be on the Classpath ; I *think* Java 2 does, but I’m not going back to check it In that case you may need to have $CLASSPATH. /user/share/java/mysql.jar
CLASSPATH=$CLASSPATH:/usr/share/java/mysql.jar export CLASSPATH
Alternatively, you can set it for all users, by editing /etc/environment (use sudo — sudo vi /etc/environment)
CLASSPATH=".:/usr/share/java/mysql.jar"
Log out and Log in again. (If you only edited /home/[user]/.bashrc you don’t need to log out/in, only execute in a terminal «$source .bashrc» in your home dir). Start up a terminal and type:
It should print out something like «:/usr/share/java/mysql.jar»
Testing in Java
It should now work. Here is some typical code (clearing up removed for simplicity)
import java.sql.*; import java.util.Properties; public class DBDemo // The JDBC Connector Class. private static final String dbClassName = "com.mysql.jdbc.Driver"; // Connection string. emotherearth is the database the program // is connecting to. You can include user and password after this // by adding (say) ?user=paulr&password=paulr. Not recommended! private static final String CONNECTION = "jdbc:mysql://127.0.0.1/emotherearth"; public static void main(String[] args) throws ClassNotFoundException,SQLException System.out.println(dbClassName); // Class.forName(xxx) loads the jdbc classes and // creates a drivermanager class factory Class.forName(dbClassName); // Properties for user and password. Here the user and password are both 'paulr' Properties p = new Properties(); p.put("user","paulr"); p.put("password","paulr"); // Now try to connect Connection c = DriverManager.getConnection(CONNECTION,p); System.out.println("It works !"); c.close(); > > JDBCAndMySQL (последним исправлял пользователь 149 2010-04-20 13:28:19)
The material on this wiki is available under a free license, see Copyright / License for details
You can contribute to this wiki, see Wiki Guide for details
JDBC and MySQL
This document describes how to set up your Arch system so that MySQL databases can be accessed via Java programs.
Installation
Installing MySQL
To allow for network access, make sure that /etc/mysql/my.cnf has the following line commented out, as shown here:
Your MySQL version may use the following line instead to restrict network access:
Installing JDBC
Install a JDBC driver according to your MySQL variant:
Testing
To access MySQL’s command line tool, run:
Creating the test database
The following commands create a database test, and grant all privileges to user foo identified by password bar. Change the variables at your discretion.
create database test; grant all privileges on test.* to foo@localhost identified by "bar"; flush privileges;
Afterwards, use Ctrl + d to exit the command line tool.
Creating the test program
Use a text editor to create the file DBDemo.java with the following code in it. You will need to change the username and password accordingly.
import java.sql.*; public class DBDemo < public static void main(String[] args) throws SQLException, ClassNotFoundException < // Load the JDBC driver Class.forName("org.mariadb.jdbc.Driver"); System.out.println("Driver loaded"); // Try to connect Connection connection = DriverManager.getConnection ("jdbc:mariadb://localhost/test", "foo", "bar"); System.out.println("It works!"); connection.close(); > > If using Oracle MySQL (as opposed to MariaDB), the above class name should be set to com.mysql.jdbc.Driver .
Running the program
To compile and run the program (you will need jre-openjdk ), execute:
$ javac DBDemo.java $ java -classpath /usr/share/java/mariadb-jdbc/mariadb-java-client.jar:. DBDemo
If all was configured correctly, you should see:
MySql JDBC Driver & How to Connect
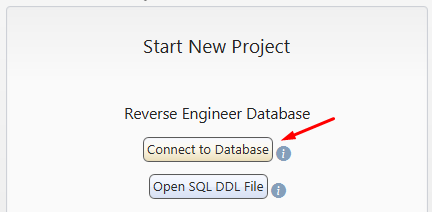
JDBC drivers are Java library files with the extension ‘.jar‘, used by Java applications to connect to the database. Usually they are provided by the same company which developed the database software. DbSchema is an MySql Client which already includes the MySql JDBC driver. DbSchema can configure the MySql JDBC URL and test the connectivity.
What is the JDBC URL?
The URL is a string (text) with a specific format containing information about the host where the database is running, the port, username, database name, etc. The URL format is specific to each driver. Any wrong character in the URL may make the database connectivity fail. Therefore we recommend installing DbSchema and try to get connected, and you will find the JDBC URL in the connection dialog.
MySql JDBC Driver
- Required File(s): mysql-connector-java-nn-bin.jar
- Java Driver Class: com.mysql.jdbc.Driver
- URL: jdbc:mysql://HOST[:PORT][/DB]
- Website: MySQL
Solving Common Connectivity Issues
Enable Remote Access on MySql Server
- On the server type in the command prompt or terminal mysql -u root -p The mysql console should start.
- List the databases using show databases
- View the configured grants using select * from db;
- Enable remote access for a user foo using GRANT ALL ON foo.* TO bar@’202.54.10.20′ IDENTIFIED BY ‘PASSWORD’; Here you have to edit the user ( put your user instead of foo ), the IP of the client machine and the root password.
MySql Installation Tips
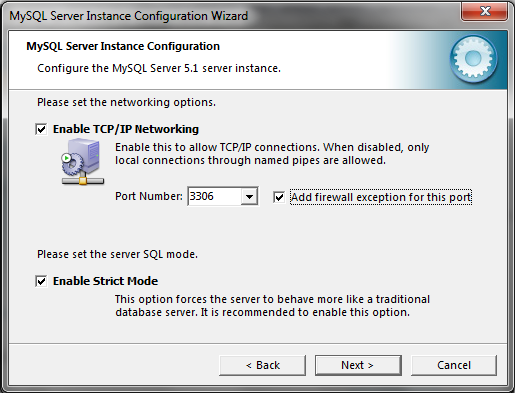
Install MySql from http://www.mysql.com. During installation go for a detailed install, and when you are prompted for the user password check the ‘Enable root access from remote machines’. Enabling this you will be allowed to connect to MySql from another computer. Remember the password you set here, it will be requested when connecting to the database as user root.
Connect to MySql using DbSchema
DbSchema is using JDBC Drivers to connect to the database. Installing the application you can easy set up a connection. DbSchema will build the JDBC URL for you.
- 1 Download DbSchema. DbSchema has a free community edition. No email or registration is required.
- 2 Choose to connect to the database, and choose MySql.

- 3 At this point, DbSchema already downloads the JDBC driver into this folders:
- C:\Users\YourUser\.DbSchema\drivers\MySql (Windows) or
- /Users/YourUser/.DbSchema/drivers/MySql (Linux and MacOS).
 At this point, DbSchema already downloads the JDBC driver into this folders:
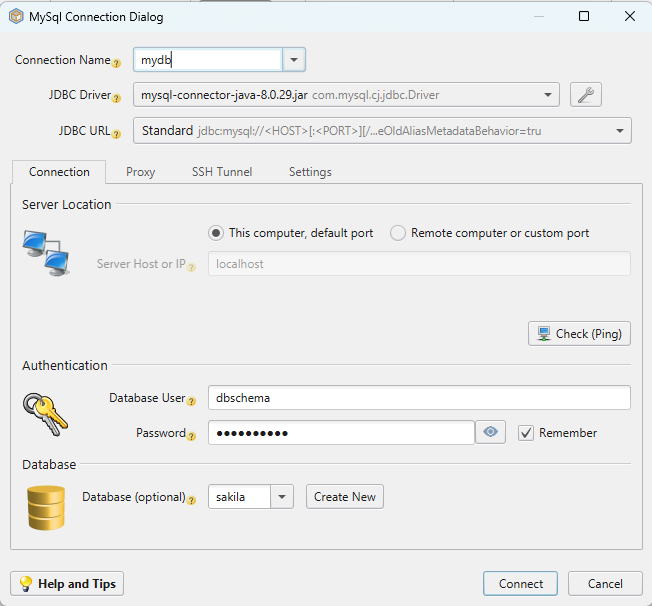
 In the Connection Dialog, select the driver and the JDBC URL template. For databases using multiple possibilities to connect, may exists multiple templates. Choose if the database is running on the current machine or a different port. If is running on a different machine (remote), you need to find the host name. Hover the Host info label using the mouse to get instructions.
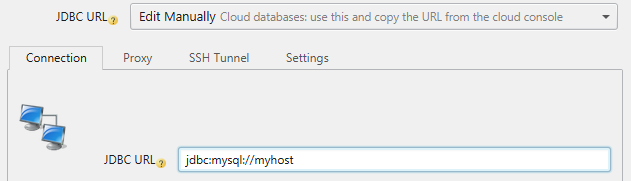 In the URL combo there is an option to ‘Manually Edit the URL’. Select this option to see the generated JDBC URL.
 After connecting, DbSchema will create the first diagrams (layouts). Double-click any table header or column to edit.
 Activate the SQL Editor from the menu to edit and execute queries. For a detailed list of features, please read the DbSchema Quick Tour.
The Coded One
Assuming that you already have MySQL installed, the next step is to install the connector driver. You can do this easily on the CLI by using the following command:
sudo apt-get install libmysql-java
The next step is to make sure that the classpath is set. You can have this set automatically by adding this command to you bashrc file.
If you want to set this for all users, you should modify the /etc/environment instead.
For those using Eclipse, you can also do this by going through the following steps:
- Select Project Properties > Java Build Path
- Select Libries tab
- Click Add External Jars
- Choose the jar file, in this case mysql-connector-java.java
Once you’re done, you can test the connection using the following snippet:
import java.sql.Connection; import java.sql.DriverManager; class JDBCTest < private static final String url = "jdbc:mysql://localhost"; private static final String user = "username"; private static final String password = "password"; public static void main(String args[]) < try < Connection con = DriverManager.getConnection(url, user, password); System.out.println("Success"); >catch (Exception e) < e.printStackTrace(); >> > Share this:
Like this:
Related
26 Responses
Subscribe to comments with RSS.
could you show me the way to set this class path in steps:
export CLASSPATH=$CLASSPATH:/usr/share/java/mysql-connector-java.jar
Your code was giving me an SQL exception.
This is what worked for me.. import java.sql.Connection;
import java.sql.DriverManager; class JDBCTest < private static final String url = “jdbc:mysql://localhost”; private static final String user = “root”; private static final String password = “vision$23”; public static void main(String args[]) try Class.forName(“com.mysql.jdbc.Driver”);
Connection con = DriverManager.getConnection(url, user, password);
System.out.println(“Success”); > catch (Exception e) e.printStackTrace();
>
>
>
im also getting d following exception after trying the code : java.sql.SQLException: Access denied for user ‘root’@’localhost’ (using password: YES)
at com.mysql.jdbc.SQLError.createSQLException(SQLError.java:1073)
at com.mysql.jdbc.MysqlIO.checkErrorPacket(MysqlIO.java:3593)
at com.mysql.jdbc.MysqlIO.checkErrorPacket(MysqlIO.java:3525)
at com.mysql.jdbc.MysqlIO.checkErrorPacket(MysqlIO.java:931)
at com.mysql.jdbc.MysqlIO.secureAuth411(MysqlIO.java:4031)
at com.mysql.jdbc.MysqlIO.doHandshake(MysqlIO.java:1296)
at com.mysql.jdbc.ConnectionImpl.coreConnect(ConnectionImpl.java:2338)
at com.mysql.jdbc.ConnectionImpl.connectOneTryOnly(ConnectionImpl.java:2371)
at com.mysql.jdbc.ConnectionImpl.createNewIO(ConnectionImpl.java:2163)
at com.mysql.jdbc.ConnectionImpl.(ConnectionImpl.java:794)
at com.mysql.jdbc.JDBC4Connection.(JDBC4Connection.java:47)
at sun.reflect.NativeConstructorAccessorImpl.newInstance0(Native Method)
at sun.reflect.NativeConstructorAccessorImpl.newInstance(NativeConstructorAccessorImpl.java:57)
at sun.reflect.DelegatingConstructorAccessorImpl.newInstance(DelegatingConstructorAccessorImpl.java:45)
at java.lang.reflect.Constructor.newInstance(Constructor.java:532)
at com.mysql.jdbc.Util.handleNewInstance(Util.java:407)
at com.mysql.jdbc.ConnectionImpl.getInstance(ConnectionImpl.java:378)
at com.mysql.jdbc.NonRegisteringDriver.connect(NonRegisteringDriver.java:305)
at java.sql.DriverManager.getConnection(DriverManager.java:620)
at java.sql.DriverManager.getConnection(DriverManager.java:200)
at JDBCTest.main(JDBCTest.java:14) i changed d username and password.. it didnt work!