- На badblock из linux
- NAME
- SYNOPSIS
- DESCRIPTION
- OPTIONS
- WARNING
- AUTHOR
- AVAILABILITY
- SEE ALSO
- Проверка HDD/SSD/USB flash на бэд-блоки на Linux.
- Проверка HDD на бэд-блоки программой badblocks.
- Проверка HDD на бэд-блоки на Linux с помощью smartmontools
- Проверка HDD на бэд-блоки на Linux с помощью GParted
- Safecopy
- RSS
На badblock из linux
NAME
badblocks - search a device for bad blocks
SYNOPSIS
badblocks [ -svwnfBX ] [ -b block_size ] [ -c blocks_at_once ] [ -d read_delay_factor ] [ -e max_bad_blocks ] [ -i input_file ] [ -o output_file ] [ -p num_passes ] [ -t test_pattern ] device [ last_block ] [ first_block ]
DESCRIPTION
badblocks is used to search for bad blocks on a device (usually a disk partition). device is the special file corresponding to the device (e.g /dev/hdc1). last_block is the last block to be checked; if it is not specified, the last block on the device is used as a default. first_block is an optional parameter specifying the starting block number for the test, which allows the testing to start in the middle of the disk. If it is not specified the first block on the disk is used as a default. Important note: If the output of badblocks is going to be fed to the e2fsck or mke2fs programs, it is important that the block size is properly specified, since the block numbers which are generated are very dependent on the block size in use by the file system. For this reason, it is strongly recommended that users not run badblocks directly, but rather use the -c option of the e2fsck and mke2fs programs.
OPTIONS
-b block_size Specify the size of blocks in bytes. The default is 1024. -c number of blocks is the number of blocks which are tested at a time. The default is 64. -d read delay factor This parameter, if passed and non-zero, will cause bad blocks to sleep between reads if there were no errors encountered in the read operation; the delay will be calculated as a percentage of the time it took for the read operation to be performed. In other words, a value of 100 will cause each read to be delayed by the amount the previous read took, and a value of 200 by twice the amount. -e max bad block count Specify a maximum number of bad blocks before aborting the test. The default is 0, meaning the test will continue until the end of the test range is reached. -f Normally, badblocks will refuse to do a read/write or a non-destructive test on a device which is mounted, since either can cause the system to potentially crash and/or damage the file system even if it is mounted read-only. This can be overridden using the -f flag, but should almost never be used --- if you think you're smarter than the badblocks program, you almost certainly aren't. The only time when this option might be safe to use is if the /etc/mtab file is incorrect, and the device really isn't mounted. -i input_file Read a list of already existing known bad blocks. Badblocks will skip testing these blocks since they are known to be bad. If input_file is specified as "-", the list will be read from the standard input. Blocks listed in this list will be omitted from the list of new bad blocks produced on the standard output or in the output file. The -b option of dumpe2fs(8) can be used to retrieve the list of blocks currently marked bad on an existing file system, in a format suitable for use with this option. -n Use non-destructive read-write mode. By default only a non-destructive read-only test is done. This option must not be combined with the -w option, as they are mutually exclusive. -o output_file Write the list of bad blocks to the specified file. Without this option, badblocks displays the list on its standard output. The format of this file is suitable for use by the -l option in e2fsck(8) or mke2fs(8). -p num_passes Repeat scanning the disk until there are no new blocks discovered in num_passes consecutive scans of the disk. Default is 0, meaning badblocks will exit after the first pass. -s Show the progress of the scan by writing out rough percentage completion of the current badblocks pass over the disk. Note that badblocks may do multiple test passes over the disk, in particular if the -p or -w option is requested by the user. -t test_pattern Specify a test pattern to be read (and written) to disk blocks. The test_pattern may either be a numeric value between 0 and ULONG_MAX-1 inclusive, or the word "random", which specifies that the block should be filled with a random bit pattern. For read/write (-w) and non-destructive (-n) modes, one or more test patterns may be specified by specifying the -t option for each test pattern desired. For read-only mode only a single pattern may be specified and it may not be "random". Read-only testing with a pattern assumes that the specified pattern has previously been written to the disk - if not, large numbers of blocks will fail verification. If multiple patterns are specified then all blocks will be tested with one pattern before proceeding to the next pattern. -v Verbose mode. Will write the number of read errors, write errors and data- corruptions to stderr. -w Use write-mode test. With this option, badblocks scans for bad blocks by writing some patterns (0xaa, 0x55, 0xff, 0x00) on every block of the device, reading every block and comparing the contents. This option may not be combined with the -n option, as they are mutually exclusive. -B Use buffered I/O and do not use Direct I/O, even if it is available. -X Internal flag only to be used by e2fsck(8) and mke2fs(8). It bypasses the exclusive mode in-use device safety check.
WARNING
Never use the -w option on a device containing an existing file system. This option erases data! If you want to do write-mode testing on an existing file system, use the -n option instead. It is slower, but it will preserve your data. The -e option will cause badblocks to output a possibly incomplete list of bad blocks. Therefore it is recommended to use it only when one wants to know if there are any bad blocks at all on the device, and not when the list of bad blocks is wanted.
AUTHOR
badblocks was written by Remy Card Remy.Card@linux.org>. Current maintainer is Theodore Ts'o tytso@alum.mit.edu>. Non-destructive read/write test implemented by David Beattie dbeattie@softhome.net>.
AVAILABILITY
SEE ALSO
Проверка HDD/SSD/USB flash на бэд-блоки на Linux.
Сегодня в статье рассмотрим, как в Linux проверить ваш HDD,SSD или USB флешку на битые сектора – Бэд-блоки.
Бэд-блок (англ. bad block) — испорченный кластер (единица хранения данных) дискового носителя информации, куда нельзя записать информацию.
Проверка HDD на бэд-блоки программой badblocks.
Badblocks — стандартная утилита Linux для проверки на битые секторы. Она устанавливается по-умолчанию практически в любой дистрибутив и с ее помощью можно проверить как жесткий диск, так и внешний накопитель.
Но для начала воспользуемся ещё одной стандартной утилитой для просмотра подключенных накопители к нашей системе — fdisk.
- -l – показать список разделов и выйти.
Теперь, когда мы знаем, какие разделы у нас есть, мы можем проверить их на битые секторы программой badblocks:
sudo badblocks -sv /dev/sda1 > ~/badblocks.txt- -v — вывод подробной информации о результатах проверки.
- -s — отображать в правильном порядке ход проверки блоков.
- /dev/sda1 — раздел, который мы хотим проверить на битые секторы.
- > ~/badblocks.txt — выводим результат выполнения команды в файл badblocks.txt расположенный в корневом каталоги пользователя.
Если же в результате были найдены битые секторы, то нам надо дать указание операционной системе не записывать в них информацию в будущем. Для этого нам понадобятся утилиты Linux для работы с файловыми системами:
- e2fsck. Если мы будем исправлять раздел с файловыми система Linux ( ext2,ext3,ext4).
- fsck. Если мы будем исправлять файловую систему, отличную от ext.
sudo e2fsck -l ~/badblocks.txt /dev/sda1 Или, если у нас файловая система не ext:
sudo fsck -l ~/badblocks.txt /dev/sda1 Если после ввода данных команд вы получаете что-то вроде этого:
Значит данные операции надо выполнить в командной строке до загрузки операционной системы. Для этого выполним следующее:
sudo nano /etc/network/interfacesВ конце файла дописываем следующие строки:
pre-up e2fsck -l ~/badblocks.txt /dev/sda1Проверка HDD на бэд-блоки на Linux с помощью smartmontools
Теперь давайте рассмотрим более современный и надежный способ проверить диск на битые секторы linux. Современные накопители ATA/SATA ,SCSI/SAS,SSD имеют встроенную систему самоконтроля S.M.A.R.T (Self-Monitoring, Analysis and Reporting Technology, Технология самоконтроля, анализа и отчетности), которая производит мониторинг параметров накопителя и поможет определить ухудшение параметров работы накопителя на ранних стадиях. Для работы со S.M.A.R.T в Linux есть утилита smartmontools.
Давайте сначала ее установим. Если ваш дистрибутив основан на Debian\Ubuntu, то вводите:
sudo apt install smartmontoolsЕсли же у Вас дистрибутив на основе RHEL\CentOS, то вводите:
sudo yum install smartmontoolsТеперь, когда мы установили smartmontools мы можем посмотреть страницу помощи, с помощью команды:
Давайте перейдем к работе с утилитой. Вводим следующую команду с параметром -H,чтобы утилита показала нам информацию о состоянии накопителя:
Как видим, проверка диска на битые секторы linux завершена и утилита говорит нам, что с накопителем все в порядке!
Ещё одна команда, если SMART поддерживается, то добавляем -s. Если он не поддерживается или уже включён, то этот аргумент можно убрать.
sudo smartctl -s on -a /dev/sdaДополнительно, можно указать следующие параметры -a или –all, чтобы получить еще больше информации о накопителе, или -x и –xall, чтобы просмотреть информацию в том числе и об остальных параметрах накопителя.
Проверка HDD на бэд-блоки на Linux с помощью GParted
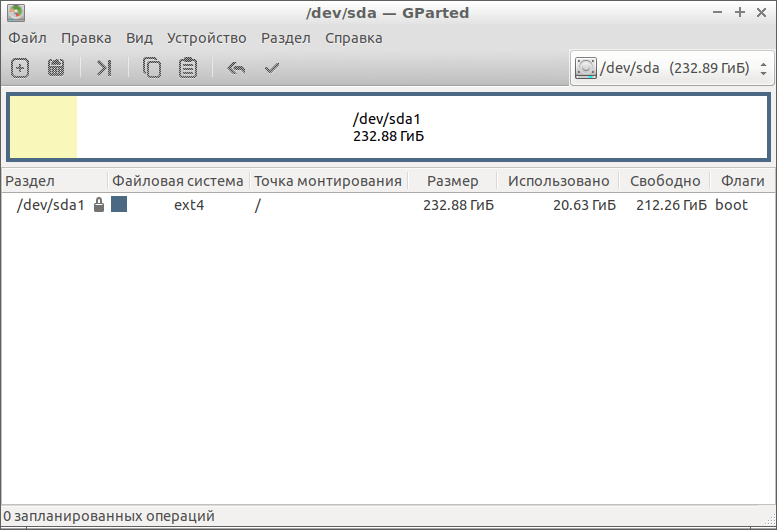
GParted как раз для тех, кому текстовый интерфейс не по душе. Утилита выполняет большое количество задач, связанных с работой HDD на Ubuntu и всех Debian-подобных системах. В их число входит и проверка диска на ошибки.
Для начала нам нужно скачать и установить GParted. Вводим следующую команду, чтобы выполнить загрузку из официальных репозиториев:
- Открываем приложение. На главном экране сразу же выводятся все носители. Если какой-то из них помечен восклицательным знаком, значит, с ним уже что-то не так.
- Щёлкаем по тому диску, который хотим проверить.
- Жмём на кнопку «Разделы», расположенную сверху.
- Выбираем «Проверка на ошибки».
Программа отсканирует диск. В зависимости от его объёма процесс может занять продолжительное время. После сканирования Вы будете оповещены о его результатах.
Safecopy
Это уже та программа, которую впору использовать на тонущем судне. Если мы осведомлены, что с нашим диском что-то не так, и нацелены спасти как можно больше выживших файлов, то Safecopy придёт на помощь. Её задача как раз заключается в копировании данных с повреждённых носителей. Причём она извлекает файлы даже из битых блоков.
sudo apt install safecopyПереносим файлы из одной директории в другую. Выбрать можно любую другую. В данном случае мы переносим данные с диска sda в папку home.
sudo safecopy /dev/sda /home/Если есть вопросы, то пишем в комментариях.
Также можете вступить в Телеграм канал, ВКонтакте или подписаться на Twitter. Ссылки в шапке страницы.
Заранее всем спасибо.
RSS
Добавление RSS-ленты на главную страницу этого сайта не поддерживается, так как это может привести к зацикливанию, замедляющему работу вашего сайта. Попробуйте использовать другой блок, например блок Последние записи, для отображения записей сайта.
Если вы нашли ошибку, пожалуйста, выделите фрагмент текста и нажмите Ctrl+Enter.
В этой статье поговорим о том как записать iso-образ какой либо операционной системы из терминала Linux дистрибутива. Для Linux на Читать
Что такое SSD, в чём его отличие от HDD, на что стоит обратить внимание при выборе SSD накопителя и как Читать
Уникальный идентификатор компьютера в сети, построенной на базе стека TCP/IP. Сетевые устройства взаимодействуют друг с другом, используя его. На данный момент применяется Читать
Как быстр ваш USB? Как быстр ваш SSD-накопитель? Это очень распространенный вопрос. Я собрал и скомпилировал несколько тестов, которые помогут Читать


