- Linux OS Service ‘named’
- Service Control
- Configuration
- How to Add a Local DNS Entry on Linux
- Domain Name System (DNS) Server
- Prerequisites
- How to Add a Local DNS Entry on Linux
- 1. Check the DNS Order in Name Service Switch
- 2. Add New Name Server in Linux
- 3. Configure /etc/hosts File in Linux to Add a Local DNS Entry
- 4. Test the Static Hosts in Linux
- How to Add a Local DNS Entry on Linux Using Network Manager (Permanent Solution)
- 1. Add Local DNS Configurations
- 2. Restart Network Manager Service
- 3. Prevent Network Manager From Modifying Files
- Final Thoughts
Linux OS Service ‘named’
The named service executes the DNS (Dynamic Name Service) server daemon. It converts host names to IP addresses and vice versa. There are several different kinds of DNS servers, such as primary server, slave server and cached server etc. Its data is stored in the directory /var/named.
The Domain Name System (DNS) is the hierarchical, distributed database. It stores information for mapping Internet host names to IP addresses and vice versa, mail routing information, and other data used by Internet applications.
The data stored in the DNS is identified by domain names that are organized as a tree according to organizational or administrative boundaries. Each node of the tree, called a domain, is given a label. The domain name of the node is the concatenation of all the labels on the path from the node to the root node. This is represented in written form as a string of labels listed from right to left and separated by dots. A label need only be unique within its parent domain.
For administrative purposes, the name space is partitioned into areas called zones, each starting at a node and extending down to the leaf nodes or to nodes where other zones start. The data for each zone is stored in a name server, which answers queries about the zone using the DNS protocol
Clients look up information in the DNS by calling a resolver library, which sends queries to one or more name servers and interprets the responses. The BIND 9 software distribution contains both a name server and a resolver library. This service is not usually used on a server because most servers are not designated to be DNS servers. An organisation typically only implements a small number of DNS servers. For DNS client use, just configure /etc/resolve.conf – this daemon is not needed for DNS clients.
Service Control
This service is handled by init.d script /etc/init.d/named. Its usage is as follows:
# /sbin/service named Usage: /etc/init.d/named
Start the service as follows:
# /sbin/service named start Starting named: [ OK ]
Stop the service as follows:
# /sbin/service named stop Stopping named: [ OK ]
Check if the serivce is started or stopped:
Restart the service like this:
# /sbin/service named restart Stopping named: [ OK ] Starting named: [ OK ]
If the service is started, then restart it; otherwise do nothing.
# /sbin/service named condrestart Stopping named: [ OK ] Starting named: [ OK ]
# /sbin/service named reload Reloading named: [ OK ]
Probe the service status using /usr/sbin/rndc command
# service named probe start
Query runlevel information for the service:
# /sbin/chkconfig --list named named 0:off 1:off 2:off 3:off 4:off 5:off 6:off
Configuration
The named service is complex to describe in detail here. /etc/named.conf is the configuration file for named. Statements are enclosed in braces and terminated with a semi-colon. Clauses in the statements are also semi-colon terminated. Below is an example named.conf file.
# cat /etc/named.conf // // named.conf // // Provided by Red Hat bind package to configure the ISC BIND named(8) DNS // server as a caching only nameserver (as a localhost DNS resolver only). // // See /usr/share/doc/bind*/sample/ for example named configuration files. // // See the BIND Administrator's Reference Manual (ARM) for details about the // configuration located in /usr/share/doc/bind-/Bv9ARM.html options < listen-on port 53 < 127.0.0.1; >; listen-on-v6 port 53 < ::1; >; directory "/var/named"; dump-file "/var/named/data/cache_dump.db"; statistics-file "/var/named/data/named_stats.txt"; memstatistics-file "/var/named/data/named_mem_stats.txt"; allow-query < localhost; >; /* - If you are building an AUTHORITATIVE DNS server, do NOT enable recursion. - If you are building a RECURSIVE (caching) DNS server, you need to enable recursion. - If your recursive DNS server has a public IP address, you MUST enable access control to limit queries to your legitimate users. Failing to do so will cause your server to become part of large scale DNS amplification attacks. Implementing BCP38 within your network would greatly reduce such attack surface */ recursion yes; dnssec-enable yes; dnssec-validation yes; /* Path to ISC DLV key */ bindkeys-file "/etc/named.iscdlv.key"; managed-keys-directory "/var/named/dynamic"; pid-file "/run/named/named.pid"; session-keyfile "/run/named/session.key"; >; logging < channel default_debug < file "data/named.run"; severity dynamic; >; >; zone "." IN < type hint; file "named.ca"; >; include "/etc/named.rfc1912.zones"; include "/etc/named.root.key";
How to Add a Local DNS Entry on Linux

In this guide, we’ll cover how to add a local DNS entry on Linux machines. Find out how you can do the same.
Domain Name System (DNS) Server
Domain Name System (DNS) is a decentralized naming service that translates domain URLs into IP addresses on the internet and intranet. In addition, a system that provides this dedicated service is called a DNS server.
You can add local entries in the DNS server when testing websites before taking them live. Also, the configuration files are stored in /etc/hosts on your local system, and you can edit those files to point to the local DNS. Also, local DNS entries help in resolving naming conflicts before launching the websites.
Prerequisites
For this article, we’ll use:
- A Linux machine with sudo access
- Configuration files in /etc/hosts
- A domain name, hostname, and static IP address.
How to Add a Local DNS Entry on Linux
In this article, we’ll look at how you can set a local DNS entry on a Linux machine. You can perform this step to test websites before taking them live.
We’ll add a local DNS entry using the non-permanent solution in this section. This means the configuration will be gone once the DHCP server is reset. The local DNS entry won’t exist in the configuration file if the system reconnects to the network, the network service is restarted, or the machine is rebooted. So, let’s get started!
1. Check the DNS Order in Name Service Switch
In Linux, there is an essential file that provides Name Service Switch functionality. Its configurations are in /etc/nsswitch.conf . The Name Service Switch functionality controls the order of execution of DNS and the domain lookup process.
If the domain lookup process is before the DNS, then it will query the /etc/hosts first. However, if the DNA is before the files, then the service will consult DNS first. For this guide, we want to query the files service first. To check this, first, open the terminal by pressing “Ctrl + Alt + T”. After that, type:
# view content on the terminal cat /etc/nsswitch.conf
# search for hosts in the file and view them on terminal grep hosts /etc/nsswitch.conf # view file content in another window less /etc/nsswitch.confTo change the order, use any text editor to open the file and reorder the configurations. Specifically, type:
# nano text editor sudo nano /etc/nsswitch.conf # vim text editor sudo vi /etc/nsswitch.conf
As we can see from the output, the “files” is already at the top by default.
2. Add New Name Server in Linux
Open the /etc/resolv.conf file using the nano or vi text editor as shown below:
sudo nano /etc/resolv.conf sudo vi /etc/resolv.conf
Next, add the following configurations:
nameserver 127.0.0.1 nameserver 192.168.0.10Make sure to replace the name server and IP address with your required server and IP. After that, save the file and exit the text editor.
3. Configure /etc/hosts File in Linux to Add a Local DNS Entry
Now we’ll reconfigure the /etc/hosts file to add the local DNS entry. Open the file using your favorite text editor and type:
# vim editor sudo vi /etc/hosts # nano editor sudo nano /etc/hostsAdd both the static IP addresses at the end of this file in this format:
IP-address localhost localhost. localdomain192.168.0.1 nameserver nameserver DOMAINPress “Ctrl + S” to save and “Ctrl + X” to exit the editor.
The output should look something like this:

If you want to know the DNS server and IP address of the host machine, then use the cat or less command to view the contents of /etc/resolv.conf file. Specifically, type:
cat /etc/resolv.conf less /etc/resolv.confAlternatively, you can do the same from Settings. For this, head to Settings and locate Wi-Fi. Long press the network and choose Modify Network.
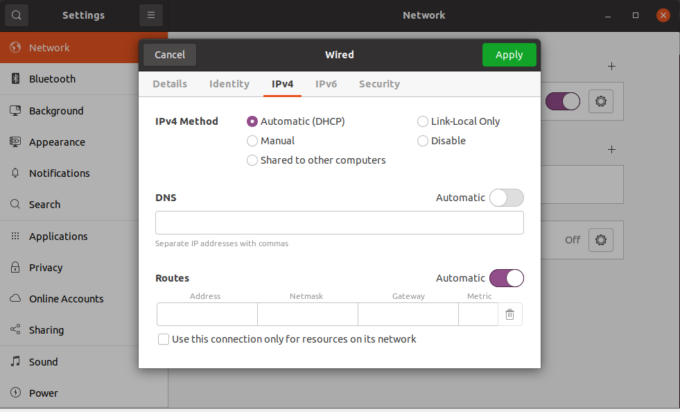
After that, locate IP Settings and change it to static. Next, enter the static IP address and click Apply to save the changes.
4. Test the Static Hosts in Linux
Next, use the ping command to test the hosts. After that, type the hostname directly with the ping command as shown below:
ping -c 4 domain.name ping -c 4 domainHow to Add a Local DNS Entry on Linux Using Network Manager (Permanent Solution)
If you want to add a local DNS entry permanently, use the Network Manager. However, you’ll have to revert it manually if it is no longer required. For this setup, we’ll edit the /etc/dhcp/dhclient.conf file.
1. Add Local DNS Configurations
First, open the file using any text editor as shown below:
sudo nano /etc/dhcp/dhclient.conf sudo vi /etc/dhcp/dhclient.confAfter that, add the following lines at the beginning of the file:
# using network manager prepend domain-name-servers 127.0.0.1; # using systemd /etc/resolv.conf.head nameserver 127.0.0.12. Restart Network Manager Service
Since we’ve configured the network manager for the first time, we’ll have to explicitly restart the service. For this step, use the restart command. Specifically, type:
# using the service sudo service network-manager restart # using the systemd sudo systemctl restart network-manager3. Prevent Network Manager From Modifying Files
To prevent Network Manager from modifying the contents of /etc/resolv.conf and let systemd-resolved handle the local DNS entry, we’ll edit the /etc/NetworkManager/NetworkManager.conf file. For this step, open this file using any text editor:
sudo nano /etc/NetworkManager/NetworkManager.conf sudo vi /etc/NetworkManager/NetworkManager.confNow, type the following lines under the [main] section of this file:
Lastly, we’ll restart the systemd-resolved service to implement the changes. We’ll use the systemctl stop and start commands. Specifically, type:
sudo systemctl stop systemd-resolved sudo systemctl start systemd-resolvedTo view the effective settings, use the status option as shown below:
sudo systemd-resolve --statusFinal Thoughts
And that’s a wrap! We’ve covered how you can use both the permanent and nonpermanent solutions to add a local DNS entry on Linux. This will help you in testing your websites and routes before uploading them on server or SSH routes. For more information, check out the systemctl manual.
If this guide helped you, please share it.
Sidrah is a staff writer at Distroid and has a Masters in Computer Science, with her key two focus areas being SQL and DevOps. She has written over 100 posts and specializes in all things Linux. She also has experience trying out various other distros, BASH scripting, Git, and software testing. LinkedIn GitHub
Leave a Reply
You must be logged in to post a comment.