- Kali Linux configure network manually a Full Guide for beginners
- Kali Linux Network Configuration for Ethernet Connection
- How do you check the Kali Linux network configuration?
- Enable/Disable network interface cards
- Assign IP Address for the network (eth0 or wlan0)
- Kali Linux network configuration with IP address and Netmask
- Add default gateway
- Add dns-namesevers
- Kali Linux network configuration from DHCP
- How to Configure Network Manually in Kali Linux Video Guide
- How to Connect to Wi-Fi on Kali Linux
- Connecting to Wi-Fi on Kali (Graphical Mode):
- Connecting to Wi-Fi With Kali (Text Mode):
- Connecting to Wi-Fi With Kali Using nmcli:
- Connecting to Wi-Fi With Kali Using nmtui:
- Troubleshooting Commands:
- Conclusion:
- About the author
- David Adams
Kali Linux configure network manually a Full Guide for beginners
This article about the ” Kali Linux configure network manually ” In this topic, I will cover all about the Kali Linux network configuration of LAN (Ethernet) and Wireless LAN adapter as well. After reading this article you will able to assign IP manually and by DHCP server as well.
Kali Linux Network Configuration for Ethernet Connection
Network interfaces (LAN adapter, wireless adapter, usb adapter, fast Ethernet) are responsible to connect and make communication between two or more computers in a network.
If the network card is not configured properly, then you are out of network and configuration is important for network security. The network should have proper IP Address, subnet mask, Default gateway, domain name server, etc.
So configure the network and get into the network. but the most important question:
How do you check the Kali Linux network configuration?
There are different methods for windows and Linux operating systems. Here we are discussing Kali Linux, I will explain tasks used in Linux. Following command is used to check the status of the networking cards in Kali Linux:
Before run command makes sure, you are working as root. I mean “You must be root to make changes in network configuration.
If you are checking only network configuration then you don’t have a need to be root.
[email protected]:~$sudo ifconfig -a eth0: flags=4163 mtu 1500 inet 10.0.2.15 netmask 255.255.255.0 broadcast 10.0.2.255 inet6 fe80::a00:27ff:fec6:ebc6 prefixlen 64 scopeid 0x20 ether 08:00:27:c6:eb:c6 txqueuelen 1000 (Ethernet) RX packets 4 bytes 930 (930.0 B) RX errors 0 dropped 0 overruns 0 frame 0 TX packets 27 bytes 2313 (2.2 KiB) TX errors 0 dropped 0 overruns 0 carrier 0 collisions 0 lo: flags=73 mtu 65536 inet 127.0.0.1 netmask 255.0.0.0 inet6 ::1 prefixlen 128 scopeid 0x10 loop txqueuelen 1000 (Local Loopback) RX packets 20 bytes 1036 (1.0 KiB) RX errors 0 dropped 0 overruns 0 frame 0 TX packets 20 bytes 1036 (1.0 KiB) TX errors 0 dropped 0 overruns 0 carrier 0 collisions 0 [email protected]:~$
[email protected]:~$ sudo ifconfig -a eth0: flags=4163 mtu 1500 inet 10.0.2.15 netmask 255.255.255.0 broadcast 10.0.2.255 inet6 fe80::a00:27ff:fec6:ebc6 prefixlen 64 scopeid 0x20 ether 08:00:27:c6:eb:c6 txqueuelen 1000 (Ethernet) RX packets 4 bytes 930 (930.0 B) RX errors 0 dropped 0 overruns 0 frame 0 TX packets 27 bytes 2313 (2.2 KiB) TX errors 0 dropped 0 overruns 0 carrier 0 collisions 0 lo: flags=73 mtu 65536 inet 127.0.0.1 netmask 255.0.0.0 inet6 ::1 prefixlen 128 scopeid 0x10 loop txqueuelen 1000 (Local Loopback) RX packets 20 bytes 1036 (1.0 KiB) RX errors 0 dropped 0 overruns 0 frame 0 TX packets 20 bytes 1036 (1.0 KiB) TX errors 0 dropped 0 overruns 0 carrier 0 collisions 0
You have seen the result of ifconfig command, You can see assigned IP address, MAC address, Netmask, for IPv4, etc.
You can run this command as a normal user, sudo user, or root user. If you didn’t create a normal user in Kali Linux then you are using the system by the root user.
Enable/Disable network interface cards
Sometimes you find that network interface is not responding properly, you will have to enable and disable.
You have more than 1 interface, and you want to use only 1 adapter, then disable other adapters.
You can use Ifconfig command followed by up option and interface name to start the network interface and for stopping it use the down option.
You can use the following syntax to enable and disable network interface cards.
[email protected]:~$sudo ifconfig eth0 down [email protected]:~$udo ifconfig lo: flags=73 mtu 65536 inet 127.0.0.1 netmask 255.0.0.0 inet6 ::1 prefixlen 128 scopeid 0x10 loop txqueuelen 1000 (Local Loopback) RX packets 20 bytes 1036 (1.0 KiB) RX errors 0 dropped 0 overruns 0 frame 0 TX packets 20 bytes 1036 (1.0 KiB) TX errors 0 dropped 0 overruns 0 carrier 0 collisions 0 [email protected]:~$
Assign IP Address for the network (eth0 or wlan0)
Eth0 is the number of a wired network interface card. if you want to assign IP address for wireless adapter replace eth0 by wlan0. The current configuration of this adapter can be changed by using the following command and this command will assign new IP address for your computer interface
$sudo ifconfig eth0 192.168.1.10
[email protected]:~$sudo ifconfig eth0 192.168.1.10 [email protected]:~$usudo ifconfig eth0: flags=4163 mtu 1500 inet 192.168.1.10 netmask 255.255.255.0 broadcast 192.168.1.255 inet6 fe80::a00:27ff:fec6:ebc6 prefixlen 64 scopeid 0x20 ether 08:00:27:c6:eb:c6 txqueuelen 1000 (Ethernet) RX packets 15013 bytes 14434124 (13.7 MiB) RX errors 0 dropped 0 overruns 0 frame 0 TX packets 8200 bytes 881820 (861.1 KiB) TX errors 0 dropped 0 overruns 0 carrier 0 collisions 0 lo: flags=73 mtu 65536 inet 127.0.0.1 netmask 255.0.0.0 inet6 ::1 prefixlen 128 scopeid 0x10 loop txqueuelen 1000 (Local Loopback) RX packets 184 bytes 14152 (13.8 KiB) RX errors 0 dropped 0 overruns 0 frame 0 TX packets 184 bytes 14152 (13.8 KiB) TX errors 0 dropped 0 overruns 0 carrier 0 collisions 0 [email protected]:~$
Kali Linux network configuration with IP address and Netmask
Netmask is used to indentify the network address. It can be configured by using given command. This will set the ip address 192.168.1.10 and set the subnet mask 255.255.255.0
$sudo ifconfig eth0 192.168.1.10 netmask 255.255.255.0
[email protected]:~$sudo ifconfig eth0 192.168.1.10 netmask 255.255.255.0 [email protected]:~$usudo ifconfig eth0: flags=4163 mtu 1500 inet 192.168.1.10 netmask 255.255.255.0 broadcast 192.168.1.255 inet6 fe80::a00:27ff:fec6:ebc6 prefixlen 64 scopeid 0x20 ether 08:00:27:c6:eb:c6 txqueuelen 1000 (Ethernet) RX packets 15013 bytes 14434124 (13.7 MiB) RX errors 0 dropped 0 overruns 0 frame 0 TX packets 8200 bytes 881820 (861.1 KiB) TX errors 0 dropped 0 overruns 0 carrier 0 collisions 0 lo: flags=73 mtu 65536 inet 127.0.0.1 netmask 255.0.0.0 inet6 ::1 prefixlen 128 scopeid 0x10 loop txqueuelen 1000 (Local Loopback) RX packets 184 bytes 14152 (13.8 KiB) RX errors 0 dropped 0 overruns 0 frame 0 TX packets 184 bytes 14152 (13.8 KiB) TX errors 0 dropped 0 overruns 0 carrier 0 collisions 0 [email protected]:~$
Add default gateway
Default gateway is added or changed, by using following command. It will set the default gateway 192.168.1.1
#route add default gw 192.168.1.1
OR
$sudo route add default gw 192.168.1.1

Add dns-namesevers
In Linux Domain Name Server or DNS can be set or modifying the resolv.conf in the /etc directory. It can be changed by editing this file. add the following sytex in terminal
#echo nameserver 8.8.8.8 > /etc/resolv.conf
This command will remove the current nameserver and set 8.8.8.8. It can be added alternate nameserver by using following syntax
#echo nameserver 4.4.4.4 >> /etc/resolv.conf
Kali Linux network configuration from DHCP
DHCP services are one of the easiest ways to configure an Ethernet. A free DHCP server provides all required configuration settings for the network cards. Use the following method:
Save the file and exit to complete the modification. It is required to take down the network and again bring up Ethernet interfaces to applying this configuration.
Use the following command to configure the network adapter
#dhclient eth0
This will configure the network adapter using the settings provided by the DHCP Server.
How to Configure Network Manually in Kali Linux Video Guide
How to Connect to Wi-Fi on Kali Linux
![]()
After reading this tutorial, you’ll know how to connect to your wireless network from your graphical environment and the console using both nmtui and mncli tools.
Connecting to Wi-Fi on Kali (Graphical Mode):
Connecting to Wi-Fi from Kali Linux is the same as connecting from any other Linux distribution. Some users may find their wireless card disabled.

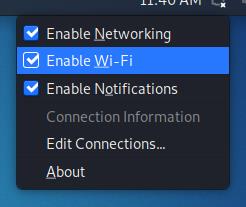
To begin, identify the network icon on your taskbar, which is displayed as:

As you can see, the network icon is located next to the clock. Once identified, right-click on it to show all available options, including Enable Wi-Fi, as shown in the image below. Make sure the option Enable Wi-Fi is marked:
Once enabled, left-click the network icon again, and you’ll see all available networks for connection. Then, press the one you want to connect to:
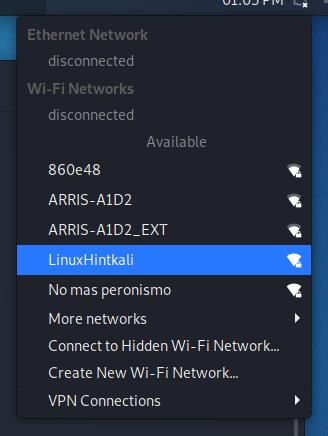
After clicking on your network, you should connect without problems.
Connecting to Wi-Fi With Kali (Text Mode):
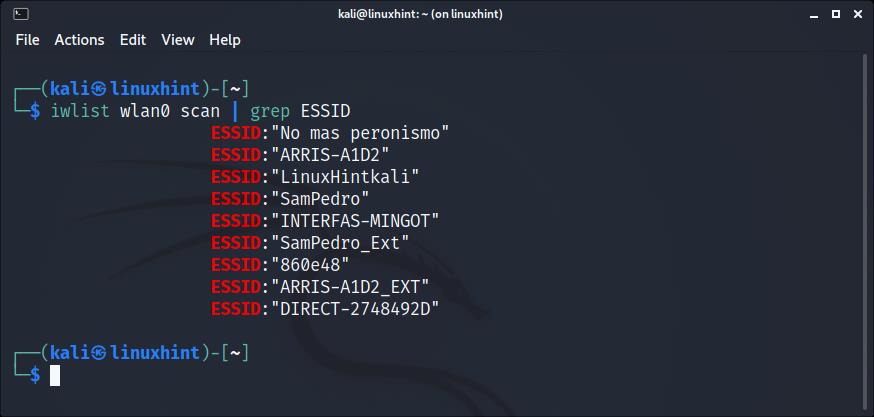
Before connecting to a network using the terminal, let’s see how to detect all available networks. To scan for networks, you can use the iwlist command followed by your wireless device and the function scan below:
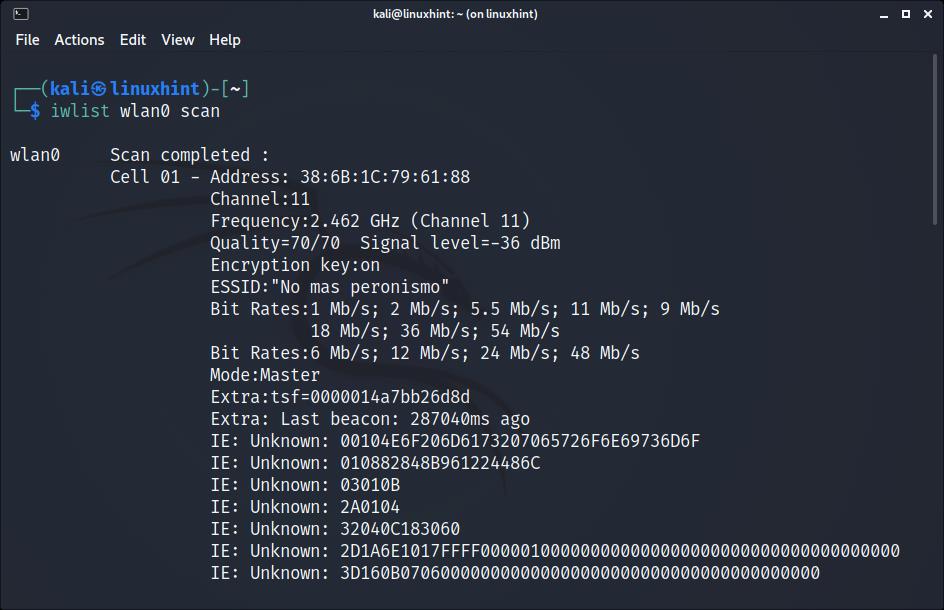
As you can see, depending on the quantity of available networks, the output will display a long list of data belonging to each network, but we are only interested in the ESSID.
You can get a more human-friendly output by implementing grep as shown below; in this manner, iwlist will only print the networks ESSID:
Once you scanned all networks and identified the one you want to connect to, you can use different text-mode methods to establish a connection.
Connecting to Wi-Fi With Kali Using nmcli:
The nmcli command allows us to control the NetworkManager from the command line and using it is pretty simple. The following example shows how to connect to a network named LinuxHintkali, whose password is linuxhintpass.
After scanning and identifying your network with the iwlist command explained previously, run the command below, replacing LinuxHintkali with the ESSID of the network you want to connect to, and replacing linuxhintpass with its password:
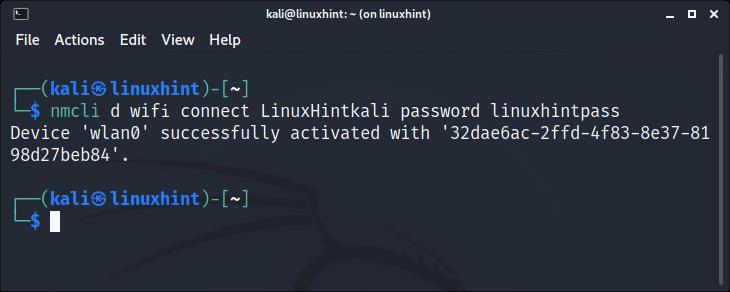
As you can see, the connection was established properly.
You can get additional information on nmcli at its man page https://linux.die.net/man/1/nmcli.
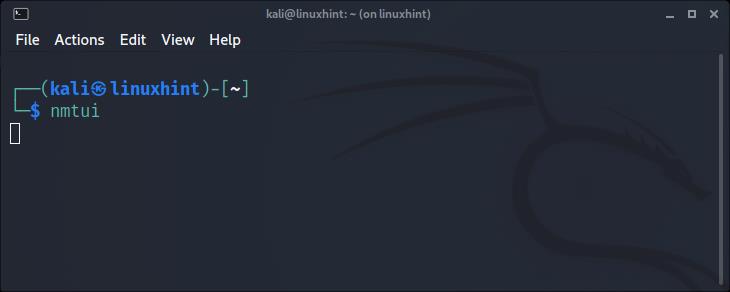
Connecting to Wi-Fi With Kali Using nmtui:
The nmtui command is a curses-based tool that allows you to control NetworkManager in an interactive mode.
To run it, simply execute the command below:
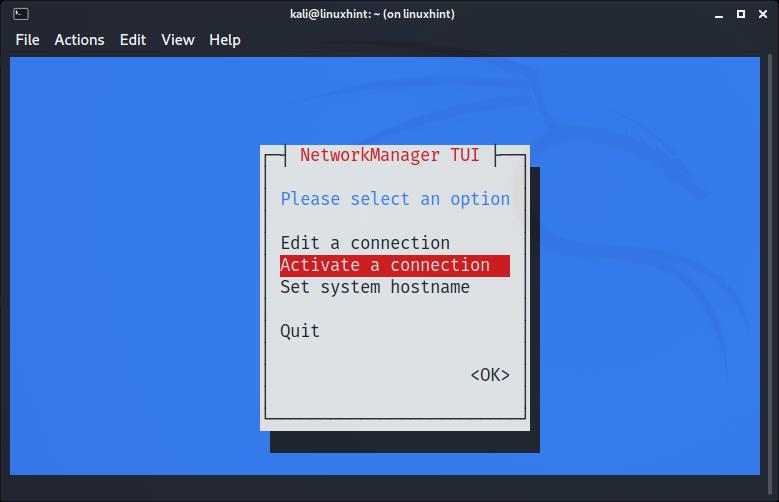
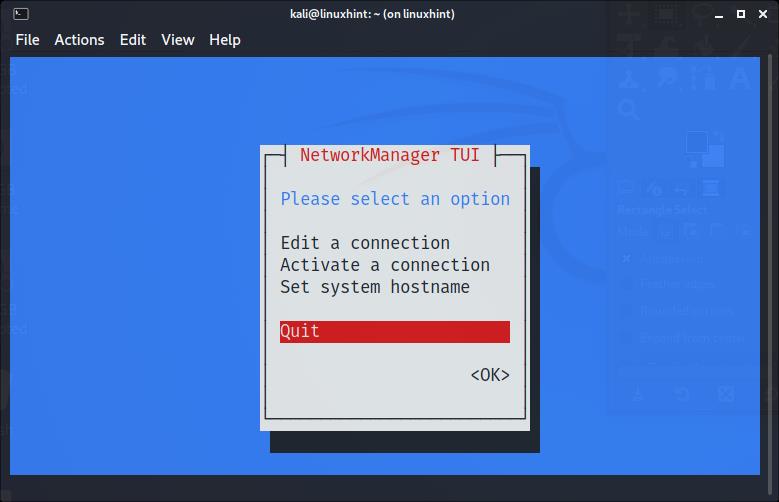
The following menu will show up. Use your keyboard arrows to select “Activate a connection” and press ENTER:
The next screen will show all available networks. Again, use your keyboard arrows to select the network you want to connect to and press ENTER:
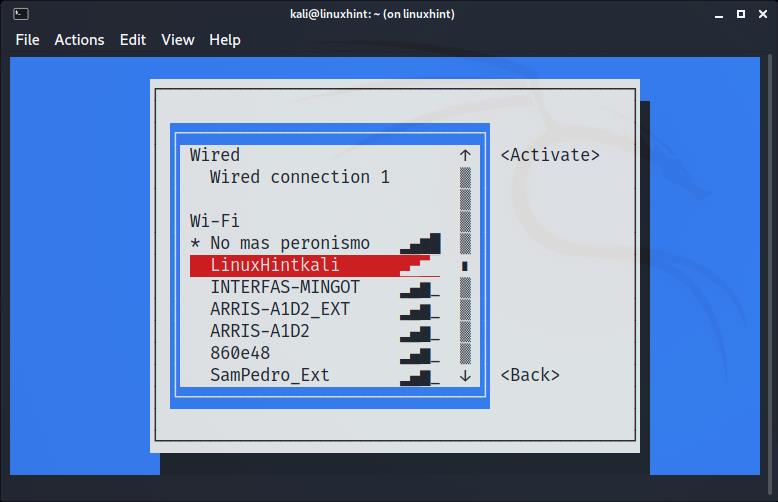
The connection will be established. You already must have internet access:

Once connected, select Back and press ENTER:

Move to Quit, and press Enter to leave nmtui:
Troubleshooting Commands:
The following commands were not tested because my network card was properly detected. The first command shown below may be useful in case your Wi-Fi device’s drivers weren’t properly detected. This is not a common scenario when using Kali:
More probably than the command shown above to install drivers, your wireless card may be down. To set it up, first identify your network device name:
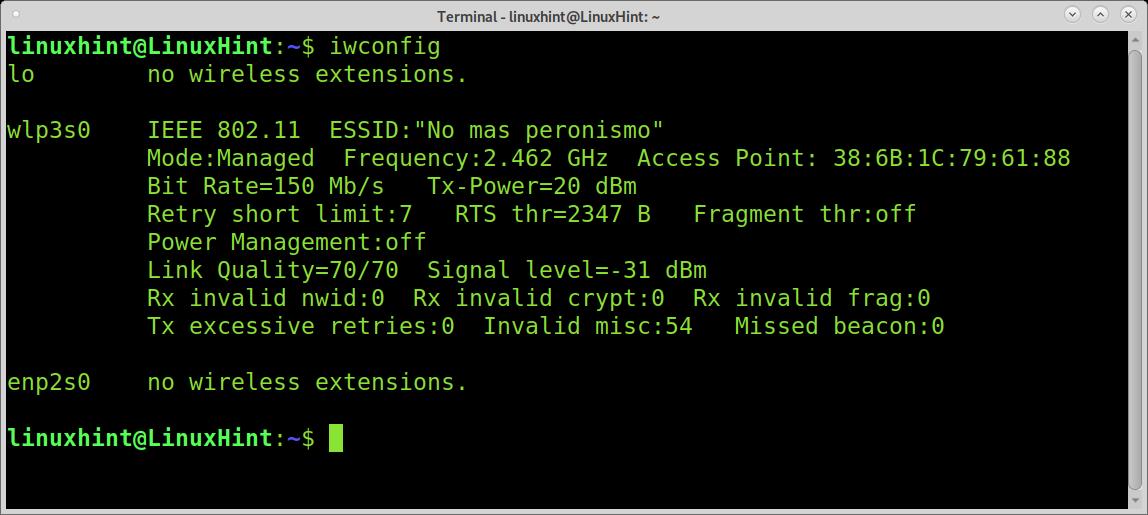
As you can see in the output above, my network device is named wlp3s0. To set it up, I run the following command:
Remember to replace wlp3s0 for your wireless card name.
Conclusion:
As you can see, connecting to Wi-Fi on Kali Linux should not be a problem even for basic Linux users. Linux, not only Kali, offers a variety of methods to establish connection. This tutorial was written after finding many Kali users report problems connecting. In most cases, their Wi-Fi adapter was disabled and enabling it from the taskbar, as shown in the first steps of this tutorial, solved the problem. Learning the text mode techniques explained in this article is especially important because they are almost universal for all Linux distributions and independent of their graphical environment.
Thank you for reading this tutorial explaining how to connect to Wi-Fi on Kali Linux, keep following us for more Linux tips and tutorials.
About the author
David Adams
David Adams is a System Admin and writer that is focused on open source technologies, security software, and computer systems.