- Настройка Интернет шлюза на CentOS
- Настройка системы
- Настройка брандмауэра
- Firewalld
- Iptables
- Проброс портов (Port Forwarding)
- Firewalld
- Iptables
- Роутер на CentOS Stream 8.3
- Похожие посты:
- How to Make a CentOS 7 Router
- Network Topology:
- Configuring Static IP Address:
- Configuring DHCP Server:
- Configuring Firewalld:
- Testing Router Configuration:
- About the author
- Shahriar Shovon
Настройка Интернет шлюза на CentOS

Обновлено: 17.08.2021 Опубликовано: 27.06.2017
Процесс настройки шлюза (NAT) на системах UNIX, обычно, выполняется в несколько команд: включением перенаправления на уровне системы и настройкой firewall.
Настройка системы
Все что нужно настроить — включить перенаправления на уровне ядра. Для этого открываем следующий файл:
И добавляем в него следующую строку:
После применяем настройку:
В случае с единым сетевым интерфейсом больше ничего делать не потребуется — CentOS начнет работать как Интернет-шлюз.
В случае с несколькими сетевыми адаптерами, настраиваем сетевой экран.
Настройка брандмауэра
Рассмотрим настройку фаервола при помощи двух различных популярных утилит — firewalld и iptables.
Firewalld
Настройка выполняется для двух сетевых интерфейсов — ens32 (внутренний) и ens34 (внешний):
firewall-cmd —direct —permanent —add-rule ipv4 nat POSTROUTING 0 -o ens34 -j MASQUERADE
firewall-cmd —direct —permanent —add-rule ipv4 filter FORWARD 0 -i ens32 -o ens34 -j ACCEPT
firewall-cmd —direct —permanent —add-rule ipv4 filter FORWARD 0 -i ens34 -o ens32 -m state —state RELATED,ESTABLISHED -j ACCEPT
systemctl restart firewalld
Iptables
Настройка выполняется из расчета, что Интернет настроен через интерфейс ens160, а внутренняя сетя через ens32:
iptables -t nat -A POSTROUTING -o ens160 -j MASQUERADE
Если на сервере для доступа в локальную и глобальную сети используются разные сетевые интерфейсы, нам может понадобиться создать еще два правила:
iptables -A FORWARD -i ens32 -o ens160 -m state —state RELATED,ESTABLISHED -j ACCEPT
iptables -A FORWARD -i ens32 -o ens160 -j ACCEPT
yum install iptables-services
Проброс портов (Port Forwarding)
Необходим для перенаправление сетевых запросов на сервер, стоящий за NAT и не имеющий прямого выхода во внешнюю сеть. Настройки отличаются в зависимости от способа управления брандмауэром netfilter.
Firewalld
firewall-cmd —zone=external —permanent —add-forward-port=port=25:proto=tcp:toport=8025:toaddr=192.168.0.15
* где 25 — прослушиваемый внешний порт, для которого сработает перенаправление; tcp — используемый транспортный протокол; 8025 — на какой порт перенаправить запрос; 192.168.0.15 — IP-адрес сервера, на который отправляем запросы.
* также обратите внимание, что в команде мы используем зону external, но в вашей среде она может и не использоваться. Посмотреть список активных зон можно командой firewall-cmd —get-active-zones.
firewall-cmd —permanent —zone=external —add-port=25/tcp
Чтобы правило вступило в силу:
Iptables
Настройка выполняется двумя командами и двумя спомобами.
iptables -t nat -I PREROUTING -p tcp -m tcp -d 10.8.232.111 —dport 25 -j DNAT —to-destination 192.168.0.15:8025
iptables -t nat -I POSTROUTING -p tcp -m tcp -s 192.168.0.15 —sport 8025 -j SNAT —to-source 10.8.232.111:25
iptables -t nat -I PREROUTING -p tcp -i eth0 —dport 25 -j DNAT —to-destination 192.168.0.15:8025
iptables -I FORWARD -p tcp -d 192.168.0.15 —dport 8025 -m state —state NEW,ESTABLISHED,RELATED -j ACCEPT
* где eth0 — внешний сетевой интерфейс.
iptables -I INPUT 1 -p tcp —dport 8025 -j ACCEPT
* обратите внимание, что мы разрешаем порт, на который переводим запрос, так как цепочки POSTROUTING и PREROUTING работают до цепочки FILTER, а потому открывать нужно не входящий порт (25), а тот, на который назначается пакет (8025).
Не забываем сохранить правила:
Роутер на CentOS Stream 8.3
Подробная инстукция по установке и настройке роутера в связке FirewallD + dnsmasq на CentOS Stream 8.3.
Исходные данные
Имеем на машине 2 сетевых интерфейса:
enp0s3 — для внешней сети 192.168.1.0/24
enp0s8 — для внутренней сети 192.168.52.0/24
Также у нас есть шлюз во внешней сети. Это маршрутизатор с IP-адресом 192.168.1.1
Наша задача — настроить доступ в Интернет для внутренней сети.
В первую очередь открываем файл /etc/sysctl.conf
и в нём в самом конце прописываем строчку:
Теперь при выполнении команды
консоль покажет такой результат:
Запускаем FirewallD и включаем его в автозагрузку:
# systemctl start firewalld # systemctl enable firewalld
Включаем поддержку NAT (masquerade)
# firewall-cmd --add-masquerade --permanent
Loaded: loaded Active: active (running)
Проверим состояние службы FirewallD
затем откроем файл /etc/dnsmasq.conf
и пропишем в него такой конфиг:
domain-needed bogus-priv interface=enp0s8 resolv-file=/etc/resolv.conf dhcp-range=192.168.50.31,192.168.50.130,24h cache-size=150
Включаем доступ к службам dns и dhcp в файрволл
# firewall-cmd --permanent --zone=public --add-service=dhcp # firewall-cmd --permanent --zone=public --add-service=dns
Затем включаем службы dnsmasq в автозагрузку и запускаем
# systemctl enable dnsmasq # systemctl start dnsmasq
Похожие посты:
How to Make a CentOS 7 Router
![]()
CentOS 7 has firewalld installed as a default firewall program. But firewalld can be used to configure CentOS 7 as a router as well. To make a CentOS 7 router, all you have to do is to configure a DHCP server on CentOS 7 and then use firewalld to configure IP forwarding. That’s it. In this article, I am going to show you how to configure CentOS 7 as a router on your network. So, let’s get started.
Network Topology:
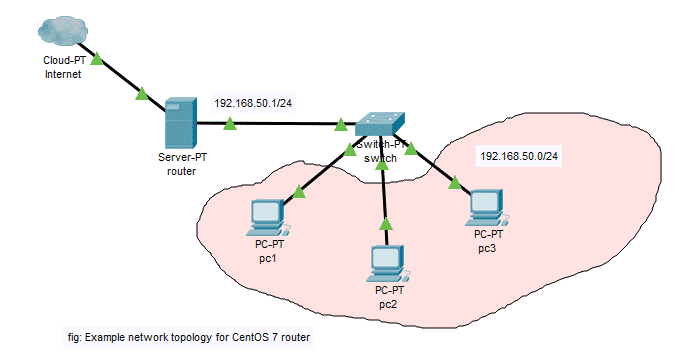
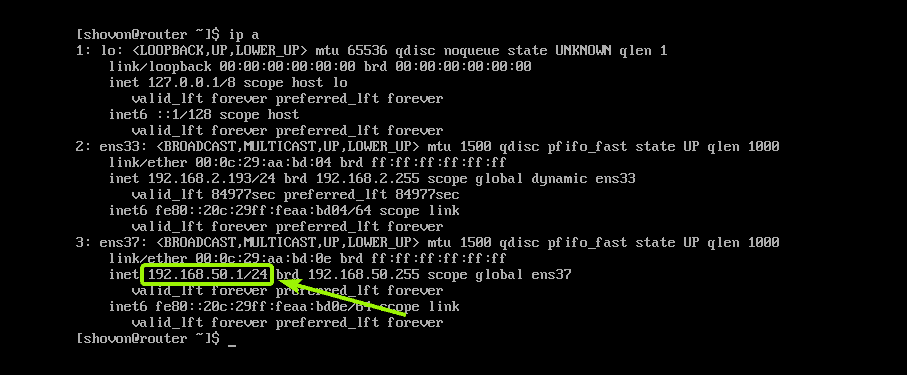
In this article, I am going to implement the network topology as given above in the figure. The server router has CentOS 7 installed and I am going to configure it as a router on the network. It has 2 NICs (Network Interface Cards). One NIC connects to the internet via the regional ISP and the other NIC is used for private networking and is connected to the switch. I am using the network 192.168.50.0/24 for the private network. So, the NIC that connects to the switch should have the IP address 192.168.50.1/24 (you can use others, but routers are usually configured to use the first usable IP address in the network).
The router will act as a DHCP server and forward IP packets to the private network. I will configure the DHCP pool in the range 192.168.50.50/24 to 192.168.50.100/24.
This is how I am going to configure the CentOS 7 router in this article.
Configuring Static IP Address:
The first thing you should do is to configure a static IP address to the NIC that connects to the switch in the private network.
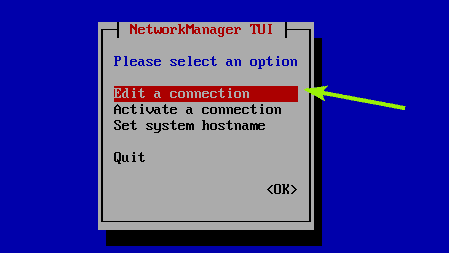
To configure a static IP on CentOS 7, I am going to use nmtui.
Start nmtui with the following command:

Now, select Edit a connection and press .
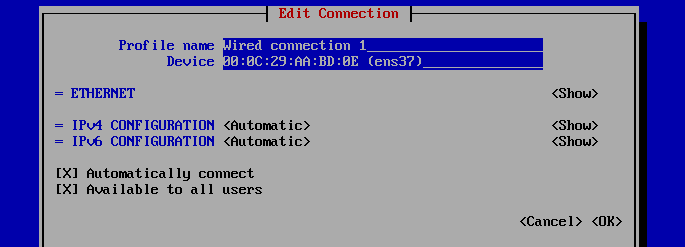
So, select Wired connection 1 and press . Then, select and press .

You should see the following window.
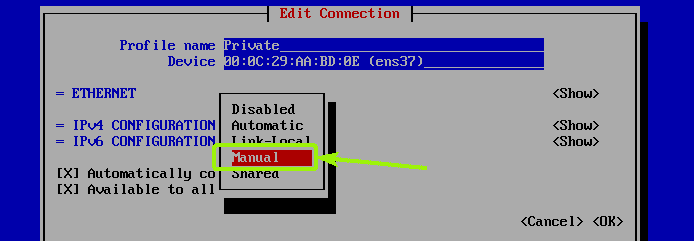
Now, change the profile name to Private. Giving a descriptive name is always a good idea. It will help your work much simpler. Now, select from the IPv4 CONFIGURATION section and press .
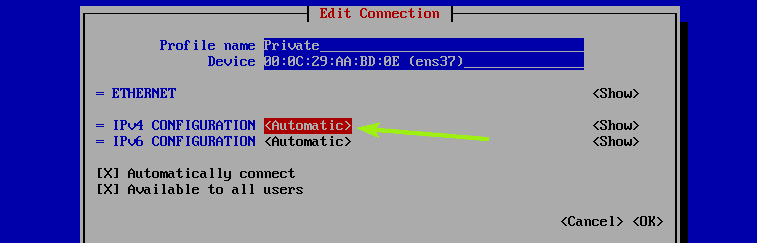
Now, select Manual and press .
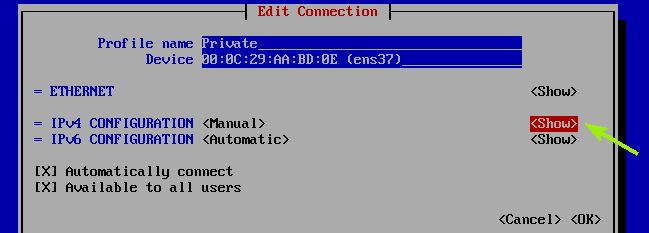
Now, select and press as marked in the screenshot below.
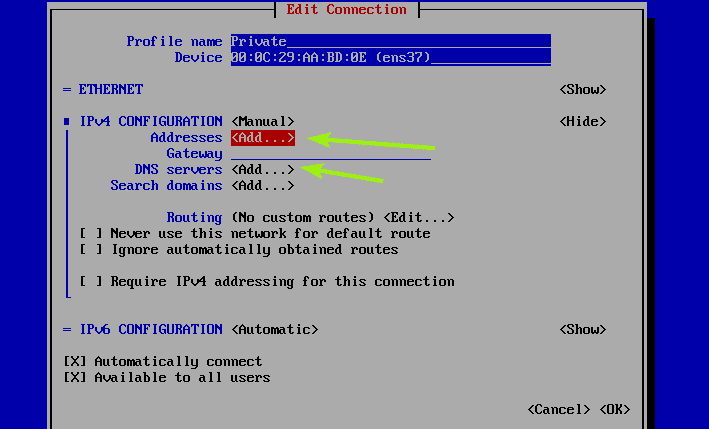
Now, you have to add the IP address and DNS information here.
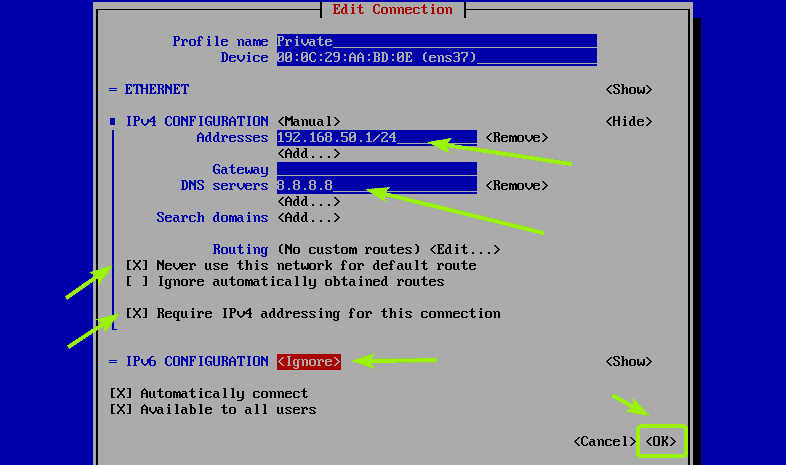
Once you’ve added the IP address and DNS server address, make sure Never use this network for default route, Require IPv4 addressing for this connection and Automatically connect check boxes are checked. I am also going to set IPv6 CONFIGURATION to Ignore as I don’t want to use IPv6. Then, select and press .
Now, press twice. You should be back to the command prompt.

Now, reboot your CentOS 7 machine with the following command:

Once you CentOS 7 machine starts, check whether the correct IP address is assigned with the following command:
The assigned IP address is correct. Great!
Configuring DHCP Server:
Now, I am going configure DHCP on the router.
DHCP server is not installed on CentOS 7 by default. But, all the required packages are available in the official package repository of CentOS 7. So, you can easily install it with the YUM package manager as follows:

Now, press y and then press .

DHCP server should be installed.

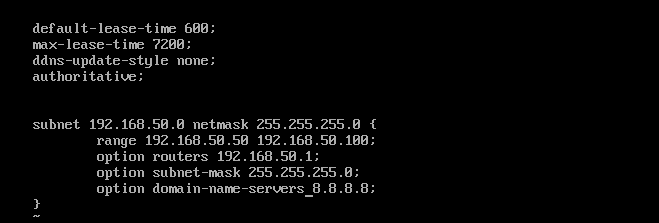
Now, open the DHCP server configuration file /etc/dhcp/dhcpd.conf with the following command:

Now, press i to go to edit mode and type in the following lines.
default-lease-time 600 ;
max-lease-time 7200 ;
ddns-update-style none;
authoritative;
& nbsp;
subnet 192.168.50.0 netmask 255.255.255.0 {
range 192.168.50.50 192.168.50.100;
option routers 192.168.50.1;
option subnet-mask 255.255.255.0;
option domain-name-servers 8.8.8.8;
}
Then press , type in :wq! and press to save the configuration file.
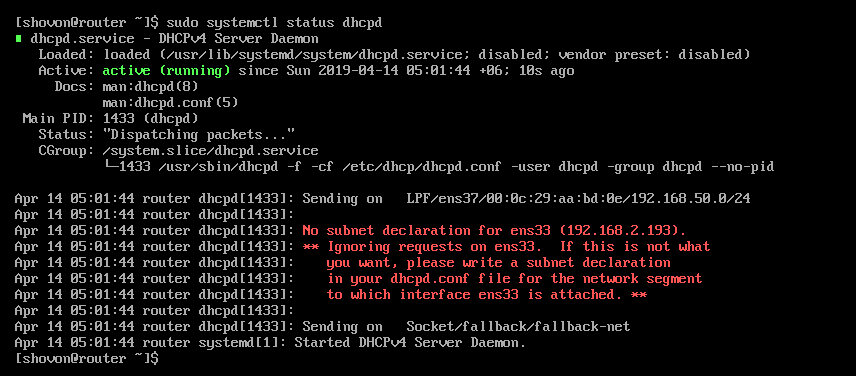
Now, restart the dhcpd service with the following command:

Now, check whether the dhcpd service is running with the following command:
As you can see, dhcpd service is running.
Configuring Firewalld:
Now, I am going to configure the Firewalld firewall program.
First, allow the DHCP ports to be accessible from the outside network with the following command:

Now, enable masquerading with the following command:

Finally, reload firewalld rules with the following command:

Testing Router Configuration:
Now, I am going to test whether each computer on the network can get IP addresses via DHCP and they can access the internet. I am also going to check whether the IP packets are going through the CentOS 7 router that I just configured.
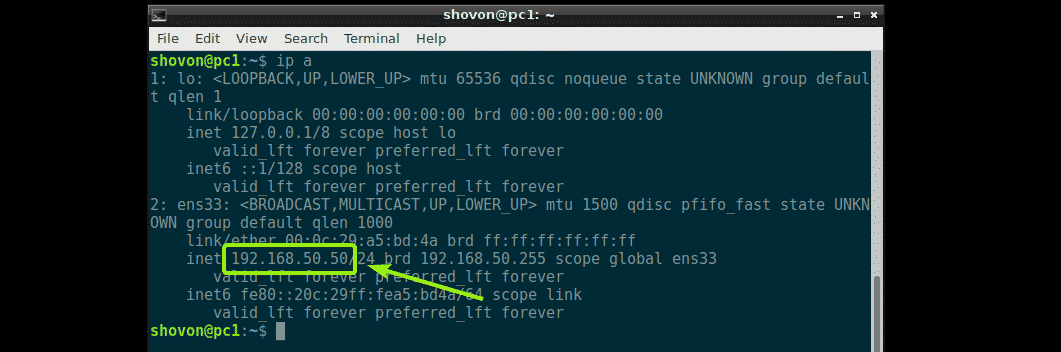
On the first computer pc1, I ran ip a command and as you can see, it got the IP address 192.168.50.50/24. So, DHCP is working.
I can ping google.com and access google.com from the web browser from pc1 as well. So, internet is working.
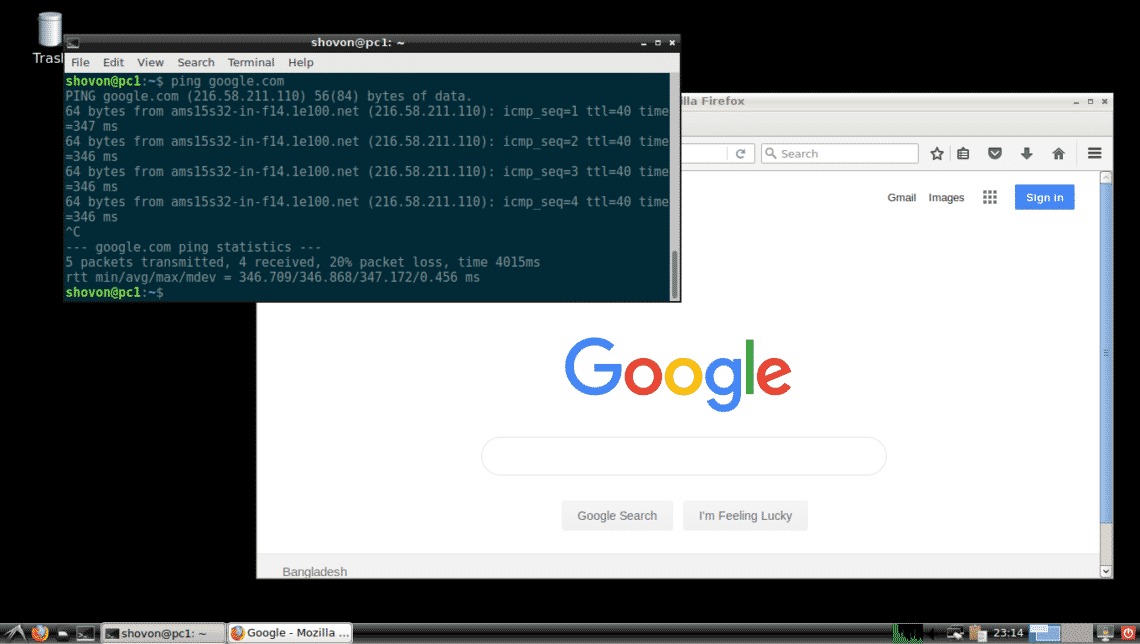
I ran traceroute google.com and as you can see, the first router the packet goes through is our CentOS 7 router with the IP address 192.168.50.1/24. This is the one we just configured. So, IP routing works in pc1.
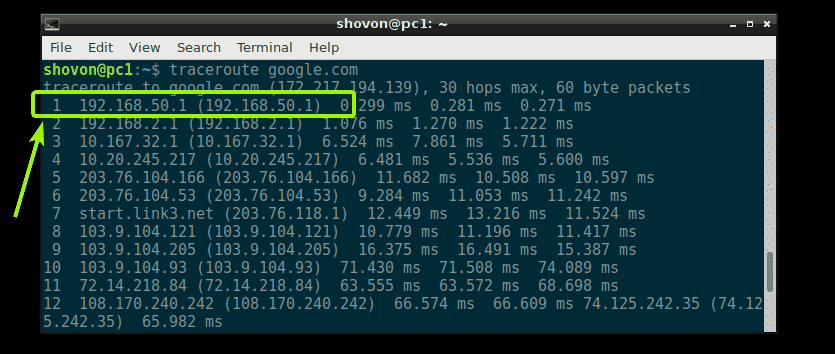
I checked the same things on pc2 and it’s working.
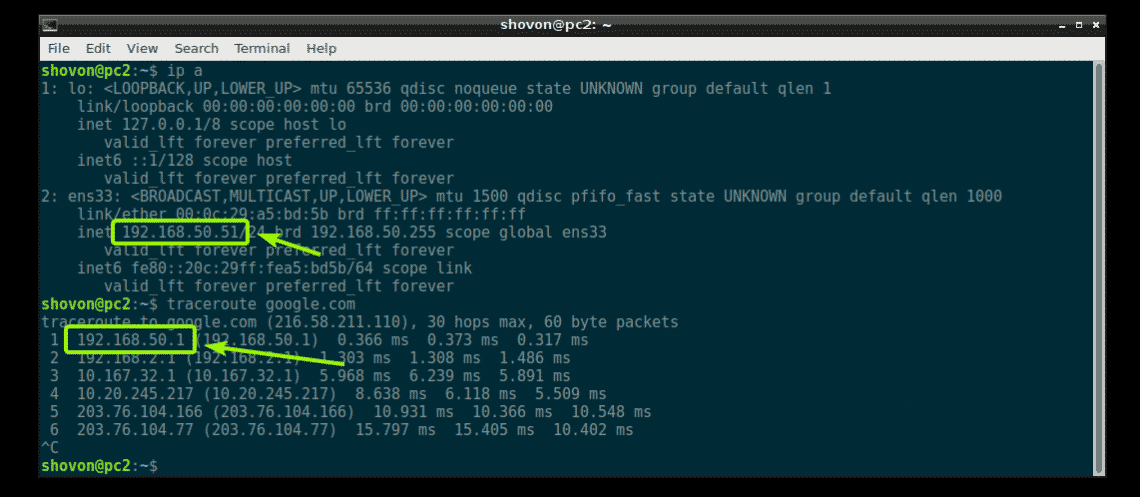
Everything works on pc3 as well. So, the CentOS 7 router configuration was a success.
So, that’s how you make a CentOS 7 router. It’s very easy. Thanks for reading this article.
About the author
Shahriar Shovon
Freelancer & Linux System Administrator. Also loves Web API development with Node.js and JavaScript. I was born in Bangladesh. I am currently studying Electronics and Communication Engineering at Khulna University of Engineering & Technology (KUET), one of the demanding public engineering universities of Bangladesh.