- Configuring Qt Creator
- Checking Build and Run Settings
- Changing Keyboard Shortcuts
- Changing Color Schemes
- Adding Your Own Code Snippets
- Configuring Version Control Systems
- Managing Plugins
- Enabling and Disabling Plugins
- Installing Plugins
- Qt creator
- Общее
- Работа с программой из дистрибутива
- Настройка работы примеров
- Работа с обновленной программой
- Компилирование примеров
- Запуск программ если установлено несколько версий QT
- Adding Kits
- Specifying Kit Settings
- Kit Settings
- Editing Qbs Profiles
Configuring Qt Creator
If you install Qt Creator as part of a Qt installation, you should be able to use it out-of-the-box, with the default settings and configuration options. However, if you install the stand-alone Qt Creator package, build Qt Creator from sources, or install several Qt versions, you may need to tell Qt Creator where to find the Qt versions and compilers by adding the paths to them and by creating kits that use them. To make Qt Creator behave more like your favorite code editor or IDE, you can change the settings for keyboard shortcuts, color schemes, generic highlighting, code snippets, and version control systems. In addition, you can enable and disable Qt Creator features by managing plugins. The following sections summarize the options that you have and point you to detailed information to help you specify any required settings and to make using Qt Creator a better experience for you.
Checking Build and Run Settings
Qt Creator is an integrated development environment (IDE) that you can use to develop Qt applications. While you can use the Qt Installer to install Qt Creator, the stand-alone Qt Creator installer never installs Qt or any Qt tools, such as qmake. To use Qt Creator for Qt development, you also need to install a Qt version and a compiler. If you update the compiler version later, you can register it into Qt Creator. The Qt Installer attempts to auto-detect compilers and Qt versions. If it succeeds, the relevant kits will automatically become available in Qt Creator. If it does not, you must add the kits yourself to tell Qt Creator where everything is. To add kits, select Edit > Preferences > Kits > Add. For more information, see Adding Kits. Each kit consists of a set of values that define one environment, such as a device, compiler, and Qt version. If Edit > Preferences > Kits > Qt Versions does not show all the installed Qt versions, select Link with Qt. If Auto-detected still does not show the Qt version, select Add to add it manually. For more information, see Adding Qt Versions. Also check that Edit > Preferences > Kits > Compilers shows your compiler. For more information, see Adding Compilers. You can connect devices to the development PC to run, debug, and analyze applications on them from Qt Creator. You can connect the device to the development PC via USB. Additionally, you can connect Linux-based devices over a WLAN. You must also configure a connection between Qt Creator and the development PC and specify the device in a kit. To add devices, select Edit > Preferences > Devices > Devices > Add. For more information, see Connecting Devices.
Changing Keyboard Shortcuts
You can use Qt Creator with your favorite keyboard shortcuts. To view and edit all keyboard shortcuts defined in Qt Creator, select Edit > Preferences > Environment > Keyboard. For more information, see Keyboard Shortcuts.
Changing Color Schemes
Themes enable you to customize the appearance of the Qt Creator UI: widgets, colors, and icons. To switch themes, select Edit > Preferences > Environment, and then select a theme in the Theme field. You can use the Qt Creator text and code editors with your favorite color scheme that defines how to highlight code elements and which background color to use. You can select one of the predefined color schemes or create custom ones. The color schemes apply to highlighting C++ files, QML files, and generic files. To change the color scheme, select Edit > Preferences > Text Editor > Fonts & Color. For more information, see Defining Color Schemes. KSyntaxHighlighting offers generic highlighting. It is the syntax highlighting engine for Kate syntax definitions. Qt Creator comes with most of the commonly used syntax files, and you can download additional files. To download and use highlight definition files, select Edit > Preferences > Text Editor > Generic Highlighter. For more information, see Generic Highlighting.
Adding Your Own Code Snippets
As you write code, Qt Creator suggests properties, IDs, and code snippets to complete the code. It lists context-sensitive suggestions for the statement currently under your cursor. You can add, modify, and remove snippets in the snippet editor. To open the snippet editor, select Edit > Preferences > Text Editor > Snippets. For more information, see Editing Code Snippets.
Configuring Version Control Systems
Qt Creator supports several version control systems. In most cases, you do not need to configure the version control in any special way to make it work with Qt Creator. However, some configuration options are available and you can set them in Edit > Preferences > Version Control > General. For more information about the supported functions, see Using Version Control Systems.
Managing Plugins
Qt Creator comes with a set of plugins, some of which are disabled by default. You can enable disabled plugins if you need them and disable plugins you don’t need. You can download and install additional plugins from Qt Marketplace or some other source, such as GitHub.
Enabling and Disabling Plugins
New Qt Creator plugins are often introduced as experimental plugins to let you try them out before they are fully supported. Experimental plugins are disabled by default and you must enable them for them to become visible after you restart Qt Creator. By default, all the plugins that the plugin depends on are also enabled. You can also disable plugins that you do not use, to streamline Qt Creator. By default, all the plugins that depend on the plugin are also disabled. To enable and disable plugins, select Help > About Plugins.
Installing Plugins
Qt Marketplace has links to Qt Creator plugins that you can download and install either for free or for a price set by their publisher. You can browse the available plugins in the Marketplace tab in the Welcome mode.
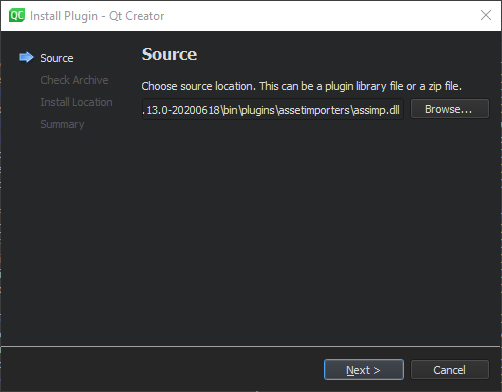
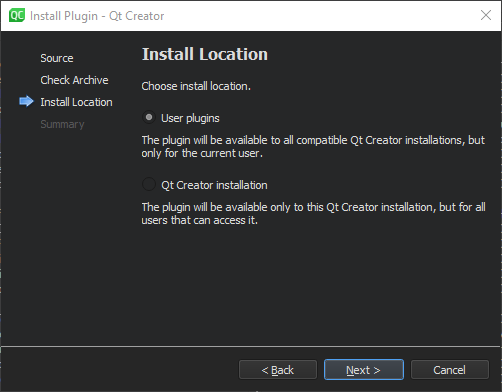
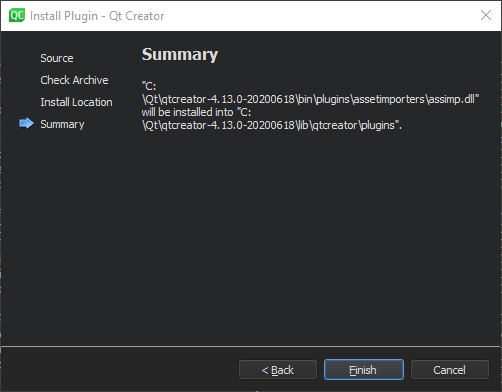
To install plugins:
- Select Help >About Plugins >Install Plugins.
- In the Source dialog, enter the path to the archive or library that has the plugin.
- In the Install Location dialog, select User plugins to make the plugin available for the current user in all compatible Qt Creator instances or Qt Creator installation to make the plugin available for all users of a particular Qt Creator instance.
- In the Summary dialog, select Finish to install the plugin.
- Select Restart Now to restart Qt Creator and load the plugin.
© 2023 The Qt Company Ltd. Documentation contributions included herein are the copyrights of their respective owners. The documentation provided herein is licensed under the terms of the GNU Free Documentation License version 1.3 as published by the Free Software Foundation. Qt and respective logos are trademarks of The Qt Company Ltd in Finland and/or other countries worldwide. All other trademarks are property of their respective owners.
Qt creator
Это программа для разработке программ на qt, qml, c++, html5.
Общее
Для компилирования проектов могут понадобится файлы разработки. Например эти:
sudo apt-get install build-essential libgl1-mesa-dev sudo apt-get install libqt5webkit5-dev
Работа с программой из дистрибутива
sudo apt-get install qtcreator
sudo apt-get install ubuntu-sdk-dev
Настройка работы примеров
Создаем папку куда будем сохранять проекты, например в ~/qtprojects. И создать ссылку на общую папку shared чтоб работал путь »../../shared.h».
mkdir ~/qtprojects sudo apt-get install qtbase5-examples qtdeclarative5-examples ln -s /usr/lib/x86_64-linux-gnu/qt5/examples/quick/shared/ ~/shared
Работа с обновленной программой
Программу qt creator можно обновить скачав последнюю версию с сайта qt
chmod u+x ~/Загрузки/qt-unified-linux-x64-2.0.1-online.run ~/Загрузки/qt-unified-linux-x64-2.0.1-online.run
Программы ставятся по умолчанию в каталог ~/Qt . Для запуска qtcreator сделаем ссылку на рабочем столе:
ln -s ~/Qt/Tools/QtCreator/bin/qtcreator ~/"Рабочий стол"/qtcreator
Для предотвращения конфликтов установим настройки по умолчанию. Меню Инструменты, Параметры, раздел Комплекты, выбрать Автоопределенная Desktop Qt 5.4.x GCC 64bit, нажать кнопку Сделать по умолчанию.
Компилирование примеров
Для начала программирования неплохо ознакомится с примерами программ. Для понимания стиля программирования и изучения языка и фраймворков.
Создаем папку куда будем сохранять проекты, например в ~/qtprojects. И создать ссылку на общую папку shared чтоб работал путь «../../shared.h».
mkdir ~/qtprojects ln -s ~/Qt/Examples/Qt-5.4/quick/shared ~/shared
Выбираем слева Начало, Примеры, кликаем и запускаем.
Запуск программ если установлено несколько версий QT
https://forum.qt.io/topic/55100/linux-run-program-if-install-two-version-qt
Adding Kits
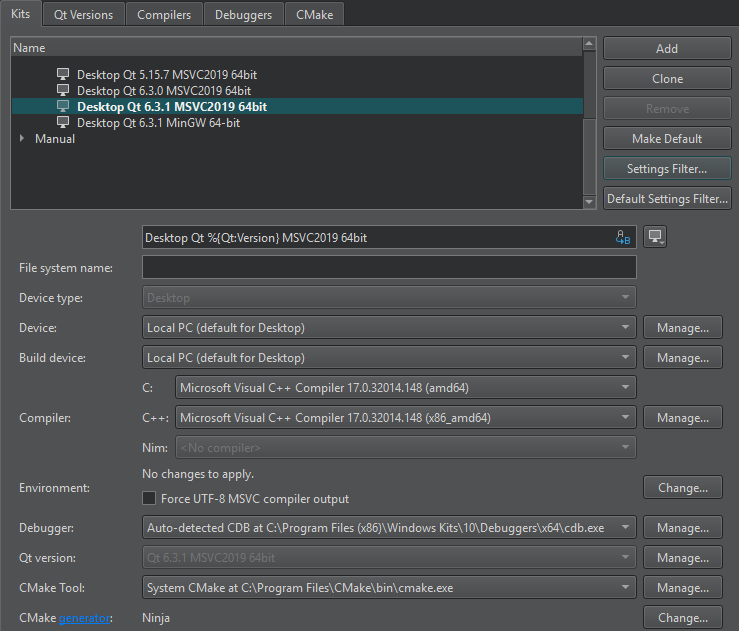
Typically, only a subset of the kit settings is relevant for a particular setup. Therefore, Qt Creator plugins register sets of relevant settings that you can view and modify in Edit > Preferences > Kits. For example, if you use CMake to build all your projects, you can hide Qbs and qmake settings by default.
To hide and show settings in the Kits tab for the current kit, select Settings Filter. To view and modify the settings displayed when you add a new kit, select Default Settings Filter.
Specifying Kit Settings
- Select Edit >Preferences >Kits >Add. To clone the selected kit, select Clone.
- Specify kit settings. The settings to specify depend on the build system and device type.
- Select OK to create the kit.
Qt Creator uses the default kit if it does not have enough information to choose the kit to use. To set the selected kit as the default kit, select Make Default.
Kit Settings
The following table summarizes the available kit settings.
| Setting | Value |
|---|---|
| Name | Name of the kit. You can use variables to generate the kit name based on the values you set in the other fields. |
 | Image to use as an icon for the kit. |
| File system name | Name for the kit to use as a part of directory names. This value is used for the CurrentKit:FileSystemName variable, which determines the name of the shadow build directory, for example. |
| Device type | Type of the device. |
Double-click the icon next to the field to select the image that is displayed in the kit selector for this kit. You can use any image in a supported file format (for example, PNG). The image is scaled to the size 64×64 pixels. For example, using the compiler logo as an icon allows you to easily see, which compiler is used to build the project for the selected kit.
This setting is used to tell the code model which compiler is used. If your project type and build tool support it, Qt Creator also tells the build tool to use this compiler for building the project.
For Android kits, the Android GDB server field will display the path to GDB server executable.
Qt Creator checks the directories listed in the PATH environment variable for the qmake executable. It refers to the qmake executable it finds as Qt in PATH and selects it as the Qt version to use for the Desktop kit that is created by default.
Editing Qbs Profiles
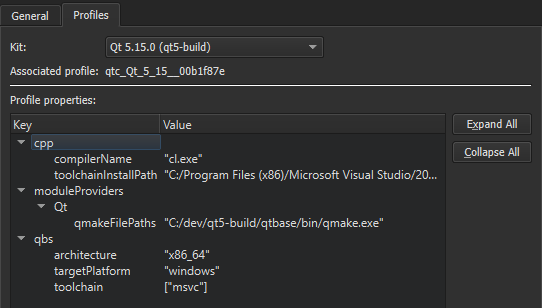
To view the Qbs profile associated with the kit, select Edit > Preferences > Qbs > Profiles.
You can add keys and values to the profile or remove them from it, as well as modify existing values. For a list of available keys and values, see List of Modules in the Qbs Manual.
To edit the Qbs profile associated with the kit:
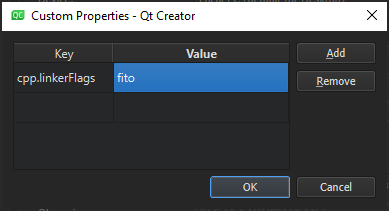
- In Edit >Preferences >Kits, select the kit, and then select Change next to the Additional Qbs Profile Settings field to open the Custom Properties dialog.
- Double-click an empty cell in the Key column to specify the key to add or modify as: . .
- Double-click the cell on the same row in the Value column to specify a value as a JSON literal.
- Select Add to add the key-value pair.
- Click OK.
To modify an existing value, double-click it in the Value field.
To remove the selected property, select Remove.
© 2023 The Qt Company Ltd. Documentation contributions included herein are the copyrights of their respective owners. The documentation provided herein is licensed under the terms of the GNU Free Documentation License version 1.3 as published by the Free Software Foundation. Qt and respective logos are trademarks of The Qt Company Ltd in Finland and/or other countries worldwide. All other trademarks are property of their respective owners.

