- Setting up a DHCP server and configuring the router as DHCP a server in the Cisco packet tracer
- Настройка DHCP Cisco
- Видеоурок по работе с Cisco Packet Tracer. Курс молодого бойца по настройке DHCP
- Настройка централизованного DHCP сервера с помощью Cisco Packet Tracer
- Листинг команд настройки маршрутизатора R1, на котором «поднят» DHCP сервер, следующий:
- Настройка DHCP сервера на маршрутизаторе Cisco, возможные причины неработоспособности сети
- Полезные команды настройке DHCP Cisco
- How to configure DHCP server in Packet Tracer.
Setting up a DHCP server and configuring the router as DHCP a server in the Cisco packet tracer
In the Cisco packet tracer, various endpoints are given that we can use to create networks and one of them is the server. This single server provides lots of services like HTTP, FTP, email, DHCP, etc.
Before enabling the DHCP service on the server, we must assign the static IP address to the server to establish connectivity.
PC should be configured to accept IPs from the DHCP server so we will change the IP configuration from static to DHCP.
To configure the DHCP service, we have to click on the DHCP tab and turn on the DHCP service.
We can change the default name of the pool which is serverpool.
We can set up the default gateway and DNS if required as per our network design.
Define the start IP address so the server will issue the IP address according to our scope mentioned.
We now have to define the maximum number of users so the server will not lease IP addresses to the devices if the limit is reached. In this example, the defined limit is 10, now the server will only release 10 IP addresses even if the mentioned IP range scope has a high number of IP addresses.
Multiple pools can be added to the server and if any pool is not required then it can be removed easily.
One extra pool name as pool1 has been added to the server with a different IP range so now the server has a lot more IPs to assign.
We can see in the image above that PC has been assigned an IP address successfully by the DHCP server. An assigned IP address is from the configured scope on the server.
Now, as we are done configuring the DHCP on the server. We will configure the router as a DHCP server in the following packet tracer lab.
We have to configure the same parameters on the router as well however we have to use the router’s command-line interface to set up the routers with DHCP capabilities.
We will configure DHCP on the Cisco router with 4 easy steps.
Creating a pool and naming the pool. In this lab, we have given the name ‘dynamic’ to the DHCP pool.
Command : Router(config)#ip dhcp pool Dynamic
Defining the ranges of the addresses that the router will lease to the clients
Command: Router(dhcp-config)#network 192.168.1.0 255.255.255.0
Excluding the range of IP addresses that we do not want the router to lease, this comes in handy when we want to keep some IPs that can be assigned to the devices statically whenever required in our network. In this example, we have assigned IP 192.168.1.1 to the router so we should exclude this IP to prevent any IP address conflict.
Command: Router(config)#ip dhcp excluded-address 192.168.1.1 192.168.1.5
Finally, we will enable the DHCP service on the router using the following command.
Command: Router(config)#service dhcp
Additionally, the time limit can be defined for the lease. For e.g, if we want the router to lease IP for a certain period then we can configure the same using the following command
Command: Router(config)#lease 10 10 10
This would mean that router will lease the IP for 10 days 10 hours and 10 mins. After the defined period, the client will be given a new IP address.
Use the following command to lease the IP for an indefinite time.
Command: Router(config)#lease infinite
In the above image, we can see that the PC has received the IP address from the router so now the router is acting as a DHCP server.
Настройка DHCP Cisco
Протокол DHCP позволяет производить автоматическую настройку сетевых устройств. Настройка DHCP сервера на маршрутизаторе выгодна тем, что позволяет по максимум задействовать работающий маршрутизатор, повесив на него максимальное количество функционала (интернет, NAT, DHCP и т.п.). DCHP позволит маршрутизатору автоматически настраивать на клиентах следующие основные параметры:
- IP адрес
- Основной шлюз
- Маска подсети
- DNS сервера
- Имя домена
Ниже мы приводим для вас сразу несколько разных инструкций по настройке DHCP на оборудовании Cisco.
Видеоурок по работе с Cisco Packet Tracer. Курс молодого бойца по настройке DHCP

Настройка централизованного DHCP сервера с помощью Cisco Packet Tracer
В этой видео инструкции рассматривается процесс настройки централизованного DHCP сервера в программе Cisco Packet Tracer.
- как настроить пулы динамических IP адресов для различных сегментов локальной сети,
- как настроить рабочую станцию на получение динамического IP адреса,
- как проверить наличие получения динамического IP адреса рабочей станцией.
Новые команды для настройки маршрутизатора для получения пула динамических IP адресов у централизованного DHCP сервера.
Для примера рассматривается роутер R1
Настройки производятся в режиме глобальной конфигурации:
R1(config)#interface fastEthernet 0/1 — заходим в настройки интерфейса к которому подключен компьютер получающий динамический IP адрес
R1(config-if)#ip helper-address 192.168.30.11 указывается IP адрес централизованного DHCP сервера.
Листинг команд настройки маршрутизатора R1, на котором «поднят» DHCP сервер, следующий:
R1(config)#interface Ethernet 0/1/0
R1(config-if)#ip address 172.33.56.1 255.255.255.0
R1(config)#ip dhcp excluded-address 172.33.56.1
R1(config)#ip dhcp excluded-address 172.33.56.254
R1(config)#ip dhcp pool R1SW6
R1(dhcp-config)#network 172.33.56.0 255.255.255.0
Routing Protocol is «bgp 1»
Outgoing update filter list for all interfaces is not set
Incoming update filter list for all interfaces is not set
R1(config-router)#do sh ip route
172.33.0.0/24 is subnetted, 1 subnets
C 172.33.56.0 is directly connected, Ethernet0/1/0
R1(config-router)#network 172.33.56.0 mask 255.255.255.0
Настройка DHCP сервера на маршрутизаторе Cisco, возможные причины неработоспособности сети
Рассматривается настройка DHCP сервера на маршрутизаторе Cisco, показаны возможные причины неработоспособности сети, связанные с работой протоколов маршрутизации и варианты устранения данных неполадок.

Полезные команды настройке DHCP Cisco
Router(config)# ip dhcp excluded-address 192.168.1.254
Router(config)# ip dhcp excluded-address 192.168.1.1 192.168.1.9
Настройка DHCP сервера включает в себя определение пула адресов, которые будут раздаваться. Для создания пула используется команда ip dhcp pool [название_пула]. После этого необходимо ввести две обязательные команды – network [адрес_сети][маска/длина_префикса] для указания сети из которой будут раздаваться адреса и default-router[адрес_default_gateway] для указания шлюза по умолчанию (можно ввести до 8 адресов).
- команда show ip dhcp binding показывает список всех IP адресов и сопоставленных с ними MAC адресов, которые были выданы DHCP сервером.
- команда show ip dhcp server statistics покажет статистику DHCP сервера, включая информацию об отправленных и полученных DHCP сообщениях
Команда ip helper-address [адрес_DHCP-сервера] на маршрутизаторе в режиме конфигурации интерфейса укажет ему перенаправлять broadcast сообщения от DHCP клиентов уже в виде unicast к DHCP серверу, находящемуся в другой сети.
Иногда роутер сам должен получить IP адрес по DHCP, например от интернет-провайдера. Для этого нужно в режиме конфигурации интерфейса ввести команду ip address dhcp, после чего интерфейс будет пытаться получить адрес от DHCP сервера.
Доставка по Москве, Санкт-Петербургу, в регионы России, в Казахстан, Беларусь
Оперативно подберем для Вас оборудование и аналоги
Настроим купленное у нас оборудование
Окажем профессиональную техподдержку
Гарантия 1 год (если не оговорено иное)
How to configure DHCP server in Packet Tracer.
Hello and welcome! This tutorial will guide you on how to configure a DHCP server both on a router and on a generic server in Cisco Packet Tracer. In both cases, configuration is simple as long as you have a basic knowledge of IP addressing. On to it then!
Configuring DHCP server on a Router.

2. On the router, configure interface fa0/0 to act as the default gateway for our LAN.
Router>enable Router#config terminal Router(config)#int fa0/0 Router(config-if)#ip add 192.168.1.1 255.255.255.0 Router(config-if)#no shutdown Router(config-if)#exit
3. Configure DHCP server on the Router. In the server we will define a DHCP pool of IP addresses to be assigned to hosts, a Default gateway for the LAN and a DNS Server.
Router(config)# Router(config)#ip dhcp pool MY_LAN Router(dhcp-config)#network 192.168.1.0 255.255.255.0 Router(dhcp-config)#default-router 192.168.1.1 Router(dhcp-config)#dns-server 192.168.1.10
We can add ip dhcp excluded-address command to our configuration so as to configure the router to exclude addresses 192.168.1.1 through 192.168.1.10 when assigning addresses to clients. The ip dhcp excluded-address command may be used to reserve addresses that are statically assigned to key hosts.
So add the above command under the global configuration mode.
Router(config)#ip dhcp excluded-address 192.168.1.1 192.168.1.10
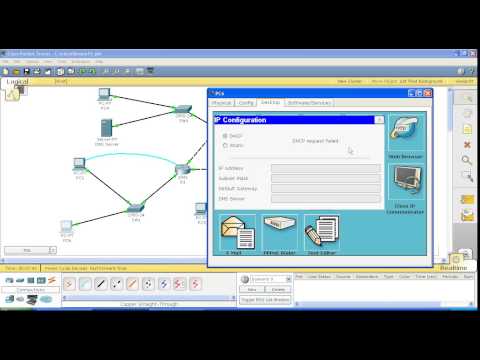
4. Now go to every PC and on their IP configuration tabs, enable DHCP. Every PC should be able to obtain an IP address, default gateway and DNS server, as defined in step 2.
For example, to enable DHCP on PC1:
Click PC1->Desktop->IP configuration . Then enable DHCP:

Do this for the other PCs.
You can test the configuration by pinging PC2 from PC1. Ping should succeed.
Now let’s do the same thing using a Generic server in place of a router:
Configuring DHCP service on a generic server in Packet Tracer.
1. Build the network topology in packet tracer

2. Configure static IP address on the server ( 192.168.1.2/24 ).
3. Now configure DHCP service on the generic server.
To do this, click on the server, then click on Services tab . You will pick DHCP on the menu. Then proceed to define the DHCP network parameters as follows:
Pool name : MY_LAN
Default Gateway : 192.168.1.1
DNS Server : 192.168.1.2
Start IP Address : 192.168.1.0
Subnet Mask : 255.255.255.0
Maximum Number of users: 256
Click on add then Save.The DHCP entry is included in the list.
Here are the configurations on the server:

Once you’ve configured everything, turn ON the DHCP service.
4. Finally, enable DHCP configuration on each PC. The three PCs should get automatically configured.
As an example, here is the DHCP configuration on PC1:

Addendum: You can define a DHCP server on one broadcast domain to serve hosts in a different broadcast domain. If you want to do this, then you should consider using ip helper-address command. To learn more about this, you can read my article on IP helper address configuration.
Hope you found this post helpful. Comment to help improve it.
You may also like to read: