NAT examples
The fw4 application has extensive support for NAT filterning. NAT is a powerful feature and is credited with extending the life of the IPv4 protocol.
As with other firewall section, this section will not delve into NAT background and theory. Some useful links for this are:
OpenWrt supports DNAT, SNAT, MASQUERADING.
NAT diagnostics
See Netfilter Management for analyzing the netfilter rules and investigating conntrack sessions.
NAT example configurations
This section contains typical uses of the fw4 NAT features
Port forwarding for IPv4 (DNAT)
The goal of this rule is to redirect all WAN -side SSH access on port 2222 to a the SSH (22) port of a single LAN -side station.
config redirect option target DNAT option src wan option dest lan option proto tcp option src_dport 2222 option dest_ip 192.168.10.20 option dest_port 22 option enabled 1
To test from a WAN -side station (STA1), SSH on port 2222 to a non-existent IPv4 address on the LAN -side network:
ssh -p 2222 192.168.10.13 hostname; cat /proc/version
When the rule is enabled STA2 will reply with its hostname and kernel version. When the rule is disabled, the connection is refused.
The passionate reader will ask “So what netfilter rules does this create?”
iptables -t nat -A zone_wan_prerouting -p tcp -m tcp --dport 2222 -m comment --comment "!fw3: @redirect[0]" -j DNAT --to-destination 192.168.10.20:22 . iptables -t nat -A zone_lan_prerouting -p tcp -s 192.168.10.0/255.255.255.0 -d 192.168.3.185/255.255.255.255 -m tcp --dport 2222 -m comment --comment "!fw3: @redirect[0] (reflection)" -j DNAT --to-destination 192.168.10.20:22
The first rule matches packets coming in the WAN -side if on TCP port 2222 and jumps to the DNAT filter to translate the destination to 192.168.10.20:22 . The second rule matches packets coming in from the LAN -side to the WAN -side if on TCP port 2222. The DNAT target uses the same —to-destination parameters as the first rule to find the “reflection” in the conntrack table.
The next thought of the passionate reader is “So what is IN the conntrack table?”
ipv4 2 tcp 6 117 TIME_WAIT src=192.168.3.171 dst=192.168.10.13 sport=51390 dport=2222 packets=21 bytes=4837 src=192.168.10.20 dst=192.168.3.171 sport=22 dport=51390 packets=23 bytes=4063 [ASSURED] mark=0 use=2
This record shows the WAN -side src=STA1 and dst=192.168.10.13:2222 and the reverse direction LAN -side src=STA2:22 src=STA1.
DNAT to translate a LAN-side address on the WAN-side
This redirect rule will cause the router to translate the WAN -side source of 1.2.3.4 to the LAN -side STA2 and route the ICMP echo to it. The rule is reflexive in that STA2 will be translated by to 1.2.3.4 on the WAN -side.
config redirect option src wan option src_dip 1.2.3.4 option proto icmp option dest lan option dest_ip 192.168.10.20 option target DNAT option name DNAT-ICMP-WAN-LAN option enabled 1 LAN-side public server
All redirection requires some form of NAT and connection tracking. For public servers behind the firewall the DNAT target is used to translate the public IP address on the WAN -side to the private address of the server in the LAN -side.
Due to the high visibility of a public server, it may warrant putting it/them in a fw4 DMZ.
config redirect option target DNAT option src wan option src_dport 25 option proto tcp option family ipv4 option dest lan option dest_ip 192.168.10.20 option dest_port 2525 option name DNAT-MAIL-SERVER option enabled 1
In this example, STA2 is running an email server (e.g. postfix) listening on port 2525 for incoming email.
This redirect rule states: any incoming traffic from the wan on port 25, redirect to STA1 port 2525.
To verify what is going on dump /proc/net/nf_conntrack to observe the dynamic connnection for incoming traffic. There can be quite a few conntrack records in it so we will search on just the ones using port 2525:
. ipv4 2 tcp 6 7436 ESTABLISHED src=192.168.3.171 dst=192.168.3.11 sport=41370 dport=25 packets=4 bytes=229 src=192.168.10.20 dst=192.168.3.171 sport=2525 dport=41370 packets=3 bytes=164 [ASSURED] mark=0 use=2 .
The connection is coming from STA1 port 25 to the DUT and is translated to STA2 on port 2525 with a response destination to STA1.
The relevant traffic matches the DNAT conntrack state which is allowed to traverse zones by OpenWrt firewall, so no extra permissive rules are required.
Source NAT (SNAT)
The goal of this rule is to translate the source IP address from a real station to a fictitious one on port 8080.
config redirect option target SNAT option src lan option dest wan option proto tcp option src_ip 192.168.10.20 option src_dip 192.168.10.13 option dest_port 8080 option enabled 1
Type something on the LAN -side station and see it echoed on the WAN -side station. Check the connection on the WAN -side station using netstat -ntap and see the line:
tcp 0 0 192.168.3.171:8080 192.168.10.13:47970 ESTABLISHED 16746/nc
The WAN -side station shows the SNAT address connecting to it on port 8080!
When used alone, Source NAT is used to restrict a computer’s access to the internet while allowing it to access a few services by forwarding what appears to be a few local services, e.g. NTP, to the internet. While DNAT hides the local network from the internet, SNAT hides the internet from the local network.
MASQUERADE
This is the most used and useful NAT function. It translates a local private network on the LAN -side to a single public address/port num on the WAN -side and then the reverse. It is the default firewall configuration for every IPv4 router. As a result it is a very simple fw4 configuration
The LAN -side uses a private network. The router translates the private addresses to the router address:port and the netfilter conntrack module manages the connection.
The masquerade is set on the WAN -side
config zone option name 'wan' list network 'wan' . option masq '1'
The router will generally get its WAN ip address from the upstream DHCP server and be the DHCP server (and usually DNS server) for LAN stations. The network configuration file defines the private network and the dhcp configuration file defines how the OpenWrt router assigns LAN -side IPv4 addresses.
When MASQUERADE is enabled, all forwarded traffic between WAN and LAN is translated. Essentially, there is very little that can go wrong with the MASQUERADE firewall rules.
Dump /proc/net/nf_conntrack to inspect the current MASQUERADE connections. The following connection tracks SSH (22) access from STA1 to STA2.
ipv4 2 tcp 6 4615 ESTABLISHED src=192.168.3.171 dst=192.168.10.20 sport=60446 dport=22 packets=27 bytes=1812 src=192.168.10.20 dst=192.168.3.171 sport=22 dport=60446 packets=21 bytes=2544 [ASSURED] mark=0 use=2
MASQUERADE supports two or more private LAN zones
Transparent proxy rule (external)
The following rule redirects all LAN -side HTTP traffic through an external proxy at 192.168.1.100 listening on port 3128. It assumes the lan address to be 192.168.1.1 — this is needed to masquerade redirected traffic towards the proxy.
config redirect option src lan option proto tcp option src_ip !192.168.1.100 option src_dport 80 option dest_ip 192.168.1.100 option dest_port 3128 option target DNAT config redirect option dest lan option proto tcp option src_dip 192.168.1.1 option dest_ip 192.168.1.100 option dest_port 3128 option target SNAT
FTP passthrough
opkg update opkg install kmod-nf-nathelper /etc/init.d/firewall restart
SIP passthrough
opkg update opkg install kmod-nf-nathelper-extra /etc/init.d/firewall restart
This website uses cookies. By using the website, you agree with storing cookies on your computer. Also you acknowledge that you have read and understand our Privacy Policy. If you do not agree leave the website. OK More information about cookies
Self-registration in the wiki has been disabled.
If you want to contribute to the OpenWrt wiki, please post HERE in the forum or ask on IRC for access.
Except where otherwise noted, content on this wiki is licensed under the following license:
CC Attribution-Share Alike 4.0 International
Как пробросить порт в OpenWRT
Ранее я уже рассказывал об интересном и нужном проекте OpenWRT. Как открыть порт в OpenWRT и как сделать перезагрузку роутера по крону.

Недавно прошивал недорогой Wi-Fi роутер TP-Link альтернативной прошивкой OpenWRT и решил рассказать и показать в картинках как сделать форвардинг портов в OpenWRT.
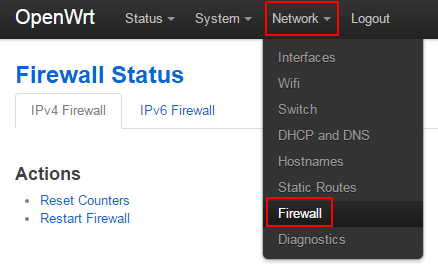
Заходим в веб интерфейс OpenWRT и переходим NetWork — Firewall
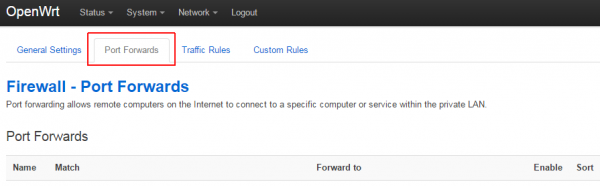
Дальше нажимаем Port Forwards
В самом низу страницы будут поля для ввода данных нового правила пересылки порта — New port forward
Записываем туда наши данные:
1. Name — название правила, например, SSH или можно чтобы было более понятно в будущем — SSH for New Server 05
2. Protocol — выбираем нужный протокол, если не знаете какой нужен или нужны оба, то выбираем TCP+UDP
3. External Zone — оставляем wan, ведь запрос к порту будет приходить из интернета, а он как правило, подключен в wan порт и так же называется в системе.
4. External port — внешний номер порта на котором мы хотим видеть переадресованный внутренний ресурс
5. Internal Zone — оставляем lan
6. Internal IP address — внутренний IP адрес нашего сервиса или устройства, который мы форвардим наружу в интернет.
7. Internal port — внутренний номер порта
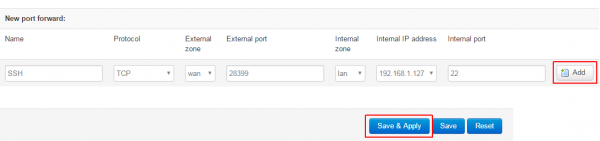
После того как заполним все поля нажимаем Add, как только правило добавится в список нажимаем Save & Apply. Правило сохраняется и сразу применяется, через пару секунд, внешний порт уже должен пробрасывать на внутренний, т.е. форвардинг заработает.
На этом этапе обычно достаточно действий, однако вам может потребоваться защитить ваш внутренний сервис от всяких внешних сканеров и роботов-переборщиков.
Самое простое, что можно сделать — ограничить форвард порт только для нужного (вашего) IP адреса.
Как разрешить проброс порта только для своего IP адреса?
Редактируем созданное нами правило, для этого находим его в списке и нажимаем Edit.
![]()
Открывается страница с более расширенными опциями нашего созданного правила форварда.
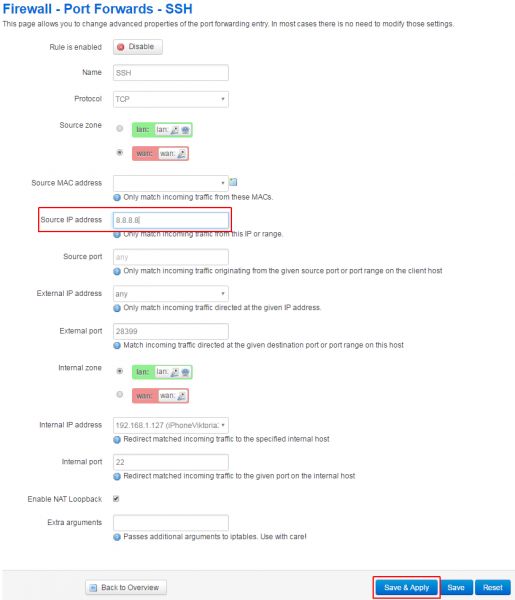
Находим строку Source IP address — именно тут мы можем указать нужный IP адрес, с которого мы будем получать доступ к проброшенному порту.
На примере в картинке я указал адрес Google, вы конечно же должны указать свой внешний адрес или диапазон адресов. Если у вас статический адрес IP, то вам повезло.
Вместо одного ай пи, можно указать диапазон или подсеть, например в таком виде 94.94.94.0/24
После этого нажимаем Save & Apply и внесенные изменения сохраняются и вступают в силу. Обычно этих действий достаточно для того чтобы сделать forwarding порта в OpenWRT.
Кому помогли данные советы, прошу не стесняться и ставить лайки, так же писать комментарии