- Setting up the FRITZ!Box for use with a cable connection
- 1 Unlocking your FRITZ!Box
- 2 Connecting the FRITZ!Box to the cable connection
- 3 Configuring the internet connection in the FRITZ!Box
- 4 Setting up telephony in the FRITZ!Box
- Настройка маршрутизатора AVM Fritz Box Router для Smart DNS Proxy
- Категории
- Login to the FRITZ 6490 Cable
- Other FRITZ 6490 Cable Guides
- Find Your FRITZ 6490 Cable Router IP Address
- Login to the FRITZ 6490 Cable Router
- Enter FRITZ 6490 Cable Internal IP Address
- FRITZ 6490 Cable Default Username and Password
- FRITZ 6490 Cable Home Screen
- Solutions To FRITZ 6490 Cable Login Problems
- FRITZ 6490 Cable Password Doesn’t Work
- Forgot Password to FRITZ 6490 Cable Router
- How to Reset the FRITZ 6490 Cable Router To Default Settings
- Other FRITZ 6490 Cable Guides
Setting up the FRITZ!Box for use with a cable connection
You want to set up a FRITZ!Box Cable? ✔ Here you’ll find the right step-by-step instructions for your connection.
The FRITZ!Box Cable is optimally prepared for use with a cable connection, regardless of whether you received it from your cable provider or purchased it in a store.
FRITZ!Boxes provided by cable providers are already unlocked for cable connections and are configured automatically.
If you purchased the FRITZ!Box in a store, you must ask your provider to unlock it and configure it once. If you are using your FRITZ!Box in Germany, use the guide that applies to your provider in Setting up the FRITZ!Box: Guides for different providers. If your internet service provider is not listed there, proceed as described in this guide.
1 Unlocking your FRITZ!Box
If you purchased your FRITZ!Box from a retailer, your cable provider must unlock it first:
Important: In Germany, you can only use the FRITZ!Box 6490 Cable with the article number 20002778 with all cable connections. Models with other AVM article numbers are not intended for use with all cable connections.
- Have your cable provider unlock your FRITZ!Box. Depending on the provider, you can either use an activation portal or call their customer service to activate it.
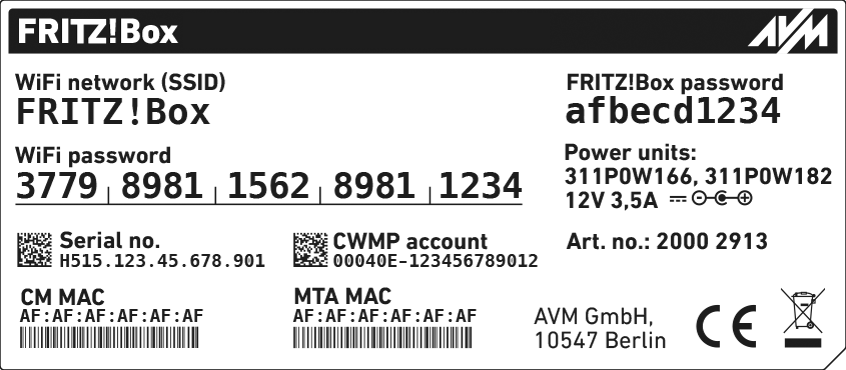
- With some providers, the serial number and the FRITZ!Box’s «CM MAC» address on the bottom of the FRITZ!Box are required to unlock it:
2 Connecting the FRITZ!Box to the cable connection
- Insert one end of the coaxial cable into the «Cable» port on the FRITZ!Box.Use the coaxial cable supplied with the FRITZ!Box, for example.
- Insert the other end of the coaxial cable into the socket for the internet connection (data socket) on the multimedia outlet in your home.
3 Configuring the internet connection in the FRITZ!Box
The following steps are only necessary if you purchased the FRITZ!Box in a store:
Note: If you obtained your FRITZ!Box from your cable provider, it is configured automatically by the provider.
- Open the FRITZ!Box user interface.
- Enter the FRITZ!Box password on the bottom of the device and click «Log In».
- If the menu «Set up Internet Connection» is not displayed automatically:
- Click «Internet» and then «Account Information».
- Enable the option «Internet connection via cable».
- Open a new window in your web browser and call up a web page of your choice, for example en.avm.de.
- Now you will be redirected to your cable provider’s portal for unlocking your FRITZ!Box.
- Follow the instructions given in the activation portal and make note of the login information for your telephone numbers, if they are displayed during the unlocking procedure.
4 Setting up telephony in the FRITZ!Box
The following steps are only necessary if you purchased the FRITZ!Box in a store and would like to use telephones with the FRITZ!Box:
Note: If you received your FRITZ!Box from your cable provider, telephone numbers are automatically configured in your FRITZ!Box when your internet connection is configured.
If you received login information for internet telephony from a provider and want to use telephones with the FRITZ!Box:
Настройка маршрутизатора AVM Fritz Box Router для Smart DNS Proxy
Следуя инструкциям по настройке, необходимо выполнить только один раз. После завершения первоначальной настройки вам не нужно будет выполнять те же самые действия в любое время. Ваше соединение будет работать автоматически *в любое время! Эти инструкции показывают меню на английском языке. Так как этот маршрутизатор очень популярен в Германии, здесь в квадратных скобках приведены соответствующие немецкие термины.
* Инструкции основаны на кабеле FRITZ!Box 6490.
1. Открытая страница администрирования маршрутизаторов. Обычно http://192.168.178.1
2. Введите свой пароль, если он у вас есть. Пароль по умолчанию напечатан на этикетке под маршрутизатором.
3. Убедитесь, что у вас активирован «Расширенный» вид [Эрвайтер]. Текущая настройка находится в нижней левой части экрана: «Вид»: Дополнительно» [Ansicht: Erweitert]. Если на экране написано «Вид: Стандартный» Вы можете нажать на слово «Стандартный», чтобы переключиться в «Расширенный» режим. Альтернативно можно нажать на меню гамбургеров в правом верхнем углу и затем активировать «Расширенный вид» [Arweiterte Ansicht].

4. Нажмите на «Интернет» слева, «Тип подключения» [Zugangsart], а затем перейдите на вкладку «DNS-сервер».
5. В разделе «Серверы DNSv4» нажмите «Использовать другие серверы DNSv4» [Andere DNSv4-Server verwenden] и заполните оба поля «Сервер DNS» IP-адресами прокси-сервера Smart DNS Proxy из списка.
Список IP-адресов наших DNS-серверов можно найти в нашем списке DNS-серверов здесь:
Используйте ближайшие к вашему физическому местоположению DNS-серверы. Выберите ближайший к вашему физическому местоположению сервер в качестве основного. Затем выберите 2-й ближайший сервер в вашем физическом местоположении в качестве Вторичного сервера.
В нашем примере мы выбрали Германию: 54.93.173.183 и Великобританию: 35.178.60.174 6. нажмите «Применить» [Übernehmen].
7. Нажмите кнопку «Система» слева, «Резервное копирование» [Sicherung], а затем нажмите на вкладку «Перезагрузка» [Neustart].
8. Нажмите кнопку «Перезапустить» [Neu starten]. Теперь маршрутизатор перезагрузится, обратите внимание, что все активные соединения с Интернетом и телефоном будут потеряны до тех пор, пока маршрутизатор не перезагрузится (может занять около 5 минут).
* Помните, что всякий раз, когда IP-адрес вашего ПК/маршрутизатора меняется, наш сервис перестает работать на вас. Вам необходимо будет войти в систему Smart DNS Proxy и обновить свой IP-адрес. Таким образом, наша система проверит ваш IP-адрес и добавит ваш новый IP-адрес в нашу базу данных. После этого вы сможете продолжать пользоваться нашим сервисом. Если вы настраиваете систему в первый раз, мы также предлагаем вам войти с вашего компьютера на наш сайт из той же проводной/беспроводной сети, чтобы показать нашей системе ваш IP-адрес.
Для автоматизации этого процесса, пожалуйста, выполните следующие дополнительные шаги:
9. После перезагрузки маршрутизатора снова войдите в свой роутер, как описано выше в разделах 1 и 2.
10. Если Вы не настроили учетную запись MyFritz!, сделайте это сейчас и убедитесь, что Ваш маршрутизатор подключен к ней. Вы можете сделать это здесь: https://sso.myfritz.net/.
11. Нажмите на «Интернет» слева, «MyFRITZ!Account» [MyFRITZ!-Konto].
12. Если Ваша учетная запись MyFritz! была настроена правильно, Ваш индивидуальный адрес теперь можно найти в строке «Ваш адрес MyFRITZ!». Выберите всю запись и скопируйте ее.
например «5gljskt56f5gestt.myfritz.net» — этот код для Вас будет другим. Не используйте версию, которая начинается с «https://».13. Зайдите на https://www.smartdnsproxy.com/MyAccount/Profile и вставьте только что скопированную запись в поле «Динамическое имя DNS хоста (необязательно)», а затем нажмите кнопку «Обновить мой профиль».
14: Зайдите на страницу MyAccount и проверьте, есть ли у вас 4 зеленых галочки. Если нет, проверьте, что вы отключили IPv6 на вашем компьютере, и что вы перезагрузили маршрутизатор и компьютер.
Если вы установили автоматическую настройку DNS, это подтверждается внизу:
Внимание
* Помните, что всякий раз, когда IP-адрес вашего ПК/маршрутизатора меняется, наш сервис перестает работать на вас. Вам необходимо будет LOG INTO Smart DNS Proxy и UPDATE ваш IP-адрес, чтобы наша система могла проверить ваш IP-адрес и добавить ваш новый IP-адрес в нашу базу данных. После этого вы сможете продолжать пользоваться нашим сервисом. Если вы настраиваетесь в первый раз, мы также предлагаем вам войти с вашего компьютера на наш сайт из той же проводной/беспроводной сети, чтобы показать нашу систему ваш IP-адрес и активировать его в вашем аккаунте.Спасибо за отзывы Возникла проблема с отправкой вашего отзыва. Пожалуйста, повторите попытку позже.
Категории
Login to the FRITZ 6490 Cable
Here are instructions for logging in to the FRITZ 6490 Cable router.
Other FRITZ 6490 Cable Guides
Find Your FRITZ 6490 Cable Router IP Address
In order to login to the FRITZ 6490 Cable router, we need to know it’s internal IP address.
Known 6490 Cable IP Addresses 192.168.178.1 169.254.1.1 http://fritz.box/ Choose an IP address from the list above and then follow the rest of this guide.
If you do not find your router’s interface later in this guide, then try a different IP address. Keep trying different IP addresses until you find your router. It should be completely harmless to try different IP addresses.
If you try all of the above IP addresses and still cannot find your router, then you have the following options:
Choose an internal IP Address using one of the above methods and then try to login to your router.
Login to the FRITZ 6490 Cable Router
The FRITZ 6490 Cable router has a web-based interface. In order to log in to it, you need to use a web browser, such as Chrome, Firefox, or Edge.
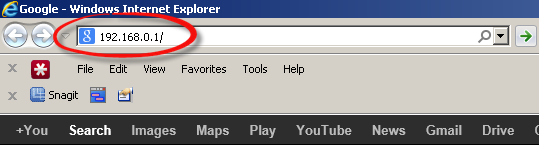
Enter FRITZ 6490 Cable Internal IP Address
Find the address bar in your web browser and type in the internal IP address of your FRITZ 6490 Cable router. The address bar will look like this:
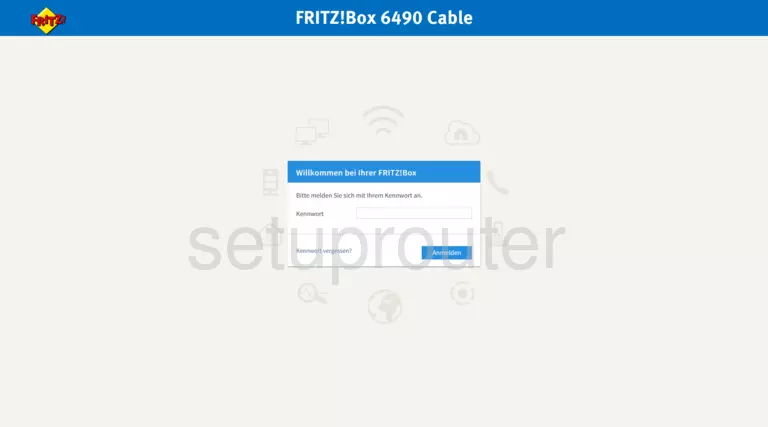
Press the Enter key on your keyboard. You should see a window pop up asking you for your FRITZ 6490 Cable password.
FRITZ 6490 Cable Default Username and Password
You must know your FRITZ 6490 Cable username and password in order to log in. If you are not sure what the username and password are, then perhaps they are still set to the factory defaults. Try all of the FRITZ 6490 Cable factory default usernames and passwords below.
FRITZ 6490 Cable Default Usernames and Passwords Username Password none printed on router Enter your username and password in the window that pops up. Keep trying them all until you get logged in.

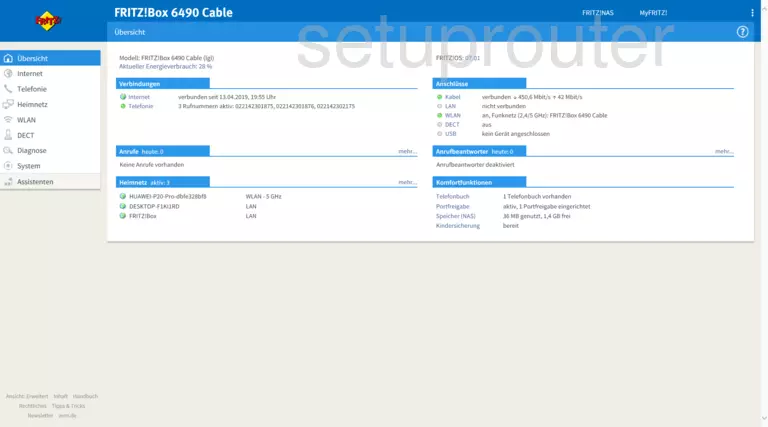
FRITZ 6490 Cable Home Screen
You should now see the FRITZ 6490 Cable home Screen, which looks similar to this:
If you see this screen, then you know that you are logged in to your FRITZ 6490 Cable router. Now you can follow any of our other guides for this router.
Solutions To FRITZ 6490 Cable Login Problems
If you cannot get logged in to your router, here a few possible solutions you can try.
FRITZ 6490 Cable Password Doesn’t Work
Your router’s factory default password might be different than what we have listed here. You can try other FRITZ passwords. Here is our list of all FRITZ Passwords.
Forgot Password to FRITZ 6490 Cable Router
If you are using an ISP provided router, then you may need to call their support desk and ask for your login information. Most of the time they will have it on file for you.
How to Reset the FRITZ 6490 Cable Router To Default Settings
As a last resort, you can reset your router to factory defaults. If all else fails and you are unable to login to your router, then you may have to reset it to its factory default settings.
Other FRITZ 6490 Cable Guides
Here are some of our other FRITZ 6490 Cable info that you might be interested in.