Wlan Repeater
If you got here from Google you may wish to read Linking Routers first. In fact, no matter how you got here, you should look at that page first.
This mode is NOT for WIRED connections between two routers! It is a wireless connection only.
- No setup changes are required to be made to your host-router / AP except that you usually must use WPA2-AES ONLY for dd-wrt to work. Also, some other revisions or adjustments may be desirable, as stated below.
- if your host AP is 192.168.1.x, then your repeater could be subnet 192.168.2.x or 192.168.69.1 or . any other unique subnet in your network. If you need a repeater-type solution in the same subnet you are in the wrong place. You need to read Linking Routers first.
[edit] Preparation
You need to know the host router’s access credentials:
- SSID
- the security settings
- its IP address
- prepare and verify the DD-WRT to be configured as a repeater
NOTE: ENSURE YOU ARE USING A RECENT STABLE BUILD. DO NOT USE THE ROUTER DATABASE, IT IS NOT UPDATED. SEE: Where do I download firmware? - cable-connect your repeater-to-be to a laptop or desktop
- install or upgrade the DD-WRT firmware (if required)
- do a 30 sec reset (see Hard reset or 30/30/30).
- verify which chip set your device uses and read Broadcom / Artheros considerations, below
- proceed with installation
[edit] Broadcom Considerations
NOTE: NEVER use v24 SP1. Refer to the Peacock thread, stickies, and build release threads for the latest recommended stable build.
[edit] Atheros Considerations
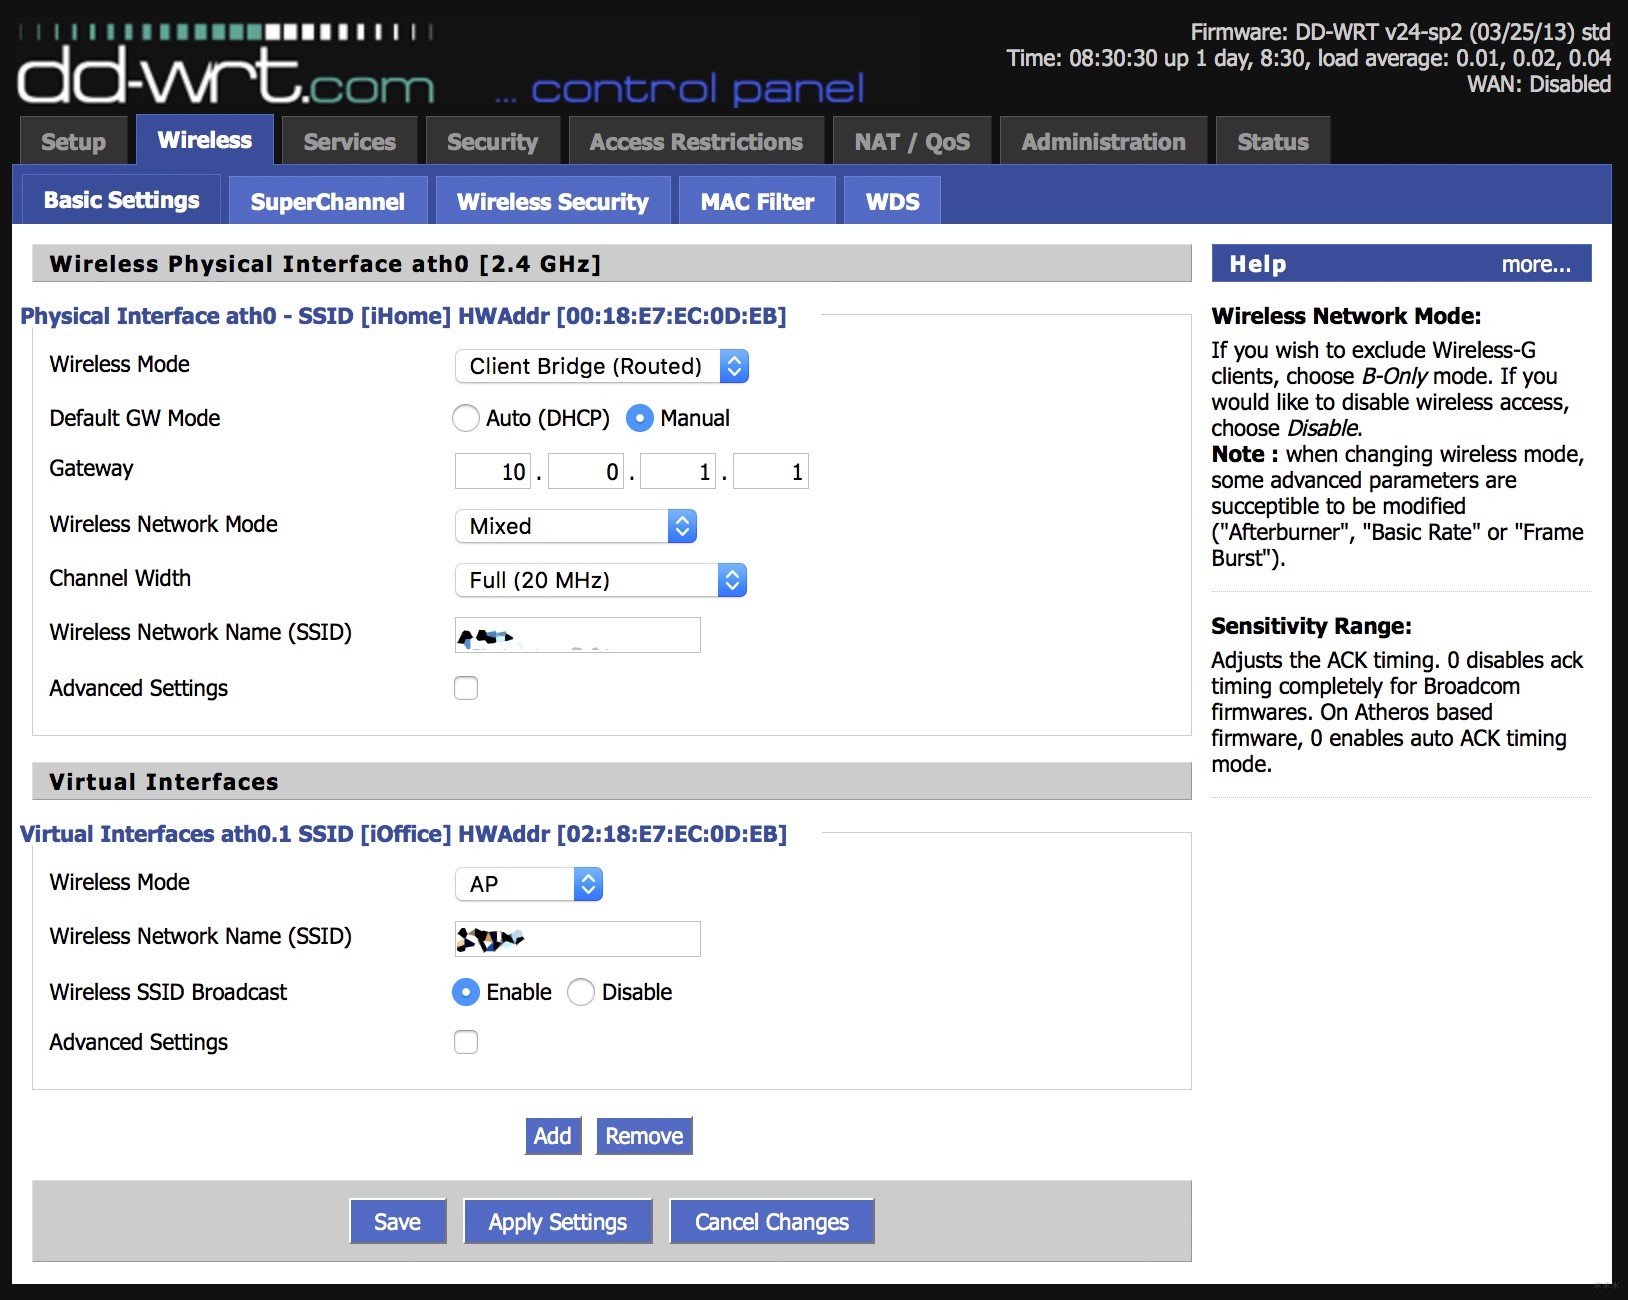
There is no «Repeater» mode on Atheros units, but you still can use it as repeater, just set the original interface as «client» and get it to connect to your AP, then create a virtual interface (VAP) to broadcast the new SSID.
[edit] Repeater Setup
- Do a hard reset).
- Under Wireless -> Basic Settings:
- Wireless mode: Repeater
- Wireless Network Mode: [set to match the host]
- Wireless Network Name (SSID): [set to match the host]
- Save
- Add one virtual interface
- Enter a new (unique) SSID of your choice
- Save
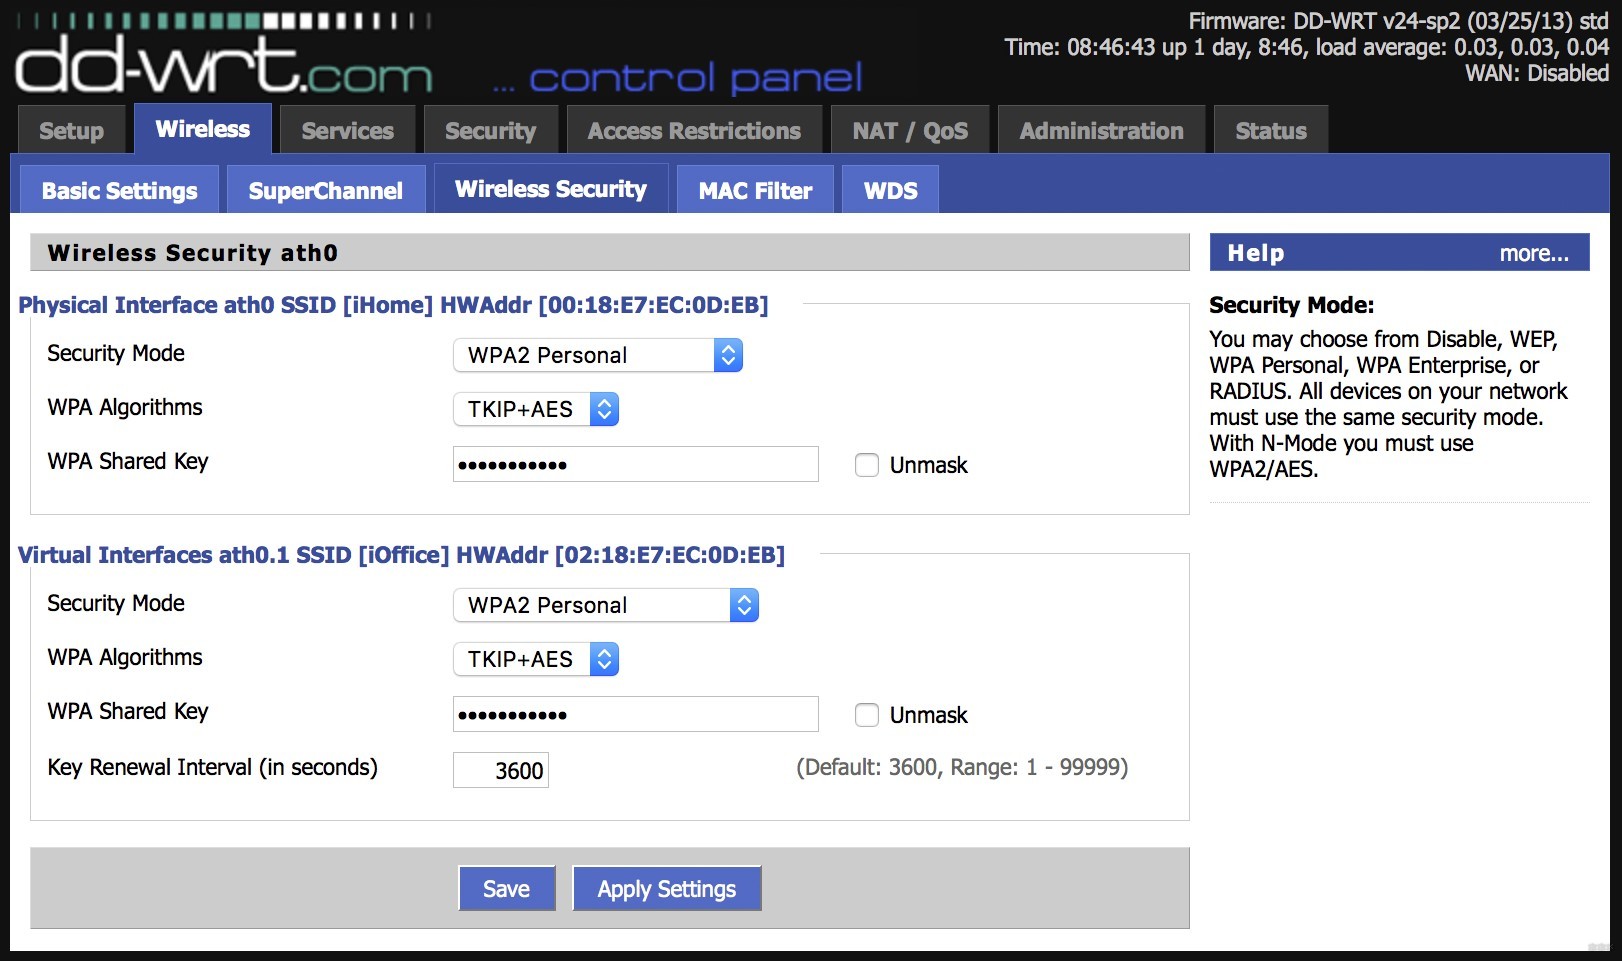
- Under Wireless->Wireless Security:
- Physical Interface wl0:
- Enter the necessary settings to connect to the wlan you’d like to repeat (if no security, leave disabled. but consider enabling security for both host AP and Repeater)
- Save
- Virtual Interface wl0.1:
- Choose the best security mode, which should be WPA2-AES whenever possible. The only other mode that will usually work is wep, which is not secure. Other modes normally do not work with ddwrt. See the peacock announcement
- Enter a security key
- Note: When using security on both the physical and virtual interfaces, you must (usually) use the same security type, and exactly the same passphrase on both the physical and virtual ssid. If you cannot connect when trying different security or passphrases, make them identical.
- Save
- Note: If you experience problems when setting up for the first time, a leading practice is to configure without any encryption (i.e. setting security to «None») at first, until the unit is confirmed to be working properly, and configuring encryption as a later step.
- Physical Interface wl0:
- Under Setup->Basic Setup:
- Network Setup:
- Here you define the repeater’s own subnet
- Set IP address to a different subnet from the Host AP you wish to repeat
- Example: if host AP is 192.168.1.x, assign repeater to 192.168.2.1
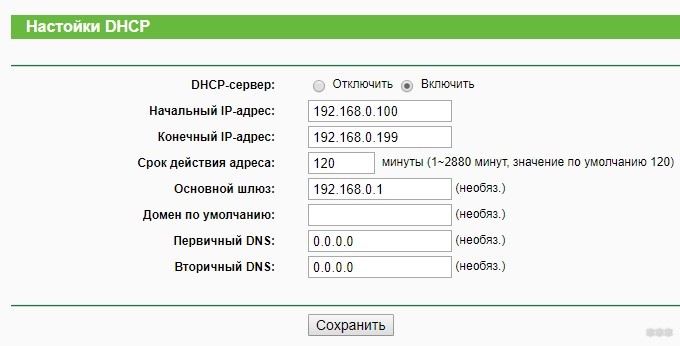
- Set up your DHCP range if you desire
- Save
- Network Setup:
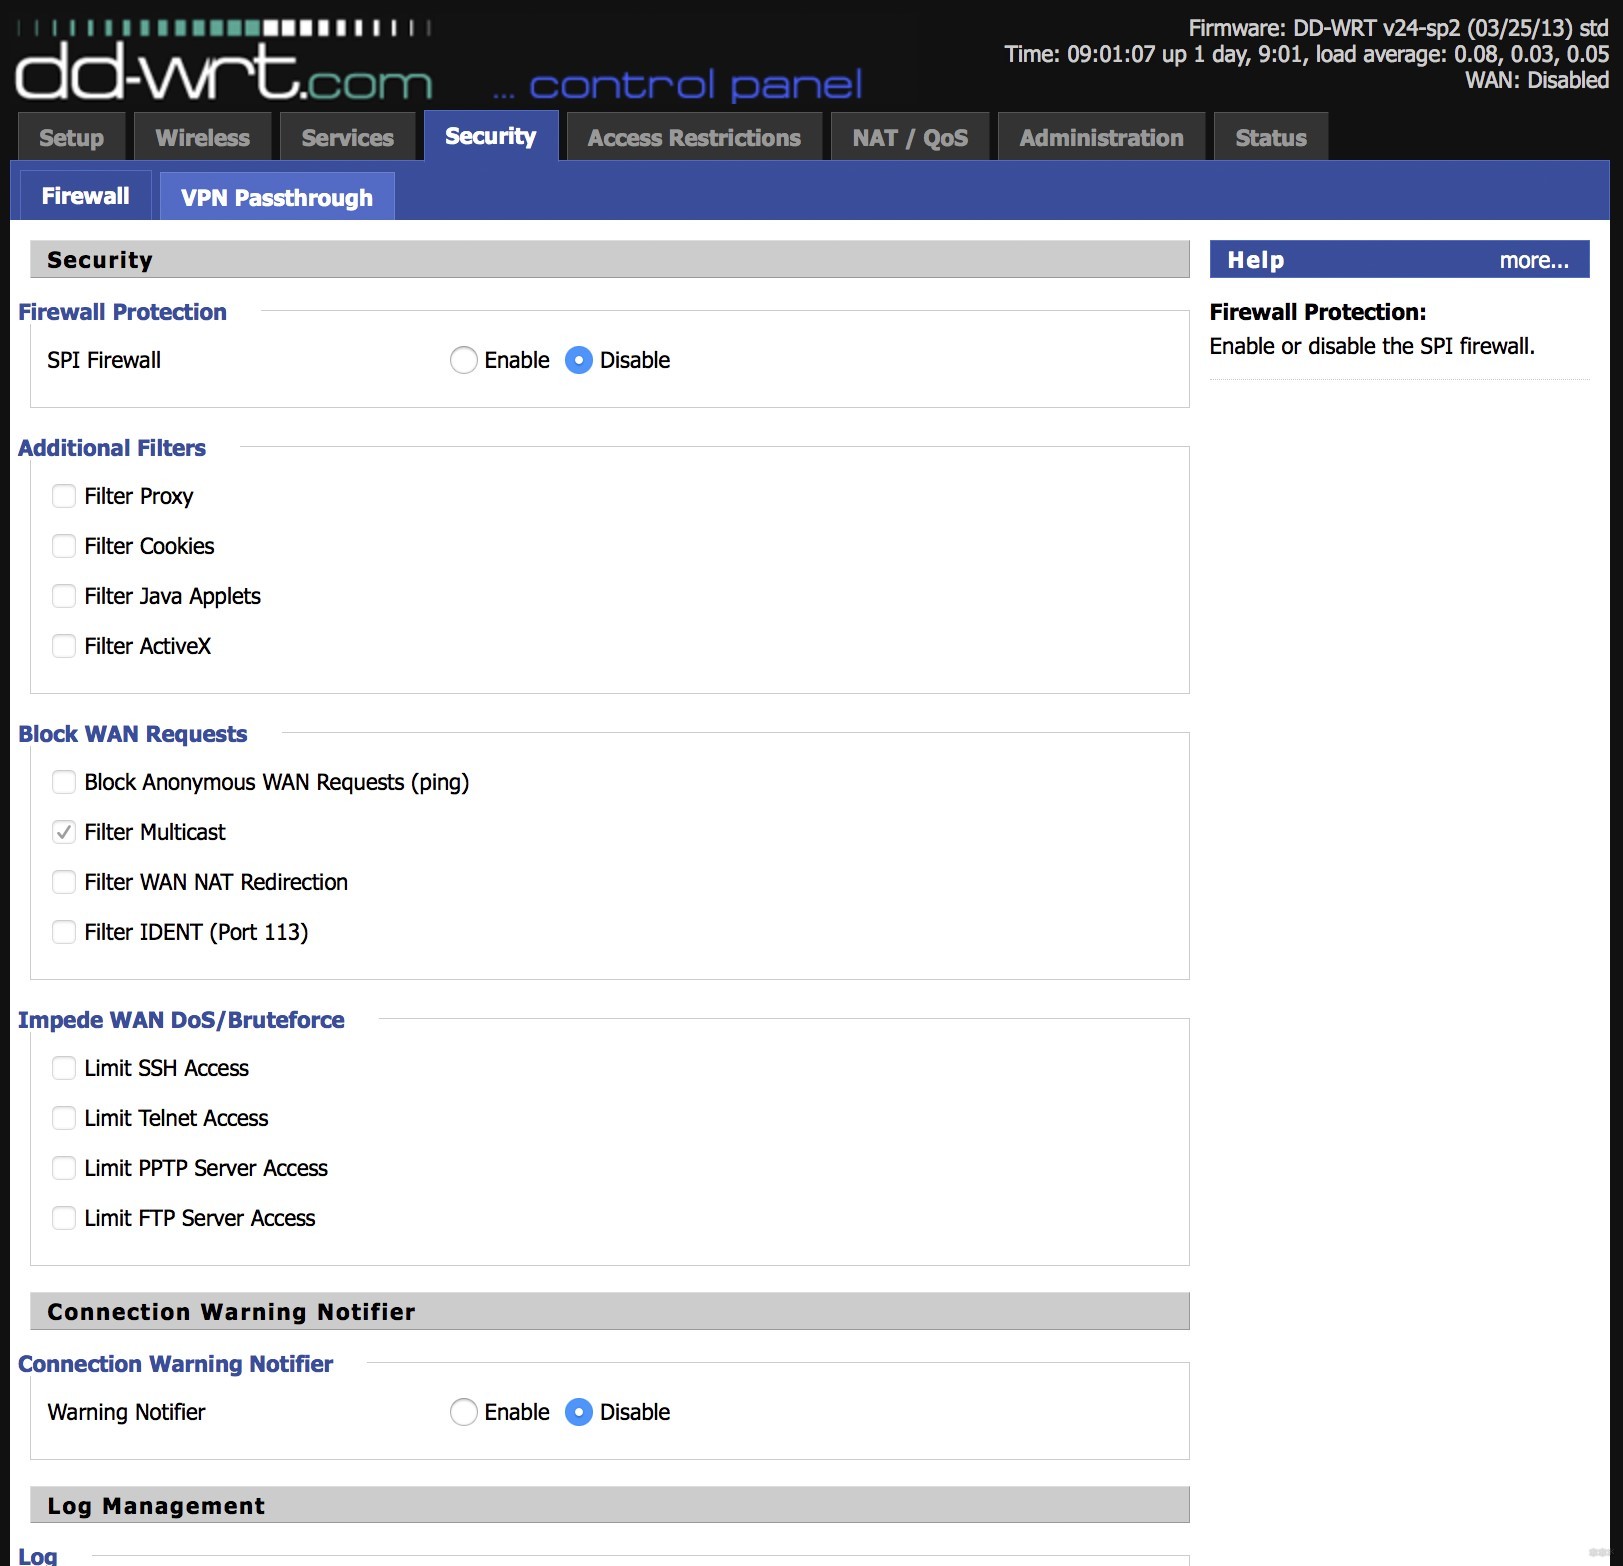
- (Optional but recommended) Under Security:
- Uncheck all items in the «Block WAN Request» section (except Filter Multicast). THEN disable the SPI firewall
- Note: If you are very concerned about security, a Repeater might still work okay with the SPI firewall enabled. If you decide to leave it enabled but experience problems, keep this step in mind.
- Save
- Uncheck all items in the «Block WAN Request» section (except Filter Multicast). THEN disable the SPI firewall
- Recheck each tab and section to ensure that your settings are correct. Then click APPLY to write changes.
[edit] Testing
- After the Repeater has rebooted, disconnect power and let it cool a bit. (let ARP expire)
- Turn power back on and let it boot
- See if you can ping 192.168.1.x and access an outside website
[edit] Footnotes
Ensure the repeater is within radio range of your host network. When the unit has logged onto the Host WLAN and has begun repeating its signal, you will see the DHCP address (generally in the 192.168.1.100-200 range) in the upper right-hand corner as the WAN address. If it shows 0.0.0.0, it is not linked, and not repeating. Refresh (F5) the browser page to make sure the WAN IP is current, when making changes.
To access your secondary router from devices on your primary LAN, go to Administration->Management->Remote Access and enable Web GUI Management. You should then be able to access the secondary router by typing in its WAN IP. Setting up a static lease for the device in Services/Services will allow you to always know where it is to access it.
But for the pièce de résistance, enter the Host WLAN router’s web GUI (NAT/QoS->Port Forwarding in DD-WRT) and set up a port forward so you can check on and fully access and control your new repeater outside the WAN (via the Internet). Check the DHCP IP address assigned to the new repeater (the Host Name entered in Setup->Basic Setup->Optional Settings will appear in the DHCP clients table of the Host router under Status->Sys-Info), and write it down. Then go to Port Forwarding and click «Add.» Make the forwarded port (Port from) something you can remember easily, like 8128 if you found your repeater on 192.168.1.128, for example. Click Both for Protocol, enter the private IP address of the repeater in the IP Address box, enter Port 80 (http default) in the «Port to» box. Or if you want to be tricky, enter something besides 80, but just be sure this matches the active Web GUI port number on your repeater). Lastly, be sure to check «Enable,» and then click «Save then «Apply». Then check the main WLAN router at its public IP address (or DDNS link) from outside the WAN, and also access the repeater GUI on the same address (or DDNS link) followed by :8128. E.g. http://yourwlan.dyndns.org/ for your Host router and http://yourwlan.dyndns.org:8128/ for the repeater.
[edit] Tips/Gotcha’s/Problems
- Note copied from Repeater Bridge mode, as it may also apply to Repeater mode: «Repeater Bridge with WPA2-AES is broken for k2.6 builds after 25974, though some models might work through 26125.» See Repeater Bridge for original note.
- If you cannot get this to connect, first try disabling ALL wireless security to test. If that does not resolve your problems, try putting both the primary and secondary routers into «G only» mode.
- When MAC Address Cloning is enabled, the Wireless Security Mode of the repeated AP has to match that of the Virtual AP. So if the AP you wish to repeat has WEP encryption you need to use WEP for the Virtual AP. Without MAC Address Cloning, you may select any Wireless Security Mode for the Virtual AP, and it need not match the repeated AP.
- I have seen on some networks where Repeater mode will not provide a reliable connection if the STP function is Enabled on the Basic Setup page. Set it to Disabled and see if your connection improves.
- If the host AP settings Wireless->Basic Settings->Wireless Network Mode is «G-only», the repeater must also be set the same way. Otherwise it will fail the connection from the repeater side.
- Tests have shown that there is no way to lock a Repeater onto a particular channel.
- I was not able to get online with the Gateway and the Local DNS containing my router’s IP as Stuckeymax suggested. Instead I left them as 0.0.0.0 and all was good.
- Also take note of the fact that all repeaters, including this Wlan Repeater mode, will sacrifice half of the bandwidth available from the primary router for clients wirelessly connected to the repeater. This is a result of the repeater taking turns talking to not just one partner, but to two, and having to relay the traffic between them. As long as your bandwidth requirements are within this halved bandwidth amount there will be little or no reduction in «speed». This is exactly the same as having two active wireless clients on one router.
- I tried a daisy chain of 4 routers AP-Rpt-Rpt-Clt, G-Only WPA2, all DHCP client from the previous, all managing it’s own subnet with it’s own DHCP-DNSMasq Authoritative (192.168.[1-2-3-4].0/24. Worked fine even with SPI firewall defaults enabled. No issues to manage all nodes from the net with the help of Port Forwarding and Port Range Forwarding.
Настройка DD WRT в режиме репитера: по шагам от WiFiGid
DD WRT – это альтернативная прошивка для ряда моделей роутеров на чипах Atheros, BroadCom, Ralink, XScale, которая есть в свободном доступе для каждого. Среди множества функций этой прошивки, в статье рассматривается настройка роутера в режиме репитера в DD WRT.
Варианты использования репитера
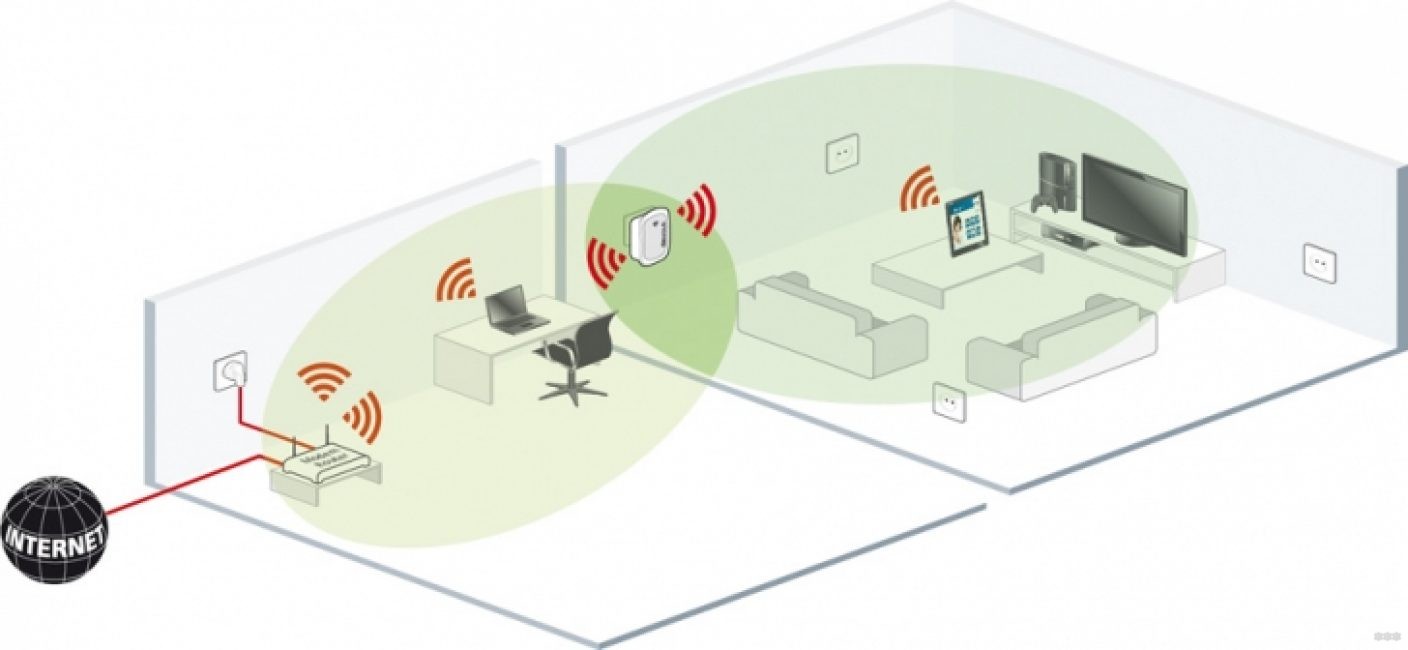
Использовать повторитель можно в различных сценариях. Чаще всего его применяют для усиления Wi-Fi или подсоединения второй LAN сети к первой, для которой открыт доступ в интернет.
- Условие 1: маршрутизатор с выходом в интернет раздает в пределах нескольких комнат Wi-Fi. Необходимо без протягивания кабеля предоставить доступ в интернет устройствам, которые будут находиться на улице, вне зоны досягаемости маршрутизатора.
- Условие 2: на фирме нужно подключить 8 компьютеров в одну локальную сеть с доступом к интернету. Четыре компьютера находятся в одной комнате и подключены Ethernet кабелем к роутеру, два ноутбука, один планшет и компьютер в другой комнате, и подключены к другому роутеру, без доступа к интернету.
Решением подобных задач станет использование беспроводного моста в режиме ретранслятора между двумя роутерами, соединяющего два сегмента LAN по Wi-Fi. По сути, второй роутер будет ретранслировать сигнал первого, усиливая его. А для соединения маршрутизаторов кабель не нужен.
Эта функция не доступна в режиме клиентского моста, который поддерживается в стандартных прошивках многих маршрутизаторов. После установки клиентского моста второй роутер может подключать к сети только компьютеры, соединенные через Ethernet кабель. Wi-Fi соединение не доступно.
Настройка в режиме репитера с DD WRT позволяет подключаться второму роутеру в качестве моста по Wi-Fi, а также раздавать интернет по Wi-Fi и LAN без ограничений.
Настройка моста репитера
Для наглядности и большего понимания посмотрите следующее видео, где версия прошивки представлена на русском языке:
Чтобы мост работал, первый роутер выставите в режим AP с включенным DHCP, а второй маршрутизатор возьмите с прошивкой DD WRT.
- Сделайте сброс настроек по умолчанию на втором роутере (зажать кнопку Reset).
- Подключитесь к роутеру с помощью Ethernet кабеля или к Wi-Fi точке dd-wrt.
- В сетевых подключениях в свойствах сети выставите статический IP 192.168.1.10.
- В адресной строке браузера напишите 192.168.1.1 и войдите в админку. Новые версии прошивки перед продолжением работ требуют установить пароль на вход.
- Перейдите во вкладку Wireless → Basic Setting. Выставите правильные параметры и жмите «Сохранить»:
- Wireless Mode: Repeater Bridge.
- Wireless Network Mode: Mixed (режимы на DD WRT и первом роутере должны совпадать).
- Wireless Network Name (SSID): аналогичный имени сети первого маршрутизатора (например dd-wrt).
- Channel: аналогичныйпервомуроутеру
- SSID Broadcast: Enable.
- Откройте вкладку Wireless → Wireless Security. Выставите параметры и жмите «Сохранить»:
- Security Mode – WPA2 (должен совпадать с первым роутером).
- WPA Algorithms – AES (аналогичный первому маршрутизатору).
- WPA Shared Key – минимум 8 символов. Аналогичный первому.
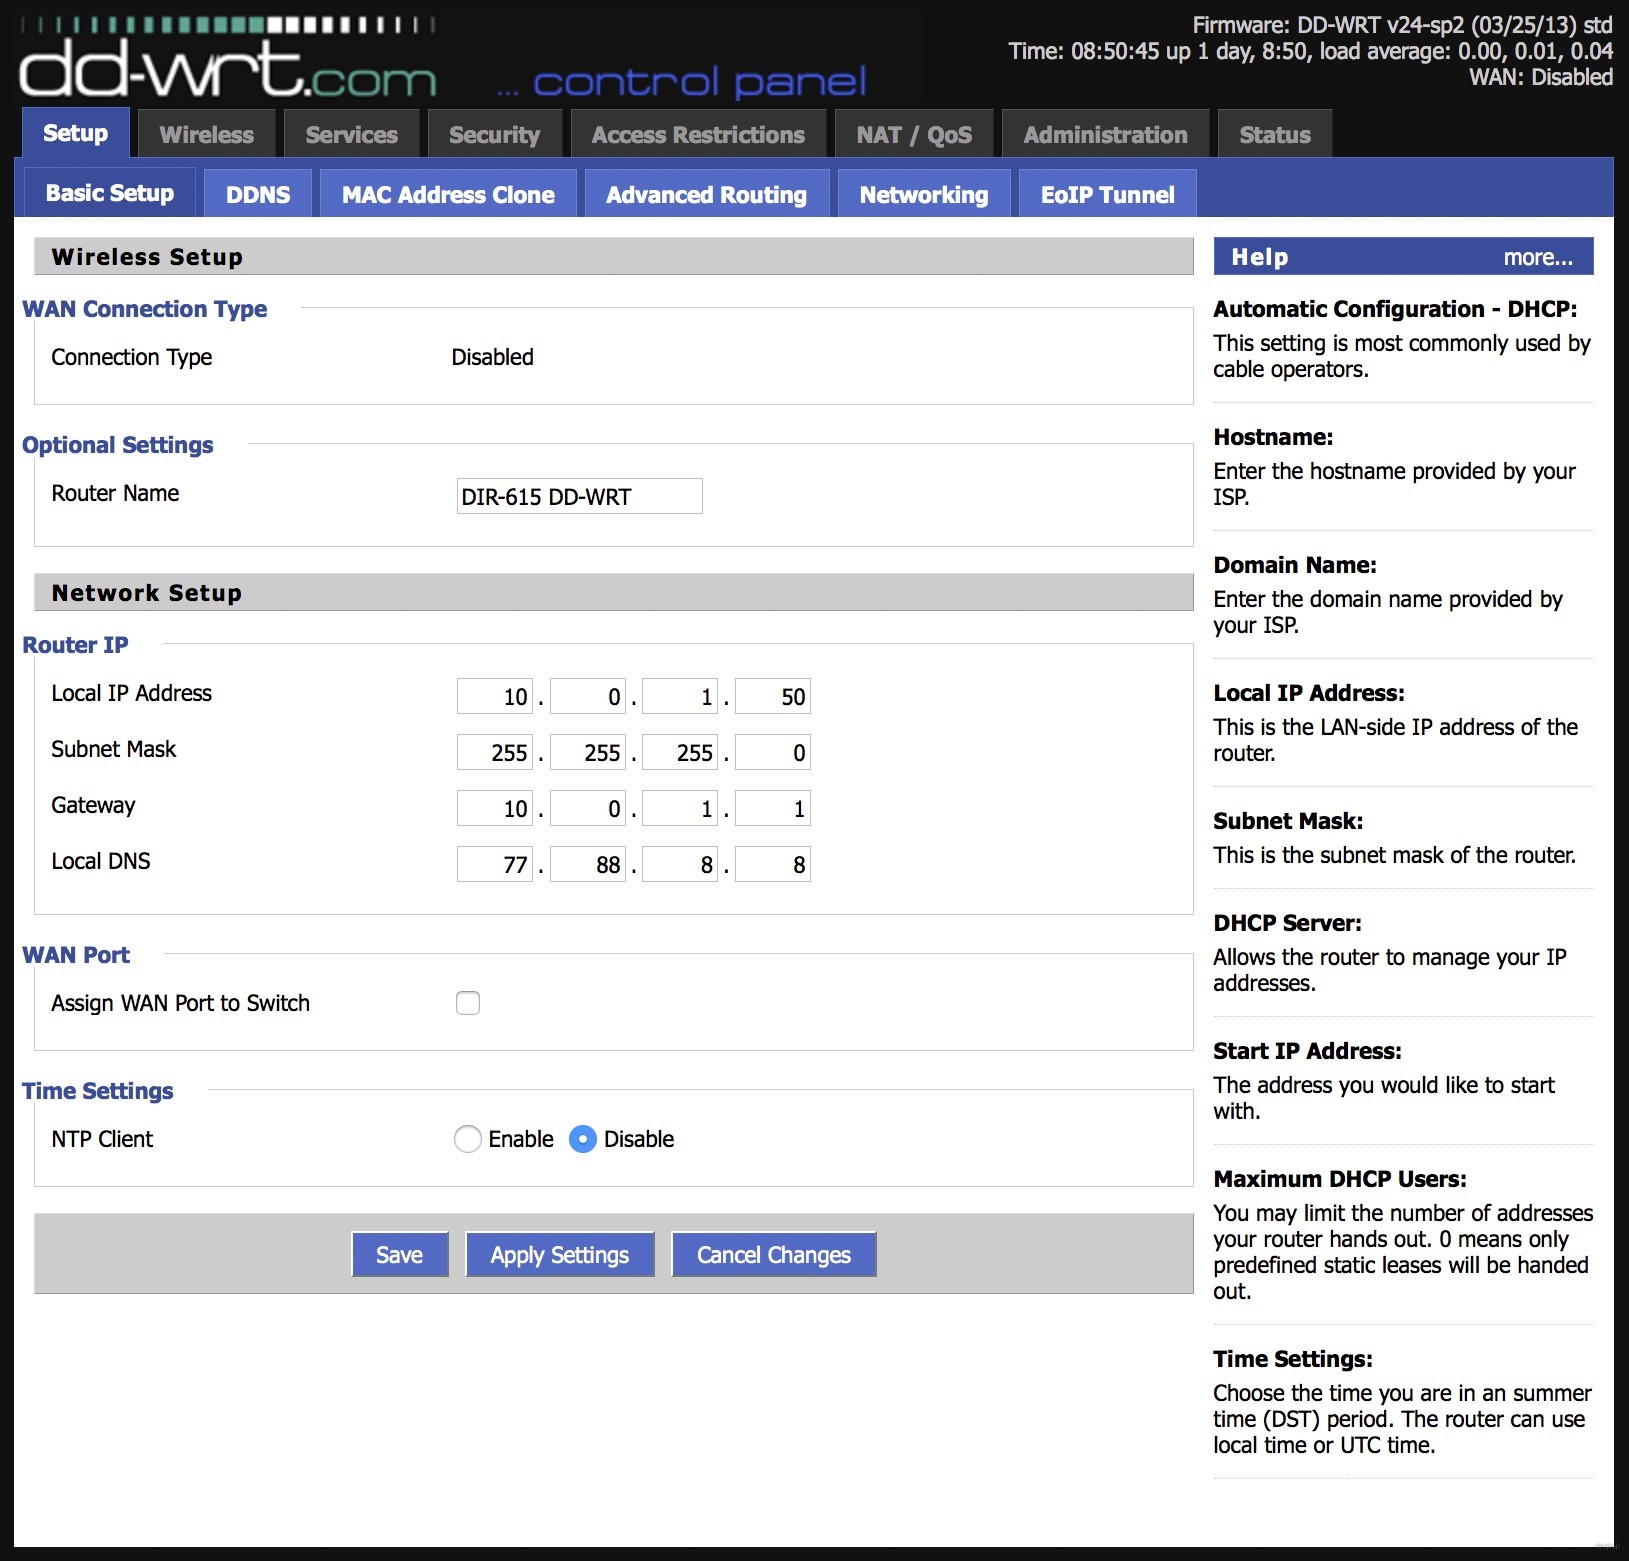
- Во вкладке Setup → Basic Setup настройте WDS и жмите «Сохранить»:
- Connection Type – DHCP.
- Local IP Address – если IP не меняли в первом роутере и оно выставлено по умолчанию 192.168.1.1, то здесь пропишите 192.168.2.1.
- Gateway – 192.168.1.1 (связываем с первым).
- DNS (можно Яндекс DNS) – 77. 88. 8. 8.
- Assign WAN Port to Switch – Enable.
- Подсоединитесь к удаленной сети Wi-Fi Wireless → Site Survey → Test (поиск) → Join и жмите «Применить».
- Далее задействуйте виртуальный интерфейс Wi-Fi, чтобы можно было раздавать интернет без проводов. В разделе Wireless → Basic Settings → Virtual Interfaces нажмите «Add». После настроек не забудьте «Сохранить»:
- Wireless Mode – AP.
- Wireless Network Name (SSID) – DD-WRT (придумайте имя для новой точки).
- Wireless SSID Broadcast -> Broadcast -> Enable (если Enable, значит сеть будет видна при Wi-Fi поиске).
Выбирая отличный от первого маршрутизатора тип ключа (например, WPA вместо WPA2), то через точку Wi-Fi может просто не пустить в локальную сеть.
Заключение
Настроить repeater с помощью прошивки DD WRT не сложно. Преимущества от этого: второй роутер раздает интернет от первого устройствам с проводным и беспроводным подключением. При этом второй маршрутизатор (репитер) находится на удалении от первого и соединен с ним через Wi-Fi.

