- Настройка сети в гостевой Ubuntu 16.04 Server на VirtualBox + Windows 7
- How to Configure Network Between Guest VM and Host in Oracle VirtualBox
- Requirements
- Create a Network For Guests and Host Machine
- Configure Virtual Machine Network Settings
- Configure Adapter to Connect Virtual Machine to Host
- Configure Adapter to Connect Virtual Machine to Internet
- Setup Static IP Address for Guest Virtual Machine
- Manage Virtual Machines From Host Using SSH
Настройка сети в гостевой Ubuntu 16.04 Server на VirtualBox + Windows 7
Весна, снова потянуло на эксперименты. Ну, в моем понимании этого слова. Решил поставить себе в Windows 7 виртуальную машину, а в эту машину — Ubuntu 16.04 Server (под которой работает хостинг для моих сайтов). И не то чтобы меня как-то OpenServer не устраивает — он как раз весьма неплох в качестве домашнего WAMP-а, но всё же иногда хочется иметь под рукой локально и LAMP, ну просто потому что. В качестве виртуальной машины [ожидаемо] выбрал VirtualBox.
В целом, установка Ubuntu 16.04 Server на VirtualBox каких-то особых вопросов не вызвала, но вот настройка сети в Ubuntu так, чтобы ее было видно из Windows, поставила меня в тупик. Ибо опыта в этом деле — 0, а мануалы по теме хотя и гуглятся во множестве, но в каждом из них тема почему-то раскрыта лишь частично, и требует уже определенного уровня знания Linux и принципов работы сетевых интерфейсов.
В конечном итоге я этот вопрос решил и теперь делюсь с теми, кому оно тоже актуально. Приступим.
1. Скачиваем VirtualBox для Windows www.virtualbox.org/wiki/Downloads
2. Скачиваем Ubuntu Server 16.04 www.ubuntu.com/download/server
3. Устанавливаем VirtualBox в систему (ставится легко, раскрывать этот вопрос здесь не буду, в крайнем случае — в сети есть много шпаргалок по теме).
4. Ставим Ubuntu Server 16.04 в VirtualBox. Здесь тоже всё не сложнее (а то и проще), чем установка винды, например, и много всяких хороших руководств с картинками (они, в общем, и не требуются — всё интуитивно понятно). Но есть пара нюансов:
4.1 При установке сети выберите автоматическую настройку.
4.2 При установке пакетов сразу поставьте галки на сервер OpenSSH и LAMP (остальное по желанию) — так проще.
5. Я полагаю, что все у вас прошло нормально, Ubuntu загрузилась, и интернет в ней наличествует ( проверить можно командой ping yandex.ru например). Однако, остается вопрос, как, например, законнектиться с Ubuntu из Windows скажем, через SSH. Или просто даже открыть в браузере сайт, работающий на убунтовском Apache.
6. Итак, остановим нашу Ubuntu, закроем окно с терминалом, и уже в главном окне VirtualBox идем в Файл → Настройки → Сеть → Виртуальные сети хоста — справа три маленькие иконки — жмем на нижнюю с изображением отвертки.
7. Видим IP-адрес: 192.168.56.1 — это адрес, по которому Windows обращается к VirtualBox.
8. Рядом вкладка «DHCP сервер» в нашем случае она пуста (чекбокс не выбран). И пусть таковой и остается.
9. Далее идем в настройки гостевой системы (в нашем случае — Ubuntu 16.04.2 Server), щелкаем правой кнопкой на вкладке с системой и выбираем самый верхний пункт «Настроить. ».
10. Здесь снова идем в «Сеть» (у нас получается два одноименных пункта «Сеть», но в первом случае мы настраивали сеть Windows и VirtualBox, а теперь мы настраиваем сеть гостевой системы — Ubuntu в связке с остальным). Здесь мы видим, что для первого адаптера отмечена NAT. Не меняем.
11. Открываем вкладку «Адаптер 2», ставим галку на «Включить сетевой адаптер» и в списке выбираем тип подключения: «Виртуальный адаптер хоста». Жмем ОК. Это действие добавит нам в Ubuntu сетевой адаптер, через который мы и прорубим окно во внешний мир, и в которое можно будет посмотреть на Ubuntu из Windows, через браузер или SSH-клиент, например.
12. Далее идем в окно терминала Ubuntu, логинимся (если еще не), и сразу ставим mc
Чем значительно облегчаем себе дальнейшую жизнь (здесь вспоминается высказывание древнего философа: — Это как же нужно было не любить людей, чтобы содать vi )
13. Смотрим какие сетевые интерфейсы нам доступны:
Нужно это для того, чтобы понять, какое имя в Ubuntu носит тот самый «Виртуальный адаптер хоста», который мы создали в шаге №11
На скрине вы видите уже настроенные интерфейсы, но у вас будет примерно то же самое. Нас в данной ситуации исключительно интересует какое имя носит сетевой интерфейс, через который мы и будем осуществлять доступ из винды в убунту.
Здесь мы видим, что есть три интерфейса: lo — локальная петля, enp0s3 — это «Адаптер 1» который у нас настроен как NAT (через него идет интернет-трафик в Ubuntu) и, наконец, enp0s8 — это и есть вышеупомянутый «Адаптер 2» («Виртуальный адаптер хоста»). Теперь осталось его настроить.
14. Запускаем mc от имени суперпользователя:
15. И открываем для правки файл
(переводим на него курсор и жмем F4), либо просто командой
Но лично я предпочитаю через mc — меньше буковок набирать приходится 🙂
16. И добавляем туда в конец текста такие строки:
Получается что-то вроде как показано на скрине:
Если двумя словами, то мы тем самым нашему «Адаптеру 2» дали статический IP-адрес: 192.168.56.107 (можете поменять его на 192.168.56.101 например, или 192.168.56.110, без разницы). И теперь через этот адрес, Ubuntu будет видна из Windows.
17. Сохраняем изменения — F2 и выходим из редактора — F10.
18. Далее перезапускаем интерфейсы, например так:
или можете просто перезагрузить Ubuntu Server.
19. Теперь, если звезды на небе расположены правильно, то открыв браузер, и набрав в адресной строке:
вы увидите приветственную страницу установленного в составе LAMP (см.п. 4.2 выше) Apache2.
Либо можете законнектиться по SSH через 22 порт по этому же IP-адресу: 192.168.56.107
How to Configure Network Between Guest VM and Host in Oracle VirtualBox
Once you have installed different operating systems in Oracle VirtualBox, you may want to enable communication between the host and the virtual machines.
In this article, we will describe the simplest and direct method of setting up a network for guest virtual machines and the host in Linux.
For the purpose of this tutorial:
- Host Operating System – Linux Mint 18
- Virtual Machine OS – CentOS 7 and Ubuntu 16.10
Requirements
- A working Oracle Virtualbox installed on Host machine.
- You must have installed a guest operating system such as Ubuntu, Fedora, CentOS, Linux Mint or any of your choice in the Oracle virtual box.
- Power off the virtual machines as you perform the configurations up to the step where your required to turn them on.
In order for the guest and host machines to communicate, they need to be on the same network and by default, you can attach up to four network cards to your guest machines.
The default network card (Adapter 1) is normally used to connect the guest machines to the Internet using NAT via the host machine.
Important: Always set the first adapter to communicate with the host and the second adapter to connect to the Internet.
Create a Network For Guests and Host Machine
At the Virtualbox manager interface below, start by creating a network on which the host and guests will operate.
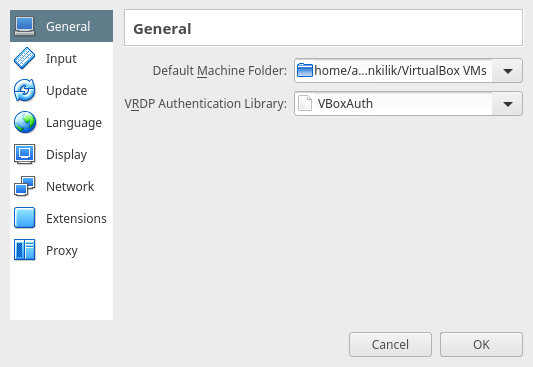
Go to File –> Preferences or hit Ctrl + G :

From the following interface, there are two options; choose Host-only Networks by clicking on it. Then use the + sign on the right to add a new host-only network.
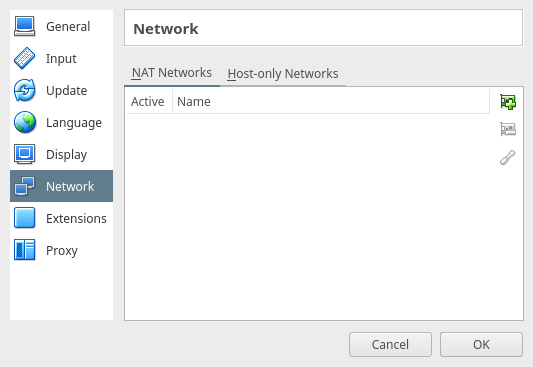
Below is a screen shot showing a new host-only network has been created called vboxnet0.
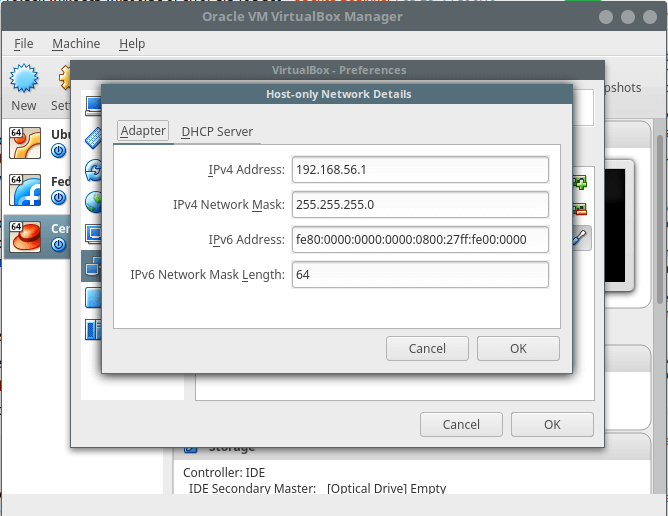
If you want, you can remove it by using the — button in the middle and to view the network details/settings, click on the edit button.
You can as well change the values as per your preferences, such as the network address, network mask, etc.
Note: The IPv4 address in the interface below is the IP address of your host machine.
In the next interface, you can configure the DHCP server that is if you want the guest machines to use a dynamic IP address (make sure it is enabled before using it). But I recommend using a static IP address for the virtual machines.
Now click OK on all network settings interfaces below to save the changes.

Configure Virtual Machine Network Settings
Note: You can follow the steps below for every virtual machine that you want to add on the network to communicate with the host machine.
Back at the virtual box manager interface, select your guest virtual machine such as Ubuntu 16.10 server or CentOS 7 and click on the Settings menu.

Configure Adapter to Connect Virtual Machine to Host
Choose the Network option from the interface above. Afterwards, configure first network card (Adapter 1) with the following settings:
- Check the option: “Enable Network Adapter” to turn it on.
- In the field Attached to: select Host-only Adapter
- Then select the Name of the network: vboxnet0
As in the screen shot below and click OK to save the settings:

Configure Adapter to Connect Virtual Machine to Internet
Then add a second network card (Adapter 2) to connect virtual machine to the Internet via the host. Use the settings below:
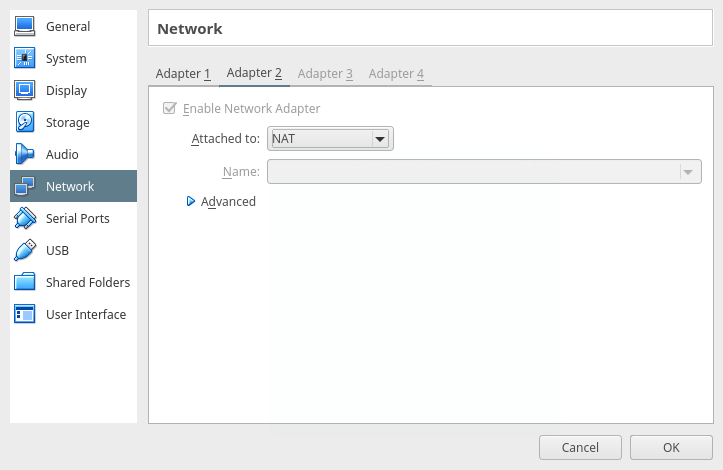
- Check the option: “Enable Network Adapter” to activate it.
- In the field Attached to: select NAT
Setup Static IP Address for Guest Virtual Machine
At this stage, power on the guest virtual machine, login and configure static IP address. Run the command below to show all the interfaces on the guest machine and allocated IP addresses:

From the screen shot above, you can see that there are three interfaces enabled on the virtual machine:
- lo – loopback interface
- enp0s3 (Adapter 1) – for host-only communication which is using the DHCP as set in one of the previous steps and later configured with a static IP address.
- enp0s8 (Adapter 2) – for connection to the Internet. It will use DHCP by default.
On Debian/Ubuntu/Linux Mint
Important: Here, I used Ubuntu 16.10 Server: IP address: 192.168.56.5.
Open the file /etc/network/interfaces using your favorite editor with super user privileges:
$ sudo vi /etc/network/interfaces
Use the following settings for the interface enp0s3 (use your preferred values here):
auto enp0s3 iface enp0s3 inet static address 192.168.56.5 network 192.168.56.0 netmask 255.255.255.0 gateway 192.168.56.1 dns-nameservers 8.8.8.8 192.168.56.1
Then restart network services like so:
$ sudo systemctl restart networking
Alternatively, reboot the system and closely, check if the interface is using the new ip addresses:
On RHEL/CentOS/Fedora
Important: For this section, I used CentOS 7: IP address: 192.168.56.10.
Begin by opening the file for enp0s3 – host-only network interface; /etc/sysconfig/network-scripts/ifcfg-enp0s3 using your favorite editor with super user privileges:
$ sudo vi /etc/sysconfig/network-scripts/ifcfg-enp0s3
Create/modify the following settings (use your preferred values here):
BOOTPROTO=static ONBOOT=yes IPADDR=192.168.56.10 NETWORK=192.168.56.0 NETMASK=255.255.255.0 GATEWAY=192.168.56.1 DNS=8.8.8.8 192.168.56.1 NM_CONTROLLED=no #use this file not network manager to manage interface
Save the file and exit. Then restart network service as follows (you can as well reboot):
$ sudo systemctl restart network.service
Check if the interface is using the new IP addresses as follows:
Manage Virtual Machines From Host Using SSH
On the host machine, use SSH to manage your virtual machines. In the following example, am accessing the CentOS 7 (192.168.56.10)server using SSH:

That’s it! In this post, we described a straightforward method of setting up a network between a guest virtual machines and the host. Do share your thoughts about this tutorial using the feedback section below.