Установка и настройка TeamSpeak 3 сервера на VDS
В данной статье речь пойдет об установке сервера TeamSpeak 3, эта программа предназначена для использования голосовой связи различными сообществами. В моем примере будет использоваться Linux Debian 6.0 x64, для ТС3 сервера также оптимален VDS с предустановленной Ubuntu, разрядность значения не имеет, принцип действия одинаковый.
Выбор подходящего хостинга
Вам подойдет практически любой хостинг VDS в ценовом диапазоне от 10$ в месяц. Обращайте внимание на локализацию хостинга, т.к. пинг в TeamSpeak 3 будет зависеть от того, где находится дата-центр с вашим сервером. В качестве основной конфигурации оптимально исходите от систем Debian и Ubuntu. По личному опыту другие решения использовать не рекомендую, но если ваш хостинг ограничен, можете конечно использовать и другие варианты.
Подготовка VDS сервера
Первое, что вам понадобится сделать — это создать пользователя для работы с TeamSpeak 3 сервером, т.к. использование сервера от root пользователя является уязвимостью, о которой предупреждают разработчики программы.
Для этого в консоли наберите команду:
После того как пользователь создан, выгрузите в папку /home/ts3server файлы загруженные отсюда: TeamSpeak Downloads (Linux Server amd64, либо x86 в зависимости от разрядности вашей системы)
Перейдите в папку ts3server и назначьте атрибуты для следующих файлов сервера:
cd /home/ts3server chmod +x ts3server_minimal_runscript.sh chmod +x ts3server_startscript.sh chmod +x ts3server_linux_x86 или chmod +x ts3server_linux_amd64 Установка TeamSpeak 3 сервера
./ts3server_minimal_runscript.sh 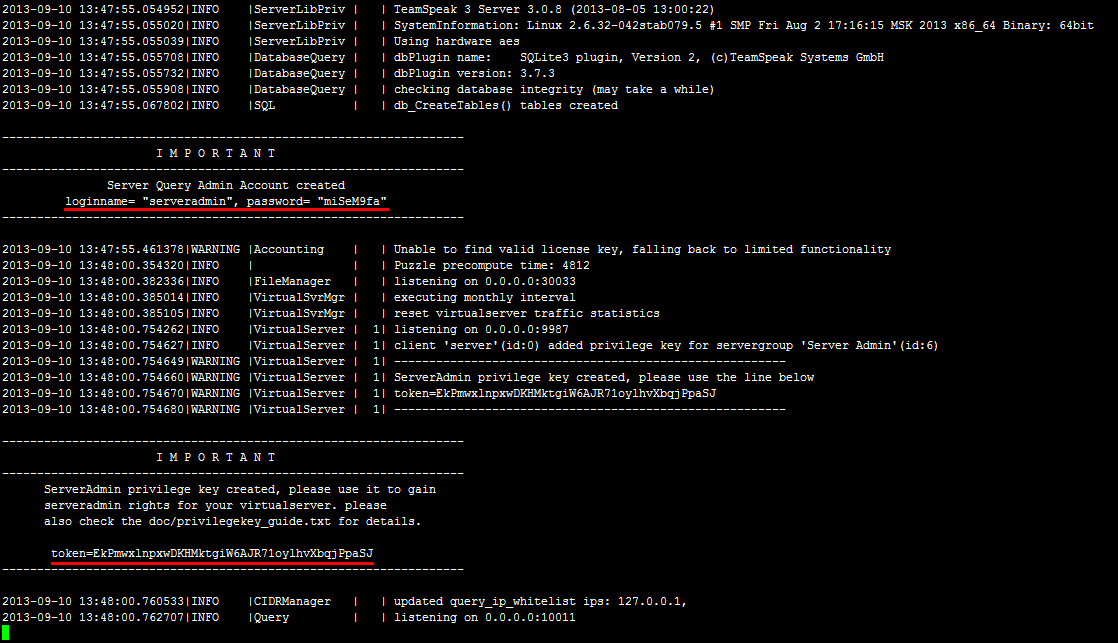
Во время запуска данной команды будут созданы все необходимые файлы на сервере, а также вам выдаст пароль от serveradmin и ключ привилегий от группы server admin в самом клиенте teamspeak:
Обязательно сохраните пароли и можете останавливать сервер командой:
./ts3server_minimal_runscript.sh stop Настройка автозапуска
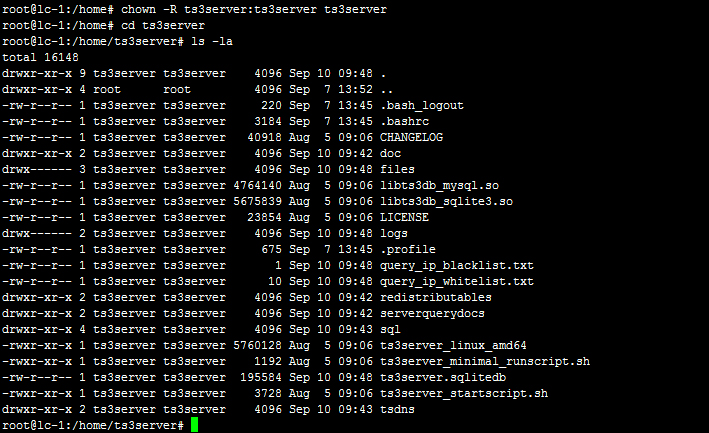
Теперь для правильной настройки crontab вам понадобится перейти в каталог выше и назначить пользователя ts3server владельцем файлов TeamSpeak сервера.
cd /home chown -R ts3server:ts3server ts3server Проверьте, все ли получилось (результат должен быть похож на изображение ниже):
Теперь перейдем к настройке crontab для пользователя ts3server, чтобы в случае сбоев сервер автоматически запускался при ребуте вашего VDS:
@reboot /home/ts3server/ts3server_startscript.sh start нажмите Esc, наберите :wq и нажмите Enter чтобы сохранились настройки.
Завершение установки и настройки сервера TeamSpeak
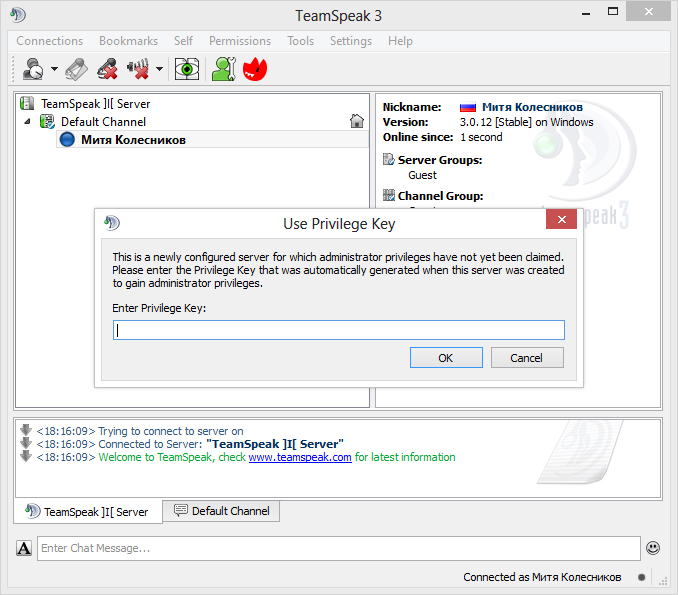
Выполните команду reboot и затем попробуйте из клиента TeamSpeak зайти на ваш сервер по IP адресу вашего VDS. Если после перезагрузки VDS вы сможете зайти на сервер и получите перед собой окно с предложением ввести ключ привилегий от группы server admin, значит вами в ходе установки сервера не было допущено ошибок:
Полезности
1. Существует маленький нюанс, по неведомой мне причине всегда после установки сервера происходит ошибка файлового браузера, который отказывается отображать файлы с кириллицей. Для решения этой проблемы я делаю следующее:
localedef -v -c -i en_US -f UTF-8 en_US.UTF-8 после чего добавляю в /etc/environment строку LC_ALL=en_US.UTF-8 и для проверки осуществляю reboot.
2. Изначально установленный сервер будет иметь статус No license. В таком случае вам будет доступен 1 виртуальный сервер на 32 слота. Если вы хотите увеличить количество виртуальных серверов и слотов, то можете подать заявку на получение NPL-лицензии, которая расширяет сервер до возможности создания до 10 виртуальных серверов с 512-ю слотами в сумме. Подача заявки на NPL происходит в этом разделе сайта teamspeak: Non-Profit License Registration. Если у вас все получится, вам будет выслан файл licensekey.dat, его нужно положить в корень TeamSpeak 3 сервера и выполнить команду:
./ts3server_startscript.sh restart 3. Вы помните этап, где был сохранен пароль от пользователя serveradmin. Этот пароль нужен для консольного управления TeamSpeak 3 сервера, наиболее удобный клиент для работы с Query Server Admin: Admin Tool: YaTQA (English/German). Суть полезности в том, что пароль не очень длинный и в нем не всегда присутствуют специальный символы, в связи с чем он подвержен бруту (лично на моем опыте нашелся умник который сумел напакостить подобрав аналогичный пароль от пользователя serveradmin), поэтому я настоятельно рекомендую сменить пароль на более сложный. Для этого остановите сервер и запустите со следующей командой:
./ts3server_startscript.sh stop ./ts3server_startscript.sh start serveradmin_password=ваш_новый_пароль 4. Чтобы обновить версию сервера, нужно остановить сервер, создать на всякий случай резервную копию файла ts3server.sqlitedb, после чего перезаписать в папке teamspeak сервера файлы новыми, расставить атрибуты и все, ваш сервер будет обновлен до последней версии.
How to Install TeamSpeak Server on Ubuntu 20.04

Teamspeak is a free voice chat software that can be used by teams, groups, and communities. It’s popular among gamers because it allows them to communicate complex strategies in real-time while playing their favorite game. Teamspeak has many other uses besides gaming though. It can also be used for running online conferences or meetings, distance learning courses, language lessons, and much more.
Is TeamSpeak better than Discord?
Teamspeak is preferred by most gamers because it’s very stable and lightning fast. In fact, the voice quality of TeamSpeak has been praised as being superior to that offered by Discord or Skype. Better sound quality isn’t all though – with Teamspeak you can also have a custom server built exactly how you want it. If there are a lot of users in your online community then an integrated web chat box will come in handy too!
Is TeamSpeak secure?
Teamspeak servers are very secure. It’s also free of malware and viruses, which is a plus if you’re worried about compromising your computer or network with spyware or other malicious code. Because TeamSpeak doesn’t have to be installed on each device that connects it can run from an external drive – making it easy to transfer between devices as needed without having to install anything new!
This article will walk you through the steps required to set up your own Teamspeak server on an Ubuntu 20.04 server. Other Debian-based distros are also supported although some of the steps may vary slightly.
Prerequisites
- You must have root access. The user account running TeamSpeak needs superuser privileges (i.e., administrative rights) to perform many of the tasks outlined in this tutorial.
- A fresh Ubuntu 20.04 server. If there are any leftover packages from previous Teamspeak installations on your server then it’s best to clean them up before continuing with this guide.
sudo apt-get autoremove -y sudo apt autoclean
Updating your System
Open the terminal of your server and run the following commands:
sudo apt-get update && sudo apt-get upgrade -y && sudo reboot
Once your system has rebooted, log back in with the same non-root user.
Installing TeamSpeak Server
TeamSpeak requires you to create a user account before you can use it. You can call this user whatever you like and it doesn’t need to be logged into the system.
Open a terminal session and create the new account using this command:
This command asks you for a new password. Enter this and keep it safe as you’ll need it to log in to your server with the user account you just created. After that personal user details will be requested. You can leave them all blank if you like, just press enter for each one or fill in the details as needed.

Use wget command to download TeamSpeak server using the newly created user
wget https://files.teamspeak-services.com/releases/server/3.13.5/teamspeak3-server_linux_amd64-3.13.5.tar.bz2

Unzip the downloaded archive and copy the extracted files into the Home folder for the TeamSpeak account, then delete the downloaded file.
tar xvfj teamspeak3-server_linux_amd64-3.13.5.tar.bz2 cp teamspeak3-server_linux_amd64/* -R /home/teamspeak/ rm -rf teamspeak3-server_linux_amd64 teamspeak3-server_linux_amd64-3.13.5.tar.bz2
Now, create a blank license file called ts3server_license_accepted. It should be placed in the same folder as your executable file of Teamspeak3.
touch .ts3server_license_accepted
This file is just an empty file that will be used to indicate that the server has an active license and you are accepting the license agreement.
At this point, TeamSpeak is installed on your server but you can’t use it yet. The configuration file for the TeamSpeak server must be created before you can run it.
Now logging out of the TeamSpeak account and returning to the root user. Then create a configure file called ts3server.service in /lib/systemd/system directory as follows:
sudo nano /lib/systemd/system/ts3server.service
Populate the file with the lines below:
[Unit] Description=Teamspeak Service Wants=network.target [Service] WorkingDirectory=/home/teamspeak User=teamspeak ExecStart=/home/teamspeak/ts3server_minimal_runscript.sh ExecStop=/home/teamspeak/ts3server_startscript.sh stop ExecReload=/home/teamspeak/ts3server_startscript.sh restart Restart=always RestartSec=15 [Install] WantedBy=multi-user.target
Save and close the file when you are done.
Now, refresh the list of system services to apply the changes
sudo systemctl daemon-reload
Start the TeamSpeak server and allow it to start upon booting your computer.
sudo systemctl start ts3server.service sudo systemctl enable ts3server.service
Make sure TeamSpeak is running correctly by checking the service status:
sudo systemctl status ts3server
You should see the following output:

To see what ports TeamSpeak uses, type the following command:

Setting an Admin Password
An administrator password is required for TeamSpeak.
Stop the TeamSpeak service and switch to TeamSpeak user.
sudo systemctl stop ts3server
Start the Teamspeak server manually and pass the serveradmin_password parameter with your password as follows
./ts3server_startscript.sh start serveradmin_password=your_password
Remember to replace your_password with your password.
Stop TeamSpeak manually after setting the password, log out the TeamSpeak user, and start the TeamSpeak service using systemctl command
./ts3server_startscript.sh stop
exit sudo systemctl start ts3server
Installing TeamSpeak Web Interface
In order to use TeamSpeak web interface you need to install a separate component.
Login as root user, install Apache web server and PHP software packages along with the unzip package with the following commands:
sudo apt-get install apache2 -y sudo apt-get install php libapache2-mod-php sudo apt-get install unzip -y
Move into the Apache Root document folder and download the web UI package called ts3wi using wget command
cd /var/www/html wget https://www.bennetrichter.de/downloads/ts3wi.zip
After downloading is complete, unzip the file and ensure the ts3wi directory has proper ownership.
unzip ts3wi.zip chown -R www-data:www-data /var/www/html/ts3wi
Now open your web browser and navigate to http://your_server_ip/ts3wi where your_server_ip is the public IP address of your server. You will be taken to the login page.

Provide username admin and password and click Login. You will be directed to TeamSpeak web UI. You can create channels, manage users and do anything else that is the same as on the windows client.

That’s it! You have successfully installed TeamSpeak server on Ubuntu 20.04 LTS server. Find more info on TeamSpeak official website.
Conclusion
We have learned how to install TeamSpeak server on Ubuntu 20.04 LTS in this tutorial. It was easy to configure and get up and running in no time. We also learned about some of the important configuration parameters that are needed for setting up a TeamSpeak server.