- How to Install Telnet Server and Client on Ubuntu
- Installing Telnet Server on Ubuntu
- Installing Telnet Client on Ubuntu
- Connect to Telnet Server from Remote System
- Uninstall Telnet Server and Client
- HOW TO CONFIGURE TELNET SERVER AND TELNET CLIENT IN RHEL/CENTOS/FEDORA
- My Scenario :
- Telnet Server Configuration :
- Step : 1 Configure the IP Address
- Step : 2 Install Required Packages for Telnet Server
- Step : 3 Configure the Telnet Server
- Step : 4 Allow root User Login to Telnet Server (If Required)
- Testing From Telnet Client Side :
How to Install Telnet Server and Client on Ubuntu
Telnet is a network protocol used for connecting to remote systems through a command-line interface. It can be used to configure remote devices such as routers, switches, servers, etc. Telnet can also be used to test if a TCP port on a remote system is open or not.
In today’s guide, we will install the Telnet server and client on Ubuntu. We will be using the two Ubuntu 20.04 LTS machines. On one Ubuntu machine, we will install Telnet server. On another Ubuntu machine, we will install the Telnet client. Then we will connect to the Telnet server using the Telnet client.
Note: Telnet is not a secure protocol because the Telnet session between server and client is unencrypted. You can use it for testing the connectivity to TCP ports. However, for connecting to the remote system, it is recommended to use SSH.
Installing Telnet Server on Ubuntu
Ubuntu default repository contains the Telnet server package. Therefore, it can be simply installed with the apt command. On one Ubuntu machine, install Telnet server by running the command below in the Terminal:
$ sudo apt install telnetd xinetd
After running the above installation command, Terminal might prompt you with the y/n option. To continue the procedure, hit y and then hit Enter. It will then install the Telnet server and xinetd on your Ubuntu system.
After installation, the xinetd service starts automatically. You can view the status of the service as follows:
$ sudo systemctl status xinetd.service

If the service does not start automatically, you can manually start it by running the command below:
$ sudo systemctl start xinetd.service
Now create the /etc/xinetd.d/telnet file using the command below:
$ sudo nano /etc/xinetd.d/telnet
Add the below lines the file:
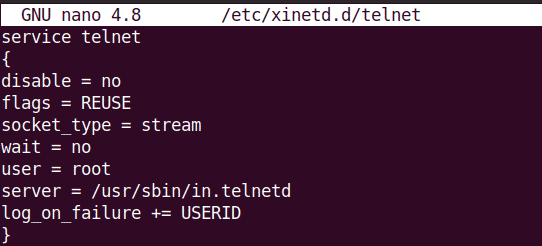
Then save and close the file and restart xinetd.service as follows:
$ sudo systemctl restart xinetd.service
Telnet server uses port 23 for listening to the incoming connections. Therefore, you will need to open this port in your firewall. Run the command below to do so :
To allow incoming connections to port 23 from only a specific IP or subnet, run the below command instead:
$ sudo ufw allow from to any port 23
Installing Telnet Client on Ubuntu
Telnet client is also available in the Ubuntu repository. On your second Ubuntu machine, run the command below in Terminal to install the Telnet client.
After running the above installation command, Terminal might prompt you with the y/n option. To continue the procedure, hit y and then hit Enter. It will then install the Telnet client on your Ubuntu system.
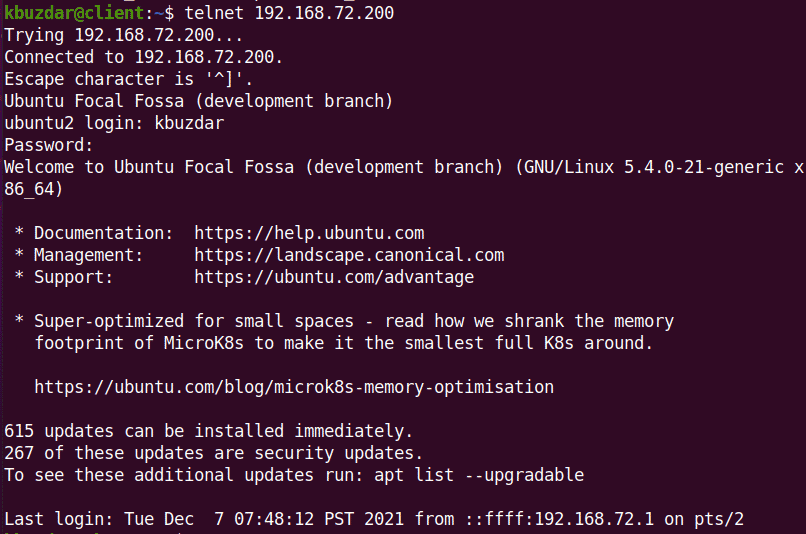
Connect to Telnet Server from Remote System
Now you can connect to your Telnet server from another machine (where the Telnet client is installed). On your client machine, use the following command syntax to connect to the Telnet server:
Where is the IP address of the Telnet server.
Uninstall Telnet Server and Client
If for any reason you want to uninstall Telnet server and client from your Ubuntu machine, you can do so as described below.
To uninstall Telnet server, run this command:
$ sudo apt remove telnetd xinetd
To uninstall Telnet client, run this command:
After running the above commands, Terminal might prompt you with the y/n option. To continue the procedure, hit y and then hit Enter. It will then remove the applications from your Ubuntu system.
By following the method explained above, you can easily install the Telnet server and client on your Ubuntu systems. We have also shared the method to uninstall the Telnet server and client from Ubuntu in case you need to remove it.
Karim Buzdar holds a degree in telecommunication engineering and holds several sysadmin certifications including CCNA RS, SCP, and ACE. As an IT engineer and technical author, he writes for various websites.
HOW TO CONFIGURE TELNET SERVER AND TELNET CLIENT IN RHEL/CENTOS/FEDORA
In this article we are going to discuss on How to configure Telnet Server and Telnet Client in RHEL/CentOS/Fedora. Telnet is nothing but a protocol was invented in 1969 used to take remote of systems over Network in text mode or command mode as it is not supports GUI (Graphical User Interface). There are two instances of Telnet i.e. Telnet Server and Telnet Client. So the concept is you can take the remote console of Telnet Server from client using telnet tools like putty or you can use Command prompt if you are using Windows Operating System. The port number of Telnet is 23. Telnet is no doubt a useful tool but has one major disadvantage is the data transfer over network by telnet is in non-encrypted manner i.e. in Plain Text which is Risky in case of Confidential Data.
So Let’s have a look at configuration steps of Telnet Server and also Telnet Client.
WARNING! : CONFIGURING TELNET IS A BAD IDEA AS ITS TRANSFER’S DATA IN PLAIN TEXT FORMAT (UNENCRYPTED FORMAT). TRY TO AVOID TELNET AS MUCH AS POSSIBLE AND USE SSH INSTADE.
My Scenario :
Telnet Server :
Telnet Server Configuration :
Follow the below steps to configure the Telnet Server.
Step : 1 Configure the IP Address
Before start the configuration of Telnet Server, configure the NIC (Network Interface Card) and check properly if the system is in network. Here my IP Address is 192.168.0.105. Refer the output below.
[root@localhost ~]# ifconfig eth0 # Check the IP Address eth0 Link encap:Ethernet HWaddr 00:0C:29:A4:B6:76 inet addr:192.168.0.105 Bcast:192.168.0.255 Mask:255.255.255.0 inet6 addr: fe80::20c:29ff:fea4:b676/64 Scope:Link UP BROADCAST RUNNING MULTICAST MTU:1500 Metric:1 RX packets:70763 errors:0 dropped:0 overruns:0 frame:0 TX packets:23211 errors:0 dropped:0 overruns:0 carrier:0 collisions:0 txqueuelen:1000 RX bytes:69485595 (66.2 MiB) TX bytes:1590367 (1.5 MiB) Step : 2 Install Required Packages for Telnet Server
To start the Telnet Server configuration we need to install some packages :
telnet-server.xxx.xxx.xx.rpm
xinetd.xxx.xxx.xx.rpm
You can install above packages by using YUM Package Repository or by rpm packages from Installation media. Here I am installing using YUM Repository. Refer the output below.
[root@localhost ~]# yum -y install telnet-server # Install telnet-server package Loaded plugins: fastestmirror, refresh-packagekit, security Setting up Install Process Loading mirror speeds from cached hostfile * base: mirror.nbrc.ac.in * extras: mirrors.vonline.vn * updates: mirrors.aluhost.com Resolving Dependencies --> Running transaction check ---> Package telnet-server.x86_64 1:0.17-48.el6 will be installed --> Processing Dependency: xinetd for package: 1:telnet-server-0.17-48.el6.x86_64 --> Running transaction check ---> Package xinetd.x86_64 2:2.3.14-40.el6 will be installed --> Finished Dependency Resolution Dependencies Resolved ================================================================================ Package Arch Version Repository Size ================================================================================ Installing: telnet-server x86_64 1:0.17-48.el6 base 37 k Installing for dependencies: xinetd x86_64 2:2.3.14-40.el6 base 122 k Transaction Summary ================================================================================ Install 2 Package(s) Total download size: 159 k Installed size: 313 k Downloading Packages: (1/2): telnet-server-0.17-48.el6.x86_64.rpm | 37 kB 00:00 (2/2): xinetd-2.3.14-40.el6.x86_64.rpm | 122 kB 00:00 -------------------------------------------------------------------------------- Total 305 kB/s | 159 kB 00:00 Running rpm_check_debug Running Transaction Test Transaction Test Succeeded Running Transaction Installing : 2:xinetd-2.3.14-40.el6.x86_64 1/2 Installing : 1:telnet-server-0.17-48.el6.x86_64 2/2 Verifying : 1:telnet-server-0.17-48.el6.x86_64 1/2 Verifying : 2:xinetd-2.3.14-40.el6.x86_64 2/2 Installed: telnet-server.x86_64 1:0.17-48.el6 Dependency Installed: xinetd.x86_64 2:2.3.14-40.el6 Complete! As you can see above we have installed all required packages. To confirm the package installation use the below command.
[root@localhost ~]# rpm -qa | grep telnet-server # Confirm telnet-server package installed or not telnet-server-0.17-48.el6.x86_64 [root@localhost ~]# rpm -qa | grep xinetd # Confirm xinetd package installed or not xinetd-2.3.14-40.el6.x86_64
Now let’s check configuration file location of Telnet Server using rpm -ql command as shown below.
[root@localhost ~]# rpm -ql telnet-server # Check Configuration file locations of Telnet-Server /etc/xinetd.d/telnet /usr/sbin/in.telnetd /usr/share/man/man5/issue.net.5.gz /usr/share/man/man8/in.telnetd.8.gz /usr/share/man/man8/telnetd.8.gz Step : 3 Configure the Telnet Server
So as shown on the output above the main configuration file of telnet server is telnet which is located at /etc/xinetd.d/telnet, So let’s go ahead and enable telnet by edit the configuration file.
To enable the Telnet Server just edit the /etc/xinetd.d/telnet file and find for line disable = yes and change it to disable = no. Follow the output below, Configuration line is highlighted in Red color.
[root@localhost ~]# nano /etc/xinetd.d/telnet # Configuring Telnet-Server # default: on # description: The telnet server serves telnet sessions; it uses \ # unencrypted username/password pairs for authentication. service telnet < flags = REUSE socket_type = stream wait = no user = root server = /usr/sbin/in.telnetd log_on_failure += USERID disable = no >
After configuration just save the file and start the xinetd service to start the Telnet Server protocol by using below command.
[root@localhost ~]# service xinetd start Starting xinetd: [ OK ]
Now you can connect to Telnet Server using Telnet client tools like putty or if you are using windows Operating System then can use command prompt to connect to telnet server and take console of the Linux Server using normal users. For example I have a username i.e. elinuxbook. refer the output below.
[root@localhost ~]# cat /etc/passwd | grep elinuxbook elinuxbook:x:500:500:elinuxbook:/home/elinuxbook:/bin/bash
Step : 4 Allow root User Login to Telnet Server (If Required)
So here I can connect to Telnet Server by using Username as elinuxbook and Password as Password of elinuxbook.
Disadvantages and Security issue in Telnet :
WARNING! : It’s highly Recommended that you should not allow root login as there may be chances of misuse. Because telnet transfer data in plain text format. Also redhat recommend that use SSH instade of telnet for security reason. But for learning purpose or on your own R & D lab you can use where security is not a matter of concern. I explained this is just for knowledge & information purpose & not to use in production server.
But if you want to login using root then you have to allow on /etc/securetty file. for that just edit the file and paste the below lines. Configuration part is highlighted in Red color.
[root@localhost ~]# nano /etc/securetty # Allow root user to login telnet-server from Client Side pts/0 pts/1 pts/2 pts/3 pts/4 pts/5 pts/6 pts/7 pts/8 pts/9
So we have done with all required configuration from Server Side. Now restart the xinetd service to take effect the configuration.
[root@localhost ~]# service xinetd restart # Restart the xinetd Service Stopping xinetd: [ OK ] Starting xinetd: [ OK ] Then start the xinetd service on startup using below command so that service will start automatically when you restart the system.
[root@localhost ~]# chkconfig --level 35 xinetd on # Start the xinetd service at Startup Testing From Telnet Client Side :
You can use telnet server to take console/remote of Linux server in text mode/Command Mode for so many purposes, eg : for configuration. To connect to telnet server use tools like putty or in windows operating system you can use command prompt.
Here I am using command prompt to connect to Telnet Server as i am using Windows Operating System.
Login Telnet Server using normal user eg: elinuxbook. Refer the snapshot below.
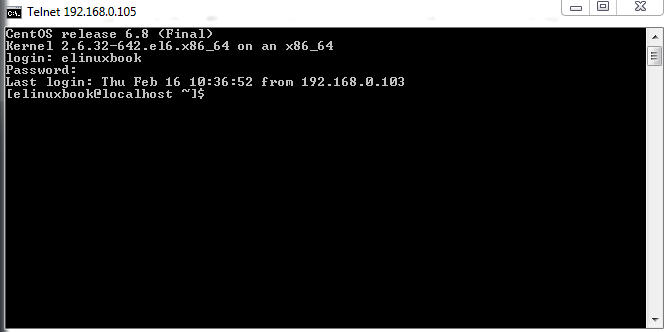
Connecting to Telnet Server
Login Telnet Server using root user. Refer the snapshot below.
Note : You will only allowed to login through root if you have added pts in /etc/securetty file, Explained above.
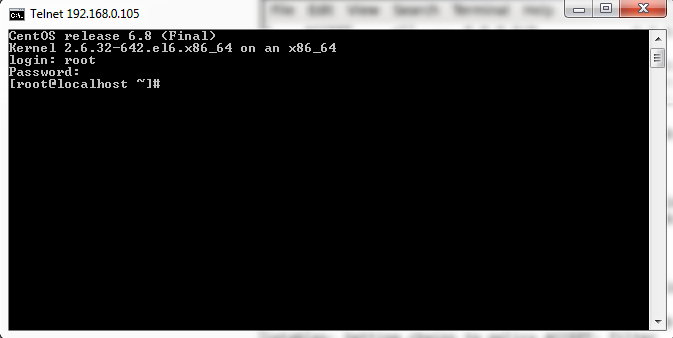
connecting to telnet server
This is how we can configure Telnet Server and Telnet Client in RHEL/CentOS/Fedora.
If you found this article useful then Like Us, Share the article on your social media profile, Subscribe our Newsletter Or if you have something to say then feel free to comment on the comment box below.