How to calibrate the monitor on an Ubuntu system?
What is the procedure to calibrate the monitor and what software to use? Edit: I think what I mean is «colour profile» if that’s what it is called. I happened to notice that the same photos look very differently indeed on my home laptop and on other computers…
9 Answers 9
You can use GNOME Color Manager to install color profiles, perform calibration and adjust color settings. For full functionality, you’ll need ICC profiles that provide the required information for your devices.
Not really. The Pantone Huey Pro, which works with GNOME Color Manager, costs $100, which is nothing if you’re doing professional work that necessitates proper calibration.
GCM developer Richard Hughes recently announced ColorHug, a colorimeter with open hardware specs and drivers — hughski.com
Even the imaging industry standards like the Spyder4 are only around $220 (US). And the Spyder4 works with gcm-calibrate.
gcm works if you have calibration hardware or an icc file to install (or if one of the bundled profiles is acceptable). What it doesn’t do is what Windows and Mac users have the option of — go through a bunch of screens dragging contrast/gamma sliders to generate a profile for the display. I don’t know of a Linux tool for that.
If you don’t use unity (or gnome), using gnome-color-manager does NOT work (see How do you set system display color profiles in Xubuntu and Lubuntu? for the glory details).
However, there is an excellent german howto all necessary things manually: http://wiki.ubuntuusers.de/Monitor_profilieren_mit_ArgyllCMS
Actually, you can get it to work by either running xiccd (not in regular repos, but not too hard to install) or gnome-settings-daemon (not that many gnome dependencies): askubuntu.com/q/427821/25639
I think that a ColorHug2 (http://www.hughski.com/colorhug2.html) is probably the best choice IMHO. I want something with Linux software out of the box and this looks like the right product.
I’m writting this so that other people googling will find the product.
I ran into the same issue using Ubuntu Mate 16.04. The solution was really simple. Go to Ubuntu Software Center and do a search for DisplayCal. Their direct url is http://displaycal.net/. It works amazingly well and quite simply utilizing my Spyder 3 Elite spectrometer. You will have to have a spectrometer to do this. In a dual boot system with Windows, you can import the icc or icm profile from Windows to Ubuntu.
Hope this will help others who have run into this issue.
j.Michael Hill Photography
I am not sure what you mean by calibrate, so ill take a few stabs.
- You can try pressing «Auto» on your monitor, if its an LCD.
- YOu can try installing f.lux That will manage your color tint according to the time, and brightness setting.
- If none of the above are answers to your question, then try adding a few more detials to your question.
EDIT: after OP added a detail, this should help: type this on a console/terminal.
first, just type xgamma to get the RGB values, in case you want to revert. Then,
xgamma -gamma 0.9 the 0.9 is the gamma value. Try a few diff combinations of RGB.
it does provide a command line tool to change the color calibration, that’s not nothing. when I start X on an external monitor, my driver incorrectly sets my color profile and my screen is unusable. Running xgamma -gamma 1.0 fixes the problem (and is scriptable). Thanks!
From man xgamma : Note that the xgamma utility is obsolete and deficient, xrandr should be used with drivers that support the XRandr extension.
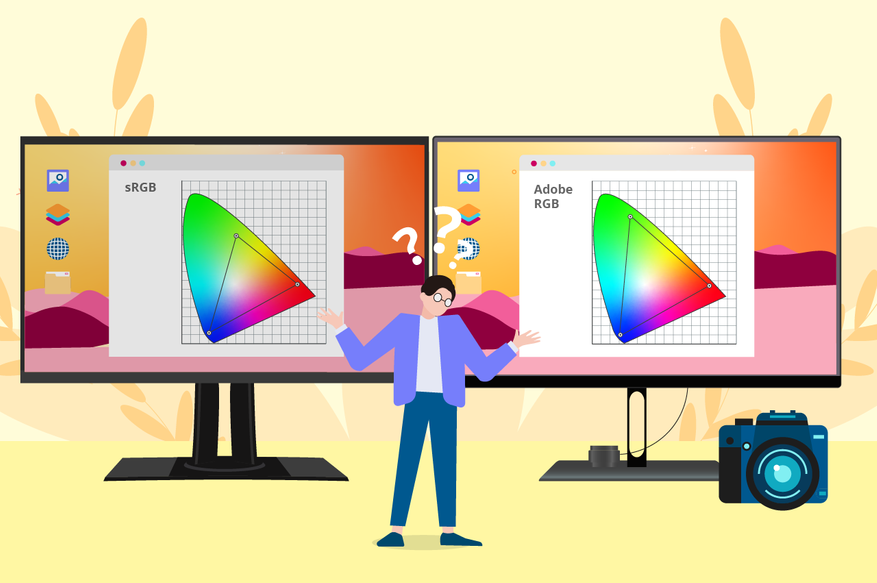
To do a colour calibration (this is the process that the ‘Calibrate. ‘ button will start) you would need to use a spectrophotometer. These measure the colour produced by monitors or printers.
The basic process is that the screen will display a number of coloured patches one after the other and the spectrophotometer will detect the actual colour produced on the screen. This allows the software to compare the colour produced with the colour that was requested.
After the process is completed Ubuntu will have a profile specifically for that monitor (or printer) that will tell it what colour to request to get the colour that it actually wants.
Разгон монитора и исправление цветового диапазона в Linux
Здравствуй, многоуважаемый читатель! Мы продолжаем серию материалов, посвящённых настройке и оптимизации систем на базе ядра Linux. В этой небольшой инструкции вы узнаете, как исправить давнюю проблему с ограниченным цветовым диапазоном в Linux, а также как всего за пару кликов разогнать матрицу монитора вне зависимости от используемой модели видеокарты, протокола графического сервера (Xorg, Wayland) или рабочего окружения (Gnome, KDE, Xfce, I3).
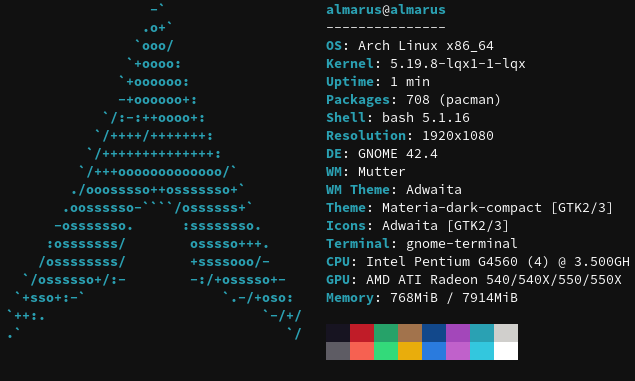
Система автора
Пояснение проблемы
Прежде чем переходить к исправлению проблемы, необходимо чуть подробней разобрать, что она из себя представляет.
При использовании цифрового подключения HDMI/DVI-D, Linux не всегда правильно выставляет цветовой диапазон и частоту обновления экрана монитора, что приводит к плохому качеству отображаемой картинки и потери плавности мыши.
Наглядно продемонстрировать проблему весьма сложно, так как это не связано с параметрами цветовой палитры файла, а является ограничением передаваемого сигнала на ваш монитор. То есть видите это только вы. Тем не мене, если вы заметили, что тёмные цвета стали отдавать белизной, а былые яркие картины потускнели и как-то выглядят не так, то эта инструкция вам точно необходима!
Full RGB и разгон монитора
В настоящее время в Linux происходит плавная замена протокола графического сервера Xorg на более новую и быструю реализацию Wayland, что приносит настоящий хаос в настройку конфигурации. Но мы воспользуемся не стандартным методом и создадим универсальный конфигурационный файл для нашего монитора.
1. Открываем терминал и вводим команду find /sys/devices/pci*/ -name edid. Она нам необходима, чтобы узнать, где хранится файл конфигурации edid.
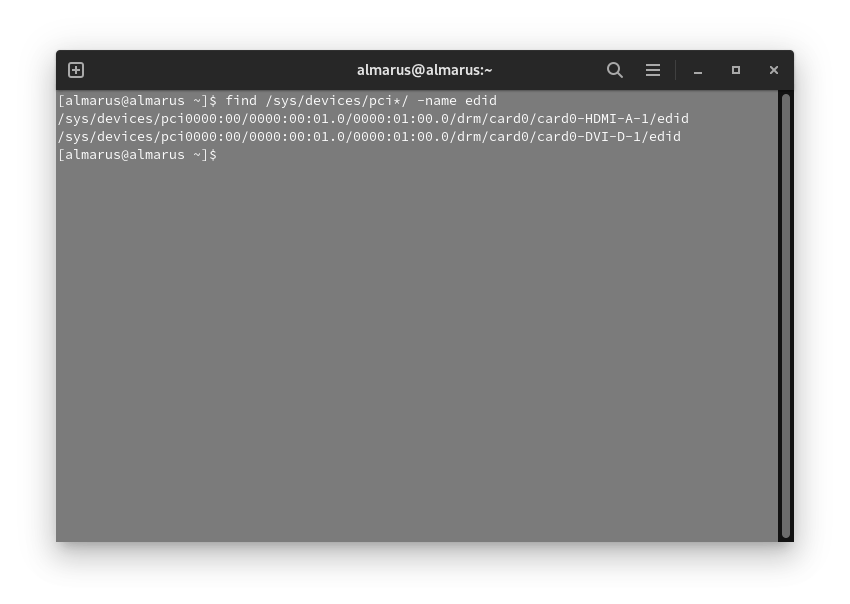
У меня монитор подключен по HDMI, а значит я просто выделяю и копирую всю первую строку.
2. Копируем файл edid в домашнюю директорию с помощью команды:
cp /sys/devices/pci0000:00/0000:00:01.0/0000:01:00.0/drm/card0/card0-HDMI-A-1/edid ~/edid.bin
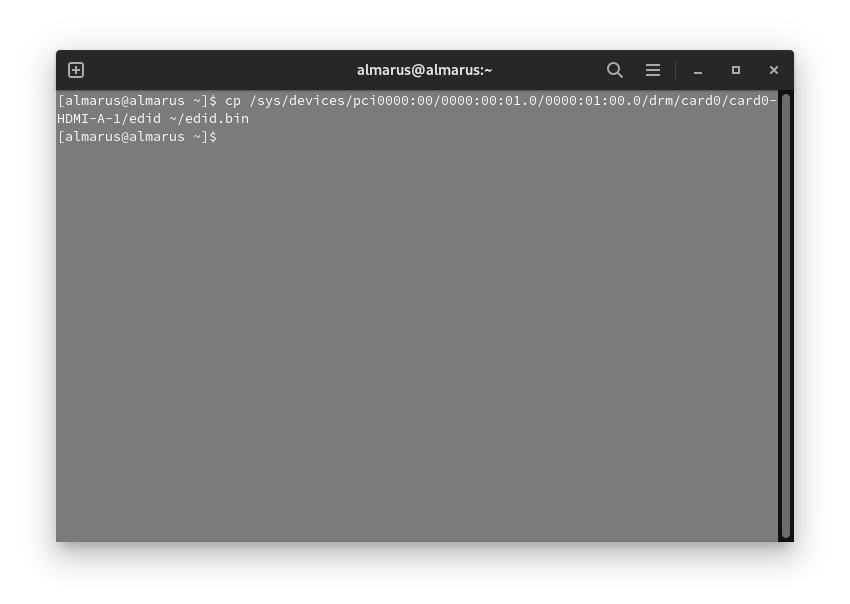
Если вы всё сделали правильно, то в /home/ваше_имя появится файл edid.bin.
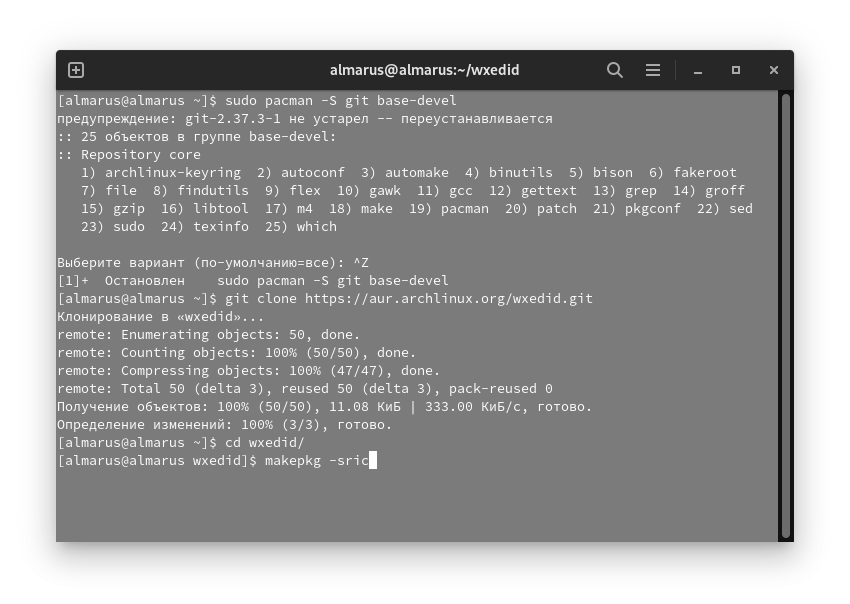
3. Теперь нам необходимо установить ПО для чтения и внесения изменений в файл edid.bin. Я рекомендую использовать нативный редактор wxEDID.
Выполняем установку wxEDID и зависимостей:
sudo pacman -S git base-devel grub-customizer # Скачать зависимости и редактор grub
git clone https://aur.archlinux.org/wxedid.git # Стянуть исходники ПО
cd wxedid # Перейти в папку с исходниками
makepkg -sric # Собрать и установить программу
4. Запускаем программу через команду в терминале sudo wxedid и в окне программы выбираем наш edid.bin. File -> Open EDID binary.
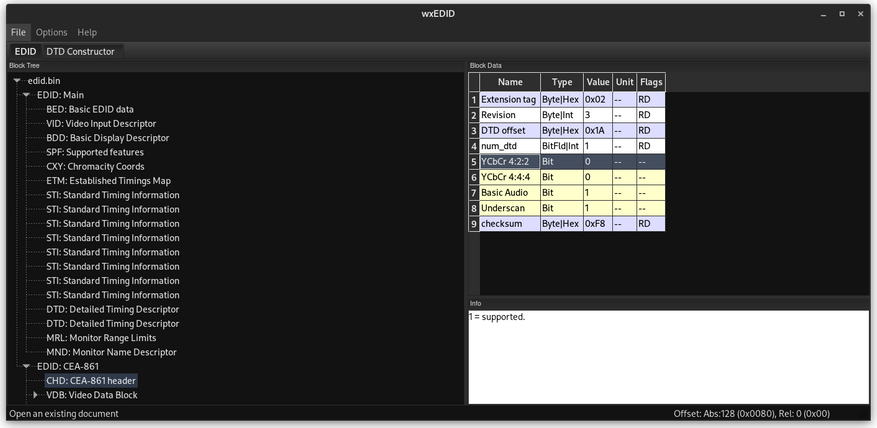
Для активации полного цветового диапазона меняем данные в строках:
- SPF: Supported features -> изменить значение vsig_format на 0b00
- CHD: CEA-861 header -> изменить значение YCbCr4:2:2 и YCbCr4:4:4 на 0
- VSD: Vendor Specific Data Block -> изменить значение DC_Y444 на 0
Для разгона матрицы монитора выбираем изменяем данные (Пропустите раздел, если вам не нужен разгон):
Выбираем DTD: Detailed Timing Descriptor и переключаемся на вкладку DTD Constructor, где в поле Pixel clock постепенно повышаем частоту обновления монитора до необходимых значений. Для различных мониторов пределы разгона отличаются.
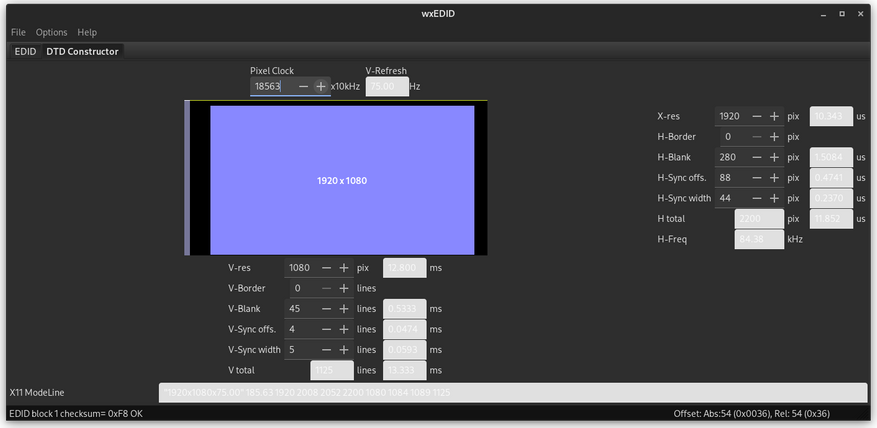
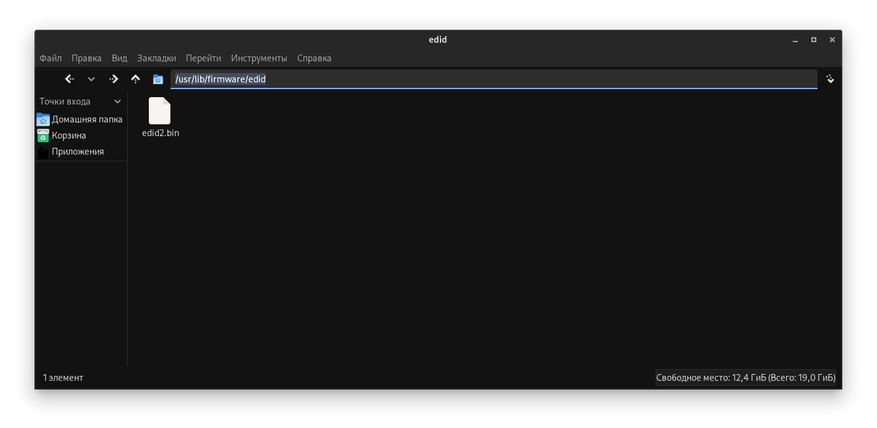
Сохраняем изменения через File-> Save EDID Binary. Для удобства я назову новый конфигурационный файл edid2.bin.
5. Теперь необходимо заставить систему использовать модифицированный файл edid2.bin вместо системного. Создаём по пути /usr/lib/firmware/ папку edid и переносим туда наш модифицированный edid2.bin.
cd /usr/lib/firmware/ # Перейти в нужный раздел
sudo mkdir edid # Создать папку от администратора
cd # Перейти в домашнюю папку
sudo cp edid2.bin /usr/lib/firmware/edid # Скопировать файл edid2.bin
6. Добавляем модифицированный файл в наш загрузчик.
Запускаем grub-customizer и добавляем в параметры ядра (в самый конец) команду drm.edid_firmware=edid/edid2.bin, которая заставит Linux подхватывать наш изменённый конфигурационный файл при загрузке ядра.
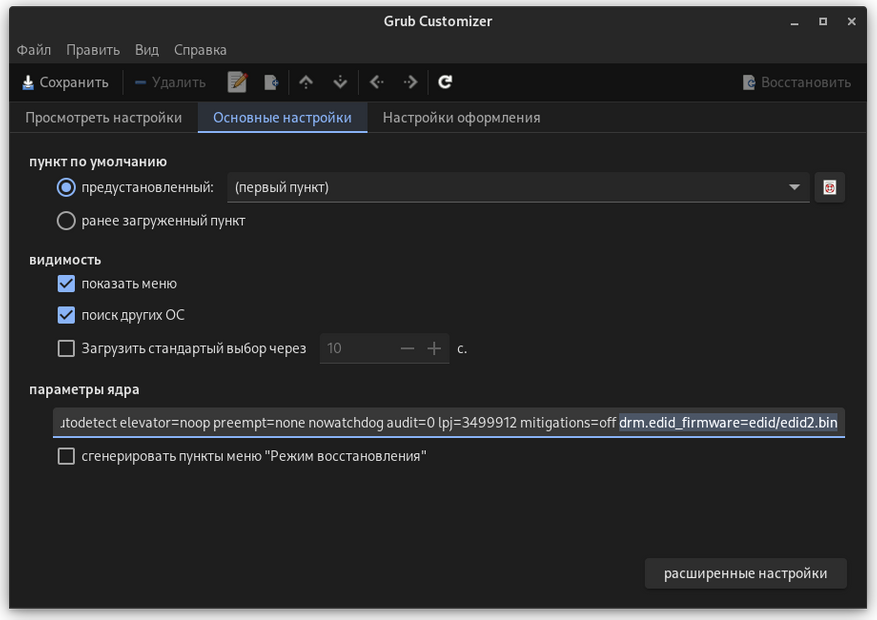
Сохраняем изменения через кнопку «Сохранить» в левом углу ПО и смотрим на представленную ниже картинку.

Если всё было сделано правильно, то после перезагрузки вы сразу почувствуете разницу в плавности движения мыши, а картинка с прекрасной Morrigan засияет новыми красками.
Заключение
Вот, собственно, и всё! Не знакомому с Linux-миром человеку вся эта инструкция может показаться пугающим шаманством, но она и не рассчитана на него, а повествует лишь о необычном способе исправления древнего бага и существенного повышения комфорта при использовании Linux. Уважайте свободу, используйте Linux и ни в коем случае не предавайте себя.
Видеоверсия
