Setting up a Debian Linux VM in VirtualBox
There are many GNU+Linux distributions out there. Debian is our choice. Start by reading a little bit about it.
Download VirtualBox and Debian
VirtualBox
Download and install the latest version of VirtualBox:
- Look for your host OS under platform packages
- Also install the Oracle VM VirtualBox Extension Pack
Debian
Download the ISO image of the latest stable Debian release at this time of writing, Debian 9.7.0 (Stretch).
- We’ll use the installer image pre-compiled for your machine’s architecture, amd64 (64-bit x86 architecture), available here.
- The CD installer you want is named debian-9.7.0-amd64-xfce-CD-1.iso .
- Always verify the checksums of what you download.
Create a VM
Create a new VM in VirtualBox. Use the following settings:
- Name: (your choice)
- John Hui suggests naming it after your favorite Pokemon, such as Poliwhirl
- Choose Dynamically allocated so that the virtual disk takes up only as much space as it is currently using
- Choose VDI (VirtualBox Disk Image)
Installing Debian
Now you’ve created a VirtualBox virtual machine, but nothing is installed on it. We will install Debian using the live CD installer image we downloaded; if you were doing this on a physical machine, you create a bootable USB drive from the .iso file you downloaded, and boot into that (because CD ROM drives are hard to come by these days). We’ll be doing the VirtualBox version of that.
Boot your VM using the CD image you downloaded (i.e. the .iso file).
The CD will give you several options for installing your operating system. Use the “graphical installer”. You’ll be guided through a somewhat lengthy installation process. Most of the default settings are acceptable – below is an outline for the choices you should be making:
- Language: English — English
- Location: United States
- Keyboard: American English
- Hostname: Whatever you named your VM, in lower case (e.g. poliwhirl )
- Domain name: (blank)
- Root password: (your choice)
- Users: Create your user account, which you will use for development
- Full name: (your choice)
- Username: (your choice; we chose debbie )
- Password: (your choice)
- Partitioning method: Guided — use entire disk
- Select disk to partition: (there should only be one option, select it)
- e.g. SCSI3 (0,0,0) (sda) — ATA VBOX HARDDISK
- Use a network mirror?: Yes
- Debian archive mirror country: United States
- Debian archive mirror: ftp.us.debian.org
- HTTP proxy information: (blank)
- Software select:
- Debian desktop environment
- . Xfce (or the desktop environment of your choice)
- print server (no need to install this)
- SSH server
- standard system utilities
- Install the GRUB boot loader to the master boot record?: Yes
- Device for boot loader installation: Instead of entering the device manually, select the /dev/sda option that the menu presents you
Time to reboot into your new system!
Setting up your Debian VM
Once you reboot, you’ll be greeted with a login screen. Use the user account you created earlier (e.g. we would use debbie here as our username).
Welcome to your VM’s desktop environment! Your system may ask you about configuring your desktop. Just select the default configuration for now – you can always tweak it later.
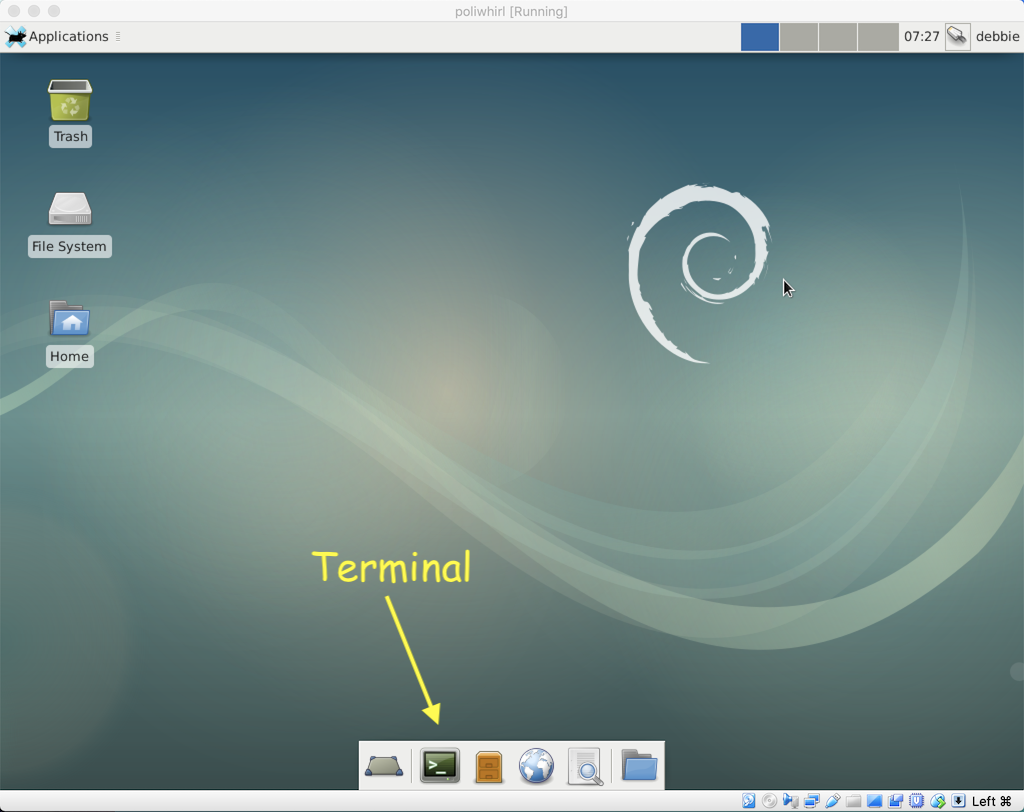
If you chose Xfce as your desktop environment, you should see a dock at the bottom of your screen, quite like the one on macOS. It should look like this:

You’ll be logged into your user account, which does not have superuser/root privileges yet. Switch into the root account using the following command:
Type in the password you set for the root account. Now you should be logged in as root :
You’ll notice through this guide (and others) that certain shell commands begin with $ , while others begin with # . These shell prompts represent the permissions you should run the command with; you should not be typing the prompts in. The convention is that commands with $ should be run as a regular user (e.g. debbie ), whereas commands beginning with # should be run as a superuser (e.g. root , or using sudo ). Speaking of which, your VM won’t have sudo installed yet! We’ll do that first.
Installing your first package
Before you can install anything, you must tweak your apt sources list. You probably won’t have your favorite text editor installed yet, so we’ll open it using a system-provided text editor, nano :
This file contains the list of sources your package manager will query to look for packages to install. You’ll find lines that looks something like this:
deb cdrom:[Debian GNU/Linux 9.6.0 _Stretch_ - Official amd64 xfce-CD .That causes issues when installing things without the installer CD inserted. Comment them out using # :
# deb cdrom:[Debian GNU/Linux 9.6.0 _Stretch_ - Official amd64 xfce-CD .Save the file using ctrl-o , followed by the return key. Then exit nano using ctrl-x .
Update your package lists:
This retrieves the most up-to-date list of packages from APT’s repositories, which tell apt all the things it can install. First, let’s upgrade all packages that can be upgraded:
Now we can install sudo , as well as some other useful packages for getting through the rest of setup:
# apt install sudo vim emacs git build-essential net-toolsSetting up sudo
sudo stands for SuperUserDO – it helps you run commands with superuser permissions from a regular account. To set this up, you will need to edit the /etc/sudoers configuration file, by running:
Add the following to the bottom:
# The basic structure of a user spec looks like this: # who where = (as_whom) how: what debbie ALL=(ALL) NOPASSWD: ALLOf course, if you chose a different username, use that instead of debbie . Save your changes and quit the text editor.
If you’re still logged in as root at this point from using su , logout to return to your regular user account:
Now that you added that line to your sudoers file, you should be able to run the following command from your regular user account, without having to type in your password:
$ sudo echo "I am a sudoer, hear me roar!" I am a sudoer, hear me roar!Now, when you come across a # shell prompt in any future guide, you may use sudo instead from your user account. For example, to update your packages again, instead of running (as root ):
You can instead run (as debbie ):
Install VirtualBox Guest Additions
Now you should install VirtualBox Guest Additions inside the VM. The Guest Additions will enable some useful features, like dynamically resizing the VM window, copying & pasting between the guest and host, time synchronization between the guest & host, and accessing the host file system from the guest.
Now, in your VirtualBox menu bar, expand the Devices menu and select Insert Guest Additions CD image…. This loads a virtual CD ROM into your VM, and puts an icon for it on your desktop. Double-click it to mount it at /media/cdrom0/ .
You can now run the installer by typing:
# apt install linux-headers-$(uname -r) # sh /media/cdrom0/VBoxLinuxAdditions.runAfter the installation completes, try resizing the virtual machine window. Your Debian desktop should resize itself accordingly.
You should also now be able to copy and paste between your host and guest machine. To enable this, go to the Devices menu, and under Shared Clipboard, select Bidirectional. After you restart your VM, you should be able to paste in your VM what you copied in your host machine, and vice versa.
Disable Power Management
By default, Debian tries to do its own power management. This is unnecessary in a VM, and may cause your VM to become unresponsive after being inactive for some time.
To disable power management in the Xfce desktop environment, open up the Applications menu on the top right corner of the GUI, and go to Settings / Power Manager to open up the Xfce Power Manager. On the System tab, make sure it never goes to sleep, and on the Display tab, uncheck “Handle display power management settings”.
Disable GUI on boot (optional)
If you prefer to boot directly into a terminal prompt on your serial console, rather than fussing with the graphical desktop environment, you can disable it by running the following:
# systemctl set-default multi-user.targetNow, once you boot, you’ll be greeted with a text-based serial console:
Debian GNU/Linux 9 poliwhirl tty1 poliwhirl login: _You can login with your regular credentials. If you need to open up your desktop environment, you can manually launch it:
You can always re-enable the booting into your graphical desktop environment:
# systemctl set-default graphical.target