- Using an External Wireless Access Point
- Turning a wireless router into an access point
- Disable the DHCP server
- Change the LAN IP address
- Plug in the LAN interface
- Bridging wireless to the LAN
- Bridging wireless to an OPT interface
- Routed segment on an OPT interface
- Настройка wifi точки доступа pfsense
- Страницы
- 4 января 2017 г.
- pfSense. Настройка Wi-Fi точки доступа
- Working with Virtual Access Point Wireless Interfaces
- Creating and Managing Wireless Instances
Using an External Wireless Access Point
Most SOHO-style wireless routers can be used as an access point if a true Access Point (AP) is not available. If pfSense® software replaced an existing wireless router, the old router can still be used to handle the wireless portion of the network.
This type of deployment is popular for wireless because it is easier to keep the access point in a location with better signal and take advantage of more current wireless hardware without relying on driver support in pfSense software. This way a network supporting 802.11ac or later wireless standards may still be used and secured by pfSense software at the edge, even though pfSense software does not yet have support for newer standards.
This technique is also common with wireless equipment running *WRT, Tomato, or other custom firmware for use as dedicated access points rather than edge routers.
Turning a wireless router into an access point
To convert the wireless router into a wireless access point, follow these generic steps for any device. To find specifics for a particular wireless router, refer to its documentation.
Disable the DHCP server
Disable the DHCP server on the wireless router to prevent a conflict. pfSense software will handle this function for the network, and having two DHCP servers on the same broadcast domain will not function correctly.
Change the LAN IP address
A functional, unique, IP address on the access point is required for management purposes.
Change the LAN IP address on the wireless router to an unused IP address in the subnet where it will reside (commonly LAN). If the firewall running pfSense software replaced this wireless router, then the wireless router was probably using the same IP address now assigned to the firewall LAN interface, which conflicts.
Plug in the LAN interface
Most wireless routers bridge their wireless network to an internal LAN port or switch ports. This means the wireless segment will be on the same broadcast domain and IP subnet as the wired ports. For routers with an integrated switch, any of the LAN switch ports will typically work.
Do not plug in the WAN or Internet port on the wireless router!
This will put the wireless network on a different broadcast domain from the rest of the network and the wireless router will perform NAT on the traffic between the wireless and LAN. This also results in double NAT of traffic between the wireless network and the Internet. This is an ugly design, and will lead to problems in some circumstances, especially if communication must occur between wireless and wired LAN clients.
Deciding where to connect the LAN interface from the wireless router depends on the chosen network design. The next sections cover options and considerations for selecting the best deployment style.
Bridging wireless to the LAN
One common means of deploying wireless is to plug the access point directly into the same switch as the LAN hosts, where the AP bridges the wireless clients onto the wired network. This works well, but offers limited control over the ability of the wireless clients to communicate with internal hosts.
See Choosing Routing or Bridging for details on bridging in this role.
Bridging wireless to an OPT interface
To keep wireless and wired networks on the same IP subnet and broadcast domain while also increasing control over wireless clients, add an OPT interface to the firewall for the access point and bridge the OPT interface to the LAN interface.
Though bridging offers increased control over traffic, it also results in lower performance as all wireless traffic must pass through and be processed by the firewall. Typically, wireless speeds are low enough that this is not a major concern, but as wireless speeds improve the severity of the problem also increases.
This scenario is functionally equivalent to plugging the access point directly into the LAN switch, except pfSense software can filter traffic from the wireless network to provide protection to LAN hosts and vice versa.
A configuration with the bridge assigned as LAN is optimal here, rather than only having the OPT bridged to the existing wired LAN.
Routed segment on an OPT interface
The wireless network can also be placed on a separate IP subnet if desired. This is done without bridging the OPT interface on pfSense, instead assigning it with an IP address in a separate subnet different from the LAN. This enables routing between internal and wireless networks, as permitted by the firewall ruleset. This is commonly done on larger networks, where multiple access points are plugged into a switch that is then plugged into the OPT interface on pfSense software. It is also preferable when wireless clients will be forced to connect to a VPN before allowing connections to internal network resources.
Настройка wifi точки доступа pfsense
Страницы
4 января 2017 г.
pfSense. Настройка Wi-Fi точки доступа
Простая настройка Wi-Fi в pfSense. Включается и настраивается беспроводной адаптер в режиме Wi-Fi точки доступа, а затем реализуется мост между беспроводной сетью (интерфейс WLAN) и проводной сетью (интерфейс LAN), для межсетевого взаимодействия.

WAN — это интерфейс, который смотрит в сторону вашего Интернет провайдера;
LAN — интерфейс, смотрящий в сторону вашей локальной сети.
Настройка Wi-Fi в pfSense
Первым делом перед настройкой Wi-Fi необходимо включить беспроводной интерфейс.
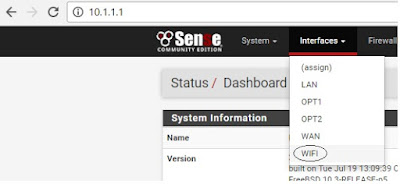
Для этого необходимо перейти в пункт меню Interfaces -> WiFi.
Вместо WiFi может быть другой заголовок (Description) беспроводного интерфейса, например OPT1).
В открывшейся странице Interfaces -> WiFi необходимо установить флажок в поле «Enable interface». Также обязательно нужно добавить описание для WiFi интерфейса, заполнив поле Description.


Теперь необходимо указать стандарт беспроводной связи и канал.
В поле Standard я выберу «802.11g» (из доступных мне адаптеров, поддерживаемых pfSense есть Atheros, работающий только с 802.11b/g).
В поле Channel выберу 5-й канал — «11b/g — 5».

Настроить режим работы и параметры безопасности для беспроводной точки доступа, которой и будет наш Wi-Fi интерфейс.
Параметры будут следующими:
Mode — установить режим «Access Point», т.е. точка доступа;
SSID — это имя Wi-Fi сети, написать на свое усмотрение. У меня в качестве примера «Wi-Fi_pfSense»;
Я также установлю флажки для параметров «802.11g only» и «Enable WME».
Enable WPA — установить галочку, чтобы задействовать шифрование.
WPA Pre-Shared Key — ввести пароль для подключения к точке доступа.
WPA mode — «WPA2»
WPA Key Management Mode — «Pre-Shared Key»
WPA Pairwise — «AES»
Остальные параметры оставить без изменения.

После этого необходимо сохранить наши настройки нажав кнопку «Save».
Настройка DHCP сервиса
Клиенты, подключающиеся к точке доступа должны получать IP адреса, для этого необходимо включить DHCP сервис на Wi-Fi интерфейсе.
В меню Services выбрать пункт DHCP Server.

В открывшейся странице перейти на вкладку Wi-Fi и настроить параметры:
Включить флаг «Enable DHCP server on WIFI interface»
Subnet — 10.1.2.0
Subnet mask — 255.255.255.0
Available range — 10.1.2.1 — 10.1.2.254
Range — From 10.1.2.10 To 10.1.2.250
Остальные параметры оставить без изменения.

Настройка моста
Создать мост для межсетевого взаимодействия.
Перейти в меню Interfaces -> Interface Assignments.
На вкладке «Briges» нажать «Add».
В поле «Member Interfaces» зажав клавишу «Ctrl» выбрать поочередно LAN и WIFI интерфейсы.
Параметр «Description» заполнить значением «LANWLAN».
После этого необходимо сохранить настройки нажав кнопку «Save».

Должно получиться следующее.

Создание правил для прохождения трафика
Для разрешения прохождения трафика создать всего одно правило в настройках файрвола.
Перейти в Firewall -> Rules
На вкладке «WIFI» нажмите «Add»
Параметры задать следующим образом:
Action — «Pass»
Protocol — «Any»
Source — «Any»
Destination — «Any»
Working with Virtual Access Point Wireless Interfaces
pfSense® software supports virtual wireless interfaces using Multi-BSS. These are known as Virtual Access Point or VAP interfaces, even if they are being used for client mode. VAPs allow multiple access points or clients to be run on the same wireless card, or to use a combination of access point and client mode. The most common use case is for multiple access points with different SSIDs each with unique security requirements. For example, one with no encryption but with captive portal and strict access rules and a separate network with encryption, authentication, and less strict access rules.
Even if a card does not support multiple VAP instances, the first entry must be created manually before it can be assigned.
Support for VAPs varies by card and driver, consult the information on driver support in Recommended Wireless Hardware to learn more. Odds are, however, if an Atheros wireless card is in use, it will work. While there is no theoretical limit to the number of VAPs a card may use, driver and hardware support varies, so the practical limit is four VAPs on ath(4) and eight on mwl(4).
All VAPs on a given card share some common settings, such as the channel, regulatory settings, antenna settings, and wireless standard. Other settings such as the mode, SSID, encryption settings and so on may vary between VAPs.
Creating and Managing Wireless Instances
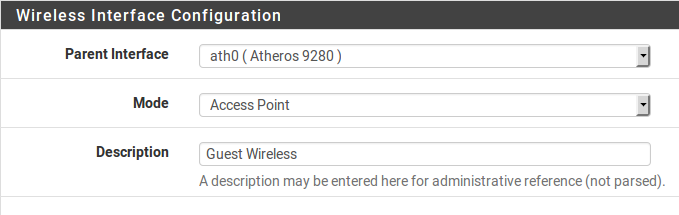
To create a new wireless instance:

- Navigate to Interfaces > Assignments on the Wireless tab.
- Click Add to create a new entry
- Select the Parent Interface, for example ath0
- Pick the Mode from one of Access Point, Infrastructure (BSS, client mode), or Ad-hoc (IBSS)
- Enter a Description
- Click Save
An example is shown in Figure Adding a Wireless Instance .
Adding a Wireless Instance 
Once the entry has been saved it is then available for assignment under Interfaces > Assignments. From there, assign and then edit the settings like any other wireless interface.
The assigned interface must be configured to use the same mode specified when the VAP was created.