- Поднимаем OpenVPN для роутера
- Как сделать?
- Покупаем VPS
- Поднимаем OpenVPN
- Настраиваем OpenVPN на роутере
- Как использовать OpenVPN для доступа к домашней сети через Wi-Fi роутер (новый логотип)?
- Похожие статьи
- How to Setup OpenVPN on TP-Link Routers (Windows)
- How to Setup OpenVPN on TP-Link Routers (Windows)
Поднимаем OpenVPN для роутера
Интернеты всех страх окукливаются в рамках своих границ, но пока еще есть способы смотреть, качать, открывать благодаря VPNам. В данном посте я вам покажу как настроить VPN на вашем роутре. В моем роутере AX5400 Wi-Fi 6 Router есть втроенный VPN клиент, он на многих роутреах есть в силу распростроненности протокола.
Как сделать?
Покупаем VPS
Выбор на ваш вкус. Любой сервис который работает и который вам нравится.
Поднимаем OpenVPN
Качаем и запускаем скрипт от Nyr
wget https://git.io/vpn -O openvpn-install.sh && bash openvpn-install.sh
Отвечаем на вопросы скрипта:
Which protocol should OpenVPN use? 1) UDP (recommended) 2) TCP
What port should OpenVPN listen to? Port [1194]:
— можно использовать дефолтный порт 1194. Нажимаем Enter
Select a DNS server for the clients: 1) Current system resolvers 2) Google 3) 1.1.1.1 4) OpenDNS 5) Quad9 6) AdGuard DNS server [1]:
Enter a name for the first client: Name [client]:
OpenVPN installation is ready to begin. Press any key to continue.
В конце вывода скрипта вы увидите такой текст
The client configuration is available in: /root/blog.ovpn
- это и есть нужный нам конфиг. Скачайте его через scp, sftp, просто скопируйте через cat себе в “блокнот”…кароче как-то добутьте файл c вируталки.
Настраиваем OpenVPN на роутере
- логинимся в вебморду роутера. У меня это 192.168.0.1 и вводим ваш пароль к роутеру
- переходим в пункт OpenVPN client и нажимаем ADD
- вводим название подключения (Description) и в секции Configuration File, выбираем и загружаем сохраненный вами конфиг ранее
- в моем роутере еще есть настройка списка устройств (Device List) для которых трафик идет через VPN. Т.е мы можем выбрать устройство для которого будет “работать” OpenVPN. Очень удобная функция
Как использовать OpenVPN для доступа к домашней сети через Wi-Fi роутер (новый логотип)?
Дата последнего обновления: 07-24-2020 10:54:53 AM 675309
Archer C1200 , Archer C5400 , Archer A2600 , Archer AX55 , Archer AX53 , Archer AX10 , Archer AX51 , Archer AX96 , Archer AXE95 , Archer AX10000 , Archer AX50 , Archer C3150( V2 ) , Archer C6( V2 ) , Archer C7( V4 V5 ) , Archer AX90 , Archer AX6000 , Archer C5400X , Archer A20 , Archer AX1800 , Archer AX206 , Archer AX4200 , Archer C3200( V2 ) , Archer AX75 , Archer AX4400 , Archer AX73 , Archer A10 , Archer AX4800 , Archer A2300 , Archer AXE75 , Archer A6 , Archer A7 , Archer AX72 , Archer AXE200 Omni , Archer GX90 , Archer A9 , Archer AX68 , Archer C2300 , Archer AX5300 , Archer AX23 , Archer AX20 , Archer C3150 V2 , Archer C4000 , Archer AX21 , Archer AXE300 , Archer AX1500 , Archer AX60 , Archer AX11000 , Archer AX3200 , Archer AX3000
При соединении OpenVPN домашняя сеть может выступать в качестве сервера, а удаленное устройство может получать доступ к серверу через маршрутизатор, который работает как шлюз сервера OpenVPN. Чтобы использовать функцию VPN, необходимо включить OpenVPN-сервер на маршрутизаторе, а также установить и запустить программное обеспечение VPN-клиента на удаленном устройстве. Пожалуйста, следуйте инструкциям ниже, чтобы установить соединение OpenVPN.
Шаг1. Настройка OpenVPN сервера на маршрутизаторе:
1.Войдите в веб-интерфейс маршрутизатора. Если вы не знаете, как это сделать, воспользуйтесь инструкциями:
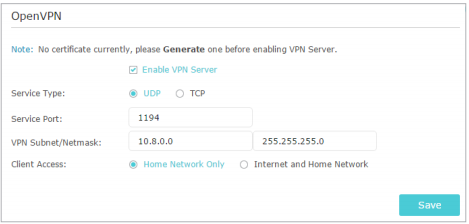
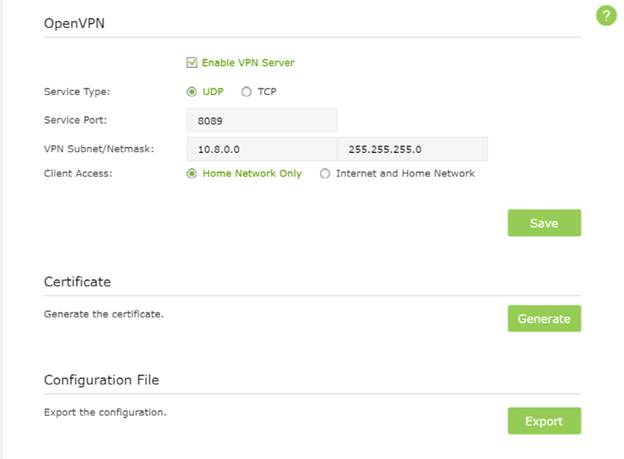
2.Перейдите в Дополнительные настройки (Advanced) > VPN Server > OpenVPN и отметьте Включить VPN Server (Enable VPN Server).
• Перед включением VPN-сервера рекомендуется настроить службу динамического DNS (рекомендуется), назначить статический IP-адрес для порта WAN маршрутизатора и синхронизировать системное время с интернетом.
• При первой настройке OpenVPN сервера может потребоваться сгенерировать сертификат перед включением VPN-сервера.
3.Выберите Тип Сервиса (Service Type – протокол связи) для OpenVPN сервера: UDP, TCP.
4.Введите Порт VPN Сервиса (VPN Service Port), к которому подключается VPN-устройство, номер порта должен быть от 1024 до 65535.
5. В полях подсеть VPN/маска сети (VPN Subnet/Netmask) введите диапазон IP-адресов, которые могут быть зарезервированы сервером OpenVPN.
6. Выберите тип клиентского доступа (Client Access). Выберите Домашнюю сеть (Home Network Only), только если хотите, чтобы удаленное устройство имело доступ к домашней сети; выберите Интернет и домашнюю сеть (Internet and Home Network), если вы также хотите, чтобы удаленное устройство имело доступ к интернету через VPN-сервер.
7. Нажмите Кнопку Сохранить (Save).
8. Нажмите кнопку Создать (Generate), чтобы получить новый сертификат.
Если сертификат уже создан, пропустите этот шаг или нажмите кнопку Создать (Generate), чтобы обновить сертификат.
9. Нажмите кнопку Экспорт (Export), чтобы сохранить файл конфигурации OpenVPN, который будет использоваться удаленным устройством для доступа к маршрутизатору.
Шаг 2. Настройка OpenVPN подключения на удаленном устройстве:
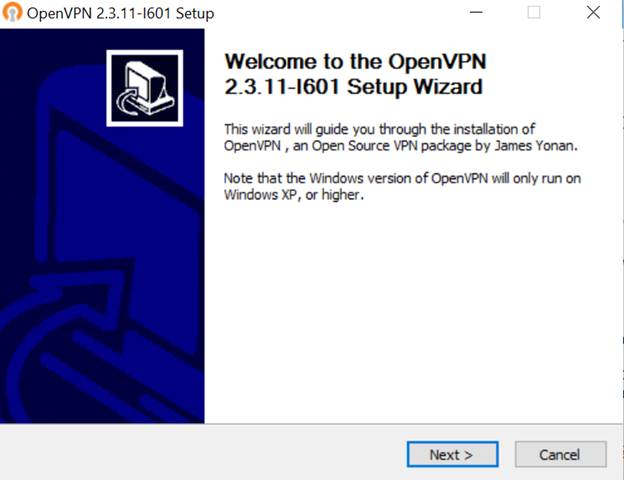
1. Посетите http://openvpn.net/index.php/download/community-downloads.html для загрузки клиентской утилиты OpenVPN и установить её на устройство, на котором планируете запускать утилиту OpenVPN клиента.
Необходимо установить клиентскую утилиту OpenVPN на каждом устройстве, которое вы планируете применить функцию VPN для доступа к маршрутизатору. Мобильные устройства должны загружать сторонние приложения из Google Play или Apple App Store.
2. После установки скопируйте файл, экспортированный с маршрутизатора, в папку «config» клиентской утилиты OpenVPN (например, C:\Program Files\OpenVPN\config – для Windows). Путь зависит от того, где была установлена утилита OpenVPN .
3.Запустите клиенсткую утилиту и подключите ее к OpenVPN серверу.
Чтобы узнать более подробную информацию о каждой функции и конфигурации, перейдите в Центр загрузки, чтобы загрузить руководство по вашему продукту.
Похожие статьи
Был ли этот FAQ полезен?
Ваш отзыв поможет нам улучшить работу сайта.
Что вам не понравилось в этой статье?
- Недоволен продуктом
- Слишком сложно
- Неверный заголовок
- Не относится к моей проблеме
- Слишком туманное объяснение
- Другое
Как мы можем это улучшить?
Спасибо за обращение
Нажмите здесь, чтобы связаться с технической поддержкой TP-Link.
How to Setup OpenVPN on TP-Link Routers (Windows)
Дата последнего обновления: 03-14-2022 09:53:30 AM 372953
Archer C59( V1 ) , Archer C1200( V1 ) , Archer C5400( V1 ) , Archer C5200( V1 ) , Archer C3150( V1 ) , Archer C60( V1 ) , AD7200( V1 )
OpenVPN is a free VPN (virtual private network) service that allows you to remotely access your Home network from anywhere with an open internet service. OpenVPN is a multiplatform service that works with both Android and iOS operating systems, allowing you to access devices and services in use through your router.
This article will take you through the steps needed to create and establish an OpenVPN connection with your TP-Link router.
Verify router/modem has a public WAN IP address that is not bounded by ISP; if it’s a private IP address, that means the router/modem is behind a NAT, please open the ports for the router/modem on the NAT.
But for the CG-NAT ISP: Comporium and Direct link — radio service, provide the customer a private IP, that will cause you can’t use the OpenVPN and affect the NAT Type. You can contact the ISP and ask them to offer a Statis IP address.
Setting Up OpenVPN on a TP-Link Router
(This example uses the Archer C5400)
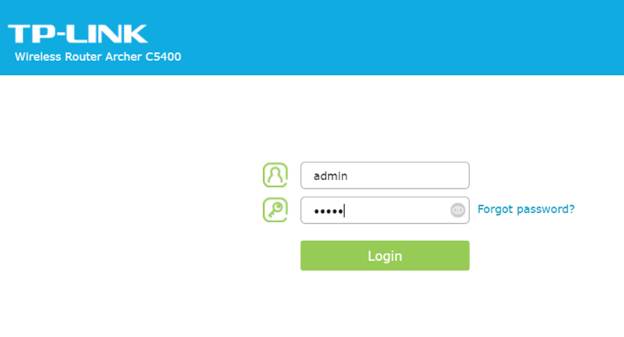
Step 1: Log into your router at tplinkwifi.net. The default username and password are admin.
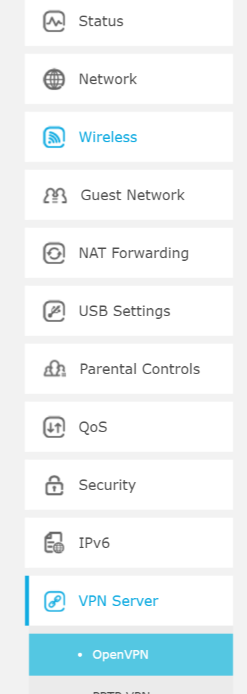
Step 2: Click Advanced on the top navigation bar.
Step 3: Click VPN Server, then OpenVPN.
Step 4: Click Certificate to generate a certificate.
Note: This step must be completed before enabling OpenVPN.
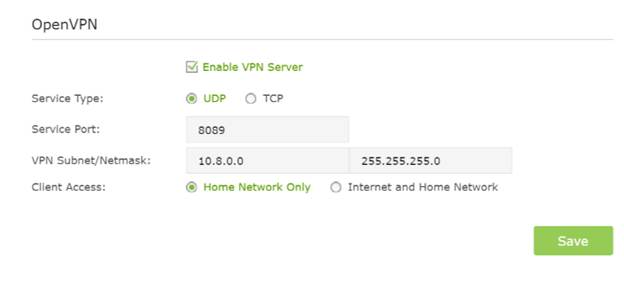
Step 5: Check the Enable VPN Server box, then fill in the following information as prompted. Click Save.
Note: What you select for Client Access will determine the content you are able to view over the VPN. Internet and Home Network will allow you to use your home internet service as well as access to your network shares. Home Network Only solely grants access to your network’s shared files and drives without home internet service accessibility.
Step 6: Click Export to download the configuration file to your computer.
Connecting OpenVPN (PC)
Step 1: Open your browser and navigate to https://openvpn.net/community-downloads/.
Step 2: Click Downloads, then click the link corresponding your Windows version.
Step 3: Download and run the installer.
Step 4: Find the Certificate in your download folder and copy the file.
Note: The file name may differ for each router.
Step 5: Paste the config file into the config folder located in the OpenVPN directory.
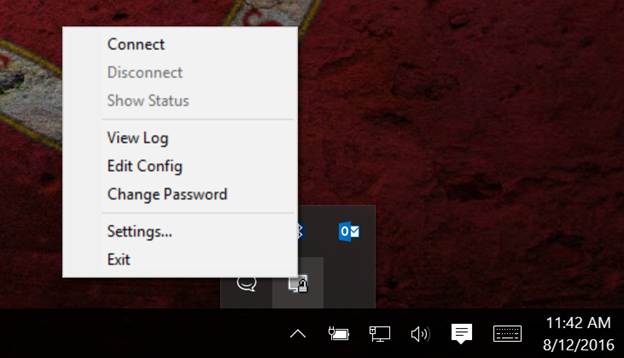
Step 6: Launch the program. A Quick launch icon will appear in your taskbar. Right-click the icon and select Connect.
Step 7: If connection is successful, you will see the following message.
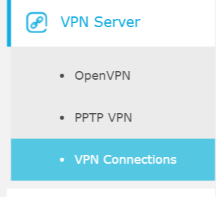
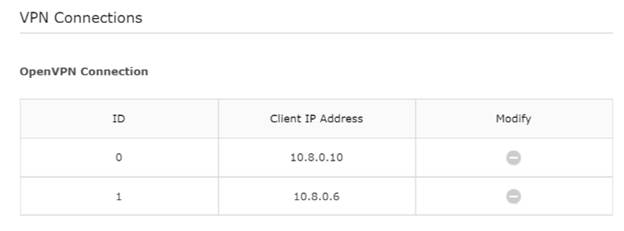
You are now connected to your home network via VPN. To verify, you can visit the VPN connections window in your router settings.
Был ли этот FAQ полезен?
Ваш отзыв поможет нам улучшить работу сайта.
Что вам не понравилось в этой статье?
- Недоволен продуктом
- Слишком сложно
- Неверный заголовок
- Не относится к моей проблеме
- Слишком туманное объяснение
- Другое
Как мы можем это улучшить?
Спасибо за обращение
Нажмите здесь, чтобы связаться с технической поддержкой TP-Link.
Подписаться на рассылку Мы с ответственностью относимся к вашим персональным данным. Полный текст положения об обработке персональных данных доступен здесь. С нашими условиями использования и программой улучшения пользовательского опыта можно ознакомиться здесь.
How to Setup OpenVPN on TP-Link Routers (Windows)
Updated 03-14-2022 09:53:30 AM 372954
Archer C59( V1 ) , Archer C1200( V1 ) , Archer C5400( V1 ) , Archer C5200( V1 ) , Archer C3150( V1 ) , Archer C60( V1 ) , AD7200( V1 )
OpenVPN is a free VPN (virtual private network) service that allows you to remotely access your Home network from anywhere with an open internet service. OpenVPN is a multiplatform service that works with both Android and iOS operating systems, allowing you to access devices and services in use through your router.
This article will take you through the steps needed to create and establish an OpenVPN connection with your TP-Link router.
Verify router/modem has a public WAN IP address that is not bounded by ISP; if it’s a private IP address, that means the router/modem is behind a NAT, please open the ports for the router/modem on the NAT.
But for the CG-NAT ISP: Comporium and Direct link — radio service, provide the customer a private IP, that will cause you can’t use the OpenVPN and affect the NAT Type. You can contact the ISP and ask them to offer a Statis IP address.
Setting Up OpenVPN on a TP-Link Router
(This example uses the Archer C5400)
Step 1: Log into your router at tplinkwifi.net. The default username and password are admin.
Step 2: Click Advanced on the top navigation bar.
Step 3: Click VPN Server, then OpenVPN.
Step 4: Click Certificate to generate a certificate.
Note: This step must be completed before enabling OpenVPN.
Step 5: Check the Enable VPN Server box, then fill in the following information as prompted. Click Save.
Note: What you select for Client Access will determine the content you are able to view over the VPN. Internet and Home Network will allow you to use your home internet service as well as access to your network shares. Home Network Only solely grants access to your network’s shared files and drives without home internet service accessibility.
Step 6: Click Export to download the configuration file to your computer.
Connecting OpenVPN (PC)
Step 1: Open your browser and navigate to https://openvpn.net/community-downloads/.
Step 2: Click Downloads, then click the link corresponding your Windows version.
Step 3: Download and run the installer.
Step 4: Find the Certificate in your download folder and copy the file.
Note: The file name may differ for each router.
Step 5: Paste the config file into the config folder located in the OpenVPN directory.
Step 6: Launch the program. A Quick launch icon will appear in your taskbar. Right-click the icon and select Connect.
Step 7: If connection is successful, you will see the following message.
You are now connected to your home network via VPN. To verify, you can visit the VPN connections window in your router settings.
Is this faq useful?
Your feedback helps improve this site.
What’s your concern with this article?
- Dissatisfied with product
- Too Complicated
- Confusing Title
- Does not apply to me
- Too Vague
- Other
We’d love to get your feedback, please let us know how we can improve this content.
We appreciate your feedback.
Click here to contact TP-Link technical support.
Subscribe TP-Link takes your privacy seriously. For further details on TP-Link’s privacy practices, see TP-Link’s Privacy Policy.
Be The First To Get Exclusive Deals & News


